Discussion


OK, I have a garage but I need a workbench.
Had a quick look at the ones that you can buy and I'm not convinced by any of them, they look a bit flimsy for the money.
Thinking of making one or trying to blag a couple of old kitchen units and some worktop from freecycle.
I'm sure there was a thread in here a couple of months ago where somebody was building a bench - there was a 3D rendition of it too! Can't find it now though, search not turning anything up.
Any suggestions?
50+ years my father built two workbenches using 6x2" planks for the top and oak edging to finish. Underneath are horizontals about 3x4", and from those descend legs of equal stature. A simlar plank was screwed to the wall onto which the rear edge affixed. The top was covered with hardboard, which can be replaced when it gets too tatty - the oak edging covers the edge of the hardboard as well for a neat apearance. Large and small woodworking vices on the front, lined up to handle large work, complete the setup.
They lasted his lifteime and will last mine too
They lasted his lifteime and will last mine too
Edited by Simpo Two on Friday 6th November 10:34
Simpo Two said:
50+ years my father built two workbenches using 6x2" planks for the top and oak edging to finish. Underneath are horizontals about 3x4", and from those descend legs of equal stature. A simlar plank was screwed to the wall onto which the rear edge affixed. The top was covered with hardboard, which can be replaced when it gets too tatty - the oak edging covers the edge of the hardboard as well for a neat apearance. Large and small woodworking vices on the front, lined up to handle large work, complete the setup.
They lasted his lifteime and will last mine too
Sounds like the sort of thing I need, pics please?They lasted his lifteime and will last mine too
Edited by Simpo Two on Friday 6th November 10:34
maxrider said:
Sounds like the sort of thing I need, pics please?
Could be tricky as my shed is very full off stuff and a photo won't really show you how it's built. I'll try to describe it.1) Securely fix a 6' length of 3x2" horizontally to back wall using coachbolts (if timber) or rawlbolts (if masonry).
2) Approximately a foot in from each end, two 2' lengths of 6x2" timber project forward to act as supports for the planks that will be fitted above. They can be longer if you want the bench deeper.
3) Each of these is supported at the front with a vertical length of 3x2" timber (ie legs). Make sure the legs are accurately cut so the bench will be level. This is bucket carpentry but it still needs to be accurate and well made. Secure everything as you go with really beefy screws.
4) Now you can place the worktop in position - 6' lengths of 6x2" timber, placed parallel to the wall and starting at the back. Again, secure everything as you go with really beefy screws.
5) Cut a sheet of hardboard to the same size as the planked area and pin it in place.
6) For a neat hard-wearing edge, screw oak battens round the three exposed edges so it's flush - ie about 2.2" deep since it covers the hardboard edge too.
Woodworking vices if required are fixed from underneath with coachbolts.
If you like, you can fit a shelf underneath between the legs (handy for putting spare bits of wood on). I used a batten on the wall, a batten behind the legs, and plywood for the shelf which I brought forward to be flush with the fronts of the legs.
You can make the bench any length or depth you like, just add more supports and legs!
Did that make sense?
Edited by Simpo Two on Friday 6th November 22:34
All good pointers, as Simpo Two says keep it simple and functional this is a functional tool we're talking about !
My bench is like a crate, made from salvaged packing cases and pallets, generally constructed from at least 1" timbers with thicker braces, all screwed together with big long screws with extra 2" timbers fixed to the top to make it really sturdy. It could have been made from 1" or less throughout if I had laid them up into overlapped double thicknesses.
A bit of skip diving and gift of beer tokens at local fabrication company got me a piece of 6mm steel to put on the top for metal bashing work and this is heaved off when a softer worktop is needed.
The top lifts off (with a lot of effort, some strap hinges coming soon when I can find them) so all the tools can go inside. I ran battens inside on the front and back and put wooden trays (salvaged pallet wood again) in there to hold all the loose hand tools. The bottom part underneath the trays has all the big tools in.
Salvaged some big braked castors from a wheelie bin that had been scrapped so the whole thing can be pushed to where it is needed in the garage or out of the way onto the driveway.
Overall size approx. 2000 x 700 x 1000
If I wanted it to look nice it would get a coat of paint, but never have got round to it.
It has survived two house moves and is never in the way like a fixed bench.
Total funds invested about £30....
Simpo Two said:
4) Now you can place the worktop in position - 6' lengths of 6x2" timber, placed parallel to the wall and starting at the back. Again, secure everything as you go with really beefy screws.
5) Cut a sheet of hardboard to the same size as the planked area and pin it in place.
Sounds like a very good bench. One option for a simpler worksurface could be a firedoor. It has the weight, strength and smooth top, so you just need the wall bar, legs, oak batten edge (and a mate to help lift it into position).5) Cut a sheet of hardboard to the same size as the planked area and pin it in place.
And whatever you do, set it at the right height for you - I have always preferred belly height to the usual hip height.
HiRich said:
And whatever you do, set it at the right height for you - I have always preferred belly height to the usual hip height.
Good point - not sure what height mine is but it's easy to press down hard on things if required!One point on woodworking vices (assuming this is for woodwork) is to pack them underneath if required so the jaws are flush with the worktop. I find that a combination of 7" vice on the right, and 10" vice on the left, aligned to hold long objects, is ideal - but then I grew up with it!
I built mine from some 4x3 that I got from a factory clearance.
I have two 8ft lengths as top rails, two more below to act as a bottom shelf, with some 3x1.5" cross-members tying the horizontals together, with two more 4x3's cut in half for the legs. I used a sheet of flooring grade chipboard for the worksurface, with some slats forming the shelf surface on the bottom shelf.
I have two 8ft lengths as top rails, two more below to act as a bottom shelf, with some 3x1.5" cross-members tying the horizontals together, with two more 4x3's cut in half for the legs. I used a sheet of flooring grade chipboard for the worksurface, with some slats forming the shelf surface on the bottom shelf.
Simpo Two said:
HiRich said:
And whatever you do, set it at the right height for you - I have always preferred belly height to the usual hip height.
Good point - not sure what height mine is but it's easy to press down hard on things if required!One point on woodworking vices (assuming this is for woodwork) is to pack them underneath if required so the jaws are flush with the worktop. I find that a combination of 7" vice on the right, and 10" vice on the left, aligned to hold long objects, is ideal - but then I grew up with it!
Stand at your bench and put your fist against your chin. The height of the underneath of your elbow is the height the jaws of your vice should be at.
Here's mine, built from 2 x 4, coach-bolted together. Top is 2 layers of 3/4" chipboard (moisture proof loft flooring) and a layer of 3/4" marine ply to top it off. It is 24" deep, as that was the width of the pre-cut B&Q wood, but I wish I'd taken the time/money to go to about 30"
This whole thing, doors included, cost less than £100. Coach bolts were from Screwfix, about £4 for 50, wood from B&Q.


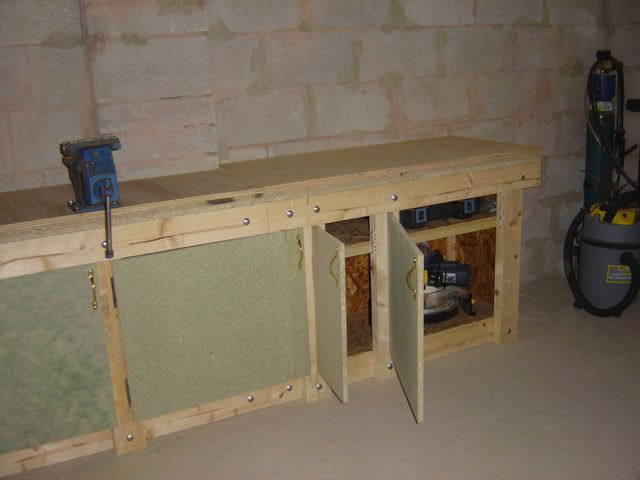
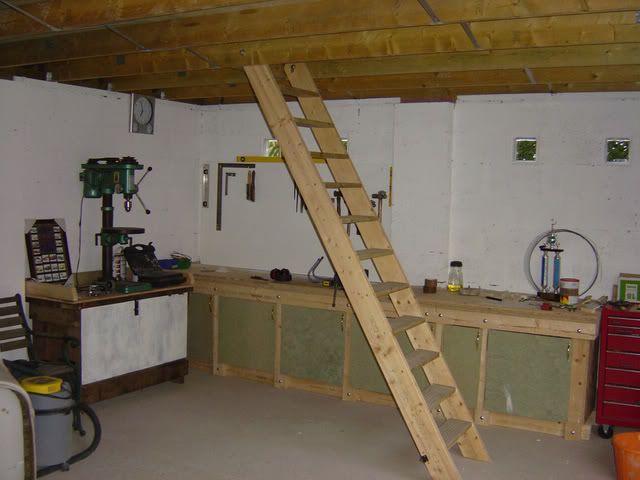
The steps pivot up into the roof when more room is required.
You don't really need a big bench, as it WILL just end up covered in junk.

This whole thing, doors included, cost less than £100. Coach bolts were from Screwfix, about £4 for 50, wood from B&Q.
The steps pivot up into the roof when more room is required.
You don't really need a big bench, as it WILL just end up covered in junk.
Edited by King Herald on Sunday 8th November 19:32
Simpo Two said:
HRG. said:
Stand at your bench and put your fist against your chin. The height of the underneath of your elbow is the height the jaws of your vice should be at.
For a woodworking vice - you sure about that? It's about level with my lower ribs!
HRG. said:
Simpo Two said:
HRG. said:
Stand at your bench and put your fist against your chin. The height of the underneath of your elbow is the height the jaws of your vice should be at.
For a woodworking vice - you sure about that? It's about level with my lower ribs!Simpo Two said:
HRG. said:
Simpo Two said:
HRG. said:
Stand at your bench and put your fist against your chin. The height of the underneath of your elbow is the height the jaws of your vice should be at.
For a woodworking vice - you sure about that? It's about level with my lower ribs!I just saw this - and just built myself a workbench last night! I kept mine simple and cheap, using wood from our local DIY place (Menards - the US version of B&Q / Wickes etc).
I made mine a standalone so it is not bolted to the wall (as houses in the US are made from cheese and polystyrene, so probably couldn't take the weight).
Wood required:
8'x2' piece of 1" thick ply, 3 x 8' length 2x4, 2 x 8' length 4x4, 1 box of 2.5" construction screws. Total cost $40
I made the frame for the top from the 2x4, screwed the plywood onto that, then made the legs from the 4x4, which was complete overkill, but it is seriously solid. It's about 40" high. Just make sure all the legs are the same length before attaching them!
I'll give it a few coats of Polyurethane tonight to make it resistant to fluids.
I bought a wooden worktop from IKEA. It is supported partially by timber battens screwed to the walls, and partially by a couple of cheap and cheerful Stanley base units. Worktop was about £150 from memory.
I haven't got a 'full frontal' of the thing, but this will give you an idea.
The base units look a bit like the wall units.

I haven't got a 'full frontal' of the thing, but this will give you an idea.
The base units look a bit like the wall units.
Gassing Station | Homes, Gardens and DIY | Top of Page | What's New | My Stuff