Rear upright overhaul?
Discussion


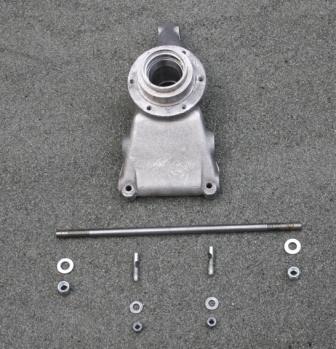
Does anyone have any info on overhauling pre-M aluminium uprights?
I'm fine with the pivot rods which I've successfully replaced with EN15T bars.
I would like to pull the rotating assembly apart, clean, check the bearings etc. Can I get away with using the original crush tube? And what would be the torque setting of the nut on the inside.
Any exploded pictures anyone?
Any help welcome.
Thanks,
N
Theres always one................!
Kabaman
I do have some photos that could be useful, but although I have done the job once, I am not really an expert. It does all have to come apart again soon so I can do it permanently. I never nipped everything up because I couldn't decide if I wanted wires or minitites and so never re-did all the studs.
Removing the original pivot tubes was not a job I could do myself and in the end I had to get these done at an engineering shop. Not really happy with the results, so may have to get more work done on them (fit over size ones etc etc). Removing the old bearing shells is a b d. There is not enough lip to get a drift on, so these had to be done at the engineers too. I wondered about cutting slots in the shoulder, as per the front bearings.
I will let the Experts comment on the crush tubes, but as far as I am concerned they are the work of the devil.


Yes, I think she might have been parked under water for some time!


Kabaman
I do have some photos that could be useful, but although I have done the job once, I am not really an expert. It does all have to come apart again soon so I can do it permanently. I never nipped everything up because I couldn't decide if I wanted wires or minitites and so never re-did all the studs.
Removing the original pivot tubes was not a job I could do myself and in the end I had to get these done at an engineering shop. Not really happy with the results, so may have to get more work done on them (fit over size ones etc etc). Removing the old bearing shells is a b
d. There is not enough lip to get a drift on, so these had to be done at the engineers too. I wondered about cutting slots in the shoulder, as per the front bearings.I will let the Experts comment on the crush tubes, but as far as I am concerned they are the work of the devil.
Yes, I think she might have been parked under water for some time!
Edited by Astacus on Monday 6th August 17:54
GAjon said:

Sorry, couldn't help myself.
Edited by GAjon on Monday 6th August 16:56
Edited by heightswitch on Monday 6th August 20:28
I've also done this job only once so don't profess to be an expert.
Assembly comes apart relatively easily but the difficult bits for me were that the inner race of the outer bearing was impossible (for me) to remove from the quill shaft with DIY tools. Also the bearing shells took a while to get out with a drift on the tiny lip. I got my local engineering shop to remove the outer bearing from the shafts and press the new shells into the uprights for me. Then after lots of measuring and some sums i got him to machine up some tubular spacers (to replace the crush tubes) of precisely the right length to sit between the bearings. Re-assembly is the reverse of removal and i was able to tighten the inner nut super tight knowing that my spacers with 3mm wall thickness would not crush.
Sorry, i don't have any photos.
Tom
Gassing Station | TVR Classics | Top of Page | What's New | My Stuff