
Project Oscar the free BGT
Discussion


I'm having a bit of a nastalgia trip, back in about 1998/9. I had this custard yellow slice of Abingdon metal as a daily driver...
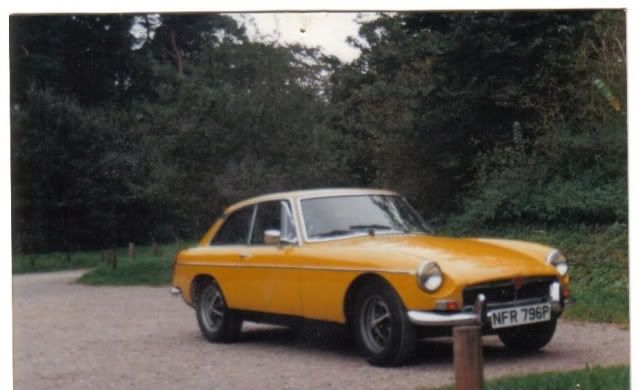
It was a bit of a shed but the ladies loved it and it was fun, if a bit slow. Anyway a thread appeared in February that instantly got my attention..
http://www.pistonheads.com/gassing/topic.asp?h=0&a...
As you will have gathered Oscar was rescued from the Airfield glider parking area and whisked to my secret base in Hampshire. Firstly I decided that before getting to engrossed in putting Oscar back into use a Log book/V5 would be good. As Ben the previous owner was in Oz and the V5 wasn't in the car I decided that all I had to do was get the vin off the car and the reg number and send off for the document. Sadly the vin plate has been scrubbed to death you can make out bits of the chassis but not all. So that's a non starter, until Ben returns!
Speaking of non starters, I figured I would have a look at the electrics after all, the non starting issue should be cheap to sort out. So I hooked up a battery and discovered that Oscar appears to be Scandinavian spec with permanently lit headlights?!

Firstly I decided to simplify things under the bonnet, a dodgy looking after market alarm had been fitted and there appeared to be random wires and scotch locks all over the place.

The alarm was unceremoniously un scotch locked from the loom and binned. Then there was the accuspark dizzy and the odd wires going between that and the coil. As a temporary measure I disconnected the coil and found the original connections, I also found a broken connection to the alternator and finally after checking and re checking the wiring diagram, reconnected the feed for the headlights to the correct point on the fuse box so that switch on and off like normal.
Having said all that I still don't have power to the coil (the original feed is dead), the indicators, the washers and wipers or the interior fan. Trying to find the common fault is quite tricky but I'm getting there slowly, I suspect its either in the ignition barrel or possibly were the power feed through tye starter/solenoid.
So in the mean time, some more pictures....
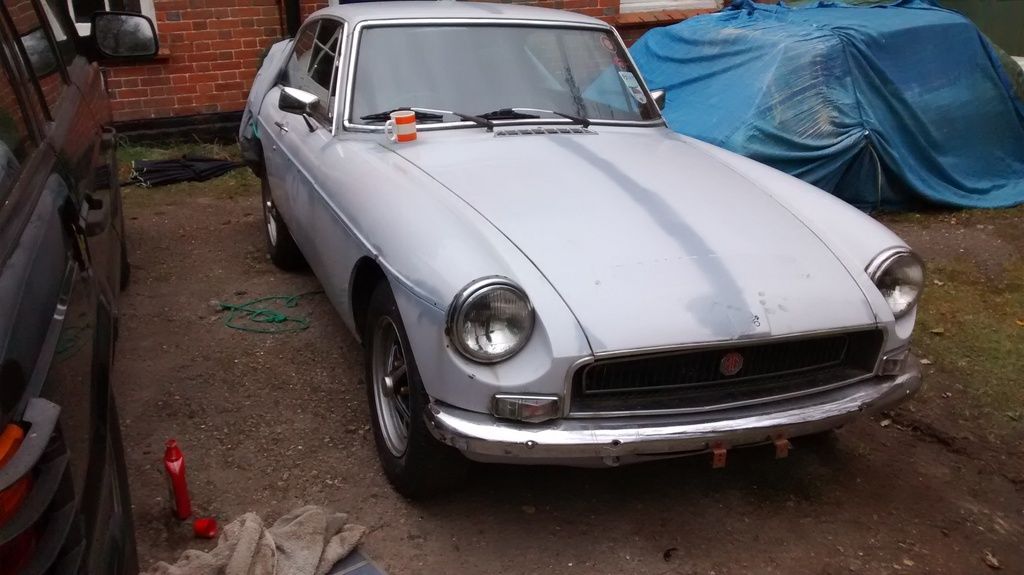


It was a bit of a shed but the ladies loved it and it was fun, if a bit slow. Anyway a thread appeared in February that instantly got my attention..
http://www.pistonheads.com/gassing/topic.asp?h=0&a...
As you will have gathered Oscar was rescued from the Airfield glider parking area and whisked to my secret base in Hampshire. Firstly I decided that before getting to engrossed in putting Oscar back into use a Log book/V5 would be good. As Ben the previous owner was in Oz and the V5 wasn't in the car I decided that all I had to do was get the vin off the car and the reg number and send off for the document. Sadly the vin plate has been scrubbed to death you can make out bits of the chassis but not all. So that's a non starter, until Ben returns!
Speaking of non starters, I figured I would have a look at the electrics after all, the non starting issue should be cheap to sort out. So I hooked up a battery and discovered that Oscar appears to be Scandinavian spec with permanently lit headlights?!

Firstly I decided to simplify things under the bonnet, a dodgy looking after market alarm had been fitted and there appeared to be random wires and scotch locks all over the place.

The alarm was unceremoniously un scotch locked from the loom and binned. Then there was the accuspark dizzy and the odd wires going between that and the coil. As a temporary measure I disconnected the coil and found the original connections, I also found a broken connection to the alternator and finally after checking and re checking the wiring diagram, reconnected the feed for the headlights to the correct point on the fuse box so that switch on and off like normal.
Having said all that I still don't have power to the coil (the original feed is dead), the indicators, the washers and wipers or the interior fan. Trying to find the common fault is quite tricky but I'm getting there slowly, I suspect its either in the ignition barrel or possibly were the power feed through tye starter/solenoid.
So in the mean time, some more pictures....


Thanks for comments, I will try and keep this up dated regularly.
Regarding the loom, I suspect its a faulty component which is the cause. The evidence is slowly pointing to one or two things. If those items and their connections prove okay then I will change tack and replace the loom but I wouldn't change it premptively.
Changing the subject..... Rust! Surprisingly the sills look reasonsble. The bulkhead and area around the windscreen are not so good. The grinder and mig welder will be in action fairly soon!
Regarding the loom, I suspect its a faulty component which is the cause. The evidence is slowly pointing to one or two things. If those items and their connections prove okay then I will change tack and replace the loom but I wouldn't change it premptively.
Changing the subject..... Rust! Surprisingly the sills look reasonsble. The bulkhead and area around the windscreen are not so good. The grinder and mig welder will be in action fairly soon!
Casual update....
I have been routing through the wiring and have now got the accu spark ignition wired back up. The engine now turns over with vigour and the plugs sparking but no go...
No fuel then! The ignition light doesn't come on either and that's on the same circuit as the fuel pump, so there's a clue I think. I suspect there is no power to the pump but probably best check first.
This car has so many odd electrical issues and they all seem to be caused by poor/broken or bodged conections. This has been a proper work out for my multi meter!
I have been routing through the wiring and have now got the accu spark ignition wired back up. The engine now turns over with vigour and the plugs sparking but no go...
No fuel then! The ignition light doesn't come on either and that's on the same circuit as the fuel pump, so there's a clue I think. I suspect there is no power to the pump but probably best check first.
This car has so many odd electrical issues and they all seem to be caused by poor/broken or bodged conections. This has been a proper work out for my multi meter!
On starting work on Oscar today I opened the boot and promptly had a flash back....

Pioneer parcel shelf speakers, how very Nineties!
Today I have been mostly looking at the mysterious lack of indicators, washers and general electrical oddness. I decided to strip out the dash, to do this first you have to remove the centre air vents, I was surprised to find this behind them..

In the red circle is the hazard switch, I suspect as it had stopped working a previous owner had decide to hide it in the dash and blank off the switch hole! Maybe an MOT get around.
Anyway on with the strip! The dash is held in place by three captive bolts in the top, accessible from underneath on the sides and through the air vent hole for the middle one. And its also held on with two screws just above the centre console.
I must admit these screws were awkward, I do wonder what order it was put together in?


Doing something like that is weirdly satisfying, although I seem to have gone a bit forwards and ever so slightly backwards again. I have determined that the circuit for the wiper works but the unit doesn't, actually it gets quite hot refusing to work.
The indicators are inop because the flasher unit is missing. Some of the dash lights don't work because the bulbs have gone dull over time (but some don't have power and yet appear to be on the same circuit?) and the ignition light has crumbled off the end of its feed wire, good enough reason not to work.
At least I can now test and re test all the connections, now I have access but its slow work, that will probably be it for this weekend, as I need a few parts before I go any further.

Pioneer parcel shelf speakers, how very Nineties!
Today I have been mostly looking at the mysterious lack of indicators, washers and general electrical oddness. I decided to strip out the dash, to do this first you have to remove the centre air vents, I was surprised to find this behind them..

In the red circle is the hazard switch, I suspect as it had stopped working a previous owner had decide to hide it in the dash and blank off the switch hole! Maybe an MOT get around.
Anyway on with the strip! The dash is held in place by three captive bolts in the top, accessible from underneath on the sides and through the air vent hole for the middle one. And its also held on with two screws just above the centre console.
I must admit these screws were awkward, I do wonder what order it was put together in?


Doing something like that is weirdly satisfying, although I seem to have gone a bit forwards and ever so slightly backwards again. I have determined that the circuit for the wiper works but the unit doesn't, actually it gets quite hot refusing to work.
The indicators are inop because the flasher unit is missing. Some of the dash lights don't work because the bulbs have gone dull over time (but some don't have power and yet appear to be on the same circuit?) and the ignition light has crumbled off the end of its feed wire, good enough reason not to work.
At least I can now test and re test all the connections, now I have access but its slow work, that will probably be it for this weekend, as I need a few parts before I go any further.
Fuel, sparks, air?! So last week we had a strong spark, air is a given but no fuel. A new fuel pump arrived and on Saturday morning I got busy and fitted it. These things are never dead straight forward, this new part has its earth connection in a different place and the old wire doesn't reach, so I had to make a new one.. Also one of the fuel hoses broke off, to be fair they probably all want replacing but that's a job for another weekend.
Shiny!

We now have fuel at the carbs. So at that point I reconnected the battery and tried a test start.... Nope
Checked the timing (position of the rotor arm against TDC) and it wasn't were it ought to be. So I set about trying to static time the engine. I got no were fast, actually I spent ages on it, checking and re checking things, reading up articles on the interwebs like you do. I could not find a logical way to find the static point with this electronic set up and I couldn't get it to fire or even miss fire at all. I have decided that the car will be going back to points, it may be old fashioned but at least I understand and can fix it!

Sunday... The day of doing something different, I turned my attention to the rust on the bulkhead. I stripped out the heater box (that's a pain of a job), the brake servo and the fuel and brake lines. I hate to say but the bulkhead is worse than I thought.

Its actually holed in places just above the transmission tunnel but I couldn't get that in shot.
Even the heater box was rusty!

Next weekend I will be out with the grinder and depending on progress maybe the welder. I suspect I may actually need to pull the engine out for access and that will slow things down a bit.
Shiny!

We now have fuel at the carbs. So at that point I reconnected the battery and tried a test start.... Nope
Checked the timing (position of the rotor arm against TDC) and it wasn't were it ought to be. So I set about trying to static time the engine. I got no were fast, actually I spent ages on it, checking and re checking things, reading up articles on the interwebs like you do. I could not find a logical way to find the static point with this electronic set up and I couldn't get it to fire or even miss fire at all. I have decided that the car will be going back to points, it may be old fashioned but at least I understand and can fix it!

Sunday... The day of doing something different, I turned my attention to the rust on the bulkhead. I stripped out the heater box (that's a pain of a job), the brake servo and the fuel and brake lines. I hate to say but the bulkhead is worse than I thought.

Its actually holed in places just above the transmission tunnel but I couldn't get that in shot.
Even the heater box was rusty!

Next weekend I will be out with the grinder and depending on progress maybe the welder. I suspect I may actually need to pull the engine out for access and that will slow things down a bit.
That's about right! Its a bit confusing, the car is basically one of the earliest "late spec" cars. The wiring looms match the diagrams for 77 and onwards cars, the dash and engine bay give the game away too.
I suspect the bright red carpets and door cards are straight out of a Moss or Rimmer bros catalougue. The chrome bumper conversion and early grill have been done rather neatly adding to the mystery!
I suspect the bright red carpets and door cards are straight out of a Moss or Rimmer bros catalougue. The chrome bumper conversion and early grill have been done rather neatly adding to the mystery!
AFAIK no post 76 RB cars were ever produced with single line brakes so I still tend to the idea that it's been modified it, it's not a difficult job.
Absent the V5 or VIN plate, and assuming it's still the original, you will find a date stamp on the bottom of the gearbox.
It's not easy though because it's stamped on the milled land between the rear rubber mounts.
As a matter of interest what is the engine number ?
Novel speaker placement BTW, designed to reflect off the tailgate glass for surround sound no doubt
Absent the V5 or VIN plate, and assuming it's still the original, you will find a date stamp on the bottom of the gearbox.
It's not easy though because it's stamped on the milled land between the rear rubber mounts.
As a matter of interest what is the engine number ?
Novel speaker placement BTW, designed to reflect off the tailgate glass for surround sound no doubt
An update with some pictures, I was hoping to have made a start on the bulkhead but its taken me a couple of hours on Saturday and most of this afternoon to get the engine out of the bay. So the bulkhead will have to wait until next weekend.
Firstly I tried to leave as many ancillaries on the engine as possible but soon found that doesn't work. For starters, I couldn't get the manifold off the down pipe so had to strip pout the SUs then release the manifold. I am rather surprised ho well most of this came apart, somebody has clearly been at these parts in the last few years.


A better view of the rot..

I lost a load of time finding a suitable tool to get the oil cooler pipes off. I ended up having to remove the dizzy, heater spout thing and alternator to give my self enough space to use the most shameful of bodgers tools...The adjustable spanner. But it worked and it didn't round the nut (correct sized spanner now on order).
Nearly ready to hoist..

On the other side of the coin, I couldn't believe how easy to access the bell housing bolts are! Oh and one slight oddity, the engine mounts, what size are the little bolts supposed to be? I tried 7/16ths, too big. I tried 3/8ths, too small. I tried 10mm perfect!!!
Finally engine out..

Roll on next weekend!
Firstly I tried to leave as many ancillaries on the engine as possible but soon found that doesn't work. For starters, I couldn't get the manifold off the down pipe so had to strip pout the SUs then release the manifold. I am rather surprised ho well most of this came apart, somebody has clearly been at these parts in the last few years.


A better view of the rot..

I lost a load of time finding a suitable tool to get the oil cooler pipes off. I ended up having to remove the dizzy, heater spout thing and alternator to give my self enough space to use the most shameful of bodgers tools...The adjustable spanner. But it worked and it didn't round the nut (correct sized spanner now on order).
Nearly ready to hoist..

On the other side of the coin, I couldn't believe how easy to access the bell housing bolts are! Oh and one slight oddity, the engine mounts, what size are the little bolts supposed to be? I tried 7/16ths, too big. I tried 3/8ths, too small. I tried 10mm perfect!!!
Finally engine out..

Roll on next weekend!
Its the weekend so time for another update. I decided to start at the bottom and work my way up and only cut out so much at a time, I don't want any issues with the car losing rigidity (probably unlikely but why take the risk?)
Firstly I cut out the bottom panel, it had rusted through..


Fishing around I found Tom's Knob (a wierd rubber tube thing which lets water out of the air vent, just in front of the windscreen) was loose, the metal pipe its attached to had bunged up with dirt and rotted off. This had let water into the area below the heater, causing the rust issue.
Thanks to another project I was working on, I have some spare ready painted sheet steel lying around. So I cut it roughly to shape and offered it up.

A bit more trimming, filing and swearing later and..


I then tacked it into place with my MIG, working from the inside out, eventually got around to the front were I plug welded and tacked initially..

Then got a half decent seem weld going..
 .
.
I am going to seem weld it under neath but I need to remove the gearbox to do that, so that will probably be next weekend. After that I can start working my way up and actually sort the bits I spotted before I took the heater out.
Firstly I cut out the bottom panel, it had rusted through..


Fishing around I found Tom's Knob (a wierd rubber tube thing which lets water out of the air vent, just in front of the windscreen) was loose, the metal pipe its attached to had bunged up with dirt and rotted off. This had let water into the area below the heater, causing the rust issue.
Thanks to another project I was working on, I have some spare ready painted sheet steel lying around. So I cut it roughly to shape and offered it up.

A bit more trimming, filing and swearing later and..


I then tacked it into place with my MIG, working from the inside out, eventually got around to the front were I plug welded and tacked initially..

Then got a half decent seem weld going..
 .
.I am going to seem weld it under neath but I need to remove the gearbox to do that, so that will probably be next weekend. After that I can start working my way up and actually sort the bits I spotted before I took the heater out.

If that's a Donkey dick, Mrs Donkey would be left very disapointed!
Anyway, its been a while, so time for a bit of an update..
After completing the area under the heater, I decided to tackle something easier so I cleaned up and welded the slighty crusty left inner wing..


And finally..

Back to the bulkhead area, the passenger side isn't in great shape, so I thought I had best check the drivers as a lot of that is hidden behind the pedal box.

Its in a very similar state as water must have sat in the bulkhead slowly rotting it out. Below is the view from inside..

That area above the steering column was pretty crusty so I cut it back to try and find solid matter.

And then took the panel above the foot well off..

At this point I decided I needed better access, I decided to take the wing off, finding all the points were it was bolted was a little bit of a challenge. Also I found the bottom of the wing was pop riveted to the sill, surely that isn't right?

You can probably guess why the corroded hole is their, its right in line with the bulkhead!
Another thing I found was the scuttle is in poor shape, its rotten were it meets the wing and has various scabs. I am probably going to pull the glass out so I can inspect the surround. I don't really want to replace the complete scuttle/windscreen surround (its a pretty expensive panel) and a big job.
More rust..


So slow progress, its a bit rustier than I had hoped but it was free so I can't complain really!
Anyway, its been a while, so time for a bit of an update..
After completing the area under the heater, I decided to tackle something easier so I cleaned up and welded the slighty crusty left inner wing..


And finally..

Back to the bulkhead area, the passenger side isn't in great shape, so I thought I had best check the drivers as a lot of that is hidden behind the pedal box.

Its in a very similar state as water must have sat in the bulkhead slowly rotting it out. Below is the view from inside..

That area above the steering column was pretty crusty so I cut it back to try and find solid matter.

And then took the panel above the foot well off..

At this point I decided I needed better access, I decided to take the wing off, finding all the points were it was bolted was a little bit of a challenge. Also I found the bottom of the wing was pop riveted to the sill, surely that isn't right?

You can probably guess why the corroded hole is their, its right in line with the bulkhead!
Another thing I found was the scuttle is in poor shape, its rotten were it meets the wing and has various scabs. I am probably going to pull the glass out so I can inspect the surround. I don't really want to replace the complete scuttle/windscreen surround (its a pretty expensive panel) and a big job.
More rust..


So slow progress, its a bit rustier than I had hoped but it was free so I can't complain really!

Gassing Station | Readers' Cars | Top of Page | What's New | My Stuff