
Jeep Grand Cherokee - repair diary.
Discussion


Thought I would do diary on here of the repairs and fixes I have done on our 2004 Jeep Grand Cherokee 2.7 CRD. Its probably been the most unreliable car we have ever had... but my wife loves it, and for its size its very good on fuel. I thought some of the things I have done might help other people. I will add to this over the next week or so if people are finding it useful...
One of the first things I did was to replace the injector seals – a One of the common failings of the Mercedes 2.7 engine is failure of the injector seals which causes what’s is known as the black death! this is where the top of the engine fills with a tar like substance which is very difficult to remove, and also makes removing the injectors VERY difficult! My engine was showing very slight signs of seal failure, so before it got too bad I decided to change the seals. I did them one at a time, starting with injectors 1, 2 and then 3, which are easy to get at.
Injector 4 and 5 however are impossible to get out due to the close proximity of the panel at the bottom of the window screen. The official way to change these injectors is to drop the back of the engine down, but this is quite a job, so I decided to cut a couple of neat holes to facilitate the removal of the injectors. I did see that some people had cut an access panel completely out, but I wanted a neater solution, so I made a punch to cut two 60mm holes above injector 4 and 5.

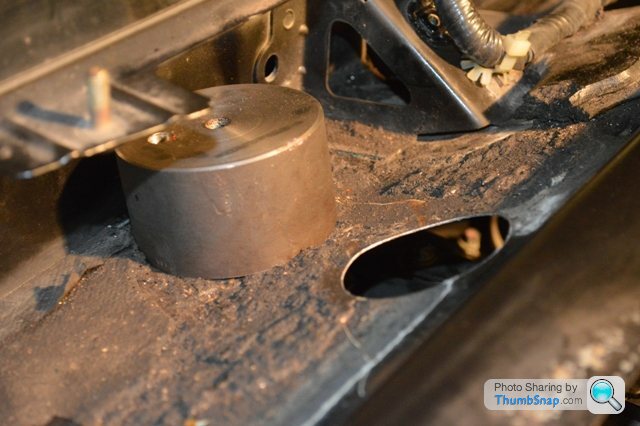
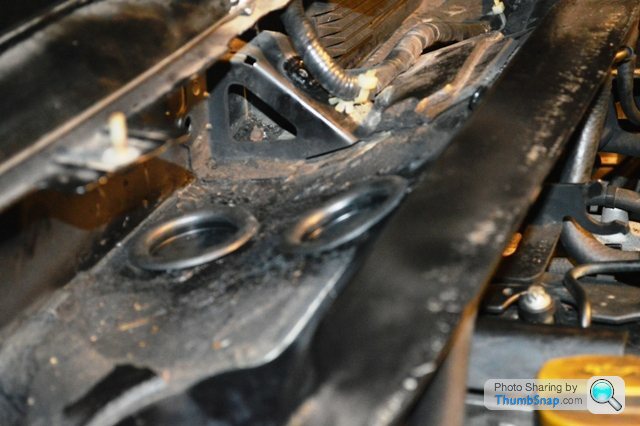

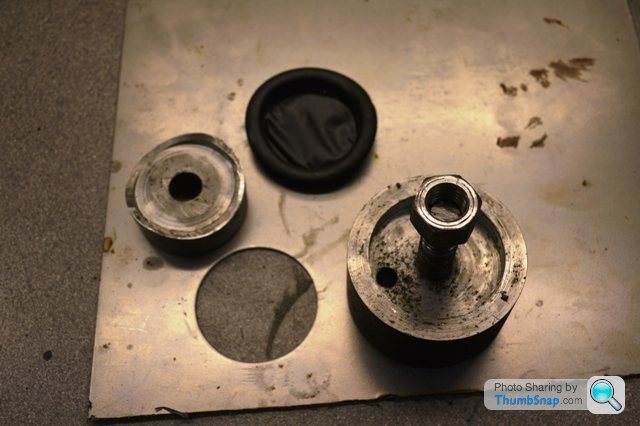
Replacing the seals is fairly straightforward, but I was worried about debris dropping into the cylinder, when cleaning out the injector hole and seat, so I made up a plug to go into the injector port (with an “O” ring to seal it). This was pushed into place and the threaded rod removed to facilitate easy cleaning. I also cut a grove into an old bolt ( you have t replace the retaining bolts as they are stretch type and can only be used once) and used this to clean out the threads. I did use a drill first to remove the debris out of the hole, of which there was quite a lot… leaving debris in the hole is a major cause of stripping the bolts. the puller in the picture is for removing the wiper arms as they are a tight fit on the shaft, and very difficult to remove without a puller!
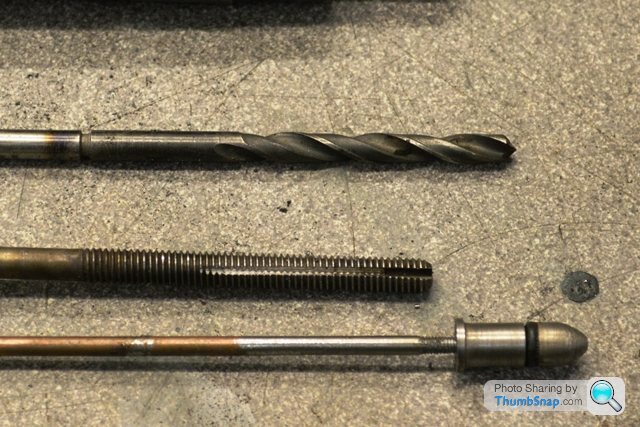
I used the special Mercedes grease on the injectors to stop them seizing in the hole, and also new genuine bolts and washers.
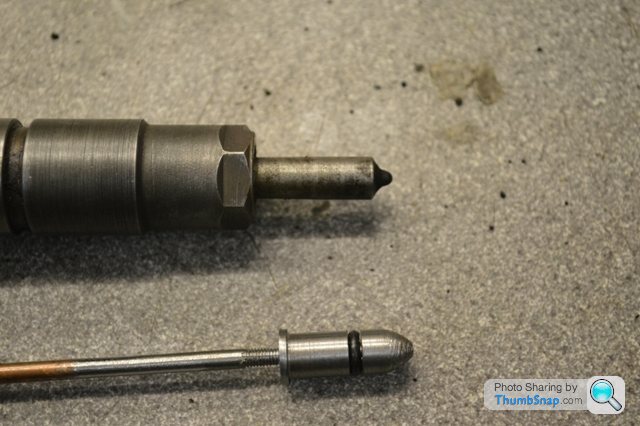
The retaining bolt threads are at the bottom of a long blind hole, you can see how far the bolt goes down… it really is important to thoroughly clean the hole of debris and oil/grease as this can cause the bolt to strip the alloy thread. I used a long air gun to clean the hole, as well as a slotted bolt. I used a couple of 60mm blind rubber grommets to seal the holes in the body after carefully rust proofing where I had cut the metal. It all looks neat, and if it was done by the factory!

One of the first things I did was to replace the injector seals – a One of the common failings of the Mercedes 2.7 engine is failure of the injector seals which causes what’s is known as the black death! this is where the top of the engine fills with a tar like substance which is very difficult to remove, and also makes removing the injectors VERY difficult! My engine was showing very slight signs of seal failure, so before it got too bad I decided to change the seals. I did them one at a time, starting with injectors 1, 2 and then 3, which are easy to get at.
Injector 4 and 5 however are impossible to get out due to the close proximity of the panel at the bottom of the window screen. The official way to change these injectors is to drop the back of the engine down, but this is quite a job, so I decided to cut a couple of neat holes to facilitate the removal of the injectors. I did see that some people had cut an access panel completely out, but I wanted a neater solution, so I made a punch to cut two 60mm holes above injector 4 and 5.
Replacing the seals is fairly straightforward, but I was worried about debris dropping into the cylinder, when cleaning out the injector hole and seat, so I made up a plug to go into the injector port (with an “O” ring to seal it). This was pushed into place and the threaded rod removed to facilitate easy cleaning. I also cut a grove into an old bolt ( you have t replace the retaining bolts as they are stretch type and can only be used once) and used this to clean out the threads. I did use a drill first to remove the debris out of the hole, of which there was quite a lot… leaving debris in the hole is a major cause of stripping the bolts. the puller in the picture is for removing the wiper arms as they are a tight fit on the shaft, and very difficult to remove without a puller!
I used the special Mercedes grease on the injectors to stop them seizing in the hole, and also new genuine bolts and washers.
The retaining bolt threads are at the bottom of a long blind hole, you can see how far the bolt goes down… it really is important to thoroughly clean the hole of debris and oil/grease as this can cause the bolt to strip the alloy thread. I used a long air gun to clean the hole, as well as a slotted bolt. I used a couple of 60mm blind rubber grommets to seal the holes in the body after carefully rust proofing where I had cut the metal. It all looks neat, and if it was done by the factory!
buzzer said:
Thought I would do diary on here of the repairs and fixes I have done on our 2004 Jeep Grand Cherokee 2.7 CRD. Its probably been the most unreliable car we have ever had
Yep, I've got a 4.0 Grand Cherokee that has sat in my drive for four years because it is an unreliable piece of crap. Shortly going to be put on ebay, 99p start and no reserve because I am sick of the sight of it.AS many people know, the EGR valves and solenoids can give problems on Diesel engines. I seemed to have an intermittent fault with the EGR solenoid on my Jeep so I decided to see if I could delete the solenoid and stop the EGR valve operating which gives a much cleaner engine intake.
At first I tried just disconnecting the wires to the EGR solenoid, but this caused the MIL to come on and a fault code to appear. Seems the ECU monitors the EGR function… The following modification fools the ECU into thinking the EGR valve is working!
I could find references to this modification being done on the Mercedes engine, there are a few guides on the internet, but not specific to the Jeep. After a bit of digging and using the information provided on the Mercedes forum, I did the following modification to my Jeep. Fingers crossed its working fine. Here is what I did:-
First I obtained the parts from Maplins, total cost £3.64
1 x 470 Ohm resistor part #D470R
1 x 1N4004 diode part # QL76
1 x 1K Ohm resistor part #M1K
1 x small circuit box part #N78BQ
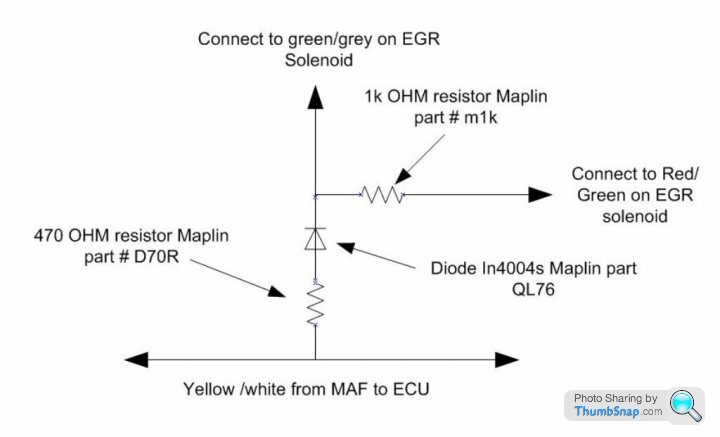
Remove the plug off the EGR solenoid and strip back the outer insulation on the wires. (Grey/yellow and red / green) This is a little awkward as space is restricted. Then remove a little insulation from each to expose the copper wire and solder on a couple of wires of a similar colour. Stagger the removal of the insulation so as to make insulating it again after soldering the wires on easier. Tape them up. DO not reconnect the plug!
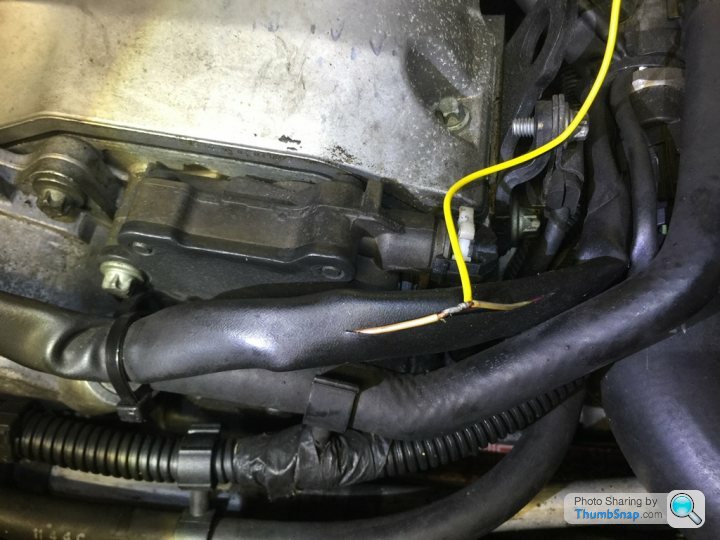
Cut a slit in the insulation of the loom at the front of the engine (see picture) and find the yellow/white wire which runs from the MAF sensor to the ECU. Bare the insulation on this to expose the copper and solder a similar colour wire to it. Tape the joint up and make good the slit in the loom insulation
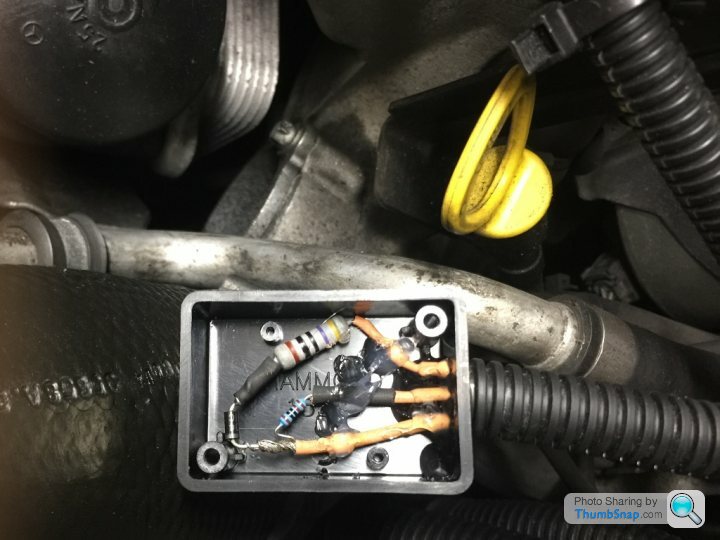
Bring all three wires up to the circuit box and connect them as per the schematic above. Note the resistors can go either way around but the diode is directional and MUST be the right way around. Add a little glue with a Glue gun to keep everything in the box stable. Cable tie the box up to a suitable location and tidy the wiring. I use the corrugated split sleeving which makes a neat job.

Remove the vacuum pipe off the EGR valve and block the pipe. I also added a bit of tape on the open EGR valve pipe.
This modification has been working great for a long time!
At first I tried just disconnecting the wires to the EGR solenoid, but this caused the MIL to come on and a fault code to appear. Seems the ECU monitors the EGR function… The following modification fools the ECU into thinking the EGR valve is working!
I could find references to this modification being done on the Mercedes engine, there are a few guides on the internet, but not specific to the Jeep. After a bit of digging and using the information provided on the Mercedes forum, I did the following modification to my Jeep. Fingers crossed its working fine. Here is what I did:-
First I obtained the parts from Maplins, total cost £3.64
1 x 470 Ohm resistor part #D470R
1 x 1N4004 diode part # QL76
1 x 1K Ohm resistor part #M1K
1 x small circuit box part #N78BQ
Remove the plug off the EGR solenoid and strip back the outer insulation on the wires. (Grey/yellow and red / green) This is a little awkward as space is restricted. Then remove a little insulation from each to expose the copper wire and solder on a couple of wires of a similar colour. Stagger the removal of the insulation so as to make insulating it again after soldering the wires on easier. Tape them up. DO not reconnect the plug!
Cut a slit in the insulation of the loom at the front of the engine (see picture) and find the yellow/white wire which runs from the MAF sensor to the ECU. Bare the insulation on this to expose the copper and solder a similar colour wire to it. Tape the joint up and make good the slit in the loom insulation
Bring all three wires up to the circuit box and connect them as per the schematic above. Note the resistors can go either way around but the diode is directional and MUST be the right way around. Add a little glue with a Glue gun to keep everything in the box stable. Cable tie the box up to a suitable location and tidy the wiring. I use the corrugated split sleeving which makes a neat job.
Remove the vacuum pipe off the EGR valve and block the pipe. I also added a bit of tape on the open EGR valve pipe.
This modification has been working great for a long time!
Sparky137 said:
buzzer said:
Thought I would do diary on here of the repairs and fixes I have done on our 2004 Jeep Grand Cherokee 2.7 CRD. Its probably been the most unreliable car we have ever had
Yep, I've got a 4.0 Grand Cherokee that has sat in my drive for four years because it is an unreliable piece of crap. Shortly going to be put on ebay, 99p start and no reserve because I am sick of the sight of it. But I have persevered with it over the years... There have been many times when it has "almost" been replaced
  But what with.... that has always been the problem...
This is the one that had me scratching my head for months! The battery would intermittently go flat. It would be OK for weeks, then the next day the battery would be flat. I did all the checks for parasitic battery drain, but everything checked out.
Three times in one week it went flat, and on a cold January day I was on the drive checking it out and checking for a drain on the battery, but there was none...
then, as I looked at the test meter, the wind blew the drivers door just slightly (it was open) and the needle on the meter swung violently to one side!
that gave a clue, and when I checked the wires in the door umbilical, I found a broken wire! another common fault apparently!

Three times in one week it went flat, and on a cold January day I was on the drive checking it out and checking for a drain on the battery, but there was none...
then, as I looked at the test meter, the wind blew the drivers door just slightly (it was open) and the needle on the meter swung violently to one side!
that gave a clue, and when I checked the wires in the door umbilical, I found a broken wire! another common fault apparently!
buzzer said:
This is the one that had me scratching my head for months! The battery would intermittently go flat. It would be OK for weeks, then the next day the battery would be flat. I did all the checks for parasitic battery drain, but everything checked out.
Ah yes, I had that one too! But you may not have found the whole cause of the problem. I had mine festooned with data logging kit trying to find out what the hell was going on. Turns out nothing electrical!!! The fault was a worn ignition key and barrel. As I'm sure that you are aware there is an auxiliary position on the ignition switch that is one turn BACK from the 'Off' position. On mine it was possible to remove the key in the auxiliary position. When that is done there was a drain of some 10 Amps!!!It seems that sometimes when switching the engine off the key would be taken out in the correct position - no battery drain, at other times it would be turned back one click too far and removed leaving a whole chunk of the electrics active and a 10A battery drain.
If I were you I'd check this out too - just in case!!!.
PS: Mine now has fault codes telling me that cam & crank signals are not being received at the ECU. I have replaced both sensors and tried a different ECU (and body module, and key module - you can't just replace the ECU). Still the fault persists and the car won't start. I suspect that theres a break in the wiring loom where it crosses the bulkhead behind the cylinder head. I've lost interest in it now and can't be bothered doing any more to it. If I fix this fault it will shortly be followed by another.
Sparky137 said:
buzzer said:
This is the one that had me scratching my head for months! The battery would intermittently go flat. It would be OK for weeks, then the next day the battery would be flat. I did all the checks for parasitic battery drain, but everything checked out.
Ah yes, I had that one too! But you may not have found the whole cause of the problem. I had mine festooned with data logging kit trying to find out what the hell was going on. Turns out nothing electrical!!! The fault was a worn ignition key and barrel. As I'm sure that you are aware there is an auxiliary position on the ignition switch that is one turn BACK from the 'Off' position. On mine it was possible to remove the key in the auxiliary position. When that is done there was a drain of some 10 Amps!!!It seems that sometimes when switching the engine off the key would be taken out in the correct position - no battery drain, at other times it would be turned back one click too far and removed leaving a whole chunk of the electrics active and a 10A battery drain.
If I were you I'd check this out too - just in case!!!.
PS: Mine now has fault codes telling me that cam & crank signals are not being received at the ECU. I have replaced both sensors and tried a different ECU (and body module, and key module - you can't just replace the ECU). Still the fault persists and the car won't start. I suspect that theres a break in the wiring loom where it crosses the bulkhead behind the cylinder head. I've lost interest in it now and can't be bothered doing any more to it. If I fix this fault it will shortly be followed by another.
is yours the straight 6 4.0 ltr?
buzzer said:
Thats useful, thanks. I will look out for that! this is one of the reasons I like to share stuff on here, others have helped me, I try to help others...
is yours the straight 6 4.0 ltr?
Yes, nice drive when it's running. Surprisingly economical if you are careful. 30 mpg is possible on a run. Better than the Range Rovers I have. Can't ever get them out of the teens.is yours the straight 6 4.0 ltr?

Sparky137 said:
Ah yes, I had that one too! But you may not have found the whole cause of the problem. I had mine festooned with data logging kit trying to find out what the hell was going on. Turns out nothing electrical!!! The fault was a worn ignition key and barrel. As I'm sure that you are aware there is an auxiliary position on the ignition switch that is one turn BACK from the 'Off' position. On mine it was possible to remove the key in the auxiliary position. When that is done there was a drain of some 10 Amps!!!
It seems that sometimes when switching the engine off the key would be taken out in the correct position - no battery drain, at other times it would be turned back one click too far and removed leaving a whole chunk of the electrics active and a 10A battery drain.
If I were you I'd check this out too - just in case!!!.
PS: Mine now has fault codes telling me that cam & crank signals are not being received at the ECU. I have replaced both sensors and tried a different ECU (and body module, and key module - you can't just replace the ECU). Still the fault persists and the car won't start. I suspect that theres a break in the wiring loom where it crosses the bulkhead behind the cylinder head. I've lost interest in it now and can't be bothered doing any more to it. If I fix this fault it will shortly be followed by another.
Check the 5 volt feed to the crank sensor would be my next port of call.It seems that sometimes when switching the engine off the key would be taken out in the correct position - no battery drain, at other times it would be turned back one click too far and removed leaving a whole chunk of the electrics active and a 10A battery drain.
If I were you I'd check this out too - just in case!!!.
PS: Mine now has fault codes telling me that cam & crank signals are not being received at the ECU. I have replaced both sensors and tried a different ECU (and body module, and key module - you can't just replace the ECU). Still the fault persists and the car won't start. I suspect that theres a break in the wiring loom where it crosses the bulkhead behind the cylinder head. I've lost interest in it now and can't be bothered doing any more to it. If I fix this fault it will shortly be followed by another.
Good to see your keeping it in good shape buzzer, I couldn't say how many of those injector seals I've had to change over the years other than a lot so I know what a fun job 4+5 are even ended up buying my own injector puller and seat cutter.
Door harness is an issue as you've seen don't rejoin it though as it will break again replace the whole section from pillar connector then splice in inside the door itself that should stop the flexing from making the issue reoccur.
The other problem we used to get with these was the heater flap actuators on the HVAC system and the heated seat mats try and set your backside on fire when they burn out.
Edited by chryslerben on Monday 8th May 07:44
chryslerben said:
Door harness is an issue as you've seen don't rejoin it though as it will break again replace the whole section from pillar connector then splice in inside the door itself that should stop the flexing from making the issue reoccur.
That's a good point... I didn't just re-join it as I noticed that the black wire which had broken was very stiff, and a larger diameter than the other wires. I cut it out completely and replaced it with some thinner wire which I doubled up.Edited by chryslerben on Monday 8th May 07:44
Sparky137 said:
buzzer said:
Thats useful, thanks. I will look out for that! this is one of the reasons I like to share stuff on here, others have helped me, I try to help others...
is yours the straight 6 4.0 ltr?
Yes, nice drive when it's running. Surprisingly economical if you are careful. 30 mpg is possible on a run. Better than the Range Rovers I have. Can't ever get them out of the teens.is yours the straight 6 4.0 ltr?
I ran one as my only car here in the UK for almost 5 years, average over that time... 17.2mpg, never more than 22 even on a long steady run.
Both figures far better than the 2 Rangies that came before though! (and not as bad as the Cayenne Turbo that I had in the UAE at the same time!)
A couple of times I have noticed the steering was a little heavy at low speeds… I suspected the the pump, but it seemed quiet. I knew the steering boxes were prone to problems so ordered a new pump repair kit. The steering box is easy enough to remove, but they have used some sealer on the 4 bolts that hold it on, and these are very VERY tight to remove.
Also the drop arm is VERY tight on the splines, and you will need a robust puller and some heat to remove it! Dont use a hammer to remove it or you will break the delicate alloy end cap.
I stripped it all down and rebuilt it, with some help of a guide found on the internet. It was remarkably good inside, but the Teflon seals did show some signs of wear…
After it was fitted back on, I refilled the system with some new oil, which I got from Opie Oils... its a special oil for this as the cooling fan is hydraulically driven from the power steering pump. All back together and although the steering felt much better, it still didn't feel right, so I replaced the power steering pump with a new insert, which was quite cheap. A good source of parts for all things Power Steering and steering racks is Jay Gee Hydraulic Services Ltd in Wolverhampton. I have used them for over 40 years!


Also the drop arm is VERY tight on the splines, and you will need a robust puller and some heat to remove it! Dont use a hammer to remove it or you will break the delicate alloy end cap.
I stripped it all down and rebuilt it, with some help of a guide found on the internet. It was remarkably good inside, but the Teflon seals did show some signs of wear…
After it was fitted back on, I refilled the system with some new oil, which I got from Opie Oils... its a special oil for this as the cooling fan is hydraulically driven from the power steering pump. All back together and although the steering felt much better, it still didn't feel right, so I replaced the power steering pump with a new insert, which was quite cheap. A good source of parts for all things Power Steering and steering racks is Jay Gee Hydraulic Services Ltd in Wolverhampton. I have used them for over 40 years!
First time in 20 years I called the AA out to one of my vehicles! one of the rear calipers started to stick, and as it got hot, it stuck even more… I managed to get back home and strip the offending caliper down.
Seems they use what is effectively a plastic piston (phenolic pistons) in the calipers! it was very tight in the bore, as if it had swelled… Looks to be a common problem.
A little bit of research told me that there were steel replacements available, perhaps an indication of a wider problem. So I decided to replace front and rear, with new seals and dust covers all round. I thought I may as well do a good job so the calipers were stripped fully down, sand blasted, and the bores honed. the caliper repair kits came with new pins, nipples, and covers, quite comprehensive. I couldn’t resist painting them red!


Seems they use what is effectively a plastic piston (phenolic pistons) in the calipers! it was very tight in the bore, as if it had swelled… Looks to be a common problem.
A little bit of research told me that there were steel replacements available, perhaps an indication of a wider problem. So I decided to replace front and rear, with new seals and dust covers all round. I thought I may as well do a good job so the calipers were stripped fully down, sand blasted, and the bores honed. the caliper repair kits came with new pins, nipples, and covers, quite comprehensive. I couldn’t resist painting them red!
buzzer said:
First time in 20 years I called the AA out to one of my vehicles! one of the rear calipers started to stick, and as it got hot, it stuck even more… I managed to get back home and strip the offending caliper down.
Now that's a problem I did have... always the n/s/r caliper and despite being replaced 3 times it still liked to stick and catch fire occasionally - bit of a shock the first time, not so much on subsequent happenings.Still loved the WJ and miss it though.
Gassing Station | Readers' Cars | Top of Page | What's New | My Stuff