
Kelvinators R53 Cooper S
Discussion


Ah yes, nothing like buying a car sight unseen, and then choosing to fly across the country and drive said car back again. Yup, I've done it again.
Much like the https://www.tasteslikepetrol.net/cars/schnellwagon... BMW E91, I found a car on Trademe that I liked, but it happened to be a few hundred KM away from home. This even came from basically the same place as the E91.
The details of the purchase are on the https://www.tasteslikepetrol.net/cars/project-r53/ cars page, but this is the story of the adventure.
The Plan
Having put a deposit on the car, it was time to book flights. I thought since last time I picked the car up and then just made a straight shot home again the same day, it might be nice to take my Wife with me and make a weekend of it.
Flights were sorted for the both of us, at what I consider a very reasonable price for a short notice flight post-Covid.
The plan was to drive the daily to the airport, fly to Hamilton, have the seller meet us at the airport, buy the car, drive it down to Taupo and stay there the night. The next day, continue on back to Wellington, pick the daily up from the airport, drive both home and bask in the glow to a trip well done.
The plan quickly changed. Why not go somewhere different, somewhere we haven't been yet, like Napier? Hmmm.
Saturday
Ugh, 5:30am on a Saturday should be illegal. It's still dark. It's also foggy outside, which doesn't bode well for flying. We get ready and head to the airport.

Flights are still coming in and out, and the fog isn't too bad. Ours is delayed by about 10 minutes.

We then proceed to get onto a narrow tin can packed with other people. If we get Covid, at least we know where it came from. Not the greatest social distancing.
On the plus side, once we shot up and above the low cloud it was quite a nice morning out

After an hour and a bit in the air, we arrive at Hamilton airport. We meet the seller outside and agree to follow him 10-15 minutes to his place. Jump in the Mini, take off, and the Tyre Pressure Monitoring System light comes on within seconds of leaving the airport. https://www.tasteslikepetrol.net/cars/schnellwagon... Not this again.
We make it to his place OK, shoot the s t for a bit, do the deal and head off. The tyres look OK, but the warning is still there.
A quick stop at a petrol station on the way out confirms its a false trigger, as all the pressures are fine. Nothing to see here. I gas up and reset the TPMS. The light stays off for the rest of the trip.
At the petrol station we also do one other thing. Change the wipers. The seller had a copy of a PPI done by a local BMW dealer, which advised the wipers were less than effective. This was proven on the drive to the sellers house, where although they cleared the glass, they also made an almighty racket.
We had been having a fair bit of rain recently and the forecast for the country was to bucket down all weekend (something like a months rain in one weekend). With this in mind I purchased some replacement wipers from work before I left on Friday, and packed them in the carry on ready for the trip. My Wife looked at me weird, but I had the last laugh because it was a life saver.
Even with the new wipers, visibility was low (or so I thought at the time, it got much worse later on)

The rear was even worse. I didn't bring a spare for that, and every time you wiped it would clear for about 30 seconds, and then be useless again

As seems to be my tradition now, we stopped at Tirau BP for an early lunch. This was the first chance I got to actually look around the car. It looked quite nice. The colour suits it. Much nicer than a black or grey.


We continued on, towards Taupo. Although we were going to Napier now, we were going via Taupo as this was meant to be our lunch stop, but we were running behind so had the early lunch at Tirau instead. Going via Taupo gives us proper roads to Napier too, not small backroads.
It wasn't all rosy though. Other than seeing this sweet, surreal, super bright and sharp rainbow that touched the ground next to the road, issues were starting to appear.

The worst issue was that the car was starting to shudder when the engine was put under load, like going up hills, or passing. This started (or I started to notice it) about 100km into the trip. The car was still running and driving fine otherwise and cruised OK.
We made it to Taupo OK, and had a quick rest break there before heading on through the Napier-Taupo State Highway to Napier. We took it fairly easy over here due to the constant rain, and I'm glad we did, that road has claimed a few lives recently.
There was one surprise though. Somewhere in the middle, we almost shot right on by a nondescript sign that just said "Scenic Lookout". Instead, we jammed on the brakes and went for a look.
Little did we know this was the Waipunga Falls, a hidden gem in the middle of nowhere. NZ can be quite stunning. If only people would stop dumping rubbish there, you scummy bds.

This stop also gave me a chance to take some more photos of the car. The sky was looking pretty moody.


It was here that I noticed just how much carbon was building up on the back of the car. Obviously the misfire was throwing some unburnt fuel around. The shudder from the misfire was slowly getting worse, but wasn't otherwise impacting the ability of the car to continue.
We got into Napier late afternoon. Still in one piece, with a slightly unhappy car, but still chugging along.
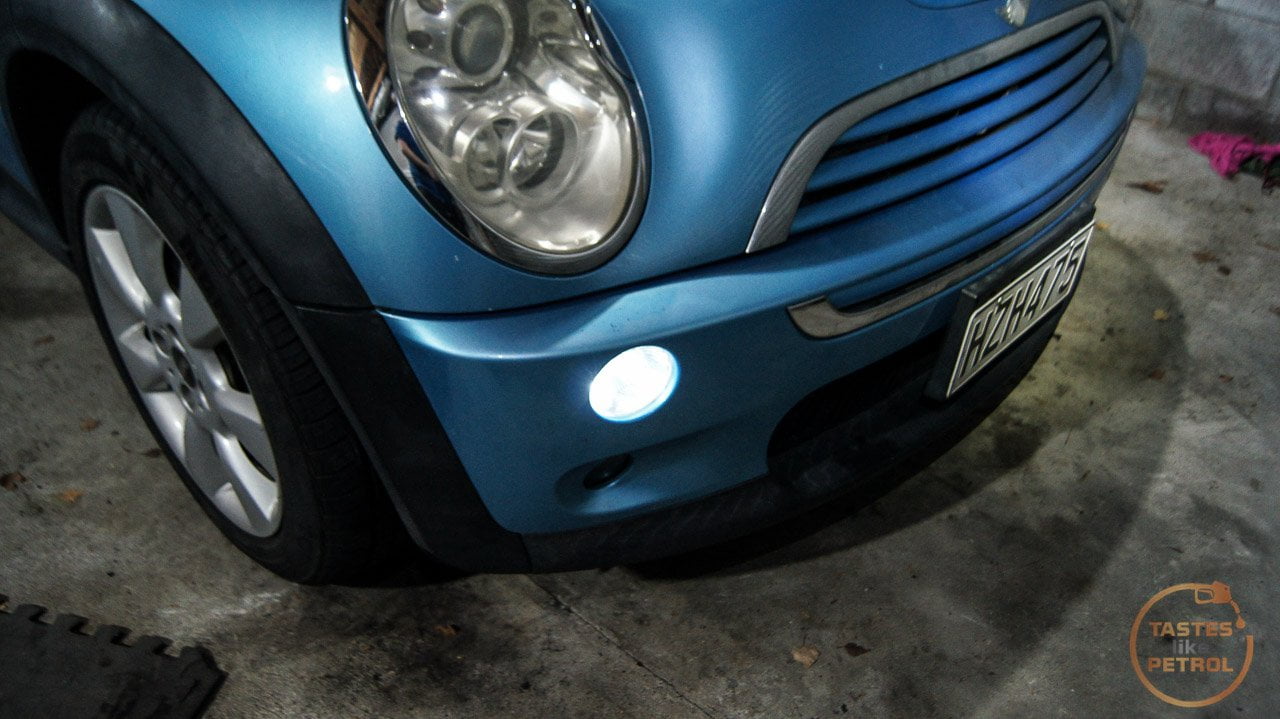
After finding, and checking in to our AirBNB we went out for dinner. This was about three shades of frustrating chaos for various reasons, but we eventually had a lovely dinner at a Mexican restaurant near the harbour. Part of the frustration was trying to use Google Maps to navigate in the pouring rain, in the dark, with some of the worst headlights I have ever had the pleasure of using. These are JDM As Fk Bellof HID bulbs, which must be about 9000k temperature as they are almost solid blue, and project little to no light more than a foot in front of the car. If I didn't have fog lights, I would've been out of luck. It's hard to capture just how blue they are.

After a lovely dinner of some tasty, hot, Mexican food we settled in for the night.
Sunday
Not a bad view from our AirBNB

But now was time for the hard yards. 4 hours of driving to get to Wellington, plus another hour or so to get back to the airport. Not many places in the middle to stop until you get about half way.
We pushed on, choosing (for better or worse) to leave Napier via State Highway 50, instead of following SH2 through Hastings. This road was an adventure. The rain was so hard the wipers could barely keep up on full speed, and the surface water was quite deep at times. Thankfully that only kept up for a few KM, but the rest was still in heavy mist and periods of rain.
SH50 is a long, twisty, winding road that is a fairly decent drive as long as you get a straight shot. Its when you get slow "brake for every bend" drivers in front of you that its starts to drag on a bit, until there is a safe space to chop a couple of gears and listen to the whine of the supercharger as you fly on by them. The Mini took all the corners in its stride without so much as a second look.
Passing was starting to cause more and more concern though as the shuddering was getting worse, to the point I was wondering if it were a stuffed axle or CV.
Eventually, we met back up with SH2, and kept heading on towards Woodville.
Woodville is where we had a bit of a whoopsie. Instead of turning off towards Masterton to continue down SH2, we missed that turn off and didn't realise until we were already on Saddle Road, a very narrow, steep and twisty road that goes over the hill to Palmerston North. This is now the main road since the Manawatu Gorge has been closed due to risk of landslides (what a shame, it was a great road).
Oh well, we're here now!
Once again, the Mini handled all the turns like a champ, and the torquey little motor hauled us up the hills with no issue, other than the annoying shudder under load.
About halfway over Saddle Road we came across the Te Apiti Wind Farm. Quite a stunning place, with a 230 foot wind turbine right in the middle of the car park. Not easy to look at if you get vertigo, but a very cool place.

Just over the other side of Saddle Road we traded the rain for high winds instead. I said to my Wife earlier in the trip that I would take the rain over high winds any day, well, looks like we get both.
During one particularly windy section, which the Mini handled very well, much better than the Honda would, we came across an accident which I can only presume was due to the truck being pushed off the road by the wind. Emergency services were already in attendance (unlike the accident I came across driving the E91 back).
That's really the end of the excitement. We more or less had a straight shot through from Palmy to the Airport in Wellington, except for the usual congestion around Otaki (which showed the Mini starting to idle a bit lumpy at times).
We finally made it home, 780km after picking the car up, and the only casualty appears to be RH hydraulic engine mount, which in the last few KM had decided it was done, and dumped all its fluid onto the frame rail.

So, what do I think of the Mini?
Well, after checking the coil and finding the terminals corroded, cleaning them, resetting the ECU and driving it, I'm impressed with the power. I thought it was rapid before, but now it's even sharper off the line. Its a shame I didn't have this power and response for the rest of the trip, but oh well. The shudder is also 90% gone, proving it was a misfire all along.
The handling is a little strange. The car kinda pivots on its axis when you turn, which I remember from the R50 Cooper, but there is a little more body roll than I expected. Might be the difference between the 16s on this and the 17s on the Cooper.
The condition isn't quite what I was expecting. It's nice from the outside, but the inside has seen some st. A couple of the boot lining trims are held in with wood screws, the boot light is missing, some screws are missing in things like the door cards, and various other things aren't quite right.
Obviously there are mechanical issues too, like the misfire, the engine mount, and the control arm bushes are stuffed too. All common Mini stuff, but annoying none the less. The control arm bushes were mentioned in the PPI as "cracked", but they are ruined. The misfire also shouldn't be a surprise, the plugs look old as hell, as do the coil and leads. New parts for all these items are en route now.
Despite the misfire, we somehow still managed to average 8.5L/100KM (27.5MPG) on the trip. I'm very impressed by that.
I'm undecided about this car. I was so disappointed by its condition last night that I was ready to just fix the mechanical issues, give it a clean and sell it on, but I'm thinking I should make the most of what I have and give the car the love it deserves. Its low KM (128,000KM), a good colour, facelift, and it's a good solid car under it all, I hope.
Much like the https://www.tasteslikepetrol.net/cars/schnellwagon... BMW E91, I found a car on Trademe that I liked, but it happened to be a few hundred KM away from home. This even came from basically the same place as the E91.
The details of the purchase are on the https://www.tasteslikepetrol.net/cars/project-r53/ cars page, but this is the story of the adventure.
The Plan
Having put a deposit on the car, it was time to book flights. I thought since last time I picked the car up and then just made a straight shot home again the same day, it might be nice to take my Wife with me and make a weekend of it.
Flights were sorted for the both of us, at what I consider a very reasonable price for a short notice flight post-Covid.
The plan was to drive the daily to the airport, fly to Hamilton, have the seller meet us at the airport, buy the car, drive it down to Taupo and stay there the night. The next day, continue on back to Wellington, pick the daily up from the airport, drive both home and bask in the glow to a trip well done.
The plan quickly changed. Why not go somewhere different, somewhere we haven't been yet, like Napier? Hmmm.
Saturday
Ugh, 5:30am on a Saturday should be illegal. It's still dark. It's also foggy outside, which doesn't bode well for flying. We get ready and head to the airport.
Flights are still coming in and out, and the fog isn't too bad. Ours is delayed by about 10 minutes.

We then proceed to get onto a narrow tin can packed with other people. If we get Covid, at least we know where it came from. Not the greatest social distancing.
On the plus side, once we shot up and above the low cloud it was quite a nice morning out

After an hour and a bit in the air, we arrive at Hamilton airport. We meet the seller outside and agree to follow him 10-15 minutes to his place. Jump in the Mini, take off, and the Tyre Pressure Monitoring System light comes on within seconds of leaving the airport. https://www.tasteslikepetrol.net/cars/schnellwagon... Not this again.
We make it to his place OK, shoot the s
t for a bit, do the deal and head off. The tyres look OK, but the warning is still there.A quick stop at a petrol station on the way out confirms its a false trigger, as all the pressures are fine. Nothing to see here. I gas up and reset the TPMS. The light stays off for the rest of the trip.
At the petrol station we also do one other thing. Change the wipers. The seller had a copy of a PPI done by a local BMW dealer, which advised the wipers were less than effective. This was proven on the drive to the sellers house, where although they cleared the glass, they also made an almighty racket.
We had been having a fair bit of rain recently and the forecast for the country was to bucket down all weekend (something like a months rain in one weekend). With this in mind I purchased some replacement wipers from work before I left on Friday, and packed them in the carry on ready for the trip. My Wife looked at me weird, but I had the last laugh because it was a life saver.
Even with the new wipers, visibility was low (or so I thought at the time, it got much worse later on)

The rear was even worse. I didn't bring a spare for that, and every time you wiped it would clear for about 30 seconds, and then be useless again

As seems to be my tradition now, we stopped at Tirau BP for an early lunch. This was the first chance I got to actually look around the car. It looked quite nice. The colour suits it. Much nicer than a black or grey.


We continued on, towards Taupo. Although we were going to Napier now, we were going via Taupo as this was meant to be our lunch stop, but we were running behind so had the early lunch at Tirau instead. Going via Taupo gives us proper roads to Napier too, not small backroads.
It wasn't all rosy though. Other than seeing this sweet, surreal, super bright and sharp rainbow that touched the ground next to the road, issues were starting to appear.

The worst issue was that the car was starting to shudder when the engine was put under load, like going up hills, or passing. This started (or I started to notice it) about 100km into the trip. The car was still running and driving fine otherwise and cruised OK.
We made it to Taupo OK, and had a quick rest break there before heading on through the Napier-Taupo State Highway to Napier. We took it fairly easy over here due to the constant rain, and I'm glad we did, that road has claimed a few lives recently.
There was one surprise though. Somewhere in the middle, we almost shot right on by a nondescript sign that just said "Scenic Lookout". Instead, we jammed on the brakes and went for a look.
Little did we know this was the Waipunga Falls, a hidden gem in the middle of nowhere. NZ can be quite stunning. If only people would stop dumping rubbish there, you scummy b
ds.
This stop also gave me a chance to take some more photos of the car. The sky was looking pretty moody.


It was here that I noticed just how much carbon was building up on the back of the car. Obviously the misfire was throwing some unburnt fuel around. The shudder from the misfire was slowly getting worse, but wasn't otherwise impacting the ability of the car to continue.
We got into Napier late afternoon. Still in one piece, with a slightly unhappy car, but still chugging along.
After finding, and checking in to our AirBNB we went out for dinner. This was about three shades of frustrating chaos for various reasons, but we eventually had a lovely dinner at a Mexican restaurant near the harbour. Part of the frustration was trying to use Google Maps to navigate in the pouring rain, in the dark, with some of the worst headlights I have ever had the pleasure of using. These are JDM As Fk Bellof HID bulbs, which must be about 9000k temperature as they are almost solid blue, and project little to no light more than a foot in front of the car. If I didn't have fog lights, I would've been out of luck. It's hard to capture just how blue they are.

After a lovely dinner of some tasty, hot, Mexican food we settled in for the night.
Sunday
Not a bad view from our AirBNB

But now was time for the hard yards. 4 hours of driving to get to Wellington, plus another hour or so to get back to the airport. Not many places in the middle to stop until you get about half way.
We pushed on, choosing (for better or worse) to leave Napier via State Highway 50, instead of following SH2 through Hastings. This road was an adventure. The rain was so hard the wipers could barely keep up on full speed, and the surface water was quite deep at times. Thankfully that only kept up for a few KM, but the rest was still in heavy mist and periods of rain.
SH50 is a long, twisty, winding road that is a fairly decent drive as long as you get a straight shot. Its when you get slow "brake for every bend" drivers in front of you that its starts to drag on a bit, until there is a safe space to chop a couple of gears and listen to the whine of the supercharger as you fly on by them. The Mini took all the corners in its stride without so much as a second look.
Passing was starting to cause more and more concern though as the shuddering was getting worse, to the point I was wondering if it were a stuffed axle or CV.
Eventually, we met back up with SH2, and kept heading on towards Woodville.
Woodville is where we had a bit of a whoopsie. Instead of turning off towards Masterton to continue down SH2, we missed that turn off and didn't realise until we were already on Saddle Road, a very narrow, steep and twisty road that goes over the hill to Palmerston North. This is now the main road since the Manawatu Gorge has been closed due to risk of landslides (what a shame, it was a great road).
Oh well, we're here now!
Once again, the Mini handled all the turns like a champ, and the torquey little motor hauled us up the hills with no issue, other than the annoying shudder under load.
About halfway over Saddle Road we came across the Te Apiti Wind Farm. Quite a stunning place, with a 230 foot wind turbine right in the middle of the car park. Not easy to look at if you get vertigo, but a very cool place.

Just over the other side of Saddle Road we traded the rain for high winds instead. I said to my Wife earlier in the trip that I would take the rain over high winds any day, well, looks like we get both.
During one particularly windy section, which the Mini handled very well, much better than the Honda would, we came across an accident which I can only presume was due to the truck being pushed off the road by the wind. Emergency services were already in attendance (unlike the accident I came across driving the E91 back).
That's really the end of the excitement. We more or less had a straight shot through from Palmy to the Airport in Wellington, except for the usual congestion around Otaki (which showed the Mini starting to idle a bit lumpy at times).
We finally made it home, 780km after picking the car up, and the only casualty appears to be RH hydraulic engine mount, which in the last few KM had decided it was done, and dumped all its fluid onto the frame rail.

So, what do I think of the Mini?
Well, after checking the coil and finding the terminals corroded, cleaning them, resetting the ECU and driving it, I'm impressed with the power. I thought it was rapid before, but now it's even sharper off the line. Its a shame I didn't have this power and response for the rest of the trip, but oh well. The shudder is also 90% gone, proving it was a misfire all along.
The handling is a little strange. The car kinda pivots on its axis when you turn, which I remember from the R50 Cooper, but there is a little more body roll than I expected. Might be the difference between the 16s on this and the 17s on the Cooper.
The condition isn't quite what I was expecting. It's nice from the outside, but the inside has seen some s
t. A couple of the boot lining trims are held in with wood screws, the boot light is missing, some screws are missing in things like the door cards, and various other things aren't quite right.Obviously there are mechanical issues too, like the misfire, the engine mount, and the control arm bushes are stuffed too. All common Mini stuff, but annoying none the less. The control arm bushes were mentioned in the PPI as "cracked", but they are ruined. The misfire also shouldn't be a surprise, the plugs look old as hell, as do the coil and leads. New parts for all these items are en route now.
Despite the misfire, we somehow still managed to average 8.5L/100KM (27.5MPG) on the trip. I'm very impressed by that.
I'm undecided about this car. I was so disappointed by its condition last night that I was ready to just fix the mechanical issues, give it a clean and sell it on, but I'm thinking I should make the most of what I have and give the car the love it deserves. Its low KM (128,000KM), a good colour, facelift, and it's a good solid car under it all, I hope.
Edited by KelvinatorNZ on Monday 22 June 12:39
I'm 15mths into R53 ownership, and the one thing I've learned is that I got lucky. There are a lot of lemons out there that haven't been loved, and they are getting to an age where persistent failure is starting to earn them a reputation for being 'unreliable'.
It's a much more complex car than a typical cheap hatch, and not all of BMW's engineering work was great. For example, the cooling system has a number of common weaknesses.
In your position I'd be thinking very carefully about how much you want to put into this before starting to improve it mechanically. I intended to keep mine for a while and use it on track, so it's been the subject of much maintenance/improvement. For example, I had the thing fettled top to bottom last year, and the bill came to more than the price of the car (not including modifications) - and I bought a good one to start with!
Having seen your TVR thread I'm sure you're more than up to solving any issues this might throw at you, but it's not a simple, modern, low-maintenance car.
It's a much more complex car than a typical cheap hatch, and not all of BMW's engineering work was great. For example, the cooling system has a number of common weaknesses.
In your position I'd be thinking very carefully about how much you want to put into this before starting to improve it mechanically. I intended to keep mine for a while and use it on track, so it's been the subject of much maintenance/improvement. For example, I had the thing fettled top to bottom last year, and the bill came to more than the price of the car (not including modifications) - and I bought a good one to start with!
Having seen your TVR thread I'm sure you're more than up to solving any issues this might throw at you, but it's not a simple, modern, low-maintenance car.
One nice roadtrip, that. I really liked your Tasmin story, hope this will make another one.
I wouldn't get too disheartened about the niggles as long as the car doesn't keep throwing up new ones all the time. Just like C70R above I guess I got lucky with mine, in nearly 3 years of ownership apart from service items and things I've bought on a whim it only needed a few age-related bits replaced. They aren't Hondas bulletproof-wise but neither are they that complex and parts are cheap. They do get under your skin, I never intended to keep mine that long but each time you go out for a drive in the hills you realise it'd be hard to replace.
Check the coolant tank, they tend to split (replacements are cheap) and replace the dipstick with a metal aftermarket one, factory ones are made of cheese and tend to leave the bottom bit in the tube which is a PITA. Control arm rear bushes are a common fault and upgrade, PU like Powerflex are much easier to fit then factory-spec and will improve handling no-end if yours are shot.
Mine's also a carbon copy of your by the way, except for the tat I've bolted on.

I wouldn't get too disheartened about the niggles as long as the car doesn't keep throwing up new ones all the time. Just like C70R above I guess I got lucky with mine, in nearly 3 years of ownership apart from service items and things I've bought on a whim it only needed a few age-related bits replaced. They aren't Hondas bulletproof-wise but neither are they that complex and parts are cheap. They do get under your skin, I never intended to keep mine that long but each time you go out for a drive in the hills you realise it'd be hard to replace.
Check the coolant tank, they tend to split (replacements are cheap) and replace the dipstick with a metal aftermarket one, factory ones are made of cheese and tend to leave the bottom bit in the tube which is a PITA. Control arm rear bushes are a common fault and upgrade, PU like Powerflex are much easier to fit then factory-spec and will improve handling no-end if yours are shot.
Mine's also a carbon copy of your by the way, except for the tat I've bolted on.
It sounds like the car needs a little bit of love to sort out but if you got it for a good price and it's lowish miles then it should be worthwhile.
I used to not be fussed about mileage on a car but it makes selling it on so much easier down the line that I'm kind of going the other way now, a slightly unloved low mile car can be a better bet than a well loved high miler if you're willing to put in the time effort and expense to get it to a good condition.
I used to not be fussed about mileage on a car but it makes selling it on so much easier down the line that I'm kind of going the other way now, a slightly unloved low mile car can be a better bet than a well loved high miler if you're willing to put in the time effort and expense to get it to a good condition.
shalmaneser said:
It sounds like the car needs a little bit of love to sort out but if you got it for a good price and it's lowish miles then it should be worthwhile.
I used to not be fussed about mileage on a car but it makes selling it on so much easier down the line that I'm kind of going the other way now, a slightly unloved low mile car can be a better bet than a well loved high miler if you're willing to put in the time effort and expense to get it to a good condition.
The challenge with that is when talking about relatively ubiquitous cars like the R53, condition generally has more of a bearing on value than mileage. I used to not be fussed about mileage on a car but it makes selling it on so much easier down the line that I'm kind of going the other way now, a slightly unloved low mile car can be a better bet than a well loved high miler if you're willing to put in the time effort and expense to get it to a good condition.
So you could pour £2k into making a low mileage car 'great', and only realise a couple of hundred quid of that when you come to sell it. They aren't yet at a status where anything other than really special cars are worth more than £2-3k.
I love your Threads on Readers Cars, not just because you actually care enough to find out how things work, or that you are able to explain it well enough to teach other people how things work, or that you pick up interesting cars...
It's my nostalgia for NZ. I went there a lot on Container Ships in the late 1990's and haven't been back. Keep meaning to but its a bit far.
(Auckland, Wellington, Lyttleton, Port Chalmers, Napier)
Beautiful country and great stories.
It's my nostalgia for NZ. I went there a lot on Container Ships in the late 1990's and haven't been back. Keep meaning to but its a bit far.
(Auckland, Wellington, Lyttleton, Port Chalmers, Napier)
Beautiful country and great stories.
C70R said:
The challenge with that is when talking about relatively ubiquitous cars like the R53, condition generally has more of a bearing on value than mileage.
So you could pour £2k into making a low mileage car 'great', and only realise a couple of hundred quid of that when you come to sell it. They aren't yet at a status where anything other than really special cars are worth more than £2-3k.
For better or worse R53s are actually reasonably uncommon here, post 05 facelift ones especially. Even getting used parts for them isn't that easy, and wreckers want good money for parts that should be cheap.So you could pour £2k into making a low mileage car 'great', and only realise a couple of hundred quid of that when you come to sell it. They aren't yet at a status where anything other than really special cars are worth more than £2-3k.
R56s are a dime a dozen in contrast. It does mean that a good low mileage R53 is actually worth something here, but the market fluctuates a lot.
Sadly I didn't pay as little for this as I should have considering the condition, but that's the game you play with sight unseen cars. It will cost me money to get back into a condition I'm happy with (and happy to pass onto the next owner), and it's unlikely I'll see that money back, but I just have to make sure I get enough enjoyment out of it to make it worth it.
Powerflex control arm bushes are already on order through work, and new engine mounts, coil and leads are on route from the USA.
C70R said:
shalmaneser said:
It sounds like the car needs a little bit of love to sort out but if you got it for a good price and it's lowish miles then it should be worthwhile.
I used to not be fussed about mileage on a car but it makes selling it on so much easier down the line that I'm kind of going the other way now, a slightly unloved low mile car can be a better bet than a well loved high miler if you're willing to put in the time effort and expense to get it to a good condition.
The challenge with that is when talking about relatively ubiquitous cars like the R53, condition generally has more of a bearing on value than mileage. I used to not be fussed about mileage on a car but it makes selling it on so much easier down the line that I'm kind of going the other way now, a slightly unloved low mile car can be a better bet than a well loved high miler if you're willing to put in the time effort and expense to get it to a good condition.
So you could pour £2k into making a low mileage car 'great', and only realise a couple of hundred quid of that when you come to sell it. They aren't yet at a status where anything other than really special cars are worth more than £2-3k.
It's been like Christmas around here, with all my individually boxed RockAuto parts arriving for the Mini.
The good thing about common cars like these, that were basically the same in all markets, is that parts can be had for cheap. RockAuto stocks heaps of R53 parts at really good prices, so I went to town ordering a bunch of things I knew the car needed.
The obvious things I needed was a replacement hydraulic engine mount, as the old one had dumped its guts, a torque mount as I noticed it was a bit thumpy when I picked the car up, and a full ignition system refresh due to misfires.
I started with the ignition system refresh first, as this was easy and should have a pretty noticeable difference.
Started with a pretty OK looking system

Don't be fooled though, there be horrors lurking beneath.


Two cylinders had their leads wrapped in insulation tape (and rusty, despite being dry).
The spark plugs were well worn too. These are weird ones with a tiny little center electrode that is basically flush with the ceramic. Well, should be flush... a couple of mine were recessed, but all were looking very end of life.


The coil wasn't doing much better either. These are well known for the terminals corroding, and mine was no different. One of the first things I did when I got the car home was to clean the corrosion of the terminals, and I noticed a big reduction in misfires, but the terminals still didn't look good.


I decided to go with NGK BKR6E plugs gapped to 0.8mm as they are easy to get, easy to get to, and are cheap, so replacement in 10,000km isn't too much of an issue. 27NM is the correct torque for the plugs.
The new leads and coil were fitted, and a quick test start showed everything was working as it should

A short test drive, in the rain, showed that I had oodles more torque than before, and the misfire/shuddering was gone. The engine was very punchy in the mid-range. Traction was now suddenly an issue.
Next on the list was the thumpy old engine mounts.
This is all pretty straight forward, with the only small catch being the need to support the engine when the RH engine mount is removed.
The car was jacked up and supported on an axle stand. it still amuses me that these are so rigid and short that both wheels are off the ground on this side

Off came the wheel, and the jack was repositioned under the engine, using a block of rubber to spread the load.
There are a few bolts to undo up the top. Obviously the big main nut on the top, but there is also a little nut and bolt holding the ground strap to the mount (this is not a captive bolt, once the nut is off the bolt will fall out too). I didn't do anything with the black valve next to the ground strap bolt, this comes off once the mount bolt holding it on is removed.

There are two bolts at the front of the head

And two around the back

The last one up top is holding the mount to the body

Once they are all loose, the engine will no longer be supported, it will float around freely on the jack.
Now, move into the front RH wheel well, and remove a couple of clips from the liner. You don't need to remove the whole thing, just free it up so you can get your arm behind it


The bolt you need to access is behind the liner, on the underside of the chassis rail. It's an E12 E-Torx bolt, and located about here, going vertically up into the underside of the mount. I found cracking it with a bar and then using a cordless ratchet was the easiest, as its a very long bolt and quite tight. They can rust in place, and are torque to yield, so have a replacement ready. Be aware that if the mount is leaking, a bunch of smelly oil is going to decide it wants to pour out of the hole where the bolt is coming out of and all down you tools/arm.

With all the bolts out, the top mount bracket can be removed, as can the mount, leaving a whole bunch of mess to clean up.


Installing the new mount is basically the reverse of removal. Just leave everything finger tight until all the bolts are in place, and then torque them up together.
The four bolts that hold the bracket to the head are 74 ft-lbs
And the engine mount bracket to engine mount nut is 50 ft-lbs
Next was the lower engine torque mount.

Apparently you can get away with just undoing the two main bolts holding the mount in, but I couldn't seem to slip it out, so had to also remove the 4 smaller bolts holding the bracket to the sump.
With it out it was easy to replace the mount, and bolt it all back together. A quick and easy job. The two large bolts are 74 ft-lbs, whilst the little ones are about 28 ft-lbs.
It's clear to see why the old mount was due for replacement


With the major work done, I carried on with a couple of smaller things. I wanted to check the air filter since I wasn't too confident on the rest of the servicing, and sure enough, it was absolutely packed with dirt. The good thing though, is its a reusable K&N filter, and I happen to have a cleaning kit, so that got a thorough clean and oil before refitting. Score.

I also fit a boot light with LED, since for some reason that was completely missing, as well as the storage tray that should live in front of the cup holders in the center console. No photos, they aren't exciting, but are very useful.
The last thing I tinkered with was the headlights. They were yellow and cloudy, which ruined the projector beam and made the terrible blue bulbs work even worse.
Using a foam ball on my drill, and some PlastX polish, I went from this


To this


BIG difference. The other side got a polish too.


They look almost new. A great result from this little guy

After all this work I took the car for a good drive over some twisty roads. The thumping and banging is 90% gone, I suspect the only way to completely remove it is with poly bushes, but I'm not going down that track. The misfire is also completely gone, and the engine pulls smoothly, and strongly no matter the RPM. It's now a fight with DSC when driving hard, trying to keep the wheels from spinning.
All in all, some good maintenance. I suspect it's been a while since it last had anything more than an oil and filter change.
The good thing about common cars like these, that were basically the same in all markets, is that parts can be had for cheap. RockAuto stocks heaps of R53 parts at really good prices, so I went to town ordering a bunch of things I knew the car needed.
The obvious things I needed was a replacement hydraulic engine mount, as the old one had dumped its guts, a torque mount as I noticed it was a bit thumpy when I picked the car up, and a full ignition system refresh due to misfires.
I started with the ignition system refresh first, as this was easy and should have a pretty noticeable difference.
Started with a pretty OK looking system

Don't be fooled though, there be horrors lurking beneath.


Two cylinders had their leads wrapped in insulation tape (and rusty, despite being dry).
The spark plugs were well worn too. These are weird ones with a tiny little center electrode that is basically flush with the ceramic. Well, should be flush... a couple of mine were recessed, but all were looking very end of life.


The coil wasn't doing much better either. These are well known for the terminals corroding, and mine was no different. One of the first things I did when I got the car home was to clean the corrosion of the terminals, and I noticed a big reduction in misfires, but the terminals still didn't look good.


I decided to go with NGK BKR6E plugs gapped to 0.8mm as they are easy to get, easy to get to, and are cheap, so replacement in 10,000km isn't too much of an issue. 27NM is the correct torque for the plugs.
The new leads and coil were fitted, and a quick test start showed everything was working as it should

A short test drive, in the rain, showed that I had oodles more torque than before, and the misfire/shuddering was gone. The engine was very punchy in the mid-range. Traction was now suddenly an issue.
Next on the list was the thumpy old engine mounts.
This is all pretty straight forward, with the only small catch being the need to support the engine when the RH engine mount is removed.
The car was jacked up and supported on an axle stand. it still amuses me that these are so rigid and short that both wheels are off the ground on this side

Off came the wheel, and the jack was repositioned under the engine, using a block of rubber to spread the load.
There are a few bolts to undo up the top. Obviously the big main nut on the top, but there is also a little nut and bolt holding the ground strap to the mount (this is not a captive bolt, once the nut is off the bolt will fall out too). I didn't do anything with the black valve next to the ground strap bolt, this comes off once the mount bolt holding it on is removed.

There are two bolts at the front of the head

And two around the back

The last one up top is holding the mount to the body

Once they are all loose, the engine will no longer be supported, it will float around freely on the jack.
Now, move into the front RH wheel well, and remove a couple of clips from the liner. You don't need to remove the whole thing, just free it up so you can get your arm behind it


The bolt you need to access is behind the liner, on the underside of the chassis rail. It's an E12 E-Torx bolt, and located about here, going vertically up into the underside of the mount. I found cracking it with a bar and then using a cordless ratchet was the easiest, as its a very long bolt and quite tight. They can rust in place, and are torque to yield, so have a replacement ready. Be aware that if the mount is leaking, a bunch of smelly oil is going to decide it wants to pour out of the hole where the bolt is coming out of and all down you tools/arm.

With all the bolts out, the top mount bracket can be removed, as can the mount, leaving a whole bunch of mess to clean up.


Installing the new mount is basically the reverse of removal. Just leave everything finger tight until all the bolts are in place, and then torque them up together.
The four bolts that hold the bracket to the head are 74 ft-lbs
And the engine mount bracket to engine mount nut is 50 ft-lbs
Next was the lower engine torque mount.

Apparently you can get away with just undoing the two main bolts holding the mount in, but I couldn't seem to slip it out, so had to also remove the 4 smaller bolts holding the bracket to the sump.
With it out it was easy to replace the mount, and bolt it all back together. A quick and easy job. The two large bolts are 74 ft-lbs, whilst the little ones are about 28 ft-lbs.
It's clear to see why the old mount was due for replacement


With the major work done, I carried on with a couple of smaller things. I wanted to check the air filter since I wasn't too confident on the rest of the servicing, and sure enough, it was absolutely packed with dirt. The good thing though, is its a reusable K&N filter, and I happen to have a cleaning kit, so that got a thorough clean and oil before refitting. Score.

I also fit a boot light with LED, since for some reason that was completely missing, as well as the storage tray that should live in front of the cup holders in the center console. No photos, they aren't exciting, but are very useful.
The last thing I tinkered with was the headlights. They were yellow and cloudy, which ruined the projector beam and made the terrible blue bulbs work even worse.
Using a foam ball on my drill, and some PlastX polish, I went from this


To this


BIG difference. The other side got a polish too.


They look almost new. A great result from this little guy

After all this work I took the car for a good drive over some twisty roads. The thumping and banging is 90% gone, I suspect the only way to completely remove it is with poly bushes, but I'm not going down that track. The misfire is also completely gone, and the engine pulls smoothly, and strongly no matter the RPM. It's now a fight with DSC when driving hard, trying to keep the wheels from spinning.
All in all, some good maintenance. I suspect it's been a while since it last had anything more than an oil and filter change.
In an effort to stamp out the issues this car has, it was time to tackle the most serious issue; The front control arm bushes.
It was noted in the PPI from the seller that the front control arm bushes were "split". What it didn't mention was that they are completely buggered.
This would become a WOF issue in the near future, and wouldn't be helping the handing, so I had to fix it. Its a well known issue with the R5x Mini, and fairly easy to test by kicking the front of the front wheel and seeing how far back it bounces. Kicking my wheel revealed a ton of play.
The internet widely regards the Powerflex PFF5-101 as the solution to all issues with the control arm bushes. Not only is it an upgraded poly bush, but it'll last for ages and is much easier to press into the housing than the OEM metal sleeve bush. The Powerflex bush is a three-piece design and doesn't need to be located in a certain location like the OEM ones.

The original plan was to replace the bushes without removing the front subframe. This turned out to be the wrong idea as I just couldn't get the control arm to break off the taper of the inner ball joint, and as it turns out, all the ball joints were all stuffed and needed replacing too. You cannot remove the inner balljoint without lowering the subframe to some degree (and even if you could break the 100NM bolts free with limited space, you would have issues torquing them up again), so it's easier just to drop the subframe completely. It's not much more work to drop the whole subframe.
My Quickjacks were perfect for this job, fitting the Mini jacking points and giving me a decent working height. You wouldn't want it any lower than this, or there may be clearance issues when pulling the subframe out from under the car.

Obviously the first step once in the air is to get rid of the front wheels. It's amazing what these little 15" wheels and runflats weigh, they're probably the heaviest wheels I've had, and I've had those horrible things on the M328i and MX5.
With the front wheels off it's time to start popping the ball joints. The tie rod end, swaybar link, and outer ball joints all need to be disconnected.


I used the old loosen the nut and hit with a hammer method to remove these, but since I now have a splitter kit I will be using that from now on

The inner joint I just could not pop. No amount of hammering would split the taper

This is the point I just decided to drop the whole subframe. Thankfully the engine isn't mounted on the subframe, so its a matter of dropping the subframe with the steering rack attached and that's really it. There is a bunch of stuff that needs to be disconnected but otherwise it's all straight forward.
One very helpful resource for this job is the Mod MINI Youtube channel. There is a specific video for doing this job, which I followed along as I went.
http://youtu.be/lrtq4qFT4Tc
To remove the subframe you need to remove the front bumper. Sounds weird, but the front crash tubes are attached to the subframe.


And the crash beam needs to be removed next


This is more or less the Service Mode for the front end. If you needed to do the radiator or supercharger, this is the minimum work you would need to do.
With the beam off, unbolt the crash tubes, remove them, and start to unbolt the subframe. Don't forget to disconnect the ABS sensors from the subframe uprights, and the power steering pump. Check your O2 sensor wiring isn't clipped the to the PS hoses under the reservoir. Support the subframe on a jack with some wood to spread the load, and lower it down.

That's it out. Now there is ample access to the arms, bushes and joints.
This is the bd. Unbolting these two bolts, and the two on the swaybar mount will allow you to remove the arm complete with bush and ball joint. Do note that if you have Xenon lights as I do, the sensor attached to the ball joint in the photos below is the auto levelling sensor. You MUST fit the correct sided ball joint to the arm (it has a locating hole drilled in it), and remember to fit this sensor during reassembly, as you'll be dropping the subframe again if you don't. There is also a small 10mm holding the sensor arm to the control arm, which will need to be removed.

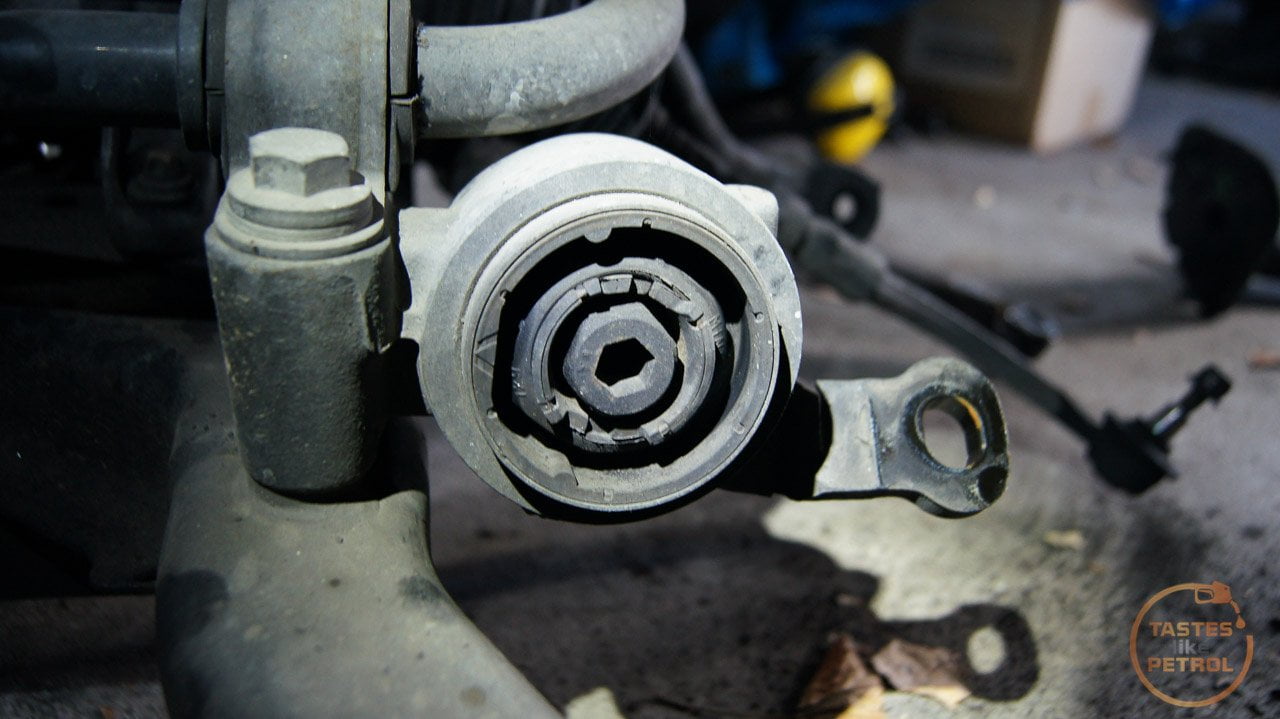
The bushes are well buggered. Both have little to no resistance to the arm being moved around, and you can see through the rubber in one. I'm not sure "split" is the word I would use if I were doing the PPI.

With the arms removed and on the bench I could try popping the taper of the inner ball joint.
First I tried a normal splitter. It just wasn't big enough, even with some modification with a grinder. The inner joint is quite limited in its access, and needs both a long reach splitter and one that opens wide.

This resulted in me spending some more money and buying a kit of splitters, which had slightly larger splitter like the above, but that just kept popping off. The real deal was this big boy press with adjustable arms. It clamped perfectly onto the arm and with some rattle gun hammering, the splitter fell off.

I thought it had slipped off, but it actually fell off when the taper popped on the joint. Finally!

Removing them confirmed to me that I made the right decision; The inner joints were stuffed. Very floppy with almost no resistance. In contrast, the new ones are very stiff.
In went the new ball joints torqued to 80NM.

Next was to tackle the bushes. The obvious thing here is that you need to press the bushes off the arms first. If they were bad enough you might be able to just pull the outer part of the bush off leaving the inner on the arm, but mine needed to be levered off in one piece. This was done with my biggest prybar, levering between the bush and the flat on the arm.
These are a metal sleeve bush pressed into a housing. This is what I was dealing with, big splits in the rubber all around and very little resistance to movement. Apparently these are fluid filled originally, but I couldn't see any fluid left in them.


They were the original bushes

To remove them, either use a big workshop press, or a reciprocating saw and metal blade. I chose the latter.
There are two layers. The first is the inner rubber section, which also has its own metal sleeve in it. Using your saw, cut through this until you can use a chisel to force it out of the outer metal sleeve.


Once that's out, carefully cut a slot into the outer metal sleeve. You don't want to cut into the housing. With the slot cut into the sleeve, it was easy to use a chisel to push the sleeve out


Now it was time to press in the new bushes. I used a length of m12 rod, some washers and a pair of 15mm galv flanges as a makeshift press. This worked perfectly.

A deadblow hammer was employed to push the bush in just that little bit more to make the lip pop out the other side


Using lot of the supplied grease, grease the bush and fit the purple insert. Fit the washer to the arm, and then slip the arm into the bush. Done. A pair of reconditioned arms.


Before I could reassemble I decided to replace the outer ball joints, and swaybar bushes.
The swaybar bushes weren't too bad, a little smooth but minimal play and no cracking. They were the original bushes. I tried to get some poly bushes for this, but couldn't get any locally, and didn't have the time to order from overseas. The 24mm MCS standard bar seems to be odd, as few places listed that size, instead only having the smaller Non-S bushes listed.


Torquing up the inner ball joint and swaybar bolts was a battle. The ball joint bolts were 100NM, which is quite a bit, but the swaybar/control arm bush mount bolts need 165NM. I had to get the help of my lovely Wife to stabilise the subframe whilst I swung off the torque wrench. I think that is the highest my torque wrench has been.
The last thing to do was the outer ball joints. These are a pain because they press into the bottom of the knuckle, and are exposed at the top, allowing them to rust into the housing. There is also limited access.
I managed to get the old ones out by using a punch and hitting the exposed parts of the flange. You can see the two shiny areas where I was hitting.

You can see the rust that was binding it in place. I have heard of people replacing knuckles because their joints just would not come out

One of the old joints was very loose and the other was actually OK. Best to replace in pairs though.
I greased the surfaces of the new joints thoroughly and used the bolts to slowly draw it into the knuckle. Hopefully this one won't seize in there.

Now that the subframe was complete, it was time to refit


Remember to reconnect the power steering wiring and feed the PS res back up through the gap.
Don't forget to torque everything up. Refer to your workshop manual for torque settings as there are a few. The gist is that the big bolts are 100NM, the small bolts/joints are 56NM.
The previous owner identified that the power steering fan wasn't working, so included a replacement with the car. Since you have to remove this to remove the subframe, it was a good time to replace it.
Four screws hold the fan in place. The old one was very gritty to spin.

A quick dip through the parts washer to get all the old dirt and grease/oil off the bracket, and on went the replacement fan.


Another reason the fan wasn't working was the low speed on the radiator fan also wasn't working, and the two are linked. A quick check at the radiator fan plug showed an open circuit on the radiator fan resistor, indicating the resistor had failed. Another common issue, and something the previous owner was preparing for as the car also came with an external replacement resistor.
This external resistor mod is a common way to fix this issue without having to remove the radiator fan shroud, which requires a lot more work. It also allows the resistor to use the car body as a heatsink, and keeps it out of the path of weather, which is generally what kills the old resistors.
A quick snip of the wire, some soldering, and the resistor was wired and mounted to an existing unused threaded hole.


There is plenty more information out there on this mod, but a good thread is this one. The low speed fan now operates correctly when the AC is running, but I still haven't seen the PS fan operating. I'll need to keep an eye on that. I did replace a blown 5A fuse for the fan, so need to check if that blew again.
A couple of other small things I did before taking the car for a test run, was the replace the cabin filter. The old one was manky as hell. Packed with dirt and leaves.


I also fit the replacement vinyl red S logos that were missing from the car. Just looked weird with no colour on the rear and sides. I purchased them from this Etsy store. They have a whole range of different colours available.


And finally, I replaced the park light bulbs with LED. I noticed when I had the front off the car that there are resistors tied into the park light wiring. I guess this is why the park lights were always super dim with the bulbs. I can only presume this was done in Japan and the LEDs were removed for compliance during import. The resistors will be there to trick the car into thinking the bulb is OK, otherwise it will usually trip a blown bulb warning with LEDs.
After all that, the results were almost immediate. There is far less play in the steering, its nice and tight now and the car kinda rotates on its own axis when turning. This is a feature I remember from my old R50, but this car hasn't felt like that until now, it always felt unsure and vague.
The thumping coming on and off accelerating is greatly lessened, and changing gears feels more direct. There must've been some sort of clunking or noise previously as there is that feeling of "huh, suddenly the car is quieter" even though I don't recall any noise when driving; much like when I did the rear arms in the Saab.
It's a lot more fun to drive. Much more surefooted and confident. It's what a Mini should drive like.
I can highly recommend refreshing the front end if it hasn't been done before. Even with only 127,000km on this car, it was all very worn out.
I'm starting to feel less disappointment and regret with this car. It's just a shame its costing time and money to put it right just so I can enjoy it.

It was noted in the PPI from the seller that the front control arm bushes were "split". What it didn't mention was that they are completely buggered.
This would become a WOF issue in the near future, and wouldn't be helping the handing, so I had to fix it. Its a well known issue with the R5x Mini, and fairly easy to test by kicking the front of the front wheel and seeing how far back it bounces. Kicking my wheel revealed a ton of play.
The internet widely regards the Powerflex PFF5-101 as the solution to all issues with the control arm bushes. Not only is it an upgraded poly bush, but it'll last for ages and is much easier to press into the housing than the OEM metal sleeve bush. The Powerflex bush is a three-piece design and doesn't need to be located in a certain location like the OEM ones.

The original plan was to replace the bushes without removing the front subframe. This turned out to be the wrong idea as I just couldn't get the control arm to break off the taper of the inner ball joint, and as it turns out, all the ball joints were all stuffed and needed replacing too. You cannot remove the inner balljoint without lowering the subframe to some degree (and even if you could break the 100NM bolts free with limited space, you would have issues torquing them up again), so it's easier just to drop the subframe completely. It's not much more work to drop the whole subframe.
My Quickjacks were perfect for this job, fitting the Mini jacking points and giving me a decent working height. You wouldn't want it any lower than this, or there may be clearance issues when pulling the subframe out from under the car.

Obviously the first step once in the air is to get rid of the front wheels. It's amazing what these little 15" wheels and runflats weigh, they're probably the heaviest wheels I've had, and I've had those horrible things on the M328i and MX5.
With the front wheels off it's time to start popping the ball joints. The tie rod end, swaybar link, and outer ball joints all need to be disconnected.


I used the old loosen the nut and hit with a hammer method to remove these, but since I now have a splitter kit I will be using that from now on

The inner joint I just could not pop. No amount of hammering would split the taper

This is the point I just decided to drop the whole subframe. Thankfully the engine isn't mounted on the subframe, so its a matter of dropping the subframe with the steering rack attached and that's really it. There is a bunch of stuff that needs to be disconnected but otherwise it's all straight forward.
One very helpful resource for this job is the Mod MINI Youtube channel. There is a specific video for doing this job, which I followed along as I went.
http://youtu.be/lrtq4qFT4Tc
To remove the subframe you need to remove the front bumper. Sounds weird, but the front crash tubes are attached to the subframe.


And the crash beam needs to be removed next


This is more or less the Service Mode for the front end. If you needed to do the radiator or supercharger, this is the minimum work you would need to do.
With the beam off, unbolt the crash tubes, remove them, and start to unbolt the subframe. Don't forget to disconnect the ABS sensors from the subframe uprights, and the power steering pump. Check your O2 sensor wiring isn't clipped the to the PS hoses under the reservoir. Support the subframe on a jack with some wood to spread the load, and lower it down.

That's it out. Now there is ample access to the arms, bushes and joints.
This is the b
d. Unbolting these two bolts, and the two on the swaybar mount will allow you to remove the arm complete with bush and ball joint. Do note that if you have Xenon lights as I do, the sensor attached to the ball joint in the photos below is the auto levelling sensor. You MUST fit the correct sided ball joint to the arm (it has a locating hole drilled in it), and remember to fit this sensor during reassembly, as you'll be dropping the subframe again if you don't. There is also a small 10mm holding the sensor arm to the control arm, which will need to be removed.
The bushes are well buggered. Both have little to no resistance to the arm being moved around, and you can see through the rubber in one. I'm not sure "split" is the word I would use if I were doing the PPI.


With the arms removed and on the bench I could try popping the taper of the inner ball joint.
First I tried a normal splitter. It just wasn't big enough, even with some modification with a grinder. The inner joint is quite limited in its access, and needs both a long reach splitter and one that opens wide.

This resulted in me spending some more money and buying a kit of splitters, which had slightly larger splitter like the above, but that just kept popping off. The real deal was this big boy press with adjustable arms. It clamped perfectly onto the arm and with some rattle gun hammering, the splitter fell off.

I thought it had slipped off, but it actually fell off when the taper popped on the joint. Finally!

Removing them confirmed to me that I made the right decision; The inner joints were stuffed. Very floppy with almost no resistance. In contrast, the new ones are very stiff.
In went the new ball joints torqued to 80NM.

Next was to tackle the bushes. The obvious thing here is that you need to press the bushes off the arms first. If they were bad enough you might be able to just pull the outer part of the bush off leaving the inner on the arm, but mine needed to be levered off in one piece. This was done with my biggest prybar, levering between the bush and the flat on the arm.
These are a metal sleeve bush pressed into a housing. This is what I was dealing with, big splits in the rubber all around and very little resistance to movement. Apparently these are fluid filled originally, but I couldn't see any fluid left in them.


They were the original bushes

To remove them, either use a big workshop press, or a reciprocating saw and metal blade. I chose the latter.
There are two layers. The first is the inner rubber section, which also has its own metal sleeve in it. Using your saw, cut through this until you can use a chisel to force it out of the outer metal sleeve.


Once that's out, carefully cut a slot into the outer metal sleeve. You don't want to cut into the housing. With the slot cut into the sleeve, it was easy to use a chisel to push the sleeve out


Now it was time to press in the new bushes. I used a length of m12 rod, some washers and a pair of 15mm galv flanges as a makeshift press. This worked perfectly.

A deadblow hammer was employed to push the bush in just that little bit more to make the lip pop out the other side


Using lot of the supplied grease, grease the bush and fit the purple insert. Fit the washer to the arm, and then slip the arm into the bush. Done. A pair of reconditioned arms.


Before I could reassemble I decided to replace the outer ball joints, and swaybar bushes.
The swaybar bushes weren't too bad, a little smooth but minimal play and no cracking. They were the original bushes. I tried to get some poly bushes for this, but couldn't get any locally, and didn't have the time to order from overseas. The 24mm MCS standard bar seems to be odd, as few places listed that size, instead only having the smaller Non-S bushes listed.


Torquing up the inner ball joint and swaybar bolts was a battle. The ball joint bolts were 100NM, which is quite a bit, but the swaybar/control arm bush mount bolts need 165NM. I had to get the help of my lovely Wife to stabilise the subframe whilst I swung off the torque wrench. I think that is the highest my torque wrench has been.
The last thing to do was the outer ball joints. These are a pain because they press into the bottom of the knuckle, and are exposed at the top, allowing them to rust into the housing. There is also limited access.
I managed to get the old ones out by using a punch and hitting the exposed parts of the flange. You can see the two shiny areas where I was hitting.

You can see the rust that was binding it in place. I have heard of people replacing knuckles because their joints just would not come out

One of the old joints was very loose and the other was actually OK. Best to replace in pairs though.
I greased the surfaces of the new joints thoroughly and used the bolts to slowly draw it into the knuckle. Hopefully this one won't seize in there.

Now that the subframe was complete, it was time to refit


Remember to reconnect the power steering wiring and feed the PS res back up through the gap.
Don't forget to torque everything up. Refer to your workshop manual for torque settings as there are a few. The gist is that the big bolts are 100NM, the small bolts/joints are 56NM.
The previous owner identified that the power steering fan wasn't working, so included a replacement with the car. Since you have to remove this to remove the subframe, it was a good time to replace it.
Four screws hold the fan in place. The old one was very gritty to spin.

A quick dip through the parts washer to get all the old dirt and grease/oil off the bracket, and on went the replacement fan.


Another reason the fan wasn't working was the low speed on the radiator fan also wasn't working, and the two are linked. A quick check at the radiator fan plug showed an open circuit on the radiator fan resistor, indicating the resistor had failed. Another common issue, and something the previous owner was preparing for as the car also came with an external replacement resistor.
This external resistor mod is a common way to fix this issue without having to remove the radiator fan shroud, which requires a lot more work. It also allows the resistor to use the car body as a heatsink, and keeps it out of the path of weather, which is generally what kills the old resistors.
A quick snip of the wire, some soldering, and the resistor was wired and mounted to an existing unused threaded hole.


There is plenty more information out there on this mod, but a good thread is this one. The low speed fan now operates correctly when the AC is running, but I still haven't seen the PS fan operating. I'll need to keep an eye on that. I did replace a blown 5A fuse for the fan, so need to check if that blew again.
A couple of other small things I did before taking the car for a test run, was the replace the cabin filter. The old one was manky as hell. Packed with dirt and leaves.


I also fit the replacement vinyl red S logos that were missing from the car. Just looked weird with no colour on the rear and sides. I purchased them from this Etsy store. They have a whole range of different colours available.


And finally, I replaced the park light bulbs with LED. I noticed when I had the front off the car that there are resistors tied into the park light wiring. I guess this is why the park lights were always super dim with the bulbs. I can only presume this was done in Japan and the LEDs were removed for compliance during import. The resistors will be there to trick the car into thinking the bulb is OK, otherwise it will usually trip a blown bulb warning with LEDs.

After all that, the results were almost immediate. There is far less play in the steering, its nice and tight now and the car kinda rotates on its own axis when turning. This is a feature I remember from my old R50, but this car hasn't felt like that until now, it always felt unsure and vague.
The thumping coming on and off accelerating is greatly lessened, and changing gears feels more direct. There must've been some sort of clunking or noise previously as there is that feeling of "huh, suddenly the car is quieter" even though I don't recall any noise when driving; much like when I did the rear arms in the Saab.
It's a lot more fun to drive. Much more surefooted and confident. It's what a Mini should drive like.
I can highly recommend refreshing the front end if it hasn't been done before. Even with only 127,000km on this car, it was all very worn out.
I'm starting to feel less disappointment and regret with this car. It's just a shame its costing time and money to put it right just so I can enjoy it.

Suspension bush refreshes are often overlooked when replacing/updating springs & dampers & make a huge difference.
When I did the motor mounts in my Integra I also fitted some poly inserts- drivetrain shunt is now zero & the handling benefits from the engine not moving about. Feels a solid part of the chassis now. Makes for such a difference at low cost and highly recommended.
When I did the motor mounts in my Integra I also fitted some poly inserts- drivetrain shunt is now zero & the handling benefits from the engine not moving about. Feels a solid part of the chassis now. Makes for such a difference at low cost and highly recommended.
KelvinatorNZ said:
bolidemichael said:
You didn't mention having protected the headlight lenses with a UV sealant after having polished them.
That's because I didn't 
Not too bothered if I need to polish them again every few months and not something I have handy.

Finally, It looks like I might be coming to the end of fixing the previous owners neglect and bodges.
When I first got the car and drove it home it shook like crazy under any acceleration. This turned out to mostly be the coil, leads and plugs that had done their dash. Once they were replaced the shaking got a lot better, except under a couple of conditions.
The worst was when I'd pull out, foot flat, to pass another car around a bend. The whole car would vibrate, but this time there was no loss of power and the engine was pulling hard. It was something else, and I had my suspicions.
One of the items on the PPI was the "RH Inner CV boot coming off". The previous owner took this as the need to replace the clamp on the boot, which he did before I collected the car.
I noticed when I had the front subframe off that it was covered in grease, and the clamp the previous owner had fitted to the boot wasn't a CV boot clamp (a narrow thin metal strap) but instead a standard hose clamp. I guess it was working as the boot was still there, but everything in the vicinity was greasy. I decided to remove the hose clamp and fit a proper clamp, but thought I should check inside the CV joint and see how much grease was in it first.
I slid the boot back, and nothing. A small smear of grease on the tripod, but otherwise it was running dry. The cup also appeared to show signs of discolouration from heat. bks.
Holding the inner CV cup in one hand, and twisting the axle or outer CV resulted in a defined click and visible movement in the inner CV. Double bks.
CVs do not like to run dry. It's the second quickest way to kill them. The first would be to replace the grease with grinding paste.
Since I didn't have a spare joint or axle at hand I packed the joint with grease and refit the boot with a proper clamp, just in the hopes it might be a bit better and keep going. It wasn't better, but at least it didn't get worse. Since new inner CV joints aren't available a new RH axle was ordered from RockAuto.
The axle arrived the other day and it was time to crack on and replace it.
Car went up on Quickjacks, wheel was taken off and then the axle nut threw up the first battle. These are tight, and the staking on the nut needs to be straightened out to help spin it off. After some bashing and rattling, it gave way and we were on a roll.

With the nut off I could already tell the splines were free in the hub, not rusted and seized like some. Winning.
To get the outer CV out of the hub you will need to swing the hub outwards. To do this the lower ball joint and tie rod end need to be disconnected. This was easy to do since the ball joint was new, and the tie rod end recently disconnected.
The PS fan and lower torque mount need to be removed to access the bolts that hold the hanger bearing in place

Now the hanger bearing bolts can be attacked. Two are easy to get at (one partly loosened already in photo) with a ratcheting spanner, but the other (LH side of photo) is tucked up behind the axle with limited room. A ratcheting spanner is a must here, and it will eventually come out far enough to remove with your fingertips

Next swing the hub outwards and slide the outer CV out of the hub and let it hang freely.
Now it's just a case of pulling the shaft out of the gearbox. I gave the hanger bearing a couple of taps with a hammer and the axle slid right on out. No oil came out of the gearbox, but apparently, if the car isn't level it can leak once the shaft is removed.
Wiggle the shaft out, spinning the hanger bearing to clear everything it tries to get stuck on

Easy.
Since the replacement shaft I got is aftermarket and not genuine, the hanger bearing housing will need to be transferred over. To the workbench we go.
This housing is held in place with a large internal circlip

Awesome, I thought, I can finally use the sweet circlip pliers I bought ages ago.

They're rubbish. Too short and too floppy due to their design. Don't bother with interchangeable ones, just get a proper pair of single purpose pliers. Like these, which I had to run out and buy for this job

And they worked a treat

Before removing the housing I also needed to transfer over the little dust shield, so to stop that being damaged by the housing I used a hammer to carefully tap it off

The hammer was once again employed to bash the housing off. It's a bit of a light press fit on the bearing, but will come off with some hitting in various places around the perimeter.

Now it was time to build up the new shaft. Mmmmm, shiny.

Refit the circlip first. Trust me, its a lot easier than doing it once you have hammered the housing onto the bearing. Then the housing goes on, as does the dust shield. Ensure the circlip is correctly seated in the groove.


Its pretty decent quality considering it costs so little. The boots are all soft rubber, the splines are nicely cut, and the CV joints are all nice and tight. There is zero play when twisting the shift, unlike the old one.

Refitting is simply a case of carefully slipping it back into place, making sure that the hanger bearing housing is rotated the correct way before slipping the shaft into the box. Ram it home, bolt the bearing into place, slip the outer CV into the hub, and reassemble everything else.
The hub nut is about 180nm, so I got my favourite helper down into the garage to sit in the car and stomp on the brakes whilst I swung off the torque wrench. Stake the nut, and that part is done.
Before fully reassembling I took the chance to fit a SuperPro insert into the lower torque mount. The mount was new, but it still felt a bit soft to me and there was some thumping when coming on and off the gas, or changing gears. SPF2426K

These are just inserts that fill the voids in the standard mount. Easy to fit, just slip them into the mount and refit.


The results of the work are all pretty immediate. The axle has completely removed the shuddering when accelerating, it is like a new car. I can push it as hard as I want around corners and nothing. The mount insert is also fairly obvious. The car feels a lot more direct and connected not. The gearshift is tighter, and the thumping has near enough gone. There is some vibration in the cabin at low RPM, but I think that was there beforehand. Well worth it for a simple upgrade. You could probably use it on an old, slightly torn, mount too.
I'm very happy to finally be at the end of fixing the issues that the car should not have even had. Now I can enjoy the car without worrying it will shake its self to bits.
When I first got the car and drove it home it shook like crazy under any acceleration. This turned out to mostly be the coil, leads and plugs that had done their dash. Once they were replaced the shaking got a lot better, except under a couple of conditions.
The worst was when I'd pull out, foot flat, to pass another car around a bend. The whole car would vibrate, but this time there was no loss of power and the engine was pulling hard. It was something else, and I had my suspicions.
One of the items on the PPI was the "RH Inner CV boot coming off". The previous owner took this as the need to replace the clamp on the boot, which he did before I collected the car.
I noticed when I had the front subframe off that it was covered in grease, and the clamp the previous owner had fitted to the boot wasn't a CV boot clamp (a narrow thin metal strap) but instead a standard hose clamp. I guess it was working as the boot was still there, but everything in the vicinity was greasy. I decided to remove the hose clamp and fit a proper clamp, but thought I should check inside the CV joint and see how much grease was in it first.
I slid the boot back, and nothing. A small smear of grease on the tripod, but otherwise it was running dry. The cup also appeared to show signs of discolouration from heat. b
ks.Holding the inner CV cup in one hand, and twisting the axle or outer CV resulted in a defined click and visible movement in the inner CV. Double b
ks.CVs do not like to run dry. It's the second quickest way to kill them. The first would be to replace the grease with grinding paste.
Since I didn't have a spare joint or axle at hand I packed the joint with grease and refit the boot with a proper clamp, just in the hopes it might be a bit better and keep going. It wasn't better, but at least it didn't get worse. Since new inner CV joints aren't available a new RH axle was ordered from RockAuto.
The axle arrived the other day and it was time to crack on and replace it.
Car went up on Quickjacks, wheel was taken off and then the axle nut threw up the first battle. These are tight, and the staking on the nut needs to be straightened out to help spin it off. After some bashing and rattling, it gave way and we were on a roll.

With the nut off I could already tell the splines were free in the hub, not rusted and seized like some. Winning.
To get the outer CV out of the hub you will need to swing the hub outwards. To do this the lower ball joint and tie rod end need to be disconnected. This was easy to do since the ball joint was new, and the tie rod end recently disconnected.
The PS fan and lower torque mount need to be removed to access the bolts that hold the hanger bearing in place

Now the hanger bearing bolts can be attacked. Two are easy to get at (one partly loosened already in photo) with a ratcheting spanner, but the other (LH side of photo) is tucked up behind the axle with limited room. A ratcheting spanner is a must here, and it will eventually come out far enough to remove with your fingertips

Next swing the hub outwards and slide the outer CV out of the hub and let it hang freely.
Now it's just a case of pulling the shaft out of the gearbox. I gave the hanger bearing a couple of taps with a hammer and the axle slid right on out. No oil came out of the gearbox, but apparently, if the car isn't level it can leak once the shaft is removed.
Wiggle the shaft out, spinning the hanger bearing to clear everything it tries to get stuck on

Easy.
Since the replacement shaft I got is aftermarket and not genuine, the hanger bearing housing will need to be transferred over. To the workbench we go.
This housing is held in place with a large internal circlip

Awesome, I thought, I can finally use the sweet circlip pliers I bought ages ago.

They're rubbish. Too short and too floppy due to their design. Don't bother with interchangeable ones, just get a proper pair of single purpose pliers. Like these, which I had to run out and buy for this job

And they worked a treat

Before removing the housing I also needed to transfer over the little dust shield, so to stop that being damaged by the housing I used a hammer to carefully tap it off

The hammer was once again employed to bash the housing off. It's a bit of a light press fit on the bearing, but will come off with some hitting in various places around the perimeter.

Now it was time to build up the new shaft. Mmmmm, shiny.

Refit the circlip first. Trust me, its a lot easier than doing it once you have hammered the housing onto the bearing. Then the housing goes on, as does the dust shield. Ensure the circlip is correctly seated in the groove.


Its pretty decent quality considering it costs so little. The boots are all soft rubber, the splines are nicely cut, and the CV joints are all nice and tight. There is zero play when twisting the shift, unlike the old one.

Refitting is simply a case of carefully slipping it back into place, making sure that the hanger bearing housing is rotated the correct way before slipping the shaft into the box. Ram it home, bolt the bearing into place, slip the outer CV into the hub, and reassemble everything else.
The hub nut is about 180nm, so I got my favourite helper down into the garage to sit in the car and stomp on the brakes whilst I swung off the torque wrench. Stake the nut, and that part is done.
Before fully reassembling I took the chance to fit a SuperPro insert into the lower torque mount. The mount was new, but it still felt a bit soft to me and there was some thumping when coming on and off the gas, or changing gears. SPF2426K

These are just inserts that fill the voids in the standard mount. Easy to fit, just slip them into the mount and refit.


The results of the work are all pretty immediate. The axle has completely removed the shuddering when accelerating, it is like a new car. I can push it as hard as I want around corners and nothing. The mount insert is also fairly obvious. The car feels a lot more direct and connected not. The gearshift is tighter, and the thumping has near enough gone. There is some vibration in the cabin at low RPM, but I think that was there beforehand. Well worth it for a simple upgrade. You could probably use it on an old, slightly torn, mount too.
I'm very happy to finally be at the end of fixing the issues that the car should not have even had. Now I can enjoy the car without worrying it will shake its self to bits.
Gassing Station | Readers' Cars | Top of Page | What's New | My Stuff