
Living the (American) Dream
Discussion


Warning, this post goes on about 27 times longer than I intended and I didn't take half as many pictures as I thought.
Well it's been a long old time since I've posted on here regularly. I've bought a house, passed my motorbike tests, bought some cars and bikes, sold some cars, done a college course and got myself a new job. The new job comes with a welcome pay rise which has enabled the dream. I'm not a big dreamer, it's no concourse Ferrari limited edition with gold plated windscreen wipers, it's 2 tonnes of American V8 "mowder", an automatic gearbox, and Plum Crazy paint.
Introducing my Dodge Challenger. I'm not after a Hellcat, a Demon, Last Call or any of that. I just wanted a V8. Be that 5.7, 6.1 or 6.4. This one is the baby V8 at just the 5.7 "liters". I believe that's somewhere in the region of 5.7 litres, so the Americans tell me.

Excuse the lack of pictures. The image platform I'm using is prone to a glitch and it's taken me longer than I care to share to get this lot of photos uploaded.
The story goes that this car came from Dubai, it has definitely been in Canada at some point (owing to a coin I found during my repairs) and is now warming up the UK by turning my bank account into greenhouse gasses. The previous owner was a lovely chap called Stephen. He's cared for the car well, and had a clear affinity with it. I got a pretty solid wedge of paperwork with the car. Truth be told, I wasn't actually looking to buy so soon. I only got my new job in September, and the wage to suit came in December. I'd planned on taking a lot more time to save but when the opportunity for this arose early for a car well revered in the UK Challenger circle, I went to the bank and asked them kindly to overcharge me for some money, to which they obliged.
Things started off great. It had a clean bill of health when I had the car professionally inspected (I'm far too giddy and this is a fair chunk of change for me). A few nicks and niggles to resolve but certainly nothing to put me off. It was exactly what I was looking for. I don't want a perfect, super low mileage example that I'm afraid to use. Just as well when it got a door ding the first time I took it anywhere.. Anyway, I paid the man, arranged collection, and got up at half 5 in the morning to catch a train. The drive home was nothing short of f*****g phenomenal. I must've had about 900,000 photos of the car taken, entertained a few people in traffic with some American V8 noises, and learned driving on the left of the car is pretty weird but not that hard. I had a comment about how much fuel it must get through at my very first fill up (at which point, I had had to fill the tank at literally every single petrol station it had seen in all my 10 minutes of ownership). The visibility is poor (I lost an entire Discovery 3 in the C pillar!), the fuel economy is poor, rear leg room is poor, the sound system is poor, it's got a vibration at motorway speeds and there's only 1 stalk for wipers and lights (while this is just how they are, it didn't half fox me). It's fabulous.
I knew before buying it that the radio worked, but the sound quality was absolutely awful. Think Temu bluetooth speaker quality. Tinny as you like, and surely this wasn't right for any vehicle's mid-tier auto option. Well I soon solved that. It turns out that someone had been fiddling with the wiring to the speakers. The car has 2 speakers between the rear seats and rear window, they're on their own circuit. Then it has 6x9's in the doors (novel to me) and 3 speakers across the dash: left, right and center (That's 'centre' for those needing translation) which are on a joined circuit. The door speakers seemed to be the culprit so I bought some new Pioneer ones. When I took the door card off, there were some far superior Pioneer ones already in place of the Alpine ones the car used to have. Well that's a Brucie Bonus, but why weren't they working? Well some electrical chimpanzee or other decided to link the rear, front and door speakers all to the rear speaker output. At least they did a proper job of connecting the wires properly.
Oh, wait

This absolutely tanked the sound quality. Probably something to do with ohms and some other rubbish. Expecting now to end up with a massive series of electrical gremlins in the speakers, I plugged them back in the way the good lord intended and set to work finding out what the problems were. Absolutely nothing. It fired up and worked fine..? Not wanting to look a gift horse in the mouth, I made sure all the connections were solid, undoing the twist n' tape carnage, and threw the panels and such back together and called it good. I think I forgot the back left speaker but otherwise it's now a hundred times better than before, and I got some free crap speaker cable for my troubles. Christmas must've come early.
The first public outing was also my first ever wedding. It caused a bit of a stir and everybody loved it (except that one git who gave me a sodding door ding). The reception was at a golf club which led me down a path that Dakar cars would wince at. This brought the airbag light on. Mint. I've used it once and broken it. A quick code read and a Google deduced the driver's side seatbelt reel was a common fault and the connector might have just popped off. No bother, a few clips and we'll be laughing, honest. So I popped off the side panel, checked the connector and sure enough, it had popped off. Hooray!

Now where is it? It's there, that wire, with no f*****g end on it.

Oh boy, here we go. The twist n' tape tosser had been here as well. Instead of just bridging the connector with a resistor, the trumpet decided to cut it off and twist the ends around the resistor legs. Heaven forbid you break out a bit of solder or some intelligence. One of the legs of the resistor had broken off, giving me an airbag light. At least Twist n' tape Timmy had used electrical tape so it could've been worse, somehow. Mercifully, the connectors are standard in the automotive industry and eBay came to the rescue (after I had ordered the wrong one first, naturally). I'm yet to fit it because, well, I'm lazy. I did solder in a bypass resistor to fool MOT man but it's not the long term fix. I'm assuming the seatbelt reel itself is broken, requiring the bypass resistor in the first place, and the inertia reel action is less than stellar so I thought I might as well go belt and braces by replacing the reel. Only a few bolts and that connector. I messaged one seller on eBay who quoted me NINE HUNDRED POUNDS for a used part. That's a hard pass. A brand spanker from the US of A including shipping, taxes and the part itself came in at £300 there or there about, and one company in Bolton offered to recondition my existing reel for about £100. Much more like it. I'll be getting that shipped off soon.
Not last and not least on my marathon of an opening post is the top arms and drop links. They were included in the sale of the car, and thought to be the mild knocking noise caused going over small bumps. One sunny afternoon I fitted them. Drop links are drop links, a nut each end, nothing interesting here. The top arms were also completely uneventful. Ball joints were a bit sticky and I got to use my snazzy ball joint remover tool jaw screw thingy from Clarke. Worked like a treat. The top bolts were easily accessible at the front and the rearward bolts just required the removal of a panel from the scuttle. And the weather stripping. Oh, and the wiper arms, the scuttle, the ECU, ECU tray and some wiring clips. Sigh. Lucky me then had access to turn the nut about a 300th of a turn at a time with the good old fashioned undo, flip spanner, undo again process. At least it was only the hottest day of the year so far so I popped up my gazebo, worked in the sun on the first side, which took so long I got to work in the sun on the other side as well. Sun burn is for wimps anyway. Still, most of the knock is gone (MOT man told me a ball joint has play), as is a concerning grinding noise which used to happen when dry steering the car.
Now, last and least is the dash cluster. The speedometer was in some curious, foreign measurement used by psychopaths and I wanted it in the lord's British miles per hour. The LCD display between the dials shows MPH on every screen, either massive in the middle or at the top. Sod that, I want a dial that's quite hard to read. A Google search suggested changing the backing piece for the gauge wasn't too hard but a set of backing pieces is about £55. I found an MPH whole cluster on eBay for about £80, and shrewdly negotiated it down to £70, saving me -£15 over the backing pieces alone. Check out Martin Lewis over here.

I had a few ways to go about it in the end. I could've salvaged the backing pieces from the donor cluster and transplanted them into my cluster, just fitted the new cluster and had an intelligent chap/chapette sort the mileage for me, or option 3 which I did. The backing pieces are adhered to a surround. Pop the clusters apart, swap the surrounds, clip it back together and clusters are none the wiser. While in there, I could also replace one of the center (centre!) pieces that has the dash lights on because it had a few cracks in the decorative ring (answers on a postcard for that one).

A German user on Reddit had a pretty thorough guide up taking me through the process step by step, though he did replace the backing pieces instead of the full surround. I thought it would have to wait until after the holiday but oh no, nobody tells me how to spend my time off work. Before we left, I removed the original cluster. Literally 20 clips on a trim and 4 screws. Say what you want about American build quality but it doesn't half make disassembly a doddle.

Revealed some nice hidden gunge to go with it.

A few days later, I commandeered the kitchen table in my caravan before the other half got up, brought my toolbox and the clusters in, got a cup of tea on the go, then the other half woke up. I cracked on anyway. Step 1, remove the rear shroud. A handful of T15's saw this out of the way. Step 2, remove 4 wiring connectors. Flip them up, pull out the ribbons. We're cooking with gas here. Step 3, remove the board from the assembly which pops off the needles. The guide said T8's but these are T10's. Step 4, remove the screen which is literally not held in with anything (see upcoming picture). Step 5, pop out the center (centre, you'll get the hang of it soon) dash light assemblies, mix and match them all, and begin reassembling. Fully deconstructed, you'll be left with these major components:

The screen held in by hopes and dreams.

The German Redditor said this next part was "tricky". Refitting the circuitboards, making sure the needles stuck back on the shafts. After spending about 30 minutes using every pick, screwdriver and trim tool I had available to line up the needles with the shafts on the circuitboard, flipping it over and trying in vain to put enough pressure on them to put them fully on the shafts, I deployed intelligence. The dash light assemblies sit over the top of the needle and shaft so access is nigh on impossible. However, there's a relief on the circuit board that allows the fitting and removal of the center (Ce... I'll stop this now) dash light assemblies when the circuit board is attached.

So I left them off, popped the needles on as close to 0 as I could get them, put the dash light assemblies back in and was done in about 5 minutes. Take that, knowledgeable German Redditor. Took the fiddle factor from a 273/10 down to about a 2/10. The ribbon cables were slightly annoying but otherwise it was a simple assembly.


I'm still on said holiday so I've not had chance to refit them yet. I'm just hoping the needles don't need recalibration or I'm in for a right headache. Might even flog the now km/h clocks and recoup a few quid, or keep for spares. Can't imagine these are going to go wrong very often though. Anyway, here's one new/old cluster with an old/new speedo and one damaged light assembly in it.

So that's where we are. It's the best thing I've ever purchased. It gets photographed or thumbed up during every single journey I go out on and I adore it. I'll post more and remember to capture more pictures as I do work but in truth, it doesn't need a lot. I've got a battery isolator with a memory saver coming, I need to fix an error with the gear shifter(it works, just has an error on the dash) the passenger seat sometimes acts up and that's about it. It's due a service in a few months so I'll go ham on that doing the engine, gearbox, diff and brake fluids with any relevant filters.
Well it's been a long old time since I've posted on here regularly. I've bought a house, passed my motorbike tests, bought some cars and bikes, sold some cars, done a college course and got myself a new job. The new job comes with a welcome pay rise which has enabled the dream. I'm not a big dreamer, it's no concourse Ferrari limited edition with gold plated windscreen wipers, it's 2 tonnes of American V8 "mowder", an automatic gearbox, and Plum Crazy paint.
Introducing my Dodge Challenger. I'm not after a Hellcat, a Demon, Last Call or any of that. I just wanted a V8. Be that 5.7, 6.1 or 6.4. This one is the baby V8 at just the 5.7 "liters". I believe that's somewhere in the region of 5.7 litres, so the Americans tell me.
Excuse the lack of pictures. The image platform I'm using is prone to a glitch and it's taken me longer than I care to share to get this lot of photos uploaded.
The story goes that this car came from Dubai, it has definitely been in Canada at some point (owing to a coin I found during my repairs) and is now warming up the UK by turning my bank account into greenhouse gasses. The previous owner was a lovely chap called Stephen. He's cared for the car well, and had a clear affinity with it. I got a pretty solid wedge of paperwork with the car. Truth be told, I wasn't actually looking to buy so soon. I only got my new job in September, and the wage to suit came in December. I'd planned on taking a lot more time to save but when the opportunity for this arose early for a car well revered in the UK Challenger circle, I went to the bank and asked them kindly to overcharge me for some money, to which they obliged.
Things started off great. It had a clean bill of health when I had the car professionally inspected (I'm far too giddy and this is a fair chunk of change for me). A few nicks and niggles to resolve but certainly nothing to put me off. It was exactly what I was looking for. I don't want a perfect, super low mileage example that I'm afraid to use. Just as well when it got a door ding the first time I took it anywhere.. Anyway, I paid the man, arranged collection, and got up at half 5 in the morning to catch a train. The drive home was nothing short of f*****g phenomenal. I must've had about 900,000 photos of the car taken, entertained a few people in traffic with some American V8 noises, and learned driving on the left of the car is pretty weird but not that hard. I had a comment about how much fuel it must get through at my very first fill up (at which point, I had had to fill the tank at literally every single petrol station it had seen in all my 10 minutes of ownership). The visibility is poor (I lost an entire Discovery 3 in the C pillar!), the fuel economy is poor, rear leg room is poor, the sound system is poor, it's got a vibration at motorway speeds and there's only 1 stalk for wipers and lights (while this is just how they are, it didn't half fox me). It's fabulous.
I knew before buying it that the radio worked, but the sound quality was absolutely awful. Think Temu bluetooth speaker quality. Tinny as you like, and surely this wasn't right for any vehicle's mid-tier auto option. Well I soon solved that. It turns out that someone had been fiddling with the wiring to the speakers. The car has 2 speakers between the rear seats and rear window, they're on their own circuit. Then it has 6x9's in the doors (novel to me) and 3 speakers across the dash: left, right and center (That's 'centre' for those needing translation) which are on a joined circuit. The door speakers seemed to be the culprit so I bought some new Pioneer ones. When I took the door card off, there were some far superior Pioneer ones already in place of the Alpine ones the car used to have. Well that's a Brucie Bonus, but why weren't they working? Well some electrical chimpanzee or other decided to link the rear, front and door speakers all to the rear speaker output. At least they did a proper job of connecting the wires properly.
Oh, wait
This absolutely tanked the sound quality. Probably something to do with ohms and some other rubbish. Expecting now to end up with a massive series of electrical gremlins in the speakers, I plugged them back in the way the good lord intended and set to work finding out what the problems were. Absolutely nothing. It fired up and worked fine..? Not wanting to look a gift horse in the mouth, I made sure all the connections were solid, undoing the twist n' tape carnage, and threw the panels and such back together and called it good. I think I forgot the back left speaker but otherwise it's now a hundred times better than before, and I got some free crap speaker cable for my troubles. Christmas must've come early.
The first public outing was also my first ever wedding. It caused a bit of a stir and everybody loved it (except that one git who gave me a sodding door ding). The reception was at a golf club which led me down a path that Dakar cars would wince at. This brought the airbag light on. Mint. I've used it once and broken it. A quick code read and a Google deduced the driver's side seatbelt reel was a common fault and the connector might have just popped off. No bother, a few clips and we'll be laughing, honest. So I popped off the side panel, checked the connector and sure enough, it had popped off. Hooray!
Now where is it? It's there, that wire, with no f*****g end on it.
Oh boy, here we go. The twist n' tape tosser had been here as well. Instead of just bridging the connector with a resistor, the trumpet decided to cut it off and twist the ends around the resistor legs. Heaven forbid you break out a bit of solder or some intelligence. One of the legs of the resistor had broken off, giving me an airbag light. At least Twist n' tape Timmy had used electrical tape so it could've been worse, somehow. Mercifully, the connectors are standard in the automotive industry and eBay came to the rescue (after I had ordered the wrong one first, naturally). I'm yet to fit it because, well, I'm lazy. I did solder in a bypass resistor to fool MOT man but it's not the long term fix. I'm assuming the seatbelt reel itself is broken, requiring the bypass resistor in the first place, and the inertia reel action is less than stellar so I thought I might as well go belt and braces by replacing the reel. Only a few bolts and that connector. I messaged one seller on eBay who quoted me NINE HUNDRED POUNDS for a used part. That's a hard pass. A brand spanker from the US of A including shipping, taxes and the part itself came in at £300 there or there about, and one company in Bolton offered to recondition my existing reel for about £100. Much more like it. I'll be getting that shipped off soon.
Not last and not least on my marathon of an opening post is the top arms and drop links. They were included in the sale of the car, and thought to be the mild knocking noise caused going over small bumps. One sunny afternoon I fitted them. Drop links are drop links, a nut each end, nothing interesting here. The top arms were also completely uneventful. Ball joints were a bit sticky and I got to use my snazzy ball joint remover tool jaw screw thingy from Clarke. Worked like a treat. The top bolts were easily accessible at the front and the rearward bolts just required the removal of a panel from the scuttle. And the weather stripping. Oh, and the wiper arms, the scuttle, the ECU, ECU tray and some wiring clips. Sigh. Lucky me then had access to turn the nut about a 300th of a turn at a time with the good old fashioned undo, flip spanner, undo again process. At least it was only the hottest day of the year so far so I popped up my gazebo, worked in the sun on the first side, which took so long I got to work in the sun on the other side as well. Sun burn is for wimps anyway. Still, most of the knock is gone (MOT man told me a ball joint has play), as is a concerning grinding noise which used to happen when dry steering the car.
Now, last and least is the dash cluster. The speedometer was in some curious, foreign measurement used by psychopaths and I wanted it in the lord's British miles per hour. The LCD display between the dials shows MPH on every screen, either massive in the middle or at the top. Sod that, I want a dial that's quite hard to read. A Google search suggested changing the backing piece for the gauge wasn't too hard but a set of backing pieces is about £55. I found an MPH whole cluster on eBay for about £80, and shrewdly negotiated it down to £70, saving me -£15 over the backing pieces alone. Check out Martin Lewis over here.
I had a few ways to go about it in the end. I could've salvaged the backing pieces from the donor cluster and transplanted them into my cluster, just fitted the new cluster and had an intelligent chap/chapette sort the mileage for me, or option 3 which I did. The backing pieces are adhered to a surround. Pop the clusters apart, swap the surrounds, clip it back together and clusters are none the wiser. While in there, I could also replace one of the center (centre!) pieces that has the dash lights on because it had a few cracks in the decorative ring (answers on a postcard for that one).
A German user on Reddit had a pretty thorough guide up taking me through the process step by step, though he did replace the backing pieces instead of the full surround. I thought it would have to wait until after the holiday but oh no, nobody tells me how to spend my time off work. Before we left, I removed the original cluster. Literally 20 clips on a trim and 4 screws. Say what you want about American build quality but it doesn't half make disassembly a doddle.
Revealed some nice hidden gunge to go with it.
A few days later, I commandeered the kitchen table in my caravan before the other half got up, brought my toolbox and the clusters in, got a cup of tea on the go, then the other half woke up. I cracked on anyway. Step 1, remove the rear shroud. A handful of T15's saw this out of the way. Step 2, remove 4 wiring connectors. Flip them up, pull out the ribbons. We're cooking with gas here. Step 3, remove the board from the assembly which pops off the needles. The guide said T8's but these are T10's. Step 4, remove the screen which is literally not held in with anything (see upcoming picture). Step 5, pop out the center (centre, you'll get the hang of it soon) dash light assemblies, mix and match them all, and begin reassembling. Fully deconstructed, you'll be left with these major components:
The screen held in by hopes and dreams.
The German Redditor said this next part was "tricky". Refitting the circuitboards, making sure the needles stuck back on the shafts. After spending about 30 minutes using every pick, screwdriver and trim tool I had available to line up the needles with the shafts on the circuitboard, flipping it over and trying in vain to put enough pressure on them to put them fully on the shafts, I deployed intelligence. The dash light assemblies sit over the top of the needle and shaft so access is nigh on impossible. However, there's a relief on the circuit board that allows the fitting and removal of the center (Ce... I'll stop this now) dash light assemblies when the circuit board is attached.
So I left them off, popped the needles on as close to 0 as I could get them, put the dash light assemblies back in and was done in about 5 minutes. Take that, knowledgeable German Redditor. Took the fiddle factor from a 273/10 down to about a 2/10. The ribbon cables were slightly annoying but otherwise it was a simple assembly.
I'm still on said holiday so I've not had chance to refit them yet. I'm just hoping the needles don't need recalibration or I'm in for a right headache. Might even flog the now km/h clocks and recoup a few quid, or keep for spares. Can't imagine these are going to go wrong very often though. Anyway, here's one new/old cluster with an old/new speedo and one damaged light assembly in it.
So that's where we are. It's the best thing I've ever purchased. It gets photographed or thumbed up during every single journey I go out on and I adore it. I'll post more and remember to capture more pictures as I do work but in truth, it doesn't need a lot. I've got a battery isolator with a memory saver coming, I need to fix an error with the gear shifter(it works, just has an error on the dash) the passenger seat sometimes acts up and that's about it. It's due a service in a few months so I'll go ham on that doing the engine, gearbox, diff and brake fluids with any relevant filters.
A VIN check will tell you if it’s originally a Canadian or UAE car, but it’s easier just to look at the regulatory stickers under the bonnet or on the sun visors, see if they’re English/French or Arabic.
Canada to Dubai to UK is odd but not unusual, and not necessarily for nefarious means (I.e written off and exported from Canada). My UAE registered Elise came from there, as did my mate’s Dodge Magnum. His was imported by a local who went to uni there, and mine by a Canadian who brought it with him. Come to think of it my Ducati is Canadian spec but was ordered and delivered new to Dubai as the owner thought he’d end up exporting it when he repatriated but never did. Odd story but confirmed to me by the dealer.
If originally a UAE car then I *might* be able to help you with the history, my mate’s mrs was a director at Stellantis UAE before they moved back to UK last year.
That is definitely Dubai wiring though lol.
Unless it’s been tampered with (!) the climate here is kind to electrics, corrosion isn’t a problem and big unstressed engines have an easy life. Deffo do all the fluids (inc transmission flush) and check the sump plugs before you do. The same approach to accessory wiring seems to prevail when it comes to rounding off bolts and replacing them with ‘ah that fits’ equivalents.
I would check all your cooling hoses and plastic joining pieces though. The heat degrades them much faster than in colder climes, I’d check them all as a given but at 10+ yrs I’d look to replace. Summit Racing and Rock Auto are your friends.
Sorry if this comes across as a negative post, it isn’t the intention. Love a Cadbury’s paint job especially paired with a V8
Only you look to know one end of a spanner/screwdriver from the other and want it to be right. They’re simple and easy to work on and it isn’t a big job to go through it end to end. Enjoy!
NB: I’m sure you’re already joined a US challenger forum. If not then do so. The yanks love to tinker with their own cars, the knowledge on the Jeep forum I used to frequent was unreal, and I even tend to find the US lotus forums have more experience with tricky jobs purely as they don’t have any dealer support.
Canada to Dubai to UK is odd but not unusual, and not necessarily for nefarious means (I.e written off and exported from Canada). My UAE registered Elise came from there, as did my mate’s Dodge Magnum. His was imported by a local who went to uni there, and mine by a Canadian who brought it with him. Come to think of it my Ducati is Canadian spec but was ordered and delivered new to Dubai as the owner thought he’d end up exporting it when he repatriated but never did. Odd story but confirmed to me by the dealer.
If originally a UAE car then I *might* be able to help you with the history, my mate’s mrs was a director at Stellantis UAE before they moved back to UK last year.
That is definitely Dubai wiring though lol.
Unless it’s been tampered with (!) the climate here is kind to electrics, corrosion isn’t a problem and big unstressed engines have an easy life. Deffo do all the fluids (inc transmission flush) and check the sump plugs before you do. The same approach to accessory wiring seems to prevail when it comes to rounding off bolts and replacing them with ‘ah that fits’ equivalents.
I would check all your cooling hoses and plastic joining pieces though. The heat degrades them much faster than in colder climes, I’d check them all as a given but at 10+ yrs I’d look to replace. Summit Racing and Rock Auto are your friends.
Sorry if this comes across as a negative post, it isn’t the intention. Love a Cadbury’s paint job especially paired with a V8
Only you look to know one end of a spanner/screwdriver from the other and want it to be right. They’re simple and easy to work on and it isn’t a big job to go through it end to end. Enjoy!
NB: I’m sure you’re already joined a US challenger forum. If not then do so. The yanks love to tinker with their own cars, the knowledge on the Jeep forum I used to frequent was unreal, and I even tend to find the US lotus forums have more experience with tricky jobs purely as they don’t have any dealer support.
I’d edit my post but the apostrophe gremlin will strike.
So ETA: make sure to add a cabin air filter to your service list, these do work hard with the dusty air and most people and garages seem to forget about them. Maybe even change the A/C receiver drier and do full flush. The cherry on top would be a PAS flush and new reservoir, the PAS filter on the challenger is built into it and not replaceable.
As I say, not wanting to be negative just these are my experiences from running older cars in the sandpit.
So ETA: make sure to add a cabin air filter to your service list, these do work hard with the dusty air and most people and garages seem to forget about them. Maybe even change the A/C receiver drier and do full flush. The cherry on top would be a PAS flush and new reservoir, the PAS filter on the challenger is built into it and not replaceable.
As I say, not wanting to be negative just these are my experiences from running older cars in the sandpit.
UK_Scat_Pack said:
Congrats on your purchase. I know that car and the previous owner very well.
I have a Challenger Scat Pack Widebody and I run the Dodge Challenger Owners Club UK group over on FB. Be good to see you there and at one of our meets.
I'm a member of that very group, though mostly a lurker! I have a Challenger Scat Pack Widebody and I run the Dodge Challenger Owners Club UK group over on FB. Be good to see you there and at one of our meets.
Stephen is a top bloke. I'm lucky to have bought from him and not one of the many people who own them because "it's a boss car bruv innit". So many red flags on Facebook and lower end Autotrader listings. Most seemed to be red flag after red flag with ownership, mileage and scabs or vastly over priced. Fresh imports that "just need" an IVA or similar for a few quid. It's a £30k car man, throw in the IVA test if it's so simple..
There was a mislabelled V6 one on Autotrader for a while. It was actually a V8 with some questionable interior customisations and alloys that imitated white wall tyres of all things. It's another reason I leapt at the opportunity to buy this one. A nice car at a reasonable price, and from a good owner. I have also given Stephen first refusal should I ever get rid (Sorry Stephen, it's not likely. I bloody love this thing!).
Back from being too hot in Cornwall, it's time to be too hot at home. I grabbed the newly assembled clocks out of the car, and promptly ignored them until this evening. I thought I'd better get them fitted because I really am quite lazy and they'd end up just taking up space for ages, then I'll panic when I need to go out somewhere.
Anyway, step 1. Degunge the screen and lower part of the dash.
Before

After

Not perfect but I'm here to put clocks in. I connected them using the wiring connector (bet you never saw that coming) and they lit up the same as they ever did.

Yes, they got a quick dust before getting screwed in. The speedo looks off on that image but that's just the angle of the dangle. Here's what they look like at eye level:


Much better.
4 screws to hold the clocks in, and just the 13 clips for the fascia. Dodge managed to underdo it and overdo it at the same time.. There's a degree of adjustment here due to manufacturing tolerances but a "that'll do" approach seems to have worked well.

Turned it on and it all seems to work spiffingly. When it first lit up, it was rhythmically ticking. After a brief panic, I noticed I'd knocked on the indicator when removing the clocks. Phew. The clocks performed a needle sweep which seems to have calibrated the needles to wherever they need to be. I know the TPMS is warning me of a low tyre. I'll put some puff in it next time it's not squeezed up against the wall. I think it's got a slow leak which stops at 28 psi but that's a headache for another day.
I took it for a quick trundle around the block (including a quick rev for a local lad on his bike. I told you it's every single journey out). The speedo dial is matching the digital speedo to perfection. I presume the tachometer is reading true as well, it feels about right. Lovely. I can now use the rest of the display for more important matters, like seeing how much money I'm investing into future heat waves.

Yes, I'm aware the speed is at the top, no it can't be removed, yes this was essentially pointless but it's my car so shurrup! Also, American air con and cooled seats are the absolute nuts in hot weather. That's it for today's fixes. As simple as you like. My plan to Frankenstein 2 working units together and making 2 working units worked a treat.
Next on the agenda is the disco simulator when using reverse. This is less than helpful when going backwards in a car that's got jolly poor visibility.

On the very rare occasion it does actually work, the image quality is laughable. Some 240p nonsense. I'm hoping a new camera will sort it out, otherwise it's chasing wiring forever.
Anyway, step 1. Degunge the screen and lower part of the dash.
Before
After
Not perfect but I'm here to put clocks in. I connected them using the wiring connector (bet you never saw that coming) and they lit up the same as they ever did.
Yes, they got a quick dust before getting screwed in. The speedo looks off on that image but that's just the angle of the dangle. Here's what they look like at eye level:
Much better.
4 screws to hold the clocks in, and just the 13 clips for the fascia. Dodge managed to underdo it and overdo it at the same time.. There's a degree of adjustment here due to manufacturing tolerances but a "that'll do" approach seems to have worked well.
Turned it on and it all seems to work spiffingly. When it first lit up, it was rhythmically ticking. After a brief panic, I noticed I'd knocked on the indicator when removing the clocks. Phew. The clocks performed a needle sweep which seems to have calibrated the needles to wherever they need to be. I know the TPMS is warning me of a low tyre. I'll put some puff in it next time it's not squeezed up against the wall. I think it's got a slow leak which stops at 28 psi but that's a headache for another day.
I took it for a quick trundle around the block (including a quick rev for a local lad on his bike. I told you it's every single journey out). The speedo dial is matching the digital speedo to perfection. I presume the tachometer is reading true as well, it feels about right. Lovely. I can now use the rest of the display for more important matters, like seeing how much money I'm investing into future heat waves.
Yes, I'm aware the speed is at the top, no it can't be removed, yes this was essentially pointless but it's my car so shurrup! Also, American air con and cooled seats are the absolute nuts in hot weather. That's it for today's fixes. As simple as you like. My plan to Frankenstein 2 working units together and making 2 working units worked a treat.
Next on the agenda is the disco simulator when using reverse. This is less than helpful when going backwards in a car that's got jolly poor visibility.
On the very rare occasion it does actually work, the image quality is laughable. Some 240p nonsense. I'm hoping a new camera will sort it out, otherwise it's chasing wiring forever.
I do hope the other image host I have been using returns or I've got some editing and faffing to do. Anyway, on with today's ramblings.
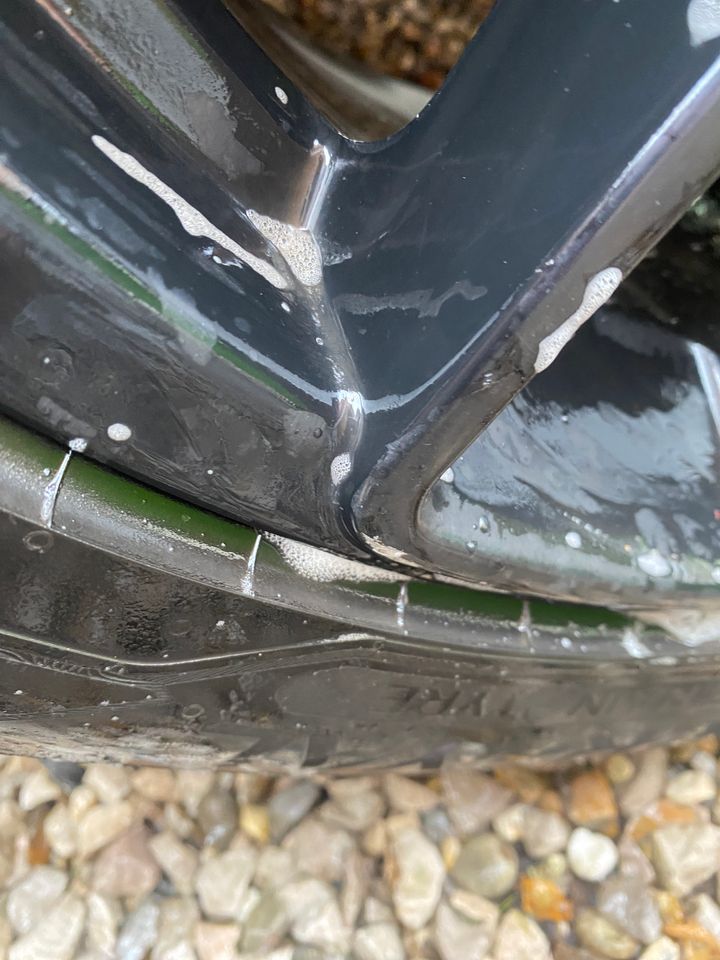
The sun was out so decided to partake in every British car owner's hobby of rubbing grit into my own paintwork. In doing so, I spotted a growing pile of bubbles among the other piles of bubbles on the offside rear wheel. Guess I've found my slow leak. I've got some time off coming so I'll visit one of the local tyre places to have it sorted. Maybe it's stuck in it's American ways and despises the fact we spell tyre with a Y instead of an I.
I also managed to grab you lovely people a shot of the quite laughable quality of the reversing camera while it decided to work for 5 minutes.
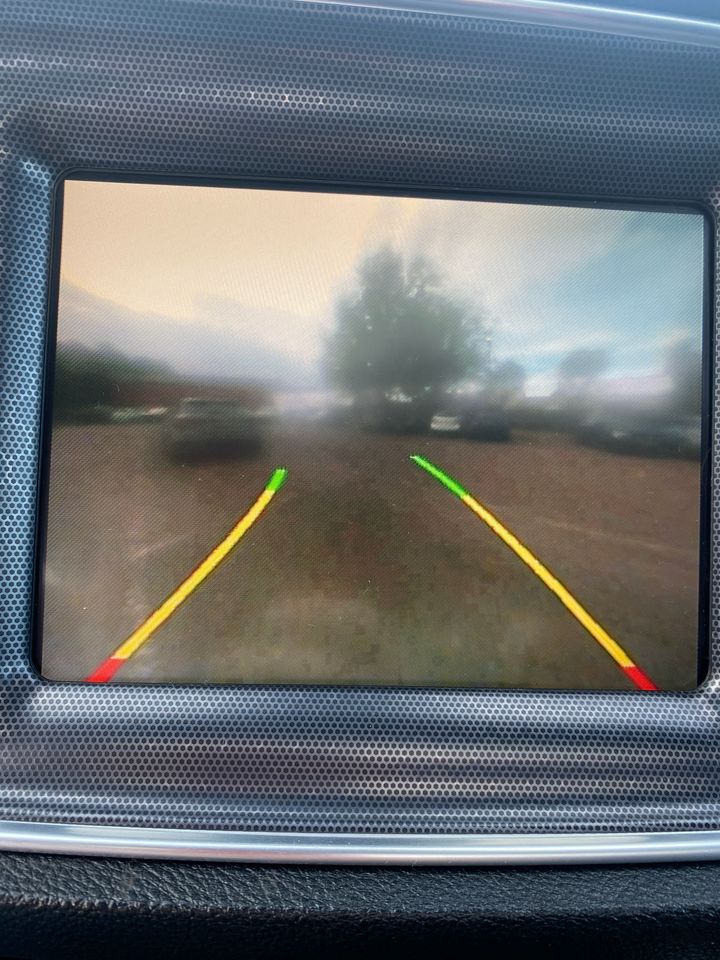
Dodge can screw over 1000 horses out of 8 cylinders but use a camera that has the image quality of a crayon drawing. A new camera will be on order shortly. It's better than the usual display that looks like one of the visualisers from Windows Media Player at least.
Last of all, I got a message saying "Service Shifter". Not much help so pulled the codes and got the following:
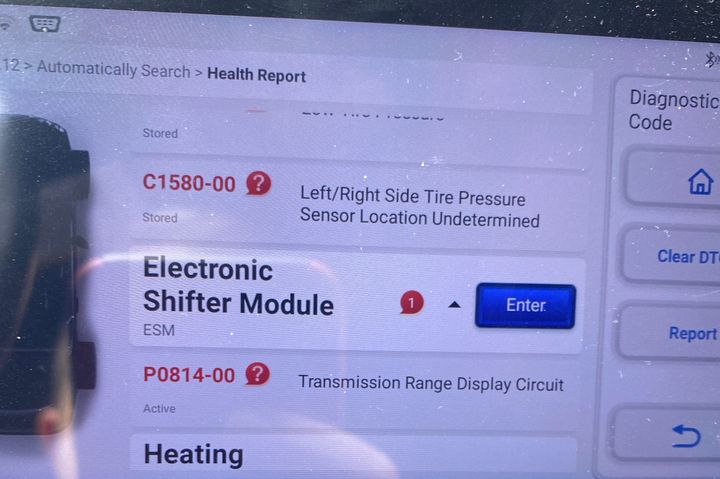
Having totally ignored the fault code description and just Googled the fault code, I spent waaaaay too long looking up where the Challenger hides the transmission range switch. Surprisingly little information on it. I suspect it doesn't have one. I did repeatedly come across a YouTube channel that claims to show Challenger repairs but manages to waffle through every video without actually showing anything useful.
The car worked fine, gear shifts were fine, manual mode worked, just the display doesn't work. I put it on the back burner for a few days while I saw my a**e due to the lack of info available. My annoyance at warning messages soon outweighed my annoyance at not being able to fix something so I decided to have another go. Having actually read the fault code description and noticed the range switch display is causing the fault, I narrowed the culprit down to the LED's on the gear shifter. The associated letter should light up red but it doesn't. Critical information to have in case I'm perplexed why I'm going backwards.. I could pop it off, take it to pieces and potentially solder or replace the LED but a full replacement unit on eBay is far easier. They're readily available in a few different colours. I went for an identical one (the bit of grey really livens up the black interior). The eBay seller had a listing with an offer button on and after some back and forth I put in an offer a fiver less than it was up for. The seller declined it. Not sure what use the offers button was then! Whatever, that's on its way from overseas. Probably from Lithuania where most Challengers and parts end up coming into the UK from. It even comes with some smaller trim clips I'm hoping I can salvage to fix a sagging knee trim.
The sun was out so decided to partake in every British car owner's hobby of rubbing grit into my own paintwork. In doing so, I spotted a growing pile of bubbles among the other piles of bubbles on the offside rear wheel. Guess I've found my slow leak. I've got some time off coming so I'll visit one of the local tyre places to have it sorted. Maybe it's stuck in it's American ways and despises the fact we spell tyre with a Y instead of an I.
I also managed to grab you lovely people a shot of the quite laughable quality of the reversing camera while it decided to work for 5 minutes.
Dodge can screw over 1000 horses out of 8 cylinders but use a camera that has the image quality of a crayon drawing. A new camera will be on order shortly. It's better than the usual display that looks like one of the visualisers from Windows Media Player at least.
Last of all, I got a message saying "Service Shifter". Not much help so pulled the codes and got the following:
Having totally ignored the fault code description and just Googled the fault code, I spent waaaaay too long looking up where the Challenger hides the transmission range switch. Surprisingly little information on it. I suspect it doesn't have one. I did repeatedly come across a YouTube channel that claims to show Challenger repairs but manages to waffle through every video without actually showing anything useful.
The car worked fine, gear shifts were fine, manual mode worked, just the display doesn't work. I put it on the back burner for a few days while I saw my a**e due to the lack of info available. My annoyance at warning messages soon outweighed my annoyance at not being able to fix something so I decided to have another go. Having actually read the fault code description and noticed the range switch display is causing the fault, I narrowed the culprit down to the LED's on the gear shifter. The associated letter should light up red but it doesn't. Critical information to have in case I'm perplexed why I'm going backwards.. I could pop it off, take it to pieces and potentially solder or replace the LED but a full replacement unit on eBay is far easier. They're readily available in a few different colours. I went for an identical one (the bit of grey really livens up the black interior). The eBay seller had a listing with an offer button on and after some back and forth I put in an offer a fiver less than it was up for. The seller declined it. Not sure what use the offers button was then! Whatever, that's on its way from overseas. Probably from Lithuania where most Challengers and parts end up coming into the UK from. It even comes with some smaller trim clips I'm hoping I can salvage to fix a sagging knee trim.
Another day, another repair, and another wash of the matte black "hood". Seriously, it attracts dust and dirt like nothing else. This actually went so fast I didn't have chance to photograph it. If I wasn't such a wimp then it could've been done with a T30 alone. Well, because I am a wimp, I had to use some trim removal tools. Did the wiring connector without any tools though, check me out.
Anyway, I was as happy as a man with 2 knobs.
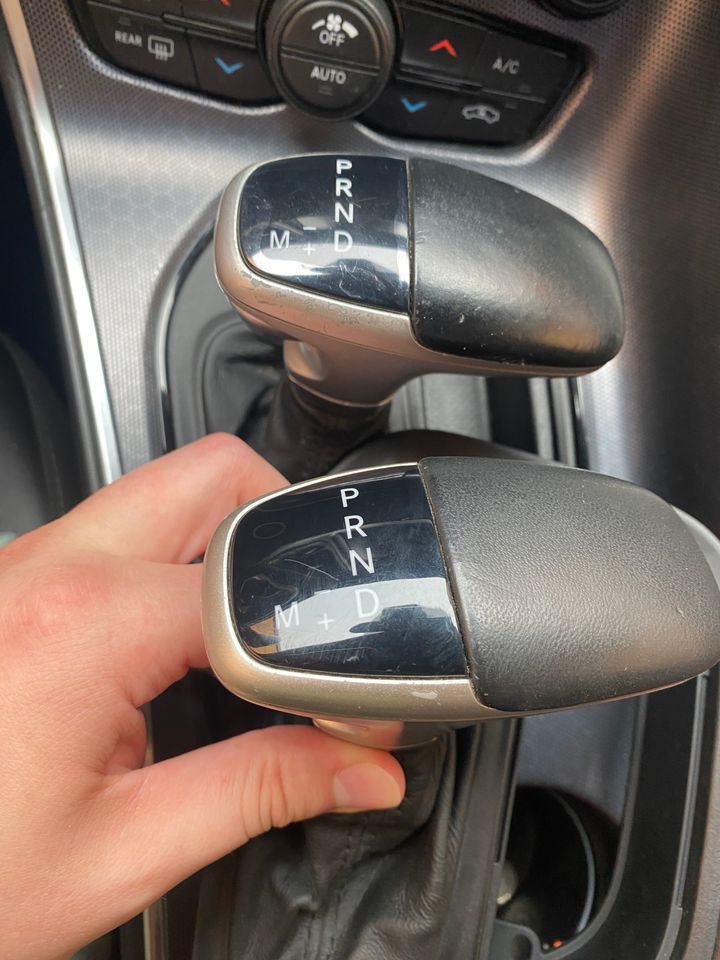
Getting myself a minor font update, some grain back in the leather (which I'm sure is real cows and the finest of quality) and lord above it lights up red.
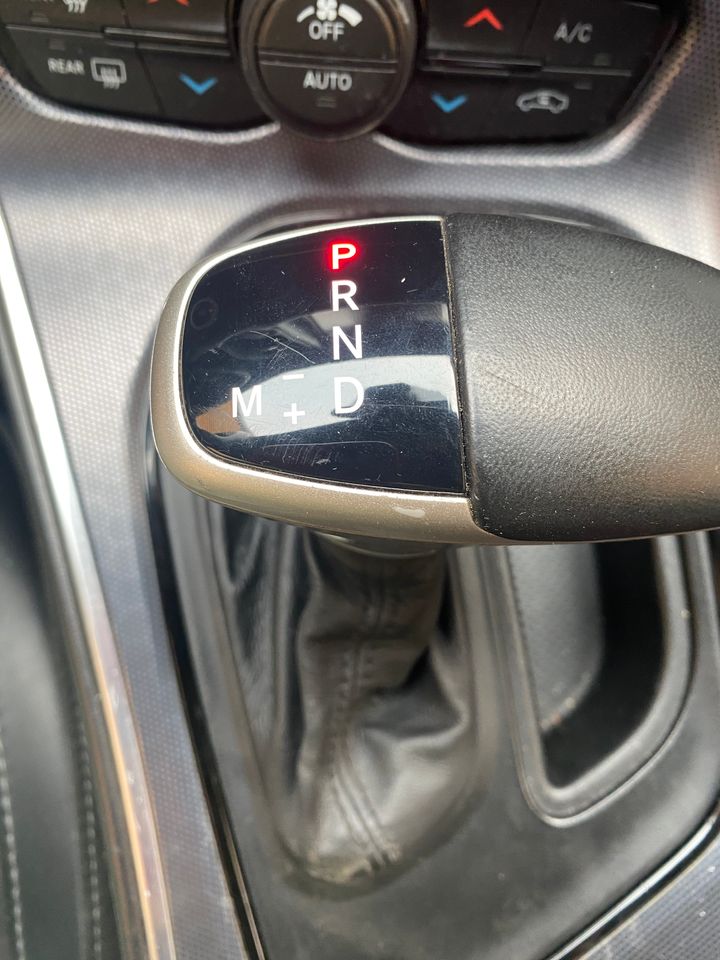
I'm not going to spam you with pictures of each letter in red, use your imagination. I don't need it whatsoever but at least it stops the previously modified dash cluster throwing an error message every time I start the car. I'm hesitating to call this fixed since the old one did work on a very rare occasion but fingers crossed that's it for now.
I had planned to nick a few trim clips to sort a loose panel but they're the wrong size. I have ordered some I thought were too big but now think are the right size. Good job I've bloody lost them then, isn't it?
Anyway, I was as happy as a man with 2 knobs.
Getting myself a minor font update, some grain back in the leather (which I'm sure is real cows and the finest of quality) and lord above it lights up red.
I'm not going to spam you with pictures of each letter in red, use your imagination. I don't need it whatsoever but at least it stops the previously modified dash cluster throwing an error message every time I start the car. I'm hesitating to call this fixed since the old one did work on a very rare occasion but fingers crossed that's it for now.
I had planned to nick a few trim clips to sort a loose panel but they're the wrong size. I have ordered some I thought were too big but now think are the right size. Good job I've bloody lost them then, isn't it?
UK_Scat_Pack said:
Pity all your original pics have disappeared. Don t use a phot sharing page, instead share photos direct to the forum and it will work just fine.
Imgbox promises to be back up soon. If it’s more than another week then I might edit the original post and put up the pictures again. Maybe edit some of the waffle while I’m there. In the mean time, I’ve had a few local journeys and the gear shifter lights seem to work 100% of the time and the error message has gone. A nice easy fix. Have a gratuitous car park shot while you’re here.
I f*****g love this car.
Tiny update since everything is going well in the land of Dodge. The Internet is rife with various Dodge models being nicked by the vehicle being broken into, popped into neutral and rolled away. A bit of paranoia set in so I looked into the remedy. There's a cover plate available to stop it happening so easily, and it's all of a tenner delivered. Cheap peace of mind. I splashed out £11.50 to get one that came with the plate, screws and the tool to install it. It's security torx.
Ordinarily, you can pull out the rubber tray next to the gear shifter and there's a fabric loop to pop the car into neutral if things have gone awry. No tools required. Small wonder they're easy to pinch.
To the fix then. The first step is tojack up your car pop the gear shifter off again. The one I recently fitted must've had it's wheaties that day because it was about 10 times harder to remove than the last one. You can see the neutral loop here.
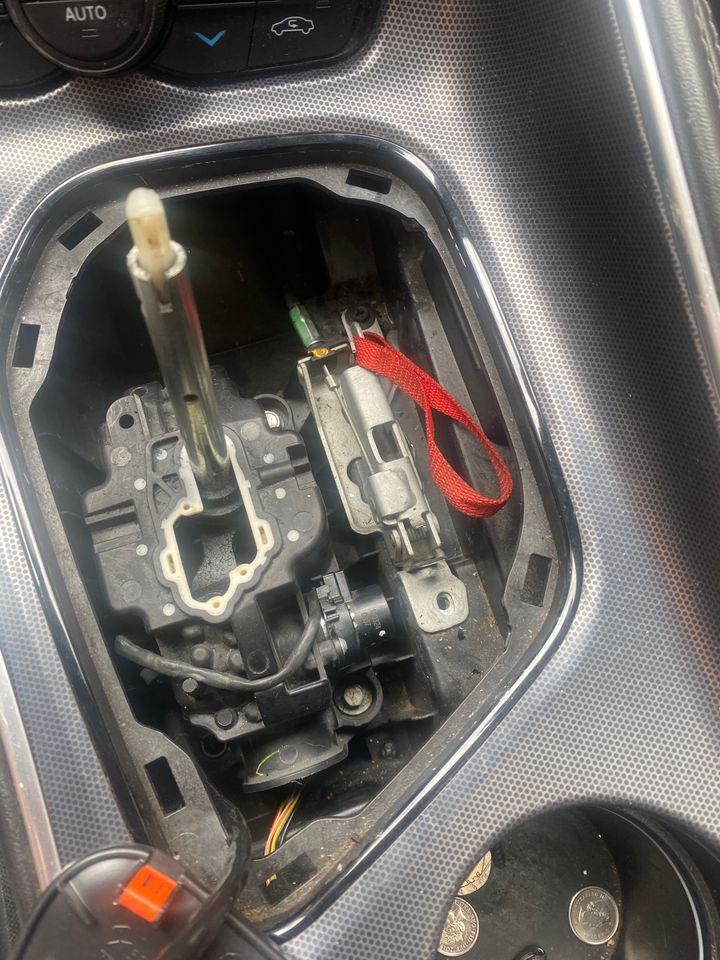
Pop the screws off either and and fit the plate over it, securing in place with China's finest screws that don't fit perfectly, but just enough to work.
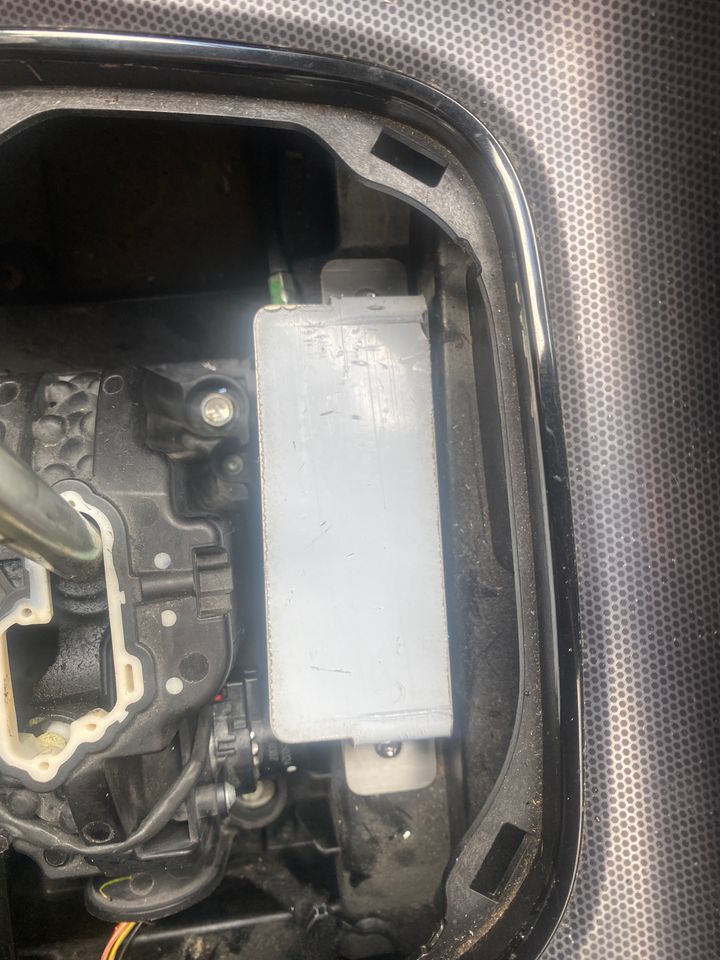
Remove the protective cover from the.. protective cover so you can admire the machined metal.
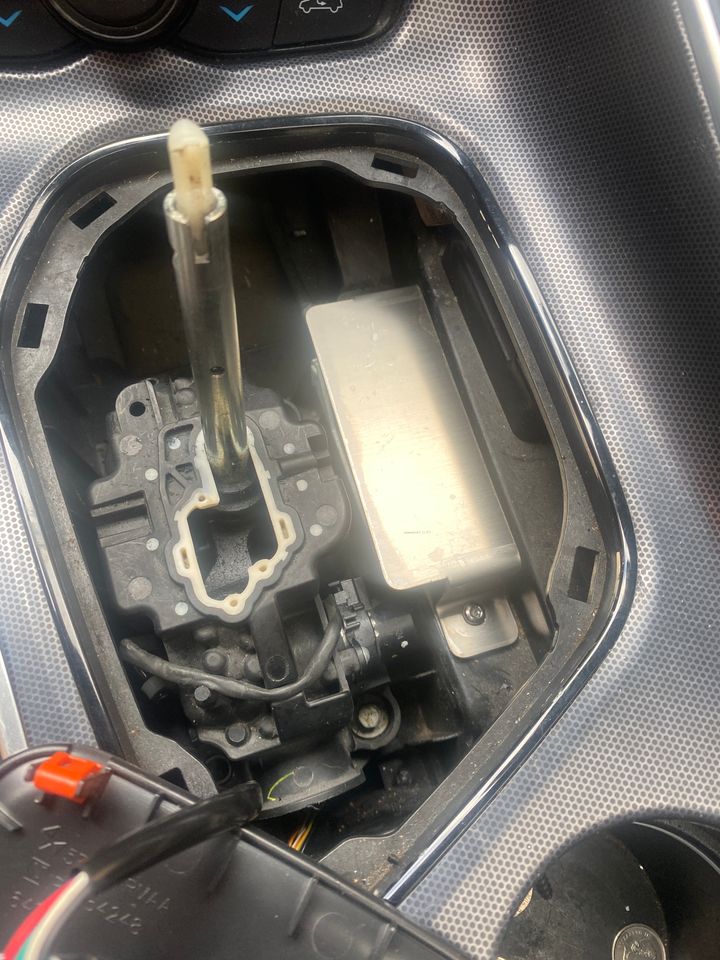
Then immediately cover it up. Here's the window that you would usually access the neutral release through.
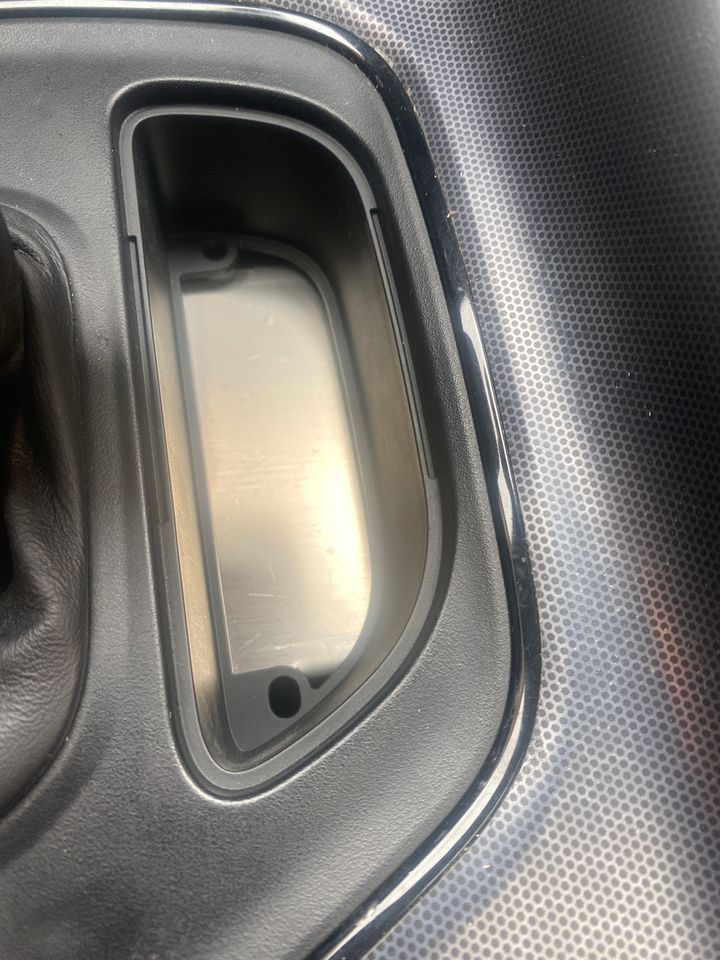
Done. It's not a lot of protection, but for less than a McDonalds meal it's a bit of easier sleeping at night. I even get to add the craptastic tool they gave me to my tool box. Winners all round.
Ordinarily, you can pull out the rubber tray next to the gear shifter and there's a fabric loop to pop the car into neutral if things have gone awry. No tools required. Small wonder they're easy to pinch.
To the fix then. The first step is to
Pop the screws off either and and fit the plate over it, securing in place with China's finest screws that don't fit perfectly, but just enough to work.
Remove the protective cover from the.. protective cover so you can admire the machined metal.
Then immediately cover it up. Here's the window that you would usually access the neutral release through.
Done. It's not a lot of protection, but for less than a McDonalds meal it's a bit of easier sleeping at night. I even get to add the craptastic tool they gave me to my tool box. Winners all round.
Gassing Station | Readers' Cars | Top of Page | What's New | My Stuff