Removing the diff cover advice please before I break it...
Discussion


I have managed to remove all the diff cover bolts from by diff cover but now what?
My thought was that once the bolts were out I could prise the cover off but it is absolutely solid. Perhaps I am missing something, those two dowel type pegs are still in but I don't know how I could remove them. I have run a Stanley knife around the cover and tried to separate it with a chisel and a lump hammer but no joy. I don't want to risk cracking the diff casing if this is not the right approach. Any advice?
To be honest I'm not surprised. Nothing has been easy on this car so far. The drain plug on the diff had been rounded off (somebody using a 13mm socket) and I had to buy a set of six point imperial sockets to grip it as my 12 point ones didn't work. It was bloody tight and took a long breaker bar and my new socket set to get it loose.
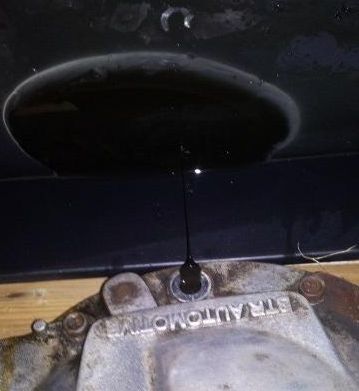
Once I took the plug out to drain it...nothing...no oil came out. At first I thought this was a really bad sign but then lumpy black foul smelling oil with a white emulsion started to seep out. It really was disgusting. It looks more like mud than oil and certainly smells like stagnant mud:
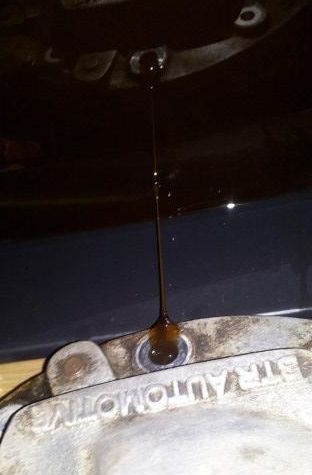
I decided to leave it to drain and walked the dog for an hour and by the time I got back it was (and still is) slowly draining clean oil:
I don't know what all that gunk was but there was a fair bit of it before the good oil came through.
It's not all bad though - the nearest place I could find that had some six point imperial sockets in stock was a good 40 min drive each way...in my Griff 500, roof off, sun shining, not that much of a hardship really!
My thought was that once the bolts were out I could prise the cover off but it is absolutely solid. Perhaps I am missing something, those two dowel type pegs are still in but I don't know how I could remove them. I have run a Stanley knife around the cover and tried to separate it with a chisel and a lump hammer but no joy. I don't want to risk cracking the diff casing if this is not the right approach. Any advice?
To be honest I'm not surprised. Nothing has been easy on this car so far. The drain plug on the diff had been rounded off (somebody using a 13mm socket) and I had to buy a set of six point imperial sockets to grip it as my 12 point ones didn't work. It was bloody tight and took a long breaker bar and my new socket set to get it loose.
Once I took the plug out to drain it...nothing...no oil came out. At first I thought this was a really bad sign but then lumpy black foul smelling oil with a white emulsion started to seep out. It really was disgusting. It looks more like mud than oil and certainly smells like stagnant mud:
I decided to leave it to drain and walked the dog for an hour and by the time I got back it was (and still is) slowly draining clean oil:
I don't know what all that gunk was but there was a fair bit of it before the good oil came through.
It's not all bad though - the nearest place I could find that had some six point imperial sockets in stock was a good 40 min drive each way...in my Griff 500, roof off, sun shining, not that much of a hardship really!

Tanguero said:
Warm it with a blowtorch. Don't go mad, you just want to get it hot enough to soften the existing sealant.
Now that's a good idea. I'm going to try a combination of the two things. Heat and tapping all the way around with my chisel and hammer.Why is it when you see people do this on telly the diff just prises apart with no effort...Ed China I'm looking at you!
I've done it! For those wondering about the best technique I would describe the process as below:
Tap tap tap...tap tap tap...FIRE!!!...tap tap tap...tap tap tap...MORE FIRE!!!...tap tap tap...TAP..TAP..WHACK...WHACK WHACK WHACK...SUCCESS!!!!
You are right though, even once you have broken the sealant those dowels are extremely tight. You have to pry apart the top dowel a couple of mm, turn the diff over, pry the bottom one, turn the diff over, pry the top one...it's slow going.
Once you get the cover off prepare yourself for the smell, my God. I should have wore my paint vapour mask. It reminds me of when we had a hamster which we though was hibernating until the hallway started smelling really bad and we realised it wasn't hibernating.
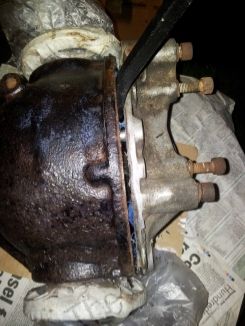
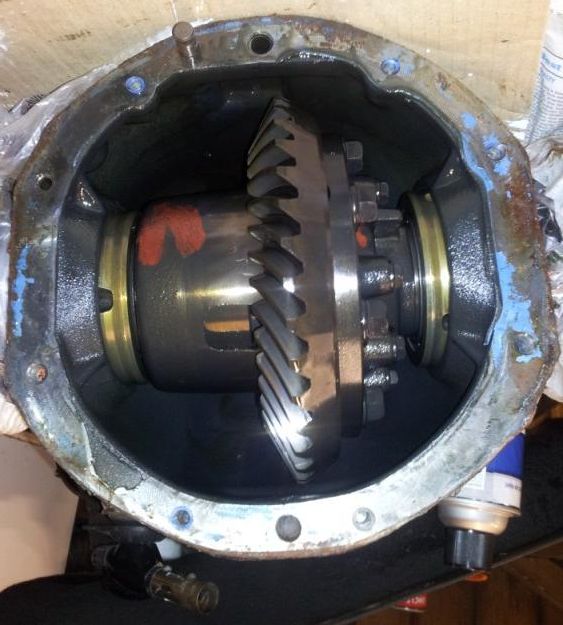
Here's the diff separated and a shot of the gears inside:

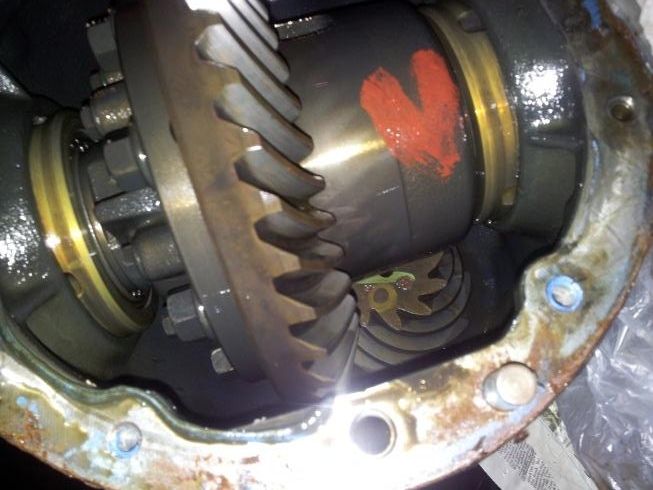
Considering the state of the oil and the mileage of the car I am pleased with the condition of the diff inside. The gears are all intact without any chips and the casing inside is swarf free.
I will clean up the casing and remove the old sealant tomorrow before resealing and filling with fresh oil.
Time for a cup of tea.
Tap tap tap...tap tap tap...FIRE!!!...tap tap tap...tap tap tap...MORE FIRE!!!...tap tap tap...TAP..TAP..WHACK...WHACK WHACK WHACK...SUCCESS!!!!
You are right though, even once you have broken the sealant those dowels are extremely tight. You have to pry apart the top dowel a couple of mm, turn the diff over, pry the bottom one, turn the diff over, pry the top one...it's slow going.
Once you get the cover off prepare yourself for the smell, my God. I should have wore my paint vapour mask. It reminds me of when we had a hamster which we though was hibernating until the hallway started smelling really bad and we realised it wasn't hibernating.
Here's the diff separated and a shot of the gears inside:
Considering the state of the oil and the mileage of the car I am pleased with the condition of the diff inside. The gears are all intact without any chips and the casing inside is swarf free.
I will clean up the casing and remove the old sealant tomorrow before resealing and filling with fresh oil.
Time for a cup of tea.

The oil leak looked like mine did and I took mine apart for the same reason. Turns out it was the breather, breathing oil, so replaced that with my own breather system and no no more leaks! Make sure you put the correct oil back in, it makes a difference to how the LSD behaves! ( found that out too, lol)
TimJM said:
Tanguero said:
So where was it leaking from?
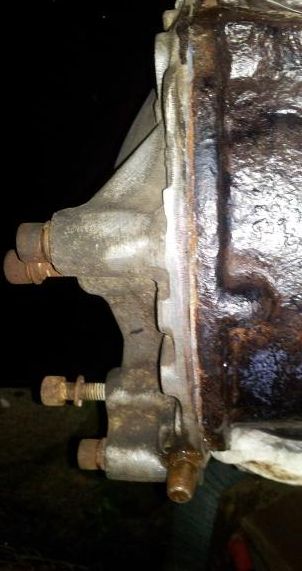
The cover, here it was at the start of the project: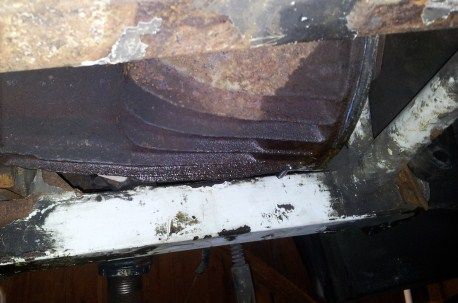
I think the sealant which is a blue coloured rubber had perished.
Still no harm in having the cover off and resealing it, though the difficulty you had would imply to me that the original seal is probably fine.
I am pretty sure it is just the sealant. The breather on top in the first photo is misleading as that was after I have been turning the diff upside-down and oil was running out the breather (turning the diff upside-down seems to make the breather the drain plug).
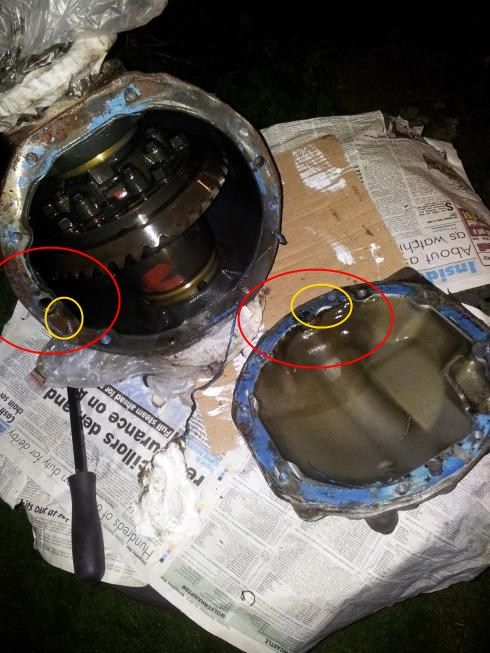
When the diff was in the car as shown in the later pic in this thread the top of the diff and the breather was bone dry and dusty. If you look at the pic where the diff and cover are shown just after separation I have circled where the cover and diff locate togethe. In red is the general area and in yellow the specific area where I think the leak was. In this location there was virtually no blue sealant at all, it was metal on metal. The rest of the cover had a good covering of sealant so this is my guess:
Of course there is a good chance I could be completely wrong - time will tell.
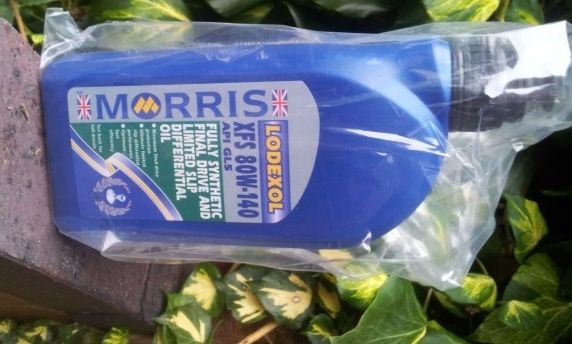
This is the oil I am using to refill the diff (I have two bottles):
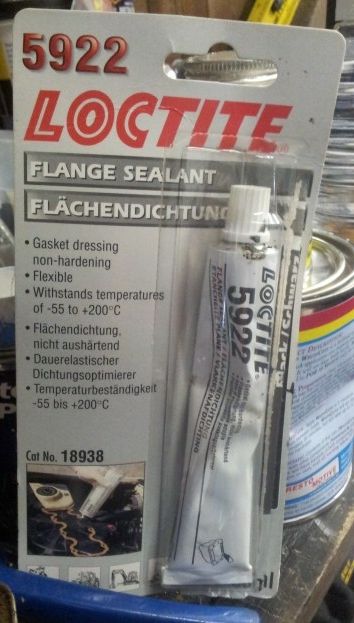
And I was planning on using this for the sealant:
If either of those is wrong (the oil or the sealant I plan on using) please let me know before tonight.
Cheers,
When the diff was in the car as shown in the later pic in this thread the top of the diff and the breather was bone dry and dusty. If you look at the pic where the diff and cover are shown just after separation I have circled where the cover and diff locate togethe. In red is the general area and in yellow the specific area where I think the leak was. In this location there was virtually no blue sealant at all, it was metal on metal. The rest of the cover had a good covering of sealant so this is my guess:
Of course there is a good chance I could be completely wrong - time will tell.
This is the oil I am using to refill the diff (I have two bottles):
And I was planning on using this for the sealant:
If either of those is wrong (the oil or the sealant I plan on using) please let me know before tonight.
Cheers,
C3BER said:
Enjoyed the thread.
Just taken the bells off my discs and what a ball ache they are to get off.
C3BER -If your using the new AP bolts to refit; its even worse!Just taken the bells off my discs and what a ball ache they are to get off.
Replaced the diff oil for the same stuff as you a couple of months ago and noticed a significant improvement in drive.
I've never driven this car so I won't know about any improvements. I have driven 4.5 Cerberas though (owned one for a few years) so I will know how it should drive once the refurb is finished.
I am just waiting for my epoxy mastic paint to be ready for painting and then I will be painting up the rear anti roll bar I have just finished sanding back, painting the bottom half of the diff, cleaning up the cover and removing old sealant, refitting the cover with new sealant and then having a beer.
I decided I need to paint the bottom half of the diff now so I can then re-fill with oil in the morning (once it is the right way up again) and paint the top half with 2x coats of paint. I can do the 2nd coat of paint on the bottom half of the diff once it is back in the car.
The diff is back together now.
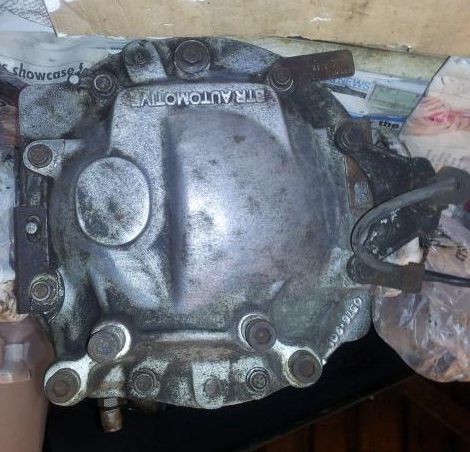
I think I have everything in the right place. When I was putting it back together I was missing a couple of bolts but then I realised the speed sensor wasn't anywhere to be seen. After a quick dig around in my box of bolts I found and attached it along with a couple of little plates that seem to grip around the diff. Does this look right or have I missed something:
It took me ages to find one of the bolts. When I bough this car I bought it as a project somebody had started and given up on. Consequently I inherited a big box of bolts wihtout any idea where they came from.
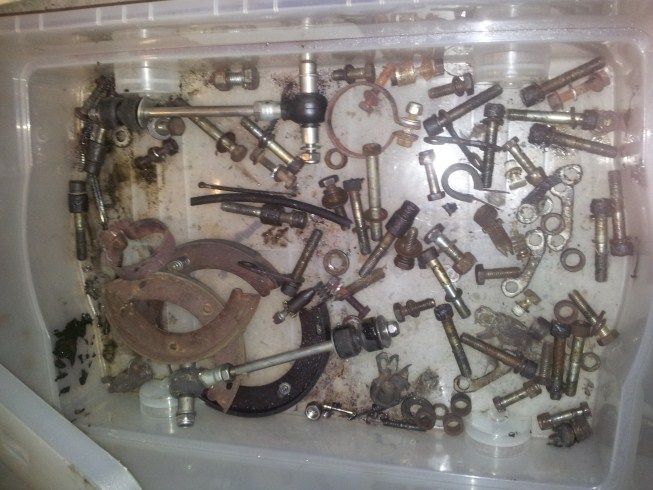
I hope to start reassembly of the rear end on Saturday but I may need some help working out where all this lot goes:
I also have another box with more bits in (rear callipers) which I will need to have a look through and a new rear end bolt set to replace all the nuts/bolts I have taken off.
The rear callipers are something I may need specific help with. I have the calliper, some big pins and some big springs. I can probably work out where the pins and bolts go but I have no idea what to do with the long springs. Does anyone have a pic of a calliper assembled (or on the car) showing where bits go?
I think I have everything in the right place. When I was putting it back together I was missing a couple of bolts but then I realised the speed sensor wasn't anywhere to be seen. After a quick dig around in my box of bolts I found and attached it along with a couple of little plates that seem to grip around the diff. Does this look right or have I missed something:
It took me ages to find one of the bolts. When I bough this car I bought it as a project somebody had started and given up on. Consequently I inherited a big box of bolts wihtout any idea where they came from.
I hope to start reassembly of the rear end on Saturday but I may need some help working out where all this lot goes:
I also have another box with more bits in (rear callipers) which I will need to have a look through and a new rear end bolt set to replace all the nuts/bolts I have taken off.
The rear callipers are something I may need specific help with. I have the calliper, some big pins and some big springs. I can probably work out where the pins and bolts go but I have no idea what to do with the long springs. Does anyone have a pic of a calliper assembled (or on the car) showing where bits go?
TimJM said:
The rear callipers are something I may need specific help with. I have the calliper, some big pins and some big springs. I can probably work out where the pins and bolts go but I have no idea what to do with the long springs. Does anyone have a pic of a calliper assembled (or on the car) showing where bits go?
http://home.online.no/~krimp/sweb/images/IMG_2503_test_mount_titanium_II.JPG(quick pic I found)
The springs go over the split pins.
Lots of help on here, just post the pictures up or what you want to fit.
Bolt sizes and lenghts chart should help out a bit too.
Gassing Station | Cerbera | Top of Page | What's New | My Stuff