Removing the dash pod
Discussion


Could someone point me in the right direction here. I know (having searched the forums) you are supposed to undo two wingnuts under the dash to release the pod but I can't find them!
I don't have the best access as my car in in a single garage so I am sitting in the driver seat fiddling about under either side of the pod but I can feel any wingnuts.
Could someone provide a photo (if they have one handy) or just some further instruction on the location of these nuts.
Cheers,
I don't have the best access as my car in in a single garage so I am sitting in the driver seat fiddling about under either side of the pod but I can feel any wingnuts.
Could someone provide a photo (if they have one handy) or just some further instruction on the location of these nuts.
Cheers,
As you look at that trim panel (Imagine from the drivers seat) there is a wingnut on each side. The studs are parallel to the ground, one anchored into the offside footwell wall and the other, anchored higher up, hidden somewhere up in the central panel.
Thy are up and behind the trailing edge of the trim panel.
I took the Air-Con dial off to get access to the offside wing-nut (You will have to anyway to remove the trim panel.
I recommend taking the offside one off first and then, once that side is clear, the trim panel moves enough to get at the second wing-nut.
Beware of the air-con hoses which are simply push fit.
I am such an un-athletic cripple that I took the driver's seat out to do this (actually, I took the adjustable Clutch and Brake pedals off as well - but I'm awkward).
Hope that's not too confusing
I was able to get in with trim panel in situ, but I did pull off the hose to the air vent between the clock and fuel gauge if memory serves. It's still fiddly and tight and I was sat the wrong way round on the sill to get in - which sounds unfeasible from your description of your garage/work area.
You must have very long fingers to get to those with the trim panel in situ!
Anyhow, I have managed to remove the pod. Part of restoring this project Cerbera myself was to learn about cars (and TVR's in particular) but also to hopefully help other who face similar problems. After some helpful advice on here about removing the trim panel the job was relatively simple and without issue.
Here is my quick guide to dash pod removal. For this guide when I say left/right I am referring to the side as if you are seated in a driving position:
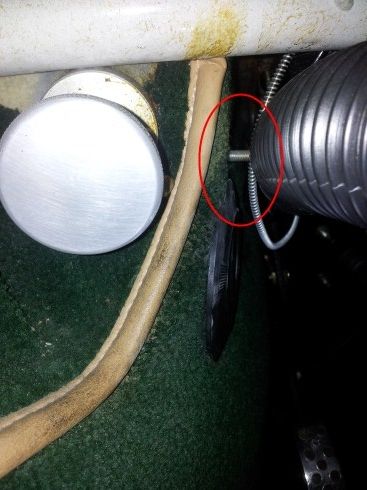
First off remove the trim panel under the steering column. The best way I found was to undo the left side wing nut which is just above the air vent:
and then the right side one which is to the right of the other air vent:
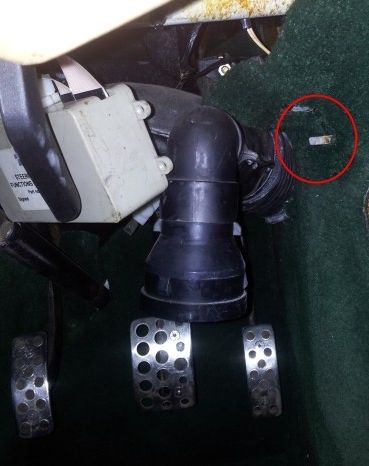
The trim panel itself has a far amount of give in it so you should then easily be able to slide the left hand side off the bolt followed by the right and then drop the panel down out the way. Obviously I took those pics after I had removed the trim panel to make it easier to see the position of the nuts/bolts.
With the panel off the right hand side dash pod wing nut is then on the underside of the dash. On the pic below the screw you can see by the wingnut is the one that goes through the dash panel - the wing nut is in line with that just below:
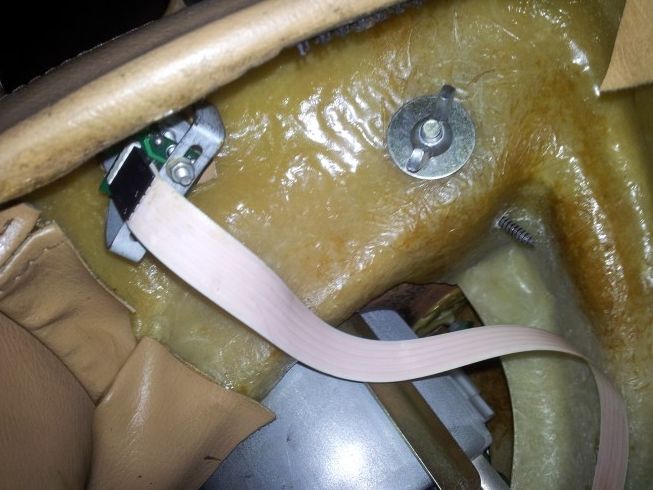
The left hand side one it in a similar position on the opposite side, be careful not to knock off the air hose as they are only push fit:
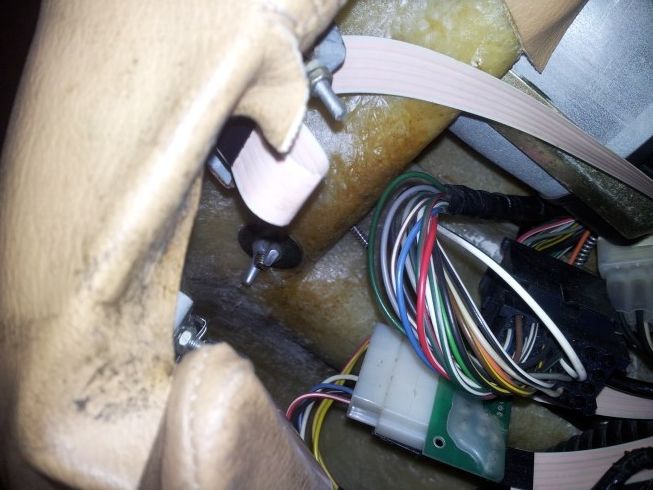
Once you have undone these the dash pod itself is free although it won't feel like it. To remove the pod I first dropped the steering wheel to its lowest height and then tilt the pod forward, this seems to free it slightly.
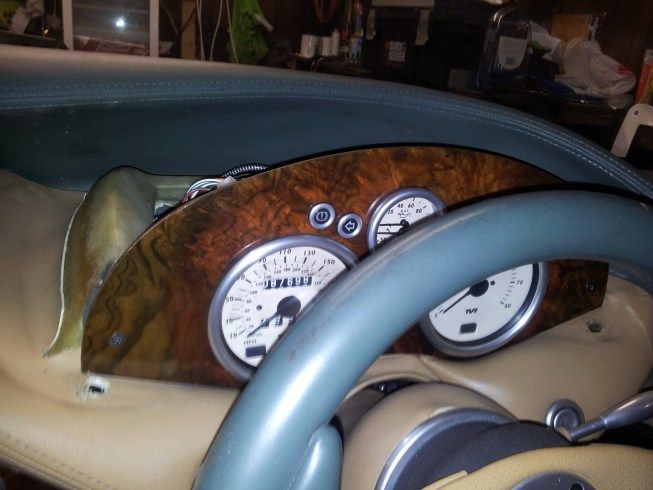
Then lift out the left side first being careful not to scratch the leather dash on the protruding bolt. Rotating the pod towards me left hand side first then made it easy to lift out the right hand side. Hopefully you will end up like this:
Most people doing this will be doing so (as I am) to remove a gauge. Be careful not to lose the tiny tiny spring washers on the back of the gauges behind the locating nuts. I didn't know they were there until I lost the first one!
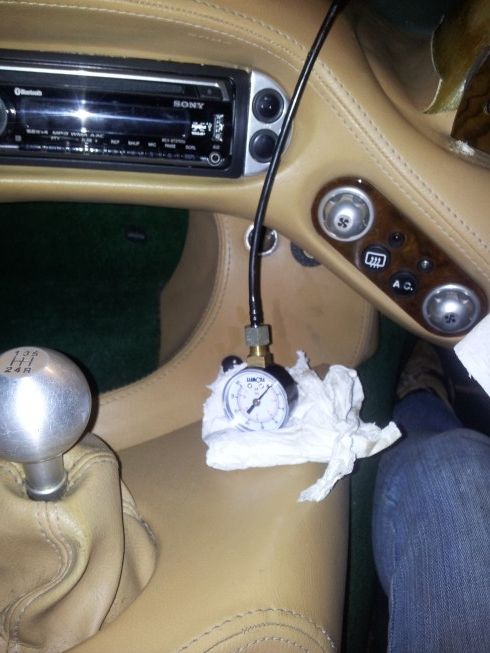
So I am all set for my test tomorrow - it was too late last night to start up my car again (4.5 with no exhausts on). I know my car has oil pressure after my last success (about 77-78PSI and I was extremely happy to see that). So before I try and thread out the water temp capillary tube (which seems to be about 4 foot too long) I am going to try the pressure in the car. Who knows, it may be a blocked or kinked oil hose...(I know I am kidding myself but you have to try):
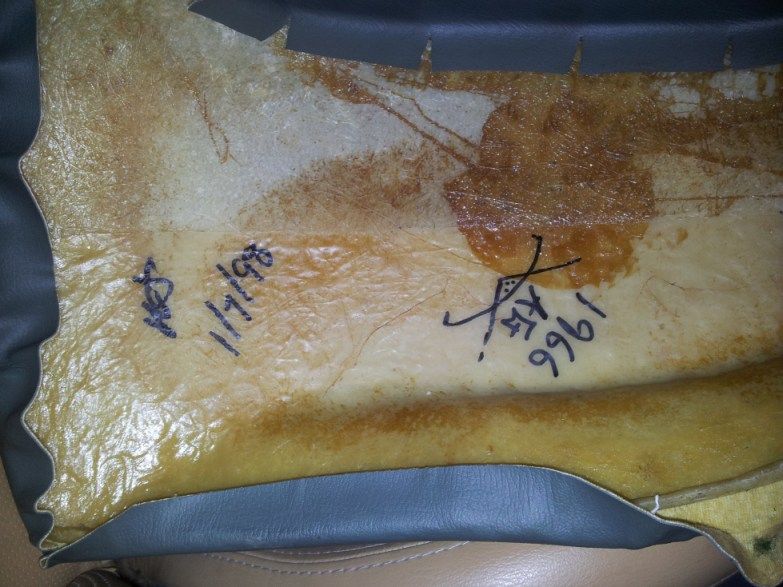
Finally, for those of you who like TVR graffiti have a look under the pod, here is mine:
Anyhow, I have managed to remove the pod. Part of restoring this project Cerbera myself was to learn about cars (and TVR's in particular) but also to hopefully help other who face similar problems. After some helpful advice on here about removing the trim panel the job was relatively simple and without issue.
Here is my quick guide to dash pod removal. For this guide when I say left/right I am referring to the side as if you are seated in a driving position:
First off remove the trim panel under the steering column. The best way I found was to undo the left side wing nut which is just above the air vent:
and then the right side one which is to the right of the other air vent:
The trim panel itself has a far amount of give in it so you should then easily be able to slide the left hand side off the bolt followed by the right and then drop the panel down out the way. Obviously I took those pics after I had removed the trim panel to make it easier to see the position of the nuts/bolts.
With the panel off the right hand side dash pod wing nut is then on the underside of the dash. On the pic below the screw you can see by the wingnut is the one that goes through the dash panel - the wing nut is in line with that just below:
The left hand side one it in a similar position on the opposite side, be careful not to knock off the air hose as they are only push fit:
Once you have undone these the dash pod itself is free although it won't feel like it. To remove the pod I first dropped the steering wheel to its lowest height and then tilt the pod forward, this seems to free it slightly.
Then lift out the left side first being careful not to scratch the leather dash on the protruding bolt. Rotating the pod towards me left hand side first then made it easy to lift out the right hand side. Hopefully you will end up like this:
Most people doing this will be doing so (as I am) to remove a gauge. Be careful not to lose the tiny tiny spring washers on the back of the gauges behind the locating nuts. I didn't know they were there until I lost the first one!
So I am all set for my test tomorrow - it was too late last night to start up my car again (4.5 with no exhausts on). I know my car has oil pressure after my last success (about 77-78PSI and I was extremely happy to see that). So before I try and thread out the water temp capillary tube (which seems to be about 4 foot too long) I am going to try the pressure in the car. Who knows, it may be a blocked or kinked oil hose...(I know I am kidding myself but you have to try):
Finally, for those of you who like TVR graffiti have a look under the pod, here is mine:
Well that settles it - my oil pressure gauge is faulty as suspected and shows 0PSI. I was hoping perhaps it was just a kinked pipe between the gauge and the connection on the wing or some sort of fitting issues from the recent repaired water temp but no - it is broken and will be heading back to speedy cables just as soon as I can remove it.
Mt test gauge using the same oil pipe as the gauge inside the car showed a reading of 80PSI on cold idle (about 800RPM):
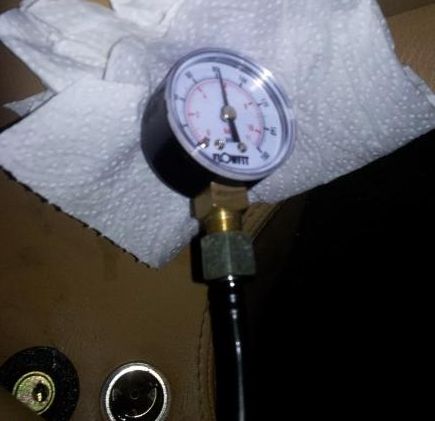
I didn't run the car long enough for a hot/warm idle reading as it was getting late and the car is extremely loud. That test will have to wait now until the gauge is fixed.
The previous owner who had the water temp part of the gauge repaired should have sent it back when it was returned and the oil pressure part not working but as the car was off the road anyway I guess they didn't bother.
Mt test gauge using the same oil pipe as the gauge inside the car showed a reading of 80PSI on cold idle (about 800RPM):
I didn't run the car long enough for a hot/warm idle reading as it was getting late and the car is extremely loud. That test will have to wait now until the gauge is fixed.
The previous owner who had the water temp part of the gauge repaired should have sent it back when it was returned and the oil pressure part not working but as the car was off the road anyway I guess they didn't bother.
TimJM said:
You must have very long fingers to get to those with the trim panel in situ!
Anyhow, I have managed to remove the pod. Part of restoring this project Cerbera myself was to learn about cars (and TVR's in particular) but also to hopefully help other who face similar problems. After some helpful advice on here about removing the trim panel the job was relatively simple and without issue.
Here is my quick guide to dash pod removal. For this guide when I say left/right I am referring to the side as if you are seated in a driving position:
First off remove the trim panel under the steering column. The best way I found was to undo the left side wing nut which is just above the air vent:
and then the right side one which is to the right of the other air vent:
The trim panel itself has a far amount of give in it so you should then easily be able to slide the left hand side off the bolt followed by the right and then drop the panel down out the way. Obviously I took those pics after I had removed the trim panel to make it easier to see the position of the nuts/bolts.
With the panel off the right hand side dash pod wing nut is then on the underside of the dash. On the pic below the screw you can see by the wingnut is the one that goes through the dash panel - the wing nut is in line with that just below:
The left hand side one it in a similar position on the opposite side, be careful not to knock off the air hose as they are only push fit:
Once you have undone these the dash pod itself is free although it won't feel like it. To remove the pod I first dropped the steering wheel to its lowest height and then tilt the pod forward, this seems to free it slightly.
Then lift out the left side first being careful not to scratch the leather dash on the protruding bolt. Rotating the pod towards me left hand side first then made it easy to lift out the right hand side. Hopefully you will end up like this:
Most people doing this will be doing so (as I am) to remove a gauge. Be careful not to lose the tiny tiny spring washers on the back of the gauges behind the locating nuts. I didn't know they were there until I lost the first one!
So I am all set for my test tomorrow - it was too late last night to start up my car again (4.5 with no exhausts on). I know my car has oil pressure after my last success (about 77-78PSI and I was extremely happy to see that). So before I try and thread out the water temp capillary tube (which seems to be about 4 foot too long) I am going to try the pressure in the car. Who knows, it may be a blocked or kinked oil hose...(I know I am kidding myself but you have to try):
[
Finally, for those of you who like TVR graffiti have a look under the pod, here is mine:
Thanks very much for the illustrated guide. Anyhow, I have managed to remove the pod. Part of restoring this project Cerbera myself was to learn about cars (and TVR's in particular) but also to hopefully help other who face similar problems. After some helpful advice on here about removing the trim panel the job was relatively simple and without issue.
Here is my quick guide to dash pod removal. For this guide when I say left/right I am referring to the side as if you are seated in a driving position:
First off remove the trim panel under the steering column. The best way I found was to undo the left side wing nut which is just above the air vent:
and then the right side one which is to the right of the other air vent:
The trim panel itself has a far amount of give in it so you should then easily be able to slide the left hand side off the bolt followed by the right and then drop the panel down out the way. Obviously I took those pics after I had removed the trim panel to make it easier to see the position of the nuts/bolts.
With the panel off the right hand side dash pod wing nut is then on the underside of the dash. On the pic below the screw you can see by the wingnut is the one that goes through the dash panel - the wing nut is in line with that just below:
The left hand side one it in a similar position on the opposite side, be careful not to knock off the air hose as they are only push fit:
Once you have undone these the dash pod itself is free although it won't feel like it. To remove the pod I first dropped the steering wheel to its lowest height and then tilt the pod forward, this seems to free it slightly.
Then lift out the left side first being careful not to scratch the leather dash on the protruding bolt. Rotating the pod towards me left hand side first then made it easy to lift out the right hand side. Hopefully you will end up like this:
Most people doing this will be doing so (as I am) to remove a gauge. Be careful not to lose the tiny tiny spring washers on the back of the gauges behind the locating nuts. I didn't know they were there until I lost the first one!
So I am all set for my test tomorrow - it was too late last night to start up my car again (4.5 with no exhausts on). I know my car has oil pressure after my last success (about 77-78PSI and I was extremely happy to see that). So before I try and thread out the water temp capillary tube (which seems to be about 4 foot too long) I am going to try the pressure in the car. Who knows, it may be a blocked or kinked oil hose...(I know I am kidding myself but you have to try):
[
Finally, for those of you who like TVR graffiti have a look under the pod, here is mine:
It has given me courage to attempt the same

No problem, it was one of those jobs that once you do it seems incredibly simple but even so I couldn't find the detail on here to do it easily so I thought I would add it.
The key points are dropping the steering wheel to the lowest point and tilting the pod forward and lifting the passenger side out first then rotating the pod to lift the right side out.
I hope your car is coming along Jim after all your problems. Has Mike managed to work his magic yet on putting it back together?
Gassing Station | Cerbera | Top of Page | What's New | My Stuff