Problems refitting diff
Discussion


I'm having major problem refitting my diff, I just can't get the bolts to all align at the same time. Is there some trick I am missing here as I don't think most people spend 8 hours as I have now trying to align bolts without success.
The off side bracket is in but I can't fit the near side (passenger side) one. I keep wondering if I have done something stupid like the brackets the wrong way around or upside down?
If I put in the bush bolt first as show here (which isn't easy in itself) then I can't get the diff bolts in:
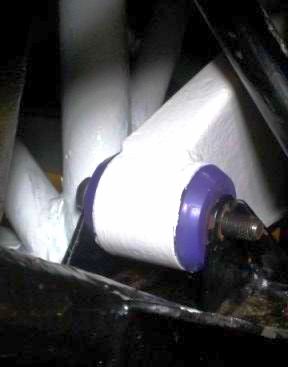
With this bolt in first the bracket won't sit flush on the diff - it's as if the bracket is too long.
If I take the bolt out and then put the diff bolts in as shown here:
Then the brackets fit nicely on the diff all flush and the bolts go in easily but then I can't get the bush bolt in as it can't get close enough in. Again it is as if the bracket is too long again:
(I forgot to sand and paint that side of the chassis diff bracket mount...another job)
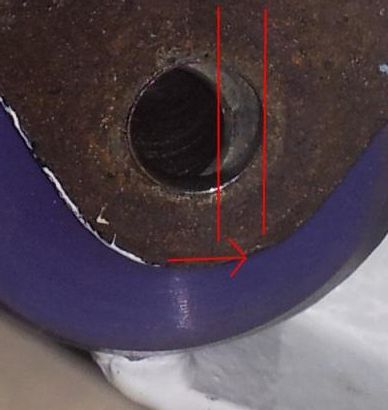
The red lines show the direction I want to move the bracket in by but no amount of mallet or pry bar action is going to move it in because it has go nowhere to move to (I've tried) unless I take out the opposite side bracket bolt and then I have the same problem there.
It is as if either the diff with the two brackets attached has become 4mm wider or the chassis has become 4mm narrower. I just can figure it out at all and after 8 hours over the last two days working on this I am ready to give up.
I had to walk away and give up tonight anyhow as I was reaching the point where I was going to start smashing the car up with a lump hammer. I must think calming thoughts....what is it they tell you in anger management...think of a shallow stream with water trickling over pebbles....ahhhh....that's better...
Has anyone else had problems refitting the diff or has any tips? I genuinely thought this would take me an hour or so.
The off side bracket is in but I can't fit the near side (passenger side) one. I keep wondering if I have done something stupid like the brackets the wrong way around or upside down?
If I put in the bush bolt first as show here (which isn't easy in itself) then I can't get the diff bolts in:
With this bolt in first the bracket won't sit flush on the diff - it's as if the bracket is too long.
If I take the bolt out and then put the diff bolts in as shown here:
Then the brackets fit nicely on the diff all flush and the bolts go in easily but then I can't get the bush bolt in as it can't get close enough in. Again it is as if the bracket is too long again:
(I forgot to sand and paint that side of the chassis diff bracket mount...another job)
The red lines show the direction I want to move the bracket in by but no amount of mallet or pry bar action is going to move it in because it has go nowhere to move to (I've tried) unless I take out the opposite side bracket bolt and then I have the same problem there.
It is as if either the diff with the two brackets attached has become 4mm wider or the chassis has become 4mm narrower. I just can figure it out at all and after 8 hours over the last two days working on this I am ready to give up.
I had to walk away and give up tonight anyhow as I was reaching the point where I was going to start smashing the car up with a lump hammer. I must think calming thoughts....what is it they tell you in anger management...think of a shallow stream with water trickling over pebbles....ahhhh....that's better...
Has anyone else had problems refitting the diff or has any tips? I genuinely thought this would take me an hour or so.
Supateg said:
Get your Podger out sir, ( tapered round drift into the hole to align and knock the bolt through)
If you have plenty of thread on the bolt grind a point on it.
I was thinking about this whilst relaxing with a beer. Why can't you buy bolts with a small drift/punch taper on the end after the thread? Those would be ideal for this.If you have plenty of thread on the bolt grind a point on it.
I can't align from the opposite end the bolt goes in from as the chassis tube drops down about 3 inches to the other side of the chassis mount blocking the insertion of any punch/drift. It is really tricky to get anything into the side the bolt has to be inserted from as that is the end facing the front of the car and you have the narrowest of gaps between the body and the main chassis rail.
I will have another go tomorrow once I have calmed down. I was just pissed off as I have a freed up a day on Saturday and I had planned on rebuilding most of the car. As it is I think after another 12 hours+ I will be in exactly the same position as I am now at the end of Saturday and very little progress will be made.
A long taper punch is on it's way.
I hope it works as I'm running out of ideas and this is holding up my rebuild. My only other idea is to try and find a narrow scissor jack and slide it between the diff and the chassis rail. Hopefully I will be able to apply a little pressure to move the diff over and align this bolt hole. Annoyingly the hole is nearly aligned from the other side of the mount but you can't insert a bolt from that side as the chassis tube is in the way.
I hope it works as I'm running out of ideas and this is holding up my rebuild. My only other idea is to try and find a narrow scissor jack and slide it between the diff and the chassis rail. Hopefully I will be able to apply a little pressure to move the diff over and align this bolt hole. Annoyingly the hole is nearly aligned from the other side of the mount but you can't insert a bolt from that side as the chassis tube is in the way.
ridds said:
You have left all the bolts "loose" haven't you?
I started off leaving the diff bolts loose but the problem I had was when I move the bush mount into place with a mallet the diff bracket pops off the front of the diff and then with the bush mount bolt in place I cant get the diff bracket back down flush onto the diff face. So I tightened the bolts up enough so the diff bracket can't move away from the diff enough to overlap the circular prop shaft flange it sits against and then I can't get the bush bolt in. As I said - it seems like my bracket has grown 4mm in length. I am hoping that when I get the punch it may work but I suspect if it does work it will be by deforming the bush material rather than moving anything. Although having said that - the bush material will bounce back as soon as the punch is removed so I don't know if it will achieve anything.
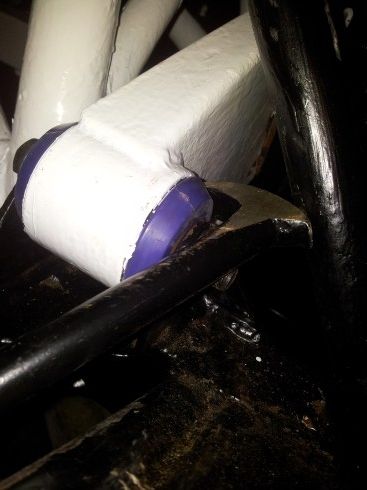
Are these poly bushes you are using? Were originals plain rubber ones? If so they would have had much more "give" when originally fitted to your chassis.
Is there perhaps some discrepancy within your chassis mounting points that is only now being shown up ?
i am no expert Tim, just trying to throw a different angle on your problem,!
Sandy
Is there perhaps some discrepancy within your chassis mounting points that is only now being shown up ?
i am no expert Tim, just trying to throw a different angle on your problem,!
Sandy
RFC1 said:
Are these poly bushes you are using? Were originals plain rubber ones? If so they would have had much more "give" when originally fitted to your chassis.
Is there perhaps some discrepancy within your chassis mounting points that is only now being shown up ?
i am no expert Tim, just trying to throw a different angle on your problem,!
Sandy
Yes - I've gone form rubber to poly and the idea of some discrepancy within the chassis mounting points that is only now being shown up is exactly what I fear. It can't be normal when refitting a diff to be this difficult to align.Is there perhaps some discrepancy within your chassis mounting points that is only now being shown up ?
i am no expert Tim, just trying to throw a different angle on your problem,!
Sandy


I refitted the diff in my tuscan last week. Had a similar problem but not quite as bad. I ended up getting the longer mount bolted up then bolting the offside one to the chassis. Then by raising and lowering the diff on a jack I managed to get the lower bolt in place. As I let the jack down the diff dropped, squashing the bushes and with a bit of wriggling the top bolt lined up. Was a bit of a pain but not as bad as having to remove the original top bush to replace with a poly one. I never want to have to do that again!
Edited by Andy_mr2sc on Sunday 20th October 15:40
Good news - the diff is in.
After spending about 10-12 hours over three days getting nowhere I decided to take everything off and start again. With a more thoughtful process it went much better and took about an hour. So in the spirit of letting other people learn from my mistakes here is my how to refit your diff in less than three days guide.
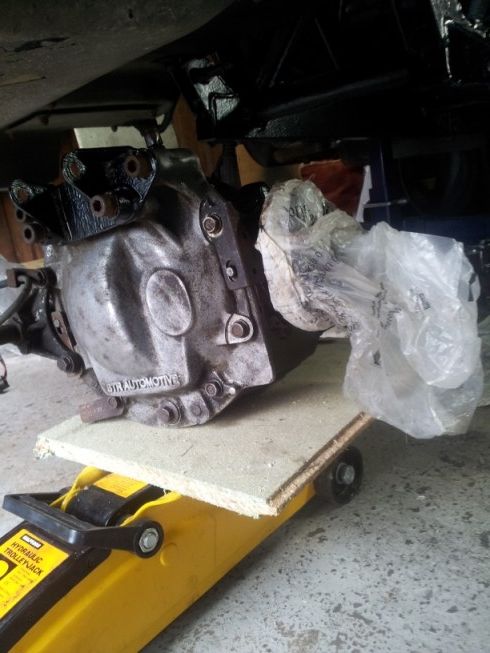
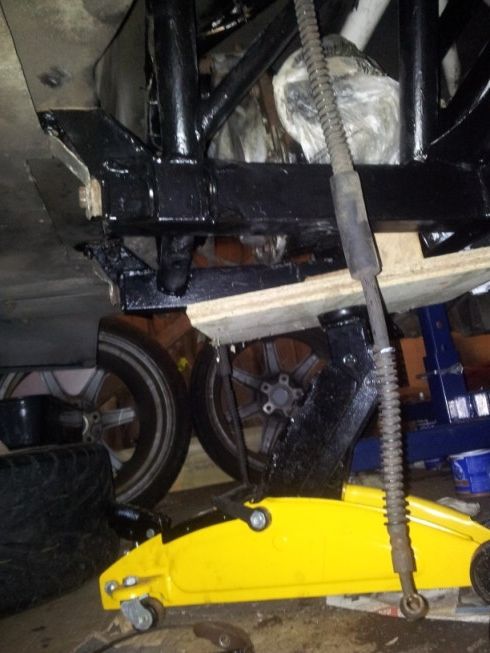
First off I was doing this on my own - it is probably a two man job but if you are on your own this is how I did it. Make yourself a little lifting platform to get the diff back up to the chassis level. I started off by trying to lift it in but when you are lying on your back lifting it at arms length it is very heavy. A pieve of wood with a bolt and some large washers into a normal jack works well:
When you get near the chassis rails you have to rotate the diff so the bits where the drive shaft connect can pass the main chassis rails. It is best to rotate anticlockwise so the diff breather is staying near the top otherwise you end up pouring out your diff oil. You also need to position the diff so the front it high to make it over the chassis tube that sits just in front of the diff. If you are doing this yourself a block of wood under the front should work while you jack it past the chassis rails:
The the fun and games start aligning up the diff with the bushes and brackets. Obviously the rear is the first one in and with the use of the jack is fairly easy to align and get a bolt through.
Then I added the off side shorter front bracket first. Aligning the bush side and getting the bolt through the chassis if fiddly but doable as this is the first bracket and you have plenty of freedom for movement. I then by moving the diff around on the jack platform loosely bolted up the two front bolts on this bracket. As this is the first bracket in it isn't too tricky.
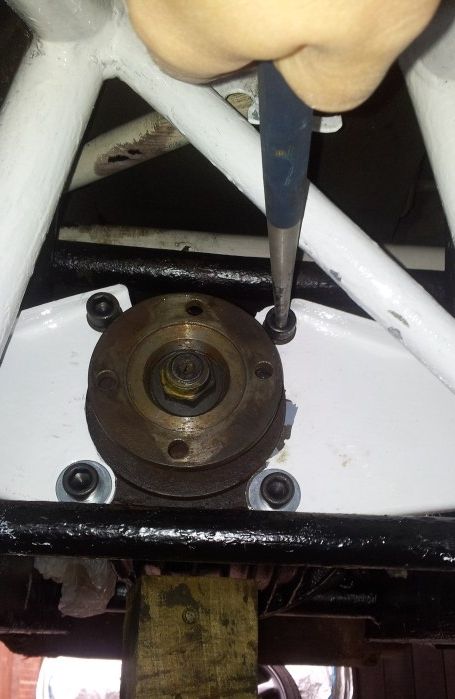
Next is the nearside longer front bracket and this is where all the problems were for me. After trying many many ways the way that worked in the end and didn't take too long was to attach the bracket to the chassis first and get the bolt all the way through the chassis mount. This is more fiddly than the first one as now the diff will be in the way of lining the bracket up easily. I ended up just using a rubber mallet to knock the diff into the mount and then using a heel bar aligned the bracket so I could get the bolt through:
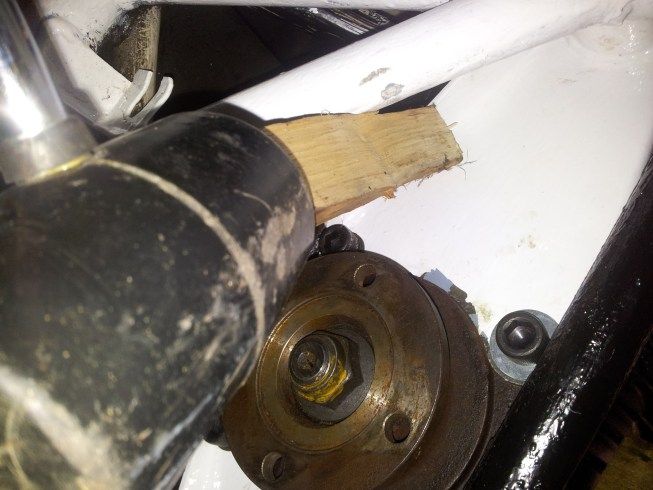
Not you have the two front bolts remaining. The problem I had was I couldn't get the bracket to sit down on the diff face, like the bracket was too long. The way I did it in the end was to use a long taper drift punch into the top of the diff and use this like a lever to line up the bottom bolt. You will have to give it a fair bit of force to move the diff enough to line up the bottom bolt but it will go.
Please ignore all the various scratches from botched refitting attempts and slipping with various tools/mallets - it was a lot of trial and error to come up with the solution and I need to retouch some marks on the chassis I created. Here is a pic to illustrate once I had my bolts in to show what I mean, obviously th etop bolt would not be in and the drift would be as far though as you can get it:
Then I tightened up the shorter bracket bolts and the bottom one I just got in enough to pull the bottom of the bracket down onto the diff face. The top will still be overlapping and you will be unable to get in the top bolt but with the other three tightened down you then need a piece of wood and a mallet. Position the wood against the top of the diff bracket like you want to push the bracket back towards the chassis and give it a far hard hits with a mallet. You should be able to knock the top of the bracket flush against the diff face. Once you have done this the top bolt will be aligned and should go in easily. Again the top bolt already in the picture was post malleting - I took these pics afterwards to help describe the process.
I just need to touch up some of the marks/scrapes on the chassis and bracket from my earlier failed attempts but for now I have a new problem to face. I will start another thread for that one.
After spending about 10-12 hours over three days getting nowhere I decided to take everything off and start again. With a more thoughtful process it went much better and took about an hour. So in the spirit of letting other people learn from my mistakes here is my how to refit your diff in less than three days guide.
First off I was doing this on my own - it is probably a two man job but if you are on your own this is how I did it. Make yourself a little lifting platform to get the diff back up to the chassis level. I started off by trying to lift it in but when you are lying on your back lifting it at arms length it is very heavy. A pieve of wood with a bolt and some large washers into a normal jack works well:
When you get near the chassis rails you have to rotate the diff so the bits where the drive shaft connect can pass the main chassis rails. It is best to rotate anticlockwise so the diff breather is staying near the top otherwise you end up pouring out your diff oil. You also need to position the diff so the front it high to make it over the chassis tube that sits just in front of the diff. If you are doing this yourself a block of wood under the front should work while you jack it past the chassis rails:
The the fun and games start aligning up the diff with the bushes and brackets. Obviously the rear is the first one in and with the use of the jack is fairly easy to align and get a bolt through.
Then I added the off side shorter front bracket first. Aligning the bush side and getting the bolt through the chassis if fiddly but doable as this is the first bracket and you have plenty of freedom for movement. I then by moving the diff around on the jack platform loosely bolted up the two front bolts on this bracket. As this is the first bracket in it isn't too tricky.
Next is the nearside longer front bracket and this is where all the problems were for me. After trying many many ways the way that worked in the end and didn't take too long was to attach the bracket to the chassis first and get the bolt all the way through the chassis mount. This is more fiddly than the first one as now the diff will be in the way of lining the bracket up easily. I ended up just using a rubber mallet to knock the diff into the mount and then using a heel bar aligned the bracket so I could get the bolt through:
Not you have the two front bolts remaining. The problem I had was I couldn't get the bracket to sit down on the diff face, like the bracket was too long. The way I did it in the end was to use a long taper drift punch into the top of the diff and use this like a lever to line up the bottom bolt. You will have to give it a fair bit of force to move the diff enough to line up the bottom bolt but it will go.
Please ignore all the various scratches from botched refitting attempts and slipping with various tools/mallets - it was a lot of trial and error to come up with the solution and I need to retouch some marks on the chassis I created. Here is a pic to illustrate once I had my bolts in to show what I mean, obviously th etop bolt would not be in and the drift would be as far though as you can get it:
Then I tightened up the shorter bracket bolts and the bottom one I just got in enough to pull the bottom of the bracket down onto the diff face. The top will still be overlapping and you will be unable to get in the top bolt but with the other three tightened down you then need a piece of wood and a mallet. Position the wood against the top of the diff bracket like you want to push the bracket back towards the chassis and give it a far hard hits with a mallet. You should be able to knock the top of the bracket flush against the diff face. Once you have done this the top bolt will be aligned and should go in easily. Again the top bolt already in the picture was post malleting - I took these pics afterwards to help describe the process.
I just need to touch up some of the marks/scrapes on the chassis and bracket from my earlier failed attempts but for now I have a new problem to face. I will start another thread for that one.
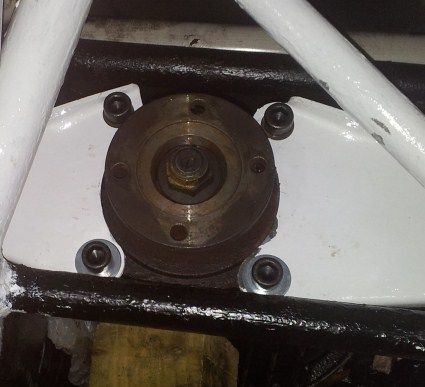
camel_landy said:
Errr... What''s that hole (Upper LH part of the pic)?? 
M
M
 - it does look like a hole in that pic doesn't it. It must be the light or angle. It is actually where I scraped off the powder coat when manoeuvring the diff with a pry bar and I have painted rust converter onto the metal (that has turned black) before I sand and repaint the scratched area with primer and POR15.
That chassis tube was pretty much the only one I didn't sand back and treat, primer and paint as it was all intact and had no marks on until I scraped it.
Gassing Station | Cerbera | Top of Page | What's New | My Stuff