Fitting Charger cables
Discussion


Looking to pick your brains here please!
Now she is laid up after the council throwing salt everywhere I wanted to get
this organised. I have a Ctek conditioner with the cables (Anderson?) that can
be permanently attached with a 'Tamiya type' connector on the other end.
Now obviously the neg side of the battery is hidden under the wing and requires the
battery moving out but it hits the airbag assy.
Is there a better way around it that folk have used or is just as it looks and disassemble
the above?
Thanks
Stickylabels

Here's how I have mine rigged up - super simple


Crocodile clips onto battery under scuttle, charging daughter lead fed up through positive pole access hole, charger connected using two way connector
BTW the Citek chargers are great (I have one for my other car) but I just three of these which are quite simply amazing (*just in case anyone else wants to buy one for Winter)

They are sub £30, fully automatic, do full cycle, top up etc. and work as soon as they get power without needing to be started (handy for me as I have the spare battery charging in the shed and the lights / power are connected to the kitchen lights!)
Alex
Crocodile clips onto battery under scuttle, charging daughter lead fed up through positive pole access hole, charger connected using two way connector
BTW the Citek chargers are great (I have one for my other car) but I just three of these which are quite simply amazing (*just in case anyone else wants to buy one for Winter)
They are sub £30, fully automatic, do full cycle, top up etc. and work as soon as they get power without needing to be started (handy for me as I have the spare battery charging in the shed and the lights / power are connected to the kitchen lights!)
Alex
I second the cigar lighter charger method, in fact i blogged about this yesterday: http://www.cerbera.co.uk/ready-for-winter-cerbera/
I have installed a fused two core lead from the battery terminating in a mini 'waterproofed' Anderson connector just inside the front grille aperture. Main reason was to be able to power-up the car in order to open it should the battery unexpectedly fail, but also handy for attaching a maintenance charger to.
Edited by TwinKam on Monday 7th November 17:32
fatjon said:
My fag lighter doesn't work when the juice is off! Mid 2000 car, worth checking before you go this route.
Mine is a 2001 Chimaera and it appears to be working just fine using the cigarette lighter socket as a charging point. The light on the charger is showing that it is charging and indeed now fully charged.I'm not technically savvy enough to know, but I think it doesn't matter if "the juice is off" or not. We want to put a charge in, not take it out.
Mine has a connector in the boot above the fuel tank.
Nice and easy to get to
 Cerbera boot Ctek by The Rain Maker, on Flickr
I've also have some extension cables and screwed the chargers to the wall, so its all nice a neat
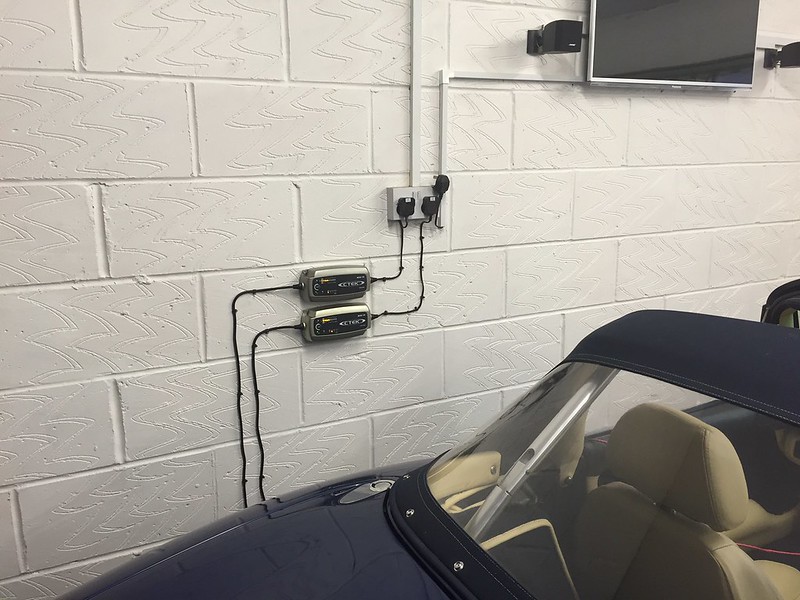 Ctek Battery Chargers by The Rain Maker, on Flickr
Nice and easy to get to
Cerbera boot Ctek by The Rain Maker, on FlickrI've also have some extension cables and screwed the chargers to the wall, so its all nice a neat
Ctek Battery Chargers by The Rain Maker, on FlickrJuddder said:
Here's how I have mine rigged up - super simple
Crocodile clips onto battery under scuttle, charging daughter lead fed up through positive pole access hole, charger connected using two way connector
BTW the Citek chargers are great (I have one for my other car) but I just three of these which are quite simply amazing (*just in case anyone else wants to buy one for Winter)
They are sub £30, fully automatic, do full cycle, top up etc. and work as soon as they get power without needing to be started (handy for me as I have the spare battery charging in the shed and the lights / power are connected to the kitchen lights!)
Alex
I have the same charger as this, but ran a longer cable permanently fixed in the front air vent of the bumper (under the indicator) so I dont need to open to boot to put it on charge.Crocodile clips onto battery under scuttle, charging daughter lead fed up through positive pole access hole, charger connected using two way connector
BTW the Citek chargers are great (I have one for my other car) but I just three of these which are quite simply amazing (*just in case anyone else wants to buy one for Winter)
They are sub £30, fully automatic, do full cycle, top up etc. and work as soon as they get power without needing to be started (handy for me as I have the spare battery charging in the shed and the lights / power are connected to the kitchen lights!)
Alex
Word of warning on these "intelligent" chargers - if you let the battery go under 6V the unit auto senses it as a 6V battery and wont charge past it. You will need to piggy back it off another 12v batter to make it charge fully.
I found this out the hard way.
I have the "Tamiya" lead connected to the battery and coming out of the engine bay in the gap below the wipers, it's tie wrapped to the scuttle panel so won't fly off. I can just drive home and plug in without opening boot/bonnet/etc... When I don't need it, it tucks away nicely in the same gap.
Only pain is when I want to take the scuttle panel off, I have to cut and replace the tie wraps, but that's not often required.
Only pain is when I want to take the scuttle panel off, I have to cut and replace the tie wraps, but that's not often required.
Finally managed to get a wee window in work/weather to sort out the charger cable phaff. Looking at your pics,
it seems my battery (Bosch) might physically be larger and more awkward. If you look at the photo there just wasn't
any space to fit a lead. So!, off with the inlet trunking and airbox and I was finally able to remove the battery, fit the
charge leads and then bung it all back together. The bonus side to all this is I now can see where the plugs actually
live, saw more of the chassis and nice shiny water rails to boot.
Pumped the tyres up to 40psi and put her back in the garage on charge
KennyP
Incognegro said:
Well done mate. Just a sanity check 40psi on tyres???? Powers recommend 28 and a Topcats 26 both say on track 24F 26R so are you sure 40psi? Sorry for questioning as you know your car and how it feels to you just worried me
I would imagine that the 40psi is just for winter storage.PoleDriver said:
Incognegro said:
Well done mate. Just a sanity check 40psi on tyres???? Powers recommend 28 and a Topcats 26 both say on track 24F 26R so are you sure 40psi? Sorry for questioning as you know your car and how it feels to you just worried me
I would imagine that the 40psi is just for winter storage.

Gassing Station | Cerbera | Top of Page | What's New | My Stuff