Harrop brakes overhaul any help grateful
Discussion


Right just replace rear pads...... As I thought there was goin to be an issue!!!!! I pumped out all 4 pistons both sides and the near side two where a little stiff but moved after a few pumps in and outer seals looked ok no major probs the offside two have cracked seals and yo can see the piston. Took a lot to get them moving out let alone in!!!! Bit of work and they moved. There is no leaking so I assume the inner seals are ok.
Should I......
A) just get new covers and push the pistons out as far as possible and clean them up or
B) completely overhaul them?????????
With overhauling how should I clean the pistons???? Brasso? any tips? can the brake guides be removed or will they just not release??? I take it I will need to completely split the caliper??? Not done this before so help would be appreciated. Finally bleed nipples..... Best way to free them???????
Thanks
Antony

I just had to type in harrop to see what the iPad suggested 
Pm me your address and I will send you a tube of top quality o ring lubricant molykote 111 FOC
Just a slight smear around the seal as you put the piston back in and a slight smear around the piston on the non pressure side of the seal and around the inside of the dust cover, you will never get any corrosion or sticking, when you next time need to push the pistons back to change the pads it will move nice and easy with no hassle.
Edited by snowwolf on Sunday 5th February 10:16
Harrop brakes:
Ok, the set I managed to get my paws on were in average condition, from a wrecked VX GTS. They had been sat for a winter or two and weren't up for making things easy. Hopefully yours will be in slightly better nick if they've been active up til now.
First up, abandon any ideas about using the old bleed nipple locations. They will be seized and locked solid. Even with heat, I sheared one. Honestly, don't touch them unless you're totally sure they'll come out. If they slacken then shear, it's going to be drilling, tapping and praying you don't stuff the caliper (I had to do this). There are other options which will work just as well, if not better. I'll get to them later.
At least 2 pistons on every caliper I had were ceased. These were really tough going to get out but persevere. I ended up making an adaptor that allowed me to use a small puller. I removed my pistons before splitting the caliper. Looking back, I should have split them first but at that stage I was unsure if splitting them was absolutely necessary.
I used old brake fluid, steel wool and micromesh to polish the pistons back to their former glory. The bores were fine on the caliper body, just grubby. Bin all the old seals and clips even if intact, it's not worth using them again if you're going to all this hassle anyway.
When it came to splitting the caliper body, it was all about heat and patience. I bolted the caliper through the steel frame on my bench to give me plenty of purchase and then attacked each bolt with a gas torch and an allen key socket and ratchet handle. A quarter of a turn at a time, out, followed by and eighth of a turn back in and repeat! It was a battle of wills but eventually the bolts gave in and came out. Chase the threads with a tap to make reassembly easier.
The O rings and mating faces on my calipers were almost pristine so if they really don't want to come apart, it's probably not going to be the end of the world but if you can split them, you may as well.
I used a bowl of brake fluid and a brass brush to clean most of the caliper body. I ended up sandblasting them, however and though this wasn't entirely necessary, it gave me a great surface to work with later. Just make sure you take your time with the taping and preparation. The last thing you want is blasting media anywhere in there on reassembly!
As mentioned previously, leave the old nipples well alone. On the front caliper half with the HSV motif, at either end of the ridged face you will find two grub screws. Remove these being careful not to lose the ball bearing behind them. Put the ball bearings in a safe place, clean the now exposed threads of the caliper with a tap and refit the grub screw so it sits flush but not tight.
Clean up your caliper bolts as best you can (I blasted mine then polished them with micromesh), fit your new O rings to one caliper half and with a dab of loctite, bolt the halves back together. I couldn't find a torque figure so went with ---king tight. Tighten from the middle of the caliper, outward to ensure a good seal.
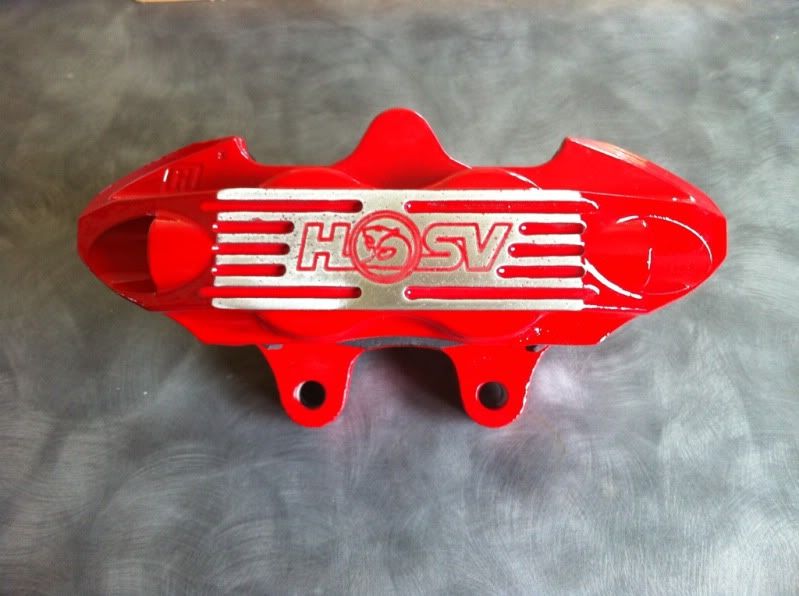
Now you need to decide on how to finish the caliper body. I used quite a thick, brush applied paint for the surfaces on show and a VHT engine enamel in graphite, which came in aerosol form for all the grubby bits. If you prep well, this will be the most rewarding stage. When it comes to the front face, as I had blasted back to bare metal, I simply painted everything. The whole lot. I let the paint harden over an hour or two and then baked the caliper in the oven for 30 minutes to really harden everything. When cooled, I used progressively finer grades of sanding block on the front face until the paint was removed on the fins and face, leaving only the HSV logo painted in a similar fashion to the original.
Now remove the grub screws and fit your nice shiny brass bleed nipples. Now you have two points of bleed and the crappy original is redundant. Soak your piston O rings in some clean brake fluid and fit them to the caliper bores, smear clean fluid on the pistons and refit. I primed the bores of the caliper with fresh fluid too but this isn't strictly necessary since you'll be bleeding anyway. Fit dust seals and retaining clips. Sit back and admire your work!
I've added a few pics. Only the finished set unfortunately but you get the idea.
Hope this helps. If you need anymore info, just PM me.


- If possible, access to a blast cabinet is very useful.
- Invest in a small gas torch. Heat is your friend with the disassembly of these things!
- Get yourself some rebuild kits. Monkfish provided mine. Not cheap but very good.
- Bring a sense of humour as I didn't enjoy this job at all after the first (which turned out to be the easiest) caliper.
- Allow plenty of time. With the best will in the world, this isn't a weekend job if you want to do it right.
Ok, the set I managed to get my paws on were in average condition, from a wrecked VX GTS. They had been sat for a winter or two and weren't up for making things easy. Hopefully yours will be in slightly better nick if they've been active up til now.
First up, abandon any ideas about using the old bleed nipple locations. They will be seized and locked solid. Even with heat, I sheared one. Honestly, don't touch them unless you're totally sure they'll come out. If they slacken then shear, it's going to be drilling, tapping and praying you don't stuff the caliper (I had to do this). There are other options which will work just as well, if not better. I'll get to them later.
At least 2 pistons on every caliper I had were ceased. These were really tough going to get out but persevere. I ended up making an adaptor that allowed me to use a small puller. I removed my pistons before splitting the caliper. Looking back, I should have split them first but at that stage I was unsure if splitting them was absolutely necessary.
I used old brake fluid, steel wool and micromesh to polish the pistons back to their former glory. The bores were fine on the caliper body, just grubby. Bin all the old seals and clips even if intact, it's not worth using them again if you're going to all this hassle anyway.
When it came to splitting the caliper body, it was all about heat and patience. I bolted the caliper through the steel frame on my bench to give me plenty of purchase and then attacked each bolt with a gas torch and an allen key socket and ratchet handle. A quarter of a turn at a time, out, followed by and eighth of a turn back in and repeat! It was a battle of wills but eventually the bolts gave in and came out. Chase the threads with a tap to make reassembly easier.
The O rings and mating faces on my calipers were almost pristine so if they really don't want to come apart, it's probably not going to be the end of the world but if you can split them, you may as well.
I used a bowl of brake fluid and a brass brush to clean most of the caliper body. I ended up sandblasting them, however and though this wasn't entirely necessary, it gave me a great surface to work with later. Just make sure you take your time with the taping and preparation. The last thing you want is blasting media anywhere in there on reassembly!
As mentioned previously, leave the old nipples well alone. On the front caliper half with the HSV motif, at either end of the ridged face you will find two grub screws. Remove these being careful not to lose the ball bearing behind them. Put the ball bearings in a safe place, clean the now exposed threads of the caliper with a tap and refit the grub screw so it sits flush but not tight.
Clean up your caliper bolts as best you can (I blasted mine then polished them with micromesh), fit your new O rings to one caliper half and with a dab of loctite, bolt the halves back together. I couldn't find a torque figure so went with ---king tight. Tighten from the middle of the caliper, outward to ensure a good seal.
Now you need to decide on how to finish the caliper body. I used quite a thick, brush applied paint for the surfaces on show and a VHT engine enamel in graphite, which came in aerosol form for all the grubby bits. If you prep well, this will be the most rewarding stage. When it comes to the front face, as I had blasted back to bare metal, I simply painted everything. The whole lot. I let the paint harden over an hour or two and then baked the caliper in the oven for 30 minutes to really harden everything. When cooled, I used progressively finer grades of sanding block on the front face until the paint was removed on the fins and face, leaving only the HSV logo painted in a similar fashion to the original.
Now remove the grub screws and fit your nice shiny brass bleed nipples. Now you have two points of bleed and the crappy original is redundant. Soak your piston O rings in some clean brake fluid and fit them to the caliper bores, smear clean fluid on the pistons and refit. I primed the bores of the caliper with fresh fluid too but this isn't strictly necessary since you'll be bleeding anyway. Fit dust seals and retaining clips. Sit back and admire your work!
I've added a few pics. Only the finished set unfortunately but you get the idea.
Hope this helps. If you need anymore info, just PM me.
Edited by woody VT on Friday 17th February 04:41
Edited by Woody VT on Saturday 18th February 10:09

 nice work
 Wow!!! Thank you!!!!
Did you remove the pad guides? Can these be removed??? I have two not straight and not able to be bent back fully flush.
Also how has the bare metal faired??? Is it still shining or tarnished???
Luxkly I have a torch so just need to get some patience!!!! As to the existing nipples I think all 4 move now after the garage broke one off may be ok. We will see. Might be a few weeks before I start now due to bike off the road. But I'll write up my woes when done.
Again thank you for this.
Gassing Station | HSV & Monaro | Top of Page | What's New | My Stuff