
How To: Replace differential oil.
Discussion


A couple of weeks ago, I decided to change the differential oil in the car. The maintenance schedule shows the oil change required at 20,000m intervals, but the workshop manual shows it using "filled for life", so with this in mind, I decided to play it safe and replace it.
Firstly, I assembled all the parts I felt I would need........2 litres of fully synthetic 75w90 transmission oil, a drain and refil bolt seal and a replacement "O" ring for the filter.

Firstly, I went for a short drive to get the oil warm, and to get any settled debris in the diff, in suspension in the oil. I then lifted the car at the rear using a couple of trolley jacks and my Ice Hockey pucks.

The diff undershield is held up with nine, M6 bolts. I replaced these previously with stainless steel cap head bolts but originally, they were rusty, mushroom head bolts that were quite difficult to remove.

Dropping the shield off reveals the diff and cooler pipework.

There are 3 things to identify here. Number 1 is the oil filter, 2 is the filler plug and 3 is the drain plug.

I ALWAYS recommend making sure you can refill the diff before draining it as on occasion, the filler plug has been so badly damaged as to make it impossible to remove, giving you a major problem if you have already drained the oil out!
So here, I am removing the filler cap with a 22mm socket.

Assuming that was successful, we can now remove the drain plug using a 14mm hex key (Allen Key).

With an oil tray underneath capable of holding at least 2 litres, allow the diff to drain fully. You will need to lower the rear of the car for this because the drain is only at the lowest point when the car is level.

The drain plug seen here is magnetic, so you will probably find some metallic sludge stuck to it. I cleaned this off with some brake cleaner, although any degreaser will be fine, and installed one of the new copper sealing washers.

Next we move on to the diff oil filter, a cleanable, all metal gauze type, so no replacement required. Undo and remove the 2x 8mm hex headed bolts.........

and withdraw the filter complete with sealing "O" ring, seen here split on mine.
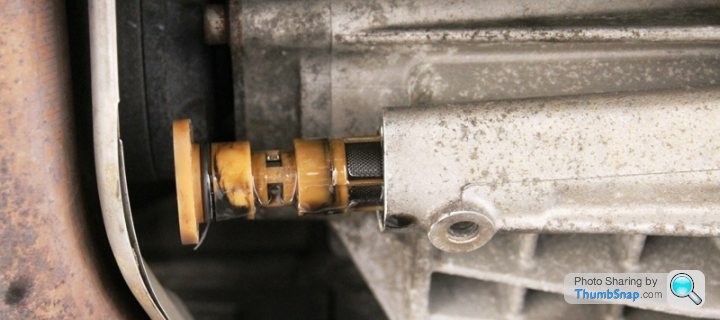
Remove the old "O" ring as shown, and slide on a new one after thoroughly cleaning the filter. Again I used brake cleaner aerosol, but petrol will be fine followed by a good blow through with an airline.

The filter assembly can now be refitted, here I am using new M5 stainless cap head bolts at a torque of just 5Nm.

You can now refit the drain plug, together with its new sealing washer. Torque for that is 50Nm.
It is now time to refill the diff with that nice clean, fresh oil. Most transmission bottles of 1 litre capacity have an extending filler tube so you can now refill the diff as so......

Although as it is not possible to point the bottle down, you need to crush the bottle to get as much oil out of it as you can.

Even doing this, you can only get about half the bottle in, so a cheap ebay mini oil pump (about £20) makes the task far easier.

Keep pumping oil in until it starts to flow back out of the filler plug, which doubles as the oil level indicator, and then refit the filler plug, again with a new sealing copper washer, and torque to 50Nm again. My diff capacity was 1.7 litres.
If you find that when draining the oil, it shows as a metallic silver colour, I recommend you just drain and refill with a cheap 75W90 gear oil and then drive around 50 miles to flush the system through before going the whole hog as above with the more expensive fully synthetic oil and filter cleaning procedure.
You can now refit the diff undershield and relax for the next 20,000m in the knowledge you diff is again running on clean, wholesome oil.
Total time taken was about an hour, but that included washing my hands to handle the camera. Just getting stuck into it would take no more than about 30 minutes.
Firstly, I assembled all the parts I felt I would need........2 litres of fully synthetic 75w90 transmission oil, a drain and refil bolt seal and a replacement "O" ring for the filter.
Firstly, I went for a short drive to get the oil warm, and to get any settled debris in the diff, in suspension in the oil. I then lifted the car at the rear using a couple of trolley jacks and my Ice Hockey pucks.
The diff undershield is held up with nine, M6 bolts. I replaced these previously with stainless steel cap head bolts but originally, they were rusty, mushroom head bolts that were quite difficult to remove.
Dropping the shield off reveals the diff and cooler pipework.
There are 3 things to identify here. Number 1 is the oil filter, 2 is the filler plug and 3 is the drain plug.
I ALWAYS recommend making sure you can refill the diff before draining it as on occasion, the filler plug has been so badly damaged as to make it impossible to remove, giving you a major problem if you have already drained the oil out!
So here, I am removing the filler cap with a 22mm socket.
Assuming that was successful, we can now remove the drain plug using a 14mm hex key (Allen Key).
With an oil tray underneath capable of holding at least 2 litres, allow the diff to drain fully. You will need to lower the rear of the car for this because the drain is only at the lowest point when the car is level.
The drain plug seen here is magnetic, so you will probably find some metallic sludge stuck to it. I cleaned this off with some brake cleaner, although any degreaser will be fine, and installed one of the new copper sealing washers.
Next we move on to the diff oil filter, a cleanable, all metal gauze type, so no replacement required. Undo and remove the 2x 8mm hex headed bolts.........
and withdraw the filter complete with sealing "O" ring, seen here split on mine.
Remove the old "O" ring as shown, and slide on a new one after thoroughly cleaning the filter. Again I used brake cleaner aerosol, but petrol will be fine followed by a good blow through with an airline.
The filter assembly can now be refitted, here I am using new M5 stainless cap head bolts at a torque of just 5Nm.
You can now refit the drain plug, together with its new sealing washer. Torque for that is 50Nm.
It is now time to refill the diff with that nice clean, fresh oil. Most transmission bottles of 1 litre capacity have an extending filler tube so you can now refill the diff as so......
Although as it is not possible to point the bottle down, you need to crush the bottle to get as much oil out of it as you can.
Even doing this, you can only get about half the bottle in, so a cheap ebay mini oil pump (about £20) makes the task far easier.
Keep pumping oil in until it starts to flow back out of the filler plug, which doubles as the oil level indicator, and then refit the filler plug, again with a new sealing copper washer, and torque to 50Nm again. My diff capacity was 1.7 litres.
If you find that when draining the oil, it shows as a metallic silver colour, I recommend you just drain and refill with a cheap 75W90 gear oil and then drive around 50 miles to flush the system through before going the whole hog as above with the more expensive fully synthetic oil and filter cleaning procedure.
You can now refit the diff undershield and relax for the next 20,000m in the knowledge you diff is again running on clean, wholesome oil.
Total time taken was about an hour, but that included washing my hands to handle the camera. Just getting stuck into it would take no more than about 30 minutes.
Edited by 8Tech on Friday 17th July 21:12

Gassing Station | Aston Martin | Top of Page | What's New | My Stuff