
ICM Radio lens screen replacement
Discussion


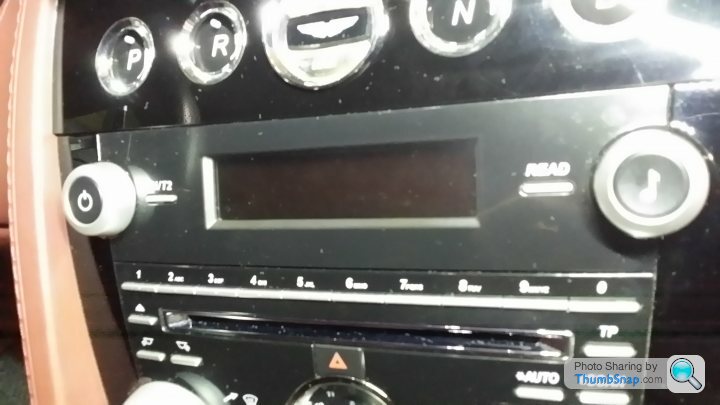
Looking to replace the plastic screen covering the radio display which as been scratched on a 2013 V12V. Has anyone done this? Looks like I would need to remove the knobs on either side. Do these pull straight off?
And I recognize that I am inviting knob-related comments....
And I recognize that I am inviting knob-related comments....
Edited by t0s on Tuesday 19th January 18:42
I did this not too long ago. It's a bit of a scary thing if only because the knobs seem pretty tightly fixed. They do pull off but they take some pulling. Once you get the knobs off, the screen is attached with a little bit of tape (I think at the top). KEEP THIS!! You'll need it for the new cover. I think it stops dust getting in behind the screen and the new screens (I got mine from astonbits) don't come with the tape. I'm sure you could use anything but I didn't have anything to hand.
From memory (so don't shoot me if it's wrong)
1) Remove the sat nav clips from the cover
2) GENTLY prise the ski slope up from where it meets the radio - be careful - it doesn't go all of the way up because of the cables for the start button etc
3) Gently but firmly pull on the knobs. I tried a method of wrapping some string around them at the joint in case they were secured by lugs, but this turned out not to be the case - or nothing that was significant enough. It's just a piece of moulded plastic that holds them in place - similar to a clip
4) The screen is secured with some tape, but also (and I think it's 4) protruding plastic ears. You almost need to bend the screen in the middle to get it out - but it does flex quite a bit so don't panic.
5) When you've got it all to bits, try your damn hardest not to get any dust behind the new screen - it'll bug the hell out of you when you get it back together and you see dust. (learned the hard way)
6) Re-assemble in reverse order.
Good luck!
Cheers
Chris
From memory (so don't shoot me if it's wrong)
1) Remove the sat nav clips from the cover
2) GENTLY prise the ski slope up from where it meets the radio - be careful - it doesn't go all of the way up because of the cables for the start button etc
3) Gently but firmly pull on the knobs. I tried a method of wrapping some string around them at the joint in case they were secured by lugs, but this turned out not to be the case - or nothing that was significant enough. It's just a piece of moulded plastic that holds them in place - similar to a clip
4) The screen is secured with some tape, but also (and I think it's 4) protruding plastic ears. You almost need to bend the screen in the middle to get it out - but it does flex quite a bit so don't panic.
5) When you've got it all to bits, try your damn hardest not to get any dust behind the new screen - it'll bug the hell out of you when you get it back together and you see dust. (learned the hard way)
6) Re-assemble in reverse order.
Good luck!
Cheers
Chris

DAMIT said:
Not sure if it the same on your year model but on my 2008 Vantage Roadster the radio display bit of plastic just pops out when I needed to clean the dust from behind it. It just pops back in place.
I know this is an old post and may not get answered. I have an AM V8 2008 and am attempting to do this. Do I need to take out the central stack? When you say it just pops out, presumably you mean when removing the stack or without removing anything?Hello everyone. I replaced the ICM lens in my 2012 Vantage today, and managed to do so without touching the waterfall (mine is piano black, which I'd read is susceptible to cracking, so I didn't want to take the risk).
The first job is to remove the two radio buttons. These consist of two parts: the silver outer part and the black inner part. I used two trim removal tools - one behind each side of the button so that I could apply even force from behind. There's just enough room to push them between the button and the fascia. I put a piece of paper behind the removal tools to stop them damaging the fascia.
The back of the silver button projects backwards into the fascia. This prevents the trim removal tools from being pushed very far behind the button. It's stiff, but it does come off and, once off, the centre part comes out with it.
The next step is to remove the ICM lens itself. This is where other instructions say that the waterfall needs to be unclipped before removing the lens, which (as mentioned) I wanted to avoid.
The ICM lens has 2 tabs protruding vertically downwards from its lower end (one at each end), and 2 clips protruding backwards from each end of the top (see photo, which shows one end of the lens, with the tab circled at the bottom and the clip circled at the top).
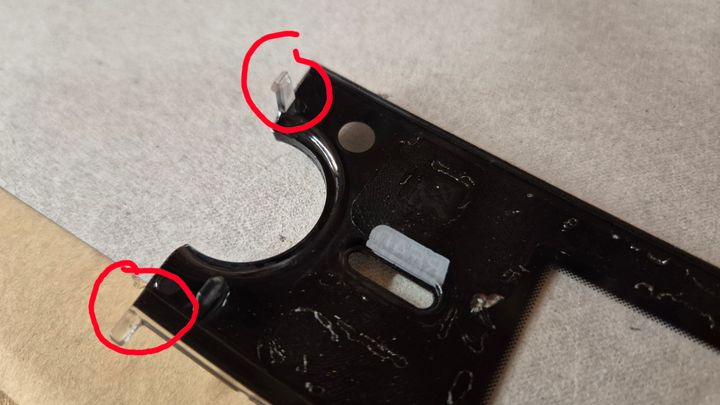
I inserted a small flat-bladed watchmaker's screwdriver to the outside of each clip to release it from the fascia (there's just enough room - I found that I needed a torch to see where the clip was located, so that I could put the screwdriver in the right position, and simultaneously used a hook tool to pull the upper middle part of lens (at the recess that goes around the radio button) so that the top of the lens is pulled far enough away from the fascia to stop the clips re-engaging (a few mm is enough). Then, do the same with the other clip. There's some adhesive on the back of the lens, which gives a bit of resistance to pulling the lens away from the fascia.
When the top clips are out and clear of the fascia, lift the whole lens upwards to disengage the tabs and it's out!
Remove the protective film from the rear of the new lens and make sure there's no dust on the surface or the fascia. Slot the tabs in first. I had to do a little manoeuvring to get it seated properly, but once that's done you can push the top edge in to engage the clips. Remove the protective film from the front and then reinsert the buttons (they only go in one way, but you may have to rotate the outer part until you find the correct orientation).
I hope that this helps someone wanting to do the same thing.
The first job is to remove the two radio buttons. These consist of two parts: the silver outer part and the black inner part. I used two trim removal tools - one behind each side of the button so that I could apply even force from behind. There's just enough room to push them between the button and the fascia. I put a piece of paper behind the removal tools to stop them damaging the fascia.
The back of the silver button projects backwards into the fascia. This prevents the trim removal tools from being pushed very far behind the button. It's stiff, but it does come off and, once off, the centre part comes out with it.
The next step is to remove the ICM lens itself. This is where other instructions say that the waterfall needs to be unclipped before removing the lens, which (as mentioned) I wanted to avoid.
The ICM lens has 2 tabs protruding vertically downwards from its lower end (one at each end), and 2 clips protruding backwards from each end of the top (see photo, which shows one end of the lens, with the tab circled at the bottom and the clip circled at the top).
I inserted a small flat-bladed watchmaker's screwdriver to the outside of each clip to release it from the fascia (there's just enough room - I found that I needed a torch to see where the clip was located, so that I could put the screwdriver in the right position, and simultaneously used a hook tool to pull the upper middle part of lens (at the recess that goes around the radio button) so that the top of the lens is pulled far enough away from the fascia to stop the clips re-engaging (a few mm is enough). Then, do the same with the other clip. There's some adhesive on the back of the lens, which gives a bit of resistance to pulling the lens away from the fascia.
When the top clips are out and clear of the fascia, lift the whole lens upwards to disengage the tabs and it's out!
Remove the protective film from the rear of the new lens and make sure there's no dust on the surface or the fascia. Slot the tabs in first. I had to do a little manoeuvring to get it seated properly, but once that's done you can push the top edge in to engage the clips. Remove the protective film from the front and then reinsert the buttons (they only go in one way, but you may have to rotate the outer part until you find the correct orientation).
I hope that this helps someone wanting to do the same thing.
Edited by Spiker63 on Wednesday 9th September 08:03
Spiker63 said:
Hello everyone. I replaced the ICM lens in my 2012 Vantage today, and managed to do so without touching the waterfall (mine is piano black, which I'd read is susceptible to cracking, so I didn't want to take the risk).
...
I hope that this helps someone wanting to do the same thing.
Thanks so much for posting this. Literally about to tackle the same job....
I hope that this helps someone wanting to do the same thing.
Edited by Spiker63 on Wednesday 9th September 08:03
Gassing Station | Aston Martin | Top of Page | What's New | My Stuff