
Ducati Multistrada special build diary
Discussion


Hi guys, thought I would start a build diary of my 2003 Ducati multistrada special. Thoughts at the moment are it will be in a street fighter style as I cant be doing with the Cafe Racer riding position any longer!
So here is how she arrived... its a CAT C write off as the guy who sold it me had a bit of an off, and it broke the lock stop off the frame, and scuffed the bodywork.


First job has been stripping off all the plastic and relocating the battery and electrics to under the seat so I can keep as clean a look as I can.

To make sure I had clearance I used an old link modified to the length of the compressed shock absorber.


In the last few days I have moved the location of the oil cooler, and started the wiring. Plan is to have a keyless ignition, as again I want to keep it clean looking. In the background you can see the wiring diagram which I have blown up to A1 as my eyes cant cope with the tiny diagrams!

After the wiring is complete, I will start the build on the exhaust. I am going to do Pie Cuts, as I like the look of this.

So here is how she arrived... its a CAT C write off as the guy who sold it me had a bit of an off, and it broke the lock stop off the frame, and scuffed the bodywork.
First job has been stripping off all the plastic and relocating the battery and electrics to under the seat so I can keep as clean a look as I can.
To make sure I had clearance I used an old link modified to the length of the compressed shock absorber.
In the last few days I have moved the location of the oil cooler, and started the wiring. Plan is to have a keyless ignition, as again I want to keep it clean looking. In the background you can see the wiring diagram which I have blown up to A1 as my eyes cant cope with the tiny diagrams!
After the wiring is complete, I will start the build on the exhaust. I am going to do Pie Cuts, as I like the look of this.


I have finished the exhaust, save for the final mounting of the silencer, and giving it a good polish which can wait for final assembly.
I did find a neat spreadsheet on the net to help with the calculations on the pie cuts to make the exhaust, which was a great help! I have to say I have found it really satisfying making the exhaust! My wife asked me what I wanted to do on my birthday and I said spend the day in the garage welding the exhaust! sad git. She took the photo when she bought me a cup of coffee in...
Next step had been to remove the engine and start the rebuild on that as I want to make sure its all OK before i get to heavily into spending. I also want to vapour blast the cases as they are painted as standard and this is really poor.
First couple of jobs was making an alternator cover puller, and a cam nut tool.


I did find a neat spreadsheet on the net to help with the calculations on the pie cuts to make the exhaust, which was a great help! I have to say I have found it really satisfying making the exhaust! My wife asked me what I wanted to do on my birthday and I said spend the day in the garage welding the exhaust! sad git. She took the photo when she bought me a cup of coffee in...
Next step had been to remove the engine and start the rebuild on that as I want to make sure its all OK before i get to heavily into spending. I also want to vapour blast the cases as they are painted as standard and this is really poor.
First couple of jobs was making an alternator cover puller, and a cam nut tool.
Thanks, I am not keen on the looks myself with the fairing on the front...
bit more progress. The strip down went well, but when it came to getting the primary gear off the crank, I realised from reading on line that they are REALLY tight. So I made another puller… quite crude this one but it worked well and after tightening it on there i used a little heat on the gear with the hot air gun… it soon came off! I also made a few mandrels to press the bearings out (and in later)


All the bearings came out OK. with the exception of one… this was in a blind hole and despite using a bearing puller, the bearing came apart and I had to resort to other methods. I made a close fitting brass bush, with a taper in the middle, and a tapered bolt. I then split the bush into four, and used this to pull the bearing out.


It took ages to clean the cases. I left them in a container of thinners for a few days, and then jet washed the paint off (what was left of it) I gave then a clean in the bead blast cabinet afterwards and they came up quite well, but I don’t like building engines where the cases have been in a dry blast cabinet… it tends to impregnate the surface, not good in the inside of the engine. So I took them to the vapour blasters who gave them the once over in the machine. Now here is the important bit… they need to be cleaned to perfection! I have seen many engines scrapped buy not getting every single bead of glass out. so, jet wash to death… making sure you flush app the oil-ways out. dry off, and clean with paraffin, use an airline to blow the bead out of every single orifice. Jet wash again, clean again with paraffin, and blow out. the final clean, i use some thinners in the oil-ways, blasted through at high pressure, just to make sure everything is out!


bit more progress. The strip down went well, but when it came to getting the primary gear off the crank, I realised from reading on line that they are REALLY tight. So I made another puller… quite crude this one but it worked well and after tightening it on there i used a little heat on the gear with the hot air gun… it soon came off! I also made a few mandrels to press the bearings out (and in later)
All the bearings came out OK. with the exception of one… this was in a blind hole and despite using a bearing puller, the bearing came apart and I had to resort to other methods. I made a close fitting brass bush, with a taper in the middle, and a tapered bolt. I then split the bush into four, and used this to pull the bearing out.
It took ages to clean the cases. I left them in a container of thinners for a few days, and then jet washed the paint off (what was left of it) I gave then a clean in the bead blast cabinet afterwards and they came up quite well, but I don’t like building engines where the cases have been in a dry blast cabinet… it tends to impregnate the surface, not good in the inside of the engine. So I took them to the vapour blasters who gave them the once over in the machine. Now here is the important bit… they need to be cleaned to perfection! I have seen many engines scrapped buy not getting every single bead of glass out. so, jet wash to death… making sure you flush app the oil-ways out. dry off, and clean with paraffin, use an airline to blow the bead out of every single orifice. Jet wash again, clean again with paraffin, and blow out. the final clean, i use some thinners in the oil-ways, blasted through at high pressure, just to make sure everything is out!
I have a bit more progress on the engine. the bottom half is all back together, and I have also been building a spare engine which I have which I will sell later on when its finished. the cases have come up really well, I love the finish you get with Vapour Blasting

Lots to clean…. I like to get everything washed and cleaned thoroughly before assemble. Even thought the inside of the engine was very clean, I still like to wash everything off in petrol, and lay it out in trays. In the picture below you will also see an engraving tool… this has a diamond tip, which marks parts nicely, without putting a stress raiser in the component. I like to mark things so they go back the same as they came apart, especially things like oil pump gears.


here is the clutch crush drive, it all looked excellent in here, testimony to the fact this is a very low miles engine! Also a selection of tools I have made. the socket and the one holding tool is for the cam pulleys, which are torqued up to 71 NM, which is quite tight, you just cant do it without the tool… the other is for holding the primary gear, which is torqued up to 190 NM, you definitely need this one! I have seen people say put a copper 2P piece in the gears… shame on you!
I could add a picture of the tool I made out of some old clutch plates to hold the basket and drum… but its not pretty!


Again, no wear on the clutch drum, or plates, which is a bonus! here are the pistons, in nice condition. I removed the rings to make sure that the lands were clear of carbon, always a heart stopping moment, but it has to be done!


Another tool to make… you need some way of holding the flywheel… I was OK in undoing it with the air gun, but again this is tightened to 190 NM and you need some way of holding it solid. the 10 mm alloy plate has a lug on it which engages in one of the holes in the flywheel perimeter.

The rings are thin and fragile, and its easy to break them trying to get them into the bore. best way is to put the piston in the bore, and then slide the gudgeon pin into place. Not the paper towel in the opening… the circlips are tricky, and if they ping out, you know where they will settle!


Next job is the cylinder heads...
Lots to clean…. I like to get everything washed and cleaned thoroughly before assemble. Even thought the inside of the engine was very clean, I still like to wash everything off in petrol, and lay it out in trays. In the picture below you will also see an engraving tool… this has a diamond tip, which marks parts nicely, without putting a stress raiser in the component. I like to mark things so they go back the same as they came apart, especially things like oil pump gears.
here is the clutch crush drive, it all looked excellent in here, testimony to the fact this is a very low miles engine! Also a selection of tools I have made. the socket and the one holding tool is for the cam pulleys, which are torqued up to 71 NM, which is quite tight, you just cant do it without the tool… the other is for holding the primary gear, which is torqued up to 190 NM, you definitely need this one! I have seen people say put a copper 2P piece in the gears… shame on you!
I could add a picture of the tool I made out of some old clutch plates to hold the basket and drum… but its not pretty!
Again, no wear on the clutch drum, or plates, which is a bonus! here are the pistons, in nice condition. I removed the rings to make sure that the lands were clear of carbon, always a heart stopping moment, but it has to be done!
Another tool to make… you need some way of holding the flywheel… I was OK in undoing it with the air gun, but again this is tightened to 190 NM and you need some way of holding it solid. the 10 mm alloy plate has a lug on it which engages in one of the holes in the flywheel perimeter.
The rings are thin and fragile, and its easy to break them trying to get them into the bore. best way is to put the piston in the bore, and then slide the gudgeon pin into place. Not the paper towel in the opening… the circlips are tricky, and if they ping out, you know where they will settle!
Next job is the cylinder heads...
Thanks for the kind comments guys.... I am enjoying this build.
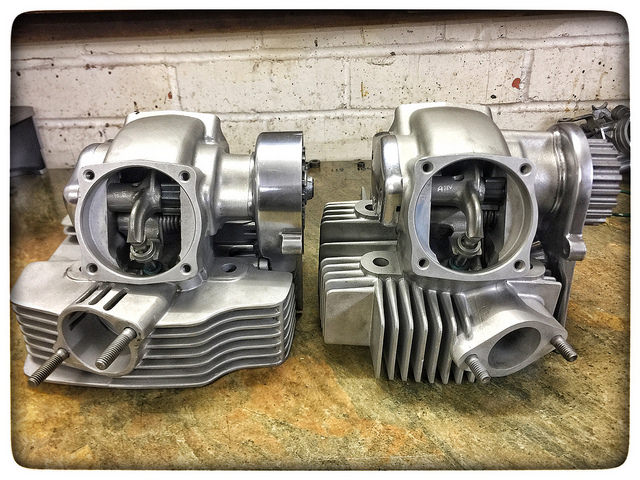
Next job has been the heads…. seems the Multistrada and a few other models of Ducati suffer premature valve guide were, its well documented. While the inlets were perfectly fine, the exhausts has more play than I would have liked… so I decided to replace them. I heated the head in the oven (hope she does not read this!) up to 180 degrees and used a drift to knock the guides out. I nearly fainted when I rang the dealer… seems inlet guides are £14… but exhausts £150 each! So I decided to have some custom made in Colsibro. They came finished to the correct OD, and ID, I just had to machine the valve seal step. Colsibro is a wonder material for valve guides (google it!) I first came across it with Ford Crossflows, which when fitted with extremely hign lift cams, wore the guides out rapidly due to the arc the rocker arm operated through, which pushed the valve hard against the side of the guide. Once I did a head with Colsibro guides, they lasted forever!
Putting the guides in is a little more tricky… I made a tool up as in the picture, whereby a slow taper mandrel sits in the valve seat, so the guide can be knocked in square. I heated the heads up again and they knocked in a treat. A quick lap with the grinding paste and I have a nice seal on the valves. An old trick is to mark lines across the seat with a felt tip pen, and then give the valve a light lap, just to be sure the lines are broken, indicating you have a full seal.
Next job will be setting the valve clearances


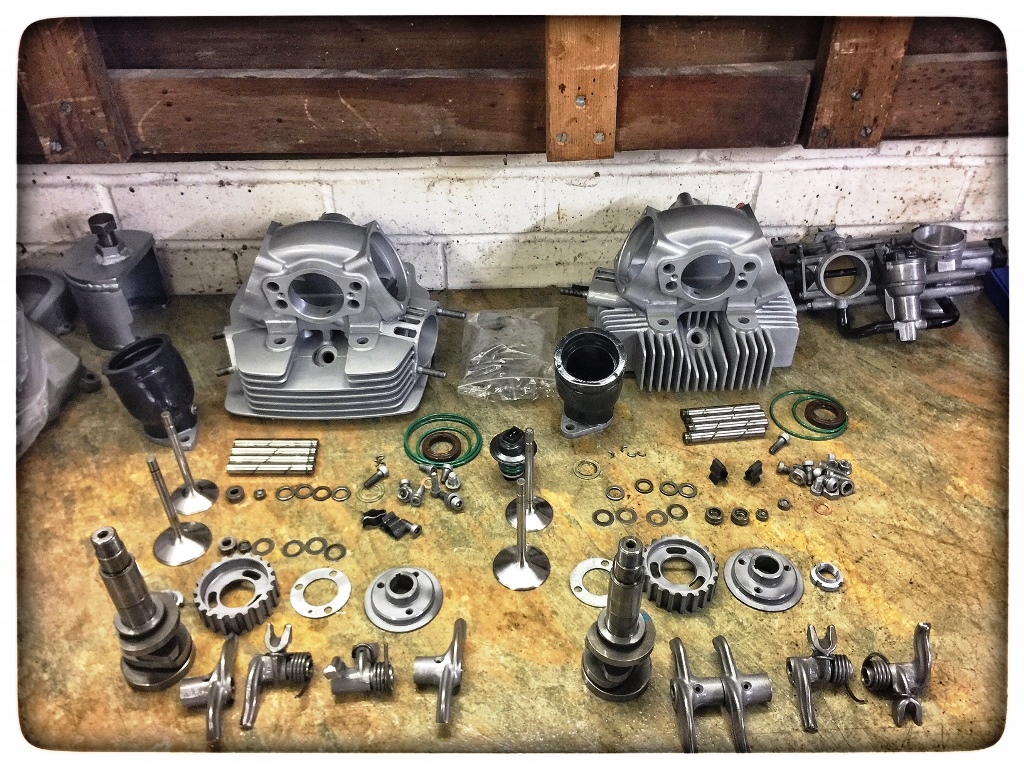
Next job has been the heads…. seems the Multistrada and a few other models of Ducati suffer premature valve guide were, its well documented. While the inlets were perfectly fine, the exhausts has more play than I would have liked… so I decided to replace them. I heated the head in the oven (hope she does not read this!) up to 180 degrees and used a drift to knock the guides out. I nearly fainted when I rang the dealer… seems inlet guides are £14… but exhausts £150 each! So I decided to have some custom made in Colsibro. They came finished to the correct OD, and ID, I just had to machine the valve seal step. Colsibro is a wonder material for valve guides (google it!) I first came across it with Ford Crossflows, which when fitted with extremely hign lift cams, wore the guides out rapidly due to the arc the rocker arm operated through, which pushed the valve hard against the side of the guide. Once I did a head with Colsibro guides, they lasted forever!
Putting the guides in is a little more tricky… I made a tool up as in the picture, whereby a slow taper mandrel sits in the valve seat, so the guide can be knocked in square. I heated the heads up again and they knocked in a treat. A quick lap with the grinding paste and I have a nice seal on the valves. An old trick is to mark lines across the seat with a felt tip pen, and then give the valve a light lap, just to be sure the lines are broken, indicating you have a full seal.
Next job will be setting the valve clearances
The next job has been setting the valve clearances… what a time consuming and fiddly job, and expensive with the shims costing £15 each, and there are 8! Lucky I only needed to buy three…
With the engine almost finished, I have turned to fully stripping the bike. The frame and wheels have gone off to be powder coated. this meant I had to remove the front wheel bearings. They are difficult to remove as you cant get behind the bearing, despite a small cut out in the spacer… so I mad this split mandrel which has a small .5mm lip, which expands behind the bearing. with this they came out easily. I have also designed some clutch covers, and headlamp brackets and had them laser cut in 304 Stainless.
I have also removed the bearings from the swinging arm, so this can be polished, yet another puller!



With the engine almost finished, I have turned to fully stripping the bike. The frame and wheels have gone off to be powder coated. this meant I had to remove the front wheel bearings. They are difficult to remove as you cant get behind the bearing, despite a small cut out in the spacer… so I mad this split mandrel which has a small .5mm lip, which expands behind the bearing. with this they came out easily. I have also designed some clutch covers, and headlamp brackets and had them laser cut in 304 Stainless.
I have also removed the bearings from the swinging arm, so this can be polished, yet another puller!

Looking good!
Echo the comments about vapour blasting, great stuff and leaves a lovely finish on alloy cases. Even after several sessions jet washing them / air line, I also chase the threads as there are always a few specs left in there.
Not the most practical finish if ridden in the wet, but then again the standard Ducati engine paint isn't much better!
I actually really like the S model Mutlstrada with all the ohlins kit in red. Really cheap now given the top spec forks and shock and still plenty quick enough for the road.
Echo the comments about vapour blasting, great stuff and leaves a lovely finish on alloy cases. Even after several sessions jet washing them / air line, I also chase the threads as there are always a few specs left in there.
Not the most practical finish if ridden in the wet, but then again the standard Ducati engine paint isn't much better!
I actually really like the S model Mutlstrada with all the ohlins kit in red. Really cheap now given the top spec forks and shock and still plenty quick enough for the road.
Edited by TwoStrokeNut on Saturday 2nd December 18:02
The engine is almost finished. I am pleased with how the hydrographic dipping of the parts came out, I will use the process on other parts like the mirrors. For now I cant make my mind up which is best, the cam belt covers with the poly-carbonate windows or without...
The frame and wheels should be back from the powder coaters at the end of the week


The frame and wheels should be back from the powder coaters at the end of the week

Liked the idea of the windows but in practice and looking at the photo, have to say it looks a bit 'my first Ducati - see how the engine works from Toymaster'.
As the rest of the bike is fuss free, I'd personally would just stick to the full covers & let the eye be drawn to the fabrication elsewhere.
Open belts would be really cool but obviously not practical.
Sorry - probably going against the grain.
As the rest of the bike is fuss free, I'd personally would just stick to the full covers & let the eye be drawn to the fabrication elsewhere.
Open belts would be really cool but obviously not practical.
Sorry - probably going against the grain.
Gassing Station | Biker Banter | Top of Page | What's New | My Stuff