Carbon canister removal, can a simpleton do it?
Discussion


Hi folks,
As per title really, I plan to get rid of mine but quite fancy tackling the job myself.
Is it just a case of removing it, tracing back any wires and pipes then chucking a breather on the petrol tank end or is there more to it than that? If it makes a difference, mine is a '98 450.
Cheers
As per title really, I plan to get rid of mine but quite fancy tackling the job myself.
Is it just a case of removing it, tracing back any wires and pipes then chucking a breather on the petrol tank end or is there more to it than that? If it makes a difference, mine is a '98 450.
Cheers
Disconnect the electrical connector, remove the vacuum pipe and cap off the spigot on the trumpet base, disconnect the tube from the canister and fit a one way valve to the tube.
Off course the vacuum pipe works both ways, expansion of air in the tank in hot weather and of course, sucking in fresh air as you use fuel.
I fitted a one way valve allowing fresh air in and have not had a problem since.
Off course the vacuum pipe works both ways, expansion of air in the tank in hot weather and of course, sucking in fresh air as you use fuel.
I fitted a one way valve allowing fresh air in and have not had a problem since.
phazed said:
Disconnect the electrical connector, remove the vacuum pipe and cap off the spigot on the trumpet base, disconnect the tube from the canister and fit a one way valve to the tube.
Off course the vacuum pipe works both ways, expansion of air in the tank in hot weather and of course, sucking in fresh air as you use fuel.
I fitted a one way valve allowing fresh air in and have not had a problem since.
I don`t understand why you need a one way valve on the vent pipe . I thought the pipe came off after the roll over valve .Off course the vacuum pipe works both ways, expansion of air in the tank in hot weather and of course, sucking in fresh air as you use fuel.
I fitted a one way valve allowing fresh air in and have not had a problem since.
Cheers 
I've been told there is no need for a valve though, just a breather and mount it somewhere near the dif.
What about the canister itself? Looks like a bugger to get out of the available space
I've been told there is no need for a valve though, just a breather and mount it somewhere near the dif.
What about the canister itself? Looks like a bugger to get out of the available space
davelittlewood said:
Out of interest, which do you want to remove it?
I'm running aftermarket ECU with no control over it. I know it's possible to do but as it's not strictly needed I thought I'd also mount the ugly looking washer bottle in the space. I think someone here has just done the very same thing.Hi Nick thanks for the message.
I apologise in advance if this guidance is long winded but I'd rather explain in full.
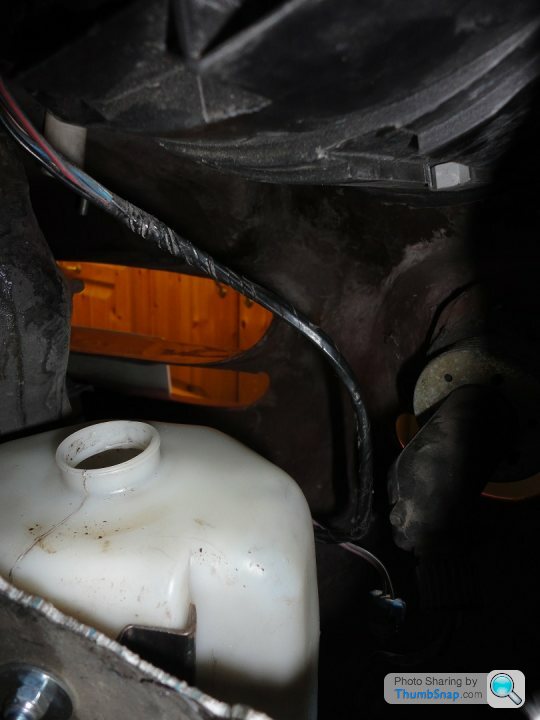
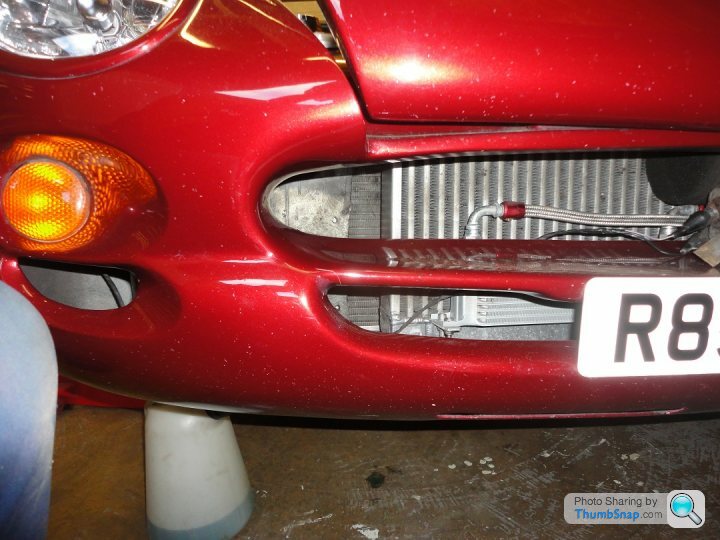
I had already disconnected the pipework from the fuel tank to can & can to trumpet base when I fitted my SC kit, only really did it to tidy up the chassis rails. I cut the fuel tank breather hose fitted a small breather filter and strapped it to the chassis near the diff.
I then cut out the remainder of the breather hose to the can and left to atmosphere (this was only because I wanted to test all worked ok before removing the canister).
I cut down a suitable bolt to form a bung to the trumpet base and fitted it with an 'o' ring to ensure a seal. I cut down the now disconnected hose from the can to the trumpet base at the inner wing and fitted another bung to tidy up. All this was to prove engine running before removing can completely.
Once proven ok (but after several months and a couple of thousand miles) I set about removing the can. I chose not to remove the radiator as I also have an intercooler in the way. I jacked up the o/s/f removed the o/s/f wheel, removed the headlamp access panel, slightly enlarged the hole (this was possible on my car as the covering panel was considerably larger than the original hole). I then removed the electrical connector and taped it up well with insulation tape (as per advice from Phazed) I then removed all hoses, unbolted the can and removed it through the access hole (just !). I then relocated the windscreen washer bottle to the newly acquired space, mounted it back to the o/s/f wing, made up a new filler hose for the relocated washer bottle and fitted it to the original filler location (made up a shiny filler cap just because it's me). I tidied up the enlarged access hole, re-drilled some pilot holes for self tappers, re-masticked the access panel and refitted with new screws.
Painted exposed fibreglass behind original washer bottle mounting, refitted wheel, lowered car, job done.
If any of this doesn't make sense please let me know and I'll try and fill in the gaps. Photos below.


 [url]
[url]
 |http://thumbsnap.com/2QqwK4XR[/url][url]
 |http://thumbsnap.com/fkoQ5lgG[/url]
I apologise in advance if this guidance is long winded but I'd rather explain in full.
I had already disconnected the pipework from the fuel tank to can & can to trumpet base when I fitted my SC kit, only really did it to tidy up the chassis rails. I cut the fuel tank breather hose fitted a small breather filter and strapped it to the chassis near the diff.
I then cut out the remainder of the breather hose to the can and left to atmosphere (this was only because I wanted to test all worked ok before removing the canister).
I cut down a suitable bolt to form a bung to the trumpet base and fitted it with an 'o' ring to ensure a seal. I cut down the now disconnected hose from the can to the trumpet base at the inner wing and fitted another bung to tidy up. All this was to prove engine running before removing can completely.
Once proven ok (but after several months and a couple of thousand miles) I set about removing the can. I chose not to remove the radiator as I also have an intercooler in the way. I jacked up the o/s/f removed the o/s/f wheel, removed the headlamp access panel, slightly enlarged the hole (this was possible on my car as the covering panel was considerably larger than the original hole). I then removed the electrical connector and taped it up well with insulation tape (as per advice from Phazed) I then removed all hoses, unbolted the can and removed it through the access hole (just !). I then relocated the windscreen washer bottle to the newly acquired space, mounted it back to the o/s/f wing, made up a new filler hose for the relocated washer bottle and fitted it to the original filler location (made up a shiny filler cap just because it's me). I tidied up the enlarged access hole, re-drilled some pilot holes for self tappers, re-masticked the access panel and refitted with new screws.
Painted exposed fibreglass behind original washer bottle mounting, refitted wheel, lowered car, job done.
If any of this doesn't make sense please let me know and I'll try and fill in the gaps. Photos below.
[url]|http://thumbsnap.com/2QqwK4XR[/url][url]|http://thumbsnap.com/fkoQ5lgG[/url]Edited by Richard 858 on Sunday 15th February 13:25
Edited by Richard 858 on Sunday 15th February 17:23
Edited by Richard 858 on Sunday 15th February 20:21

Can't comment on mpg in isolation as can disconnected when fitting supercharger, bigger injectors etc. but between all the mods I'd say I've probably lost a couple of mpg. Anyway Daz if that's the case why haven't you reconnected yours ?
Edited by Richard 858 on Sunday 15th February 19:50
QBee said:
Interesting. As a comparison, what's your average mpg? I will need to factor Emerald vs 14CUX of course.
Rubbish on petrol ,larger valves and ported with a larger piston means less efficient ,you can`t beat a good standard 4l with a few minor breathing mods for economy .My old MGRV8 4l returned 35mpg on a run with the Rover higher geared gearbox .It was running on the old 14cux. .with the Mark Adams Optimax chip . I think its tweaked for economy and the rest of the map left alone .Its a cut down Tornado chip .
Nothing wrong with the good old standard 4l .
Edited by SILICONEKID345HP on Sunday 15th February 20:02
Funnily enough I whipped my carbon canister out today, it made sense as I was replacing my headlight reflectors.
Once the old O/S reflector is out you have a massive hole to remove the canister, undo the big Jubilee clip that secures the canister to the inner wing, disconnect the wires at the connector and remove the pipes.
You can then simply pull it out through the open headlight hole.
So if you need to change your reflectors because they're corroding & going dull, that's the time to remove the carbon canister.
It makes the job a cinch
ChimpOnGas said:
Funnily enough I whipped my carbon canister out today, it made sense as I was replacing my headlight reflectors.
Once the old O/S reflector is out you have a massive hole to remove the canister, undo the big Jubilee clip that secures the canister to the inner wing, disconnect the wires at the connector and remove the pipes.
You can then simply pull it out through the open headlight hole.
So if you need to change your reflectors because they're corroding & going dull, that's the time to remove the carbon canister.
It makes the job a cinch
Its an easy job with the early cars,comes straight out the front grill .Once the old O/S reflector is out you have a massive hole to remove the canister, undo the big Jubilee clip that secures the canister to the inner wing, disconnect the wires at the connector and remove the pipes.
You can then simply pull it out through the open headlight hole.
So if you need to change your reflectors because they're corroding & going dull, that's the time to remove the carbon canister.
It makes the job a cinch
Gassing Station | Chimaera | Top of Page | What's New | My Stuff