
Shock Absorbers - A Guide (Sort of)
Discussion


I actually did this job a while back when the weather was still good,
but have only just gotten around to writing it up.
Hopefully it will prove useful to other owners who might be thinking
about replacing their shock absorbers.
I've put plenty of pictures in as they seemed to be in short supply when
I was searching on this job.
I did this job at home on the drive with a basic jack and stands and standard
sockets, spanners and other tools.
However, you might want to buy some additional 19mm or 3/4" sockets - long and
short - to help with access and so you can use a ratchet on both ends at once.
The replacement was out of necessity as two of the four were starting to weep
- nothing major - but they were only going to get worse from that point on.
There are a multitude of options out there for shocks/dampers/springs
depending on how you use your car and what you expect from it.
I don't do track days and only do varied road driving so opted for
"standard" Bilsteins. These are moderately adjustable with three
settings. I would guess they could be done on the car with the aid of
spring compressors.
I got my Bilsteins from Blackdown Automotive and they were bushed top
and bottom and came fully assembled with new coilovers ready for fitting.
They were already set up to suit my driving style.
If in doubt or if you need any advice then I would recommend contacting
Ben Lang at Blackdown.
Next I needed some new bolts. I found this post by PeteGriff.
see towards the bottom of page 1
http://www.pistonheads.com/gassing/topic.asp?t=134...
It's probably worth getting a handful of penny washers as well while
you are at it.
My four new Bilsteins and coilovers. Yellow springs are rears and red
springs are fronts.

I will assume everyone is happy with jacking up, supporting the car on
stands and removing wheels. The job can be done one corner at a time
so no need for "complex" jacking of an entire end.
I would recommmned starting on the rears as the access is a little easier
making the swap simpler. This means you can build your experience and
confidence as you go along.
Here is the old rear top and bottom. The top bolt is partly undone.
The serrations on the bottom bolt are just where the socket has dug into
the grime on the bolt head.


Here is the new rear shock in place - top, bottom and full.
Top bolt is 1/2" x 4 1/2" UNF
Bottom bolt is 1/2" x 3 1/2" UNF
Getting the bolt holes to line up between the mounting and bush can
be a bit of a fiddle but stick a screwdriver through and wiggle it
around and you should get there. Once you get the bolt going, even
if it only goes part in, you can wind it through and it will all
pull itself into place.


So before moving on to the front treat yourself to a cup of coffee and a biscuit.
Here you can see the old front top. Like the back, access is very easy.

Now we move onto the front bottom - this is where life gets a little
more tricky. Picture quality here isn't quite so good as it was
harder to get in with the camera. However, hopefully you can see
the lower mount is inside the U-channel of the wishbone and even
worse in the pointy end of the wishbone so access to the bolts is
difficult.

You can't get in with a socket and can only turn a spanner
about 1/8 - 1/4 turn before you have to remove the spanner and reset.
It's slow going to say the least but persevere and you will get there
in the end.
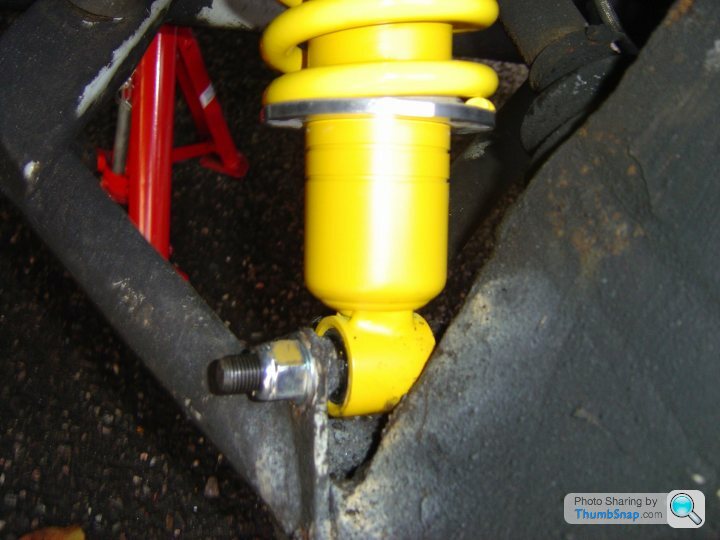
Here is the new shock in place.
Top bolt is 1/2" x 3" UNF

and the bottom which gives a slightly better view of the mount
in the U-Channel
In the PeteGriff post it says the bolt is 1/2" x 3" UNF but if you
can get them a 1/2" x 2.75" UNF would make life easier with fitting
and removal.

As it turned out the near side front bottom bolt was completely seized
and stuck solid. I tried all of the usual tricks to get it to budge
(yes I really did try everything) and in the end had to resort to
cutting the old shock out. My neighbour Tim very kindly gave me a
hand here. He cut the old shock with a disc cutter just below the bottom
shoulder. While he was rolling about on the floor I kept a firm grip on
the shock and positioned a light on it. I then got in and cut and butchered
through the remainder of the shocker, bush and bolt and eventually got all
of the bits out.
but have only just gotten around to writing it up.
Hopefully it will prove useful to other owners who might be thinking
about replacing their shock absorbers.
I've put plenty of pictures in as they seemed to be in short supply when
I was searching on this job.
I did this job at home on the drive with a basic jack and stands and standard
sockets, spanners and other tools.
However, you might want to buy some additional 19mm or 3/4" sockets - long and
short - to help with access and so you can use a ratchet on both ends at once.
The replacement was out of necessity as two of the four were starting to weep
- nothing major - but they were only going to get worse from that point on.
There are a multitude of options out there for shocks/dampers/springs
depending on how you use your car and what you expect from it.
I don't do track days and only do varied road driving so opted for
"standard" Bilsteins. These are moderately adjustable with three
settings. I would guess they could be done on the car with the aid of
spring compressors.
I got my Bilsteins from Blackdown Automotive and they were bushed top
and bottom and came fully assembled with new coilovers ready for fitting.
They were already set up to suit my driving style.
If in doubt or if you need any advice then I would recommend contacting
Ben Lang at Blackdown.
Next I needed some new bolts. I found this post by PeteGriff.
see towards the bottom of page 1
http://www.pistonheads.com/gassing/topic.asp?t=134...
It's probably worth getting a handful of penny washers as well while
you are at it.
My four new Bilsteins and coilovers. Yellow springs are rears and red
springs are fronts.
I will assume everyone is happy with jacking up, supporting the car on
stands and removing wheels. The job can be done one corner at a time
so no need for "complex" jacking of an entire end.
I would recommmned starting on the rears as the access is a little easier
making the swap simpler. This means you can build your experience and
confidence as you go along.
Here is the old rear top and bottom. The top bolt is partly undone.
The serrations on the bottom bolt are just where the socket has dug into
the grime on the bolt head.
Here is the new rear shock in place - top, bottom and full.
Top bolt is 1/2" x 4 1/2" UNF
Bottom bolt is 1/2" x 3 1/2" UNF
Getting the bolt holes to line up between the mounting and bush can
be a bit of a fiddle but stick a screwdriver through and wiggle it
around and you should get there. Once you get the bolt going, even
if it only goes part in, you can wind it through and it will all
pull itself into place.
So before moving on to the front treat yourself to a cup of coffee and a biscuit.
Here you can see the old front top. Like the back, access is very easy.
Now we move onto the front bottom - this is where life gets a little
more tricky. Picture quality here isn't quite so good as it was
harder to get in with the camera. However, hopefully you can see
the lower mount is inside the U-channel of the wishbone and even
worse in the pointy end of the wishbone so access to the bolts is
difficult.
You can't get in with a socket and can only turn a spanner
about 1/8 - 1/4 turn before you have to remove the spanner and reset.
It's slow going to say the least but persevere and you will get there
in the end.
Here is the new shock in place.
Top bolt is 1/2" x 3" UNF
and the bottom which gives a slightly better view of the mount
in the U-Channel
In the PeteGriff post it says the bolt is 1/2" x 3" UNF but if you
can get them a 1/2" x 2.75" UNF would make life easier with fitting
and removal.
As it turned out the near side front bottom bolt was completely seized
and stuck solid. I tried all of the usual tricks to get it to budge
(yes I really did try everything) and in the end had to resort to
cutting the old shock out. My neighbour Tim very kindly gave me a
hand here. He cut the old shock with a disc cutter just below the bottom
shoulder. While he was rolling about on the floor I kept a firm grip on
the shock and positioned a light on it. I then got in and cut and butchered
through the remainder of the shocker, bush and bolt and eventually got all
of the bits out.
Here is some more info rebuilding the front suspension (albeit on a Griff)
http://www.pistonheads.com/gassing/topic.asp?h=0&a...
Similar to you I went for Billies but with height adjusters. Also there is new wishbones (old ones proved rotted thru !) plus new top and bottom ball-joints and droplinks (yours look somewhat 'sorry'....)
http://www.pistonheads.com/gassing/topic.asp?h=0&a...
Similar to you I went for Billies but with height adjusters. Also there is new wishbones (old ones proved rotted thru !) plus new top and bottom ball-joints and droplinks (yours look somewhat 'sorry'....)
Dr Mike Oxgreen said:
I've always found access to the front bottom can be tricky.
Cheeky boy! I had to change my dampers around after fitting my Racing Reds, as instructions were misunderstood and I ended up with the springs on the correct ends, but the front dampers on the rear and vice versa.
My nuts were therefore all free, from having been removed previously (register office do a good deal on that) and even with the use of a four post ramp and a garage full of tools, the whole operation took me the best part of two hours and a modicum of bad language regarding the parentage of the designer of the wishbones.
By the way, the OP's wishbones look somewhat rusty to me, but I am sure he checked their integrity at the time he did the job.
Good write up

Be carefull when assessing the state of the wishbones, I've only found out after shot-blasting .....state of the ball-joints can be easily checked when the top wishbone is detached from the top ball-joint, both for play in the tops and seizure of the bottoms. Them drop-links are from a past era, you really wan them changed for something more modern...

Gassing Station | Chimaera | Top of Page | What's New | My Stuff