Parrot in an Xtype
Discussion


I'm thinking of getting a bluetooth kit installed into the Xtype and the Parrot 3100 looks like the one which most people use and works best.
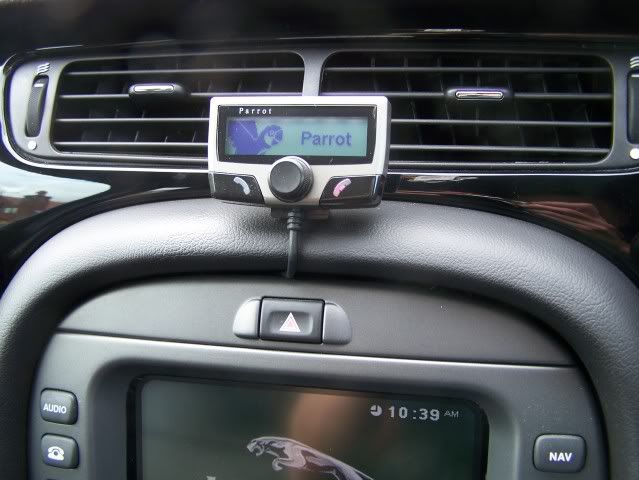
Has anyone got photos of how your Parrot unit is installed - particularly where the LCD display is mounted and how.
And if anyone has a different type of Bluetooth unit I'd be happy to hear your experiences.
Thanks chaps
Ian
Has anyone got photos of how your Parrot unit is installed - particularly where the LCD display is mounted and how.
And if anyone has a different type of Bluetooth unit I'd be happy to hear your experiences.
Thanks chaps
Ian
Hi Barreti
We have the parrot installed in ours, will get some pics for you in the daylight;)
This was allready fitted when we purchased the car, and have to say it is very good
won't be able to give any advise on fitting, nor do i have a clue whats sitting behind the dash
but at least it will give you location idea's
>>andy
Thanks ADU, its the location that I'm interested in as much as anything because I think I might be lazy for once and actually get someone else to do the install.
It all looks plug-and-play but I have neither the time nor inclination to do it.
I have also been reading about MultiComm to connect the Parrot to the left hand side steering wheel buttons which control the radio.
Does anyone have experience of this?
It all looks plug-and-play but I have neither the time nor inclination to do it.
I have also been reading about MultiComm to connect the Parrot to the left hand side steering wheel buttons which control the radio.
Does anyone have experience of this?

Right, bought the CK3100 kit, just waiting for the SOT-018 adapter cable to come and I can get cracking.
I decided to do it myself because my tightness overcame my laziness!
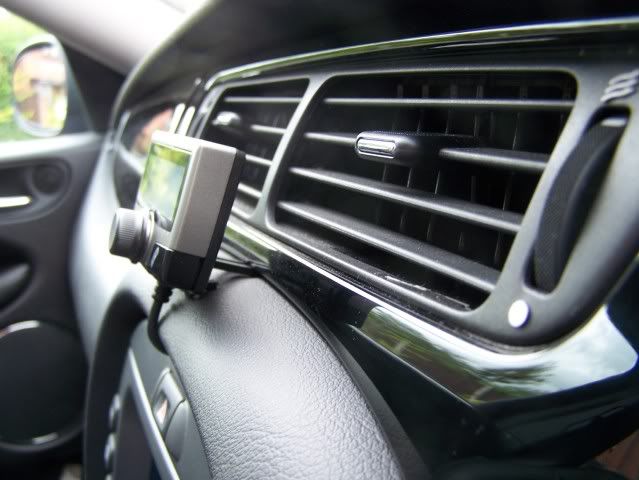
Andy, where did you mount the blue box and how is the mic cable routed up to the headlining console - it doesn't look long enough to route up the A posts
I decided to do it myself because my tightness overcame my laziness!
Andy, where did you mount the blue box and how is the mic cable routed up to the headlining console - it doesn't look long enough to route up the A posts
For anyone interested, if you want Bluetooth in your xtype this is a no brainer.
I bought the following
Parrot CK3100 with fixing kit for £75 off fleabay
SOT-082 cable for about £5 off the internet
These plug together with idiot proof connectors which you can put together in the comfort of your own home before even setting foot in the car.
You will then be left with 2 ISO connectors. One goes in the back of the radio, and the cable which you've just taken out of the back of the radio goes into the other.
Run the microphone through the headlining to the DRIVERS SIDE.
I spent more than an hour trying to get it through the passenger side and gave up, so believe me on this one.
I used a thick piece of steel cable to act as a guide as its flexible yet tough.
Pull off the door seal and there is a nice cavity behind the interior trim you can drop the wire into.
Pull off the panel above your knee - it literally pulls off - you can get your hand in up towards the clocks then and feel the wire as you push it through from the edge of the door. Then pass it to the gap where you've removed the radio.
Its not actually than complicated. Honestly.
Important bit here;
Swap over the two fused connections (red and orange) or the Parrot won't remember any of the voice commands you record.
Switch on the ignition and it should spring to life.
Make sure it says GOODBYE when you turn off the ignition, if it doesn't you either forgot to swap the red/orange wires, or your car is different to mine so put them back.
I put the 'Head' unit inside the ashtray holder and it fits perfectly and rock solid.
To do this, use the pyramid/triangular bracket which attaches to the car with sticky stuff.
When you fit this to the 'Head' you will have to undo the screws on the back of the 'head'
While you have these apart, pull the back of the unit off, and pull the cable out of the back of the unit at the small white connector. Mark which way it was in the unit as I think it might be possible to reverse it.
Now you have the cable split from the 'head' take the ashtray and remove the inner and store it somewhere safe.
Drill a 10mm hole right in the back of it and feed the 'head' unit cable through it.
Reconnect the cable to the 'head' unit, attach the back and the bracket and screw it together.
Test it again.
Stick the pyramid bracket to the side of the ashtray holder, against the 'wall' between the lighter socket and the ashtray hole, being careful to make sure the front will shut in the position you have it.
Thats about it. All simple plug and play stuff. And without any help it took me Saturday afternoon.
ETA: Forgot to mention. The microphone sticks neatly behind the grill slots in the overhead console using the sticky 'foot' provided, where I guess the Jag mic probably sits.
Edited by Barreti on Monday 17th August 16:39

Gassing Station | Jaguar | Top of Page | What's New | My Stuff