
LT77 Clutch Fork help please
Discussion


The clutch fork has worn through around the pivot ball so the fork is now jammed slightly further back than where it should normally sit. I've not seen or heard of this ever happening on any type of LT77 equipped vehicle. I'm assuming the tranny has to come off or motor out. Or is there room to move the tranny back to gain enough access.
Anyone got any related advice? Better still. Is there a quick way of changing the clutch fork without entirely pulling the tranny or motor?
Anyone got any related advice? Better still. Is there a quick way of changing the clutch fork without entirely pulling the tranny or motor?
Gearbox will need to be separated from the engine for this, but not totally out. Details if you need them are:
Car up on sturdy axle stands all round...
Exhaust off, Propshaft off, wires unplugged, gearlever off, bellhousing-engine bolts removed, engined supported from tipping back, support gearbox on trolley jack, take off gearbox cross member then carefuly separate bellhousing from engine and lower whilst moving backwards. Gearbox will not come out fully as the bellhousing fouls on the chassis but no need to as you should be able to get your hand into the bellhousing passed the flywheel to separate the thrust bearing from the fork and then remove the fork. If you need to replace the thrust bearing you'll need to split the box from the bellhousing by undoing the 6 bolts inside the housing. Make sure everything is properly supported. Allow yourself the time as it's a challenging job, especially refitting as the gearbox has to be in perfect aligment with the engine before it will slid into place...but very rewarding when it does!
Better still if you've got the readies get a garage to do it.
All the best
John
Car up on sturdy axle stands all round...
Exhaust off, Propshaft off, wires unplugged, gearlever off, bellhousing-engine bolts removed, engined supported from tipping back, support gearbox on trolley jack, take off gearbox cross member then carefuly separate bellhousing from engine and lower whilst moving backwards. Gearbox will not come out fully as the bellhousing fouls on the chassis but no need to as you should be able to get your hand into the bellhousing passed the flywheel to separate the thrust bearing from the fork and then remove the fork. If you need to replace the thrust bearing you'll need to split the box from the bellhousing by undoing the 6 bolts inside the housing. Make sure everything is properly supported. Allow yourself the time as it's a challenging job, especially refitting as the gearbox has to be in perfect aligment with the engine before it will slid into place...but very rewarding when it does!
Better still if you've got the readies get a garage to do it.
All the best
John
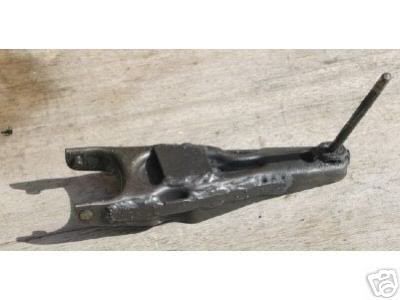
If only I could post pic's I would give a detailed written and photographic description of the repair POSSIBLE WITHOUT DISTURBING THE TRANSMISSION.
As I said earlier, in a past life someone had cut a crude shaped hole in the bell housing, and covered it with a tin plate. After removing the clutch slave cylinder, tin plate protecting the flywheel, detaching the rod from the clutch fork, then unscrewing and removing the tin plate covering the hole, I was able to see through the hole pretty much what your pic above shows. With a large flat blade screwdriver I was able to pop the fork off the pivot and retaining clip and let it fall into the bell housing. Then it was just a question of pushing the clutch fork up into the left hand side of the bell housing enough so as the thinner end of the fork could fall into the cut out hole. Once there it was just a question of tugging at it to get it through the hole. Strangely though, whoever cut the hole in the first place must have used a clutch fork and piece of cardboard or similar before hand to make a template then place it on the bell housing to plot the shape and size of the hole, because the clutch fork only just came out of the hole they'd cut. And that was using a flat blade screwdriver to help lever it through. Why they didn't just cut a large rectangle hole with room to spare, I don't know. So that's the first thing I did once the damaged fork was out. With cutting disc and file the hole was made larger and neater, and doing so will not do any harm to any related transmission components or weaken the bell housing. Frankly I don't understand why there isn't a hole in the bell housing from manufacture for exactly this purpose.
The next part should have been fairly straightforward, but for two reasons it wasn't. First off, tvrcarparts.com wanted almost twice the price for a clutch fork the same as supplied by Rimmer Brothers. Obviously I bought the fork from Rimmers. Unfortunately the sales assistant who took the phone order, for reasons unknown, managed to send the wrong fork. Such meant another day delayed - or not. In the end I decided to repair the damaged fork by placing a dome headed nut on a long bolt and using the dome head inside the fork to reform the dimple where the pivot pin sits. I did this using a panel beating hammer. Once done I filled the backside of the fork around the damaged area completely using a mig welder. With a mushroom shape cutting tool and drill I cleaned up the inside of the pivot area. Now I have a clutch fork much stronger than a new one. Greased up the fork inside the pivot area. Made sure the locating spring clip was good then fitted new release bearing locators. At this point you need to put the clutch fork back into the bell housing taking care not to let the bearing locators fall off. Once the fork is rattling around in the bell housing, you need to position it so you can fit the slave cylinder pushrod using a new clip for same. Now the real fun starts.
Trying to locate the clutch fork onto the pivot pin clip and locate the bearing locators, you need the patience of Job. The bearing locators are rectangular in shape, and will only slide onto the bearing carrier one way. Make sure you have them right. Make sure you use something sticky on them to first keep them on the fork, and second to try and keep them in position so they slide onto the bearing carrier. Trying to get them to do so at the same time as trying to locate the fork retaining clip onto the back side of the pivot pin ball is tricky. This took me several thousand attempts and three hours. All the time I kept telling myself, you could do this one time and be lucky enough to locate it the first attempt. In which case the entire job should take an hour tops. In my case I was unlucky enough to struggle to get the fork components to locate time after time after time, but when it did I was bloody grateful not to have had to remove the transmission.
Had my Griff not had a recent new clutch, of course I would have pulled the transmission and done the entire job. As in my case though, I did replace the clutch master cylinder, slave cylinder and pipe, and bled system through with new fluid, which one should do at this stage anyway. Now I have a lovely operating clutch complete with new clevis pin at the pedal, all greased up and working lovely, and I have a hole in my transmission I know I can use again if need be, lol, and a spare brand new clutch fork too. I will be strengthening the new fork though. It's easy to see why they fail when you have a new one in your hand. The entire thing is punched into shape at manufacture and it's clear to see that the pivot pin domed area is weakened in the process. Such should be mig welded on the backside and a flat plate welded across the top of the dome on the backside. That should do it.
As I said earlier, in a past life someone had cut a crude shaped hole in the bell housing, and covered it with a tin plate. After removing the clutch slave cylinder, tin plate protecting the flywheel, detaching the rod from the clutch fork, then unscrewing and removing the tin plate covering the hole, I was able to see through the hole pretty much what your pic above shows. With a large flat blade screwdriver I was able to pop the fork off the pivot and retaining clip and let it fall into the bell housing. Then it was just a question of pushing the clutch fork up into the left hand side of the bell housing enough so as the thinner end of the fork could fall into the cut out hole. Once there it was just a question of tugging at it to get it through the hole. Strangely though, whoever cut the hole in the first place must have used a clutch fork and piece of cardboard or similar before hand to make a template then place it on the bell housing to plot the shape and size of the hole, because the clutch fork only just came out of the hole they'd cut. And that was using a flat blade screwdriver to help lever it through. Why they didn't just cut a large rectangle hole with room to spare, I don't know. So that's the first thing I did once the damaged fork was out. With cutting disc and file the hole was made larger and neater, and doing so will not do any harm to any related transmission components or weaken the bell housing. Frankly I don't understand why there isn't a hole in the bell housing from manufacture for exactly this purpose.
The next part should have been fairly straightforward, but for two reasons it wasn't. First off, tvrcarparts.com wanted almost twice the price for a clutch fork the same as supplied by Rimmer Brothers. Obviously I bought the fork from Rimmers. Unfortunately the sales assistant who took the phone order, for reasons unknown, managed to send the wrong fork. Such meant another day delayed - or not. In the end I decided to repair the damaged fork by placing a dome headed nut on a long bolt and using the dome head inside the fork to reform the dimple where the pivot pin sits. I did this using a panel beating hammer. Once done I filled the backside of the fork around the damaged area completely using a mig welder. With a mushroom shape cutting tool and drill I cleaned up the inside of the pivot area. Now I have a clutch fork much stronger than a new one. Greased up the fork inside the pivot area. Made sure the locating spring clip was good then fitted new release bearing locators. At this point you need to put the clutch fork back into the bell housing taking care not to let the bearing locators fall off. Once the fork is rattling around in the bell housing, you need to position it so you can fit the slave cylinder pushrod using a new clip for same. Now the real fun starts.
Trying to locate the clutch fork onto the pivot pin clip and locate the bearing locators, you need the patience of Job. The bearing locators are rectangular in shape, and will only slide onto the bearing carrier one way. Make sure you have them right. Make sure you use something sticky on them to first keep them on the fork, and second to try and keep them in position so they slide onto the bearing carrier. Trying to get them to do so at the same time as trying to locate the fork retaining clip onto the back side of the pivot pin ball is tricky. This took me several thousand attempts and three hours. All the time I kept telling myself, you could do this one time and be lucky enough to locate it the first attempt. In which case the entire job should take an hour tops. In my case I was unlucky enough to struggle to get the fork components to locate time after time after time, but when it did I was bloody grateful not to have had to remove the transmission.
Had my Griff not had a recent new clutch, of course I would have pulled the transmission and done the entire job. As in my case though, I did replace the clutch master cylinder, slave cylinder and pipe, and bled system through with new fluid, which one should do at this stage anyway. Now I have a lovely operating clutch complete with new clevis pin at the pedal, all greased up and working lovely, and I have a hole in my transmission I know I can use again if need be, lol, and a spare brand new clutch fork too. I will be strengthening the new fork though. It's easy to see why they fail when you have a new one in your hand. The entire thing is punched into shape at manufacture and it's clear to see that the pivot pin domed area is weakened in the process. Such should be mig welded on the backside and a flat plate welded across the top of the dome on the backside. That should do it.
Rocket Pepper said:
It's easy to see why they fail when you have a new one in your hand. The entire thing is punched into shape at manufacture and it's clear to see that the pivot pin domed area is weakened in the process. Such should be mig welded on the backside and a flat plate welded across the top of the dome on the backside. That should do it.
As per my picture .. Agree - locating the fork can be really difficult if the engine / box is only moved slightly..
No Rev, not suggesting it was. That said, the welding on mine appears to have failed. Not certain until tomoz when I get in the bell housing again. Leaving Harewood today though, pedal went momentarily soft. Next change it went straight to the floor like the rod had gone through the fork, then pedal jammed solid. Feels exactly the same as the last time. Solution this time will be to copy Steve Heath pic modification with new fork before I put it in.
No the clutch felt great. I replaced master and slave cylinder too, and I know the clutch is relatively recent in mileage terms. Such is supported by looking at it through the access hole in the bell housing, and the diaphragm springs are nicely positioned to suggest a fat friction plate.
That said, and bare in mind I'd made the pedal good with new clevis pin, I hadn't got much if any free play at the pedal. Then yesterday, which equates to about 100 miles driven, I gave it a boot full and thought the clutch was slipping. Again I tried, and sure enough clutch slip. Now I won't know for sure depending on the state the fork's in when I get it out, but I'm thinking the welding repair had put too much meat on the pushrod side and taken up any free play that should exist. In other words, the weld repair had the release bearing too tight against the pressure plate springs. Given a bit of poke, and heat expansion, result clutch slip at boot full. And to support that, sticking it in 5th down the A1 after the pedal jammed, no more clutch slip. Ah well, best get off to work and fix it. C ya!!
That said, and bare in mind I'd made the pedal good with new clevis pin, I hadn't got much if any free play at the pedal. Then yesterday, which equates to about 100 miles driven, I gave it a boot full and thought the clutch was slipping. Again I tried, and sure enough clutch slip. Now I won't know for sure depending on the state the fork's in when I get it out, but I'm thinking the welding repair had put too much meat on the pushrod side and taken up any free play that should exist. In other words, the weld repair had the release bearing too tight against the pressure plate springs. Given a bit of poke, and heat expansion, result clutch slip at boot full. And to support that, sticking it in 5th down the A1 after the pedal jammed, no more clutch slip. Ah well, best get off to work and fix it. C ya!!
Unbelievably, the problem is the release bearing carrier is rotating slightly in one direction when the fork moves towards the clutch pressure plate (pedal press). I've put a new fork in there today, with new locating bobbins, and it lasted about 4 presses of the pedal before the release bearing carrier rotates enough for the locators to come out of the track they sit in. As soon as they do the fork jumps forward as the slave cylinder pushrod pressure has nothing to hold/pivot against. Then of course it all jams up. Looks like a new bearing carrier is in order. I just can't understand why mechanics would put a new clutch in there without renewing the bearing and carrier too. No matter how hard it is to source one if that were the problem. Now it's my problem, which just means more downtime.
Don't know if this info will help but there are 2 different bearings on the LT77.
Early is all steel and is on a steel carrier (push on bearing) .. it's incredibly robust.
Later bearings are one piece moulded plastic .. self centering bearings but more importantly - the carrier in plastic - and the metal location lugs of the lever arm can easily chew into the plastic..
Heck knows why they redesigned it..
I use the old one because it's stronger.
Early is all steel and is on a steel carrier (push on bearing) .. it's incredibly robust.
Later bearings are one piece moulded plastic .. self centering bearings but more importantly - the carrier in plastic - and the metal location lugs of the lever arm can easily chew into the plastic..
Heck knows why they redesigned it..
I use the old one because it's stronger.
Well mines the plastic one, and there's a story to tell.
This time I got in there laid on my back under the Griff as opposed to doing it on the ramp last week. On my back I was closer to the bearing with the old eye ball eye ball, and line of sight was straight ahead as opposed to neck strained at 45 deg! Result - look closer.
The plastic bearing carrier has slight tapers to the tracks that the clutch fork rectangular pivoting bobbins sit and run in. These tracks are also ever so slightly ramped. The ramps however run in opposite directions. When putting the bearing carrier onto the shaft and locating the fork, it's a twisting action that locks the bobbins into the track. Hence the ramps in opposite directions.
If you do like I've done (which is repeat what some previous owner had/ or had done) which is put the clutch fork on with the transmission in situ by using an access hole cut into the bell housing, it is not possible to put the fork in situ then rotate the bearing retainer and locate the bobbins. The only way to do this is to force the fork onto the bearing retainer and this will open out the tapers and damage the ramps which are designed to hold the clutch fork and bobbins in place. This damage, which lasted about 150 miles last week, but only 4 pedal presses on Monday after putting it back on again, is now the cause of what is essentially a major problem which really means replacing the bearing carrier as the only solution. So no I don't recommend anyone try this as a way of replacing a damaged clutch fork. I've learnt the hard way.
That said, I am up and running again as I laid on my back for two hours with Snap-ons finest gas soldering iron and proceeded to plastic weld (using a cable tie for extra plastic - good stuff as plastic goes) a sort of backing onto the ramp area to stop the bearing carrier rotating. So far after 100 miles last night it has held up and the clutch is working beautifully. I'm hoping this bodge will get me to the end of the good weather season - if one can call it that - when I will pull the motor for some choice fettling.
To summaries if you've followed this thread...........
I DON'T RECOMMEND REPLACING A CLUTCH FORK INTHE WAY I HAVE.
This time I got in there laid on my back under the Griff as opposed to doing it on the ramp last week. On my back I was closer to the bearing with the old eye ball eye ball, and line of sight was straight ahead as opposed to neck strained at 45 deg! Result - look closer.
The plastic bearing carrier has slight tapers to the tracks that the clutch fork rectangular pivoting bobbins sit and run in. These tracks are also ever so slightly ramped. The ramps however run in opposite directions. When putting the bearing carrier onto the shaft and locating the fork, it's a twisting action that locks the bobbins into the track. Hence the ramps in opposite directions.
If you do like I've done (which is repeat what some previous owner had/ or had done) which is put the clutch fork on with the transmission in situ by using an access hole cut into the bell housing, it is not possible to put the fork in situ then rotate the bearing retainer and locate the bobbins. The only way to do this is to force the fork onto the bearing retainer and this will open out the tapers and damage the ramps which are designed to hold the clutch fork and bobbins in place. This damage, which lasted about 150 miles last week, but only 4 pedal presses on Monday after putting it back on again, is now the cause of what is essentially a major problem which really means replacing the bearing carrier as the only solution. So no I don't recommend anyone try this as a way of replacing a damaged clutch fork. I've learnt the hard way.
That said, I am up and running again as I laid on my back for two hours with Snap-ons finest gas soldering iron and proceeded to plastic weld (using a cable tie for extra plastic - good stuff as plastic goes) a sort of backing onto the ramp area to stop the bearing carrier rotating. So far after 100 miles last night it has held up and the clutch is working beautifully. I'm hoping this bodge will get me to the end of the good weather season - if one can call it that - when I will pull the motor for some choice fettling.
To summaries if you've followed this thread...........
I DON'T RECOMMEND REPLACING A CLUTCH FORK INTHE WAY I HAVE.


Gassing Station | Griffith | Top of Page | What's New | My Stuff