
AJP 4.2 Rebuild Progress
Discussion


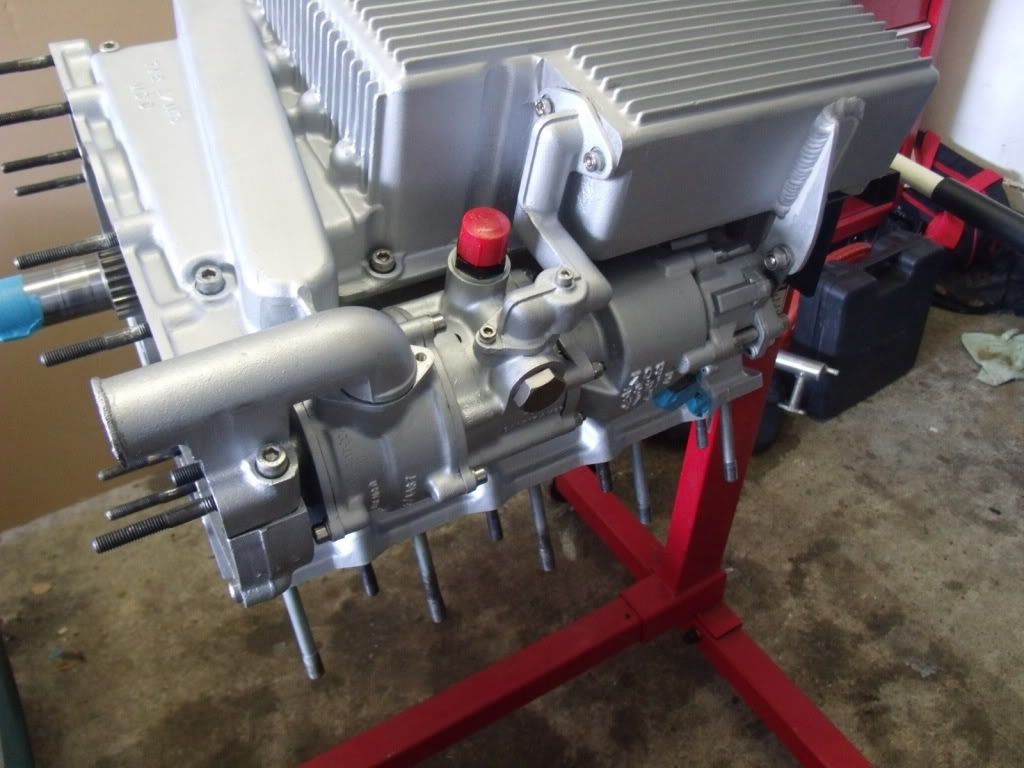



That is utterly stunning...
Are the manifolds just new or coated?
Interesting arrangement of the ignition leads too....they look like the same Magnecors I have, did you require longer leads to run them in the configuration there.....or were they standard length?
If I ever...EVER...get my engine bay looking like that, Id either have been divorced or Id won the lottery...or both!!
Beautiful
Are the manifolds just new or coated?
Interesting arrangement of the ignition leads too....they look like the same Magnecors I have, did you require longer leads to run them in the configuration there.....or were they standard length?
If I ever...EVER...get my engine bay looking like that, Id either have been divorced or Id won the lottery...or both!!
Beautiful
Edited by djstevec on Sunday 21st August 00:12
Thanks for the encouraging words. Its been a long hard slog and I need all the encouragement I can get. Hopefully its close to completion.
The manifolds are finished with Eastwoods paint on high temperature coating supplied by Frosts. The tin says stainless steel finish but its definitely battle ship grey. But it looks OK I think.
The leads and their position are standard for a 4.2. They are longer than 4.5 leads. Joo from Track car Solutions supplied them. I believe he had a company that manufactured them for him.
The manifolds are finished with Eastwoods paint on high temperature coating supplied by Frosts. The tin says stainless steel finish but its definitely battle ship grey. But it looks OK I think.
The leads and their position are standard for a 4.2. They are longer than 4.5 leads. Joo from Track car Solutions supplied them. I believe he had a company that manufactured them for him.
mikesr said:
Thanks for the encouraging words. Its been a long hard slog and I need all the encouragement I can get. Hopefully its close to completion.
The manifolds are finished with Eastwoods paint on high temperature coating supplied by Frosts. The tin says stainless steel finish but its definitely battle ship grey. But it looks OK I think.
The leads and their position are standard for a 4.2. They are longer than 4.5 leads. Joo from Track car Solutions supplied them. I believe he had a company that manufactured them for him.
You might want to make sure the leads aren't left resting on the manifolds. The manifolds are finished with Eastwoods paint on high temperature coating supplied by Frosts. The tin says stainless steel finish but its definitely battle ship grey. But it looks OK I think.
The leads and their position are standard for a 4.2. They are longer than 4.5 leads. Joo from Track car Solutions supplied them. I believe he had a company that manufactured them for him.

Byker28i said:
mikesr said:
Thanks for the encouraging words. Its been a long hard slog and I need all the encouragement I can get. Hopefully its close to completion.
The manifolds are finished with Eastwoods paint on high temperature coating supplied by Frosts. The tin says stainless steel finish but its definitely battle ship grey. But it looks OK I think.
The leads and their position are standard for a 4.2. They are longer than 4.5 leads. Joo from Track car Solutions supplied them. I believe he had a company that manufactured them for him.
You might want to make sure the leads aren't left resting on the manifolds. The manifolds are finished with Eastwoods paint on high temperature coating supplied by Frosts. The tin says stainless steel finish but its definitely battle ship grey. But it looks OK I think.
The leads and their position are standard for a 4.2. They are longer than 4.5 leads. Joo from Track car Solutions supplied them. I believe he had a company that manufactured them for him.
I was going to see if anyone else mentioned that.....
Congratulations on a first class level of detail and finish.
Did you paint the block or are we looking at a bare bead/water blasted surface ?
Incidentally,I`m guessing the purple handle on the offside front of the engine is the oil dip ? Strangely on my 97` it`s located on the same side although in the camshaft valley towards the rear of the motor .. wonder when it changed ?
Did you paint the block or are we looking at a bare bead/water blasted surface ?
Incidentally,I`m guessing the purple handle on the offside front of the engine is the oil dip ? Strangely on my 97` it`s located on the same side although in the camshaft valley towards the rear of the motor .. wonder when it changed ?
pirateTVR said:
Congratulations on a first class level of detail and finish.
Did you paint the block or are we looking at a bare bead/water blasted surface ?
Incidentally,I`m guessing the purple handle on the offside front of the engine is the oil dip ? Strangely on my 97` it`s located on the same side although in the camshaft valley towards the rear of the motor .. wonder when it changed ?
I think it was 1998 engines, my Cerb 96 had the dip stick at the back but when the crank snapped and destroyed the engine the first thing I noticed when I got the Cerb back with a new engine when I tried to check the oil the dip stick was at the front, I think the reason was easier to get toDid you paint the block or are we looking at a bare bead/water blasted surface ?
Incidentally,I`m guessing the purple handle on the offside front of the engine is the oil dip ? Strangely on my 97` it`s located on the same side although in the camshaft valley towards the rear of the motor .. wonder when it changed ?
billy no brakes said:
I think it was 1998 engines, my Cerb 96 had the dip stick at the back but when the crank snapped and destroyed the engine the first thing I noticed when I got the Cerb back with a new engine when I tried to check the oil the dip stick was at the front, I think the reason was easier to get to
Take your point,plus it looks to be a much shorter and probably smoother in operation but there looks to be a whole load of work in the changeover.By the look of things the new siting would run straight through my water pipe but I`m guessing the breather feed would be a lot less constricted with an alternative layout .. was there also a change in the fibreglass dress shroud to allow access ?
..just nice to know.
HarryW said:
Byker28i said:
mikesr said:
Thanks for the encouraging words. Its been a long hard slog and I need all the encouragement I can get. Hopefully its close to completion.
The manifolds are finished with Eastwoods paint on high temperature coating supplied by Frosts. The tin says stainless steel finish but its definitely battle ship grey. But it looks OK I think.
The leads and their position are standard for a 4.2. They are longer than 4.5 leads. Joo from Track car Solutions supplied them. I believe he had a company that manufactured them for him.
You might want to make sure the leads aren't left resting on the manifolds. The manifolds are finished with Eastwoods paint on high temperature coating supplied by Frosts. The tin says stainless steel finish but its definitely battle ship grey. But it looks OK I think.
The leads and their position are standard for a 4.2. They are longer than 4.5 leads. Joo from Track car Solutions supplied them. I believe he had a company that manufactured them for him.
I was going to see if anyone else mentioned that.....
pirateTVR said:
Congratulations on a first class level of detail and finish.
Did you paint the block or are we looking at a bare bead/water blasted surface ?
The block and heads are painted. There was a fair amount of corrosion of the alloy so I decided to clean it off and seal the surface with engine paint.Did you paint the block or are we looking at a bare bead/water blasted surface ?
billy no brakes said:
pirateTVR said:
Congratulations on a first class level of detail and finish.
Did you paint the block or are we looking at a bare bead/water blasted surface ?
Incidentally,I`m guessing the purple handle on the offside front of the engine is the oil dip ? Strangely on my 97` it`s located on the same side although in the camshaft valley towards the rear of the motor .. wonder when it changed ?
I think it was 1998 engines, my Cerb 96 had the dip stick at the back but when the crank snapped and destroyed the engine the first thing I noticed when I got the Cerb back with a new engine when I tried to check the oil the dip stick was at the front, I think the reason was easier to get toDid you paint the block or are we looking at a bare bead/water blasted surface ?
Incidentally,I`m guessing the purple handle on the offside front of the engine is the oil dip ? Strangely on my 97` it`s located on the same side although in the camshaft valley towards the rear of the motor .. wonder when it changed ?
clive f said:
 very nice work mate, you must feel very pleased with yourself when it all goes back together and back into the car.
Hopefully next weekend will see and hear it burst into life.
pirateTVR said:
Take your point,plus it looks to be a much shorter and probably smoother in operation but there looks to be a whole load of work in the changeover.
By the look of things the new siting would run straight through my water pipe but I`m guessing the breather feed would be a lot less constricted with an alternative layout .. was there also a change in the fibreglass dress shroud to allow access ?
..just nice to know.
Don,t think it would be too hard to change you would need to get the pipe and dip stick off an engine, might be easier to look at another ceb with the later version on and see fow the pipe for the dipstick is routed. They all see m to be different on Mikesr engine which looks very nice the dipstick is lower than the oil breather pipe lug on mine it level and to the side of it and I have to push the breather pipe out the way to get the dipstick out and on others the metal lug is right angled I bet everybody will be looking now would be good to know the differences I,am going to change the metal lug on mine as it is too short and when I check the oil the breather pipe sometimes comes off the metal lug, don,t know what you mean about fibreglass put a picture on so we can see.By the look of things the new siting would run straight through my water pipe but I`m guessing the breather feed would be a lot less constricted with an alternative layout .. was there also a change in the fibreglass dress shroud to allow access ?
..just nice to know.
Mikesr sorry if we are nicking your thread but muat say the engine does look good are you putting silicon water hoses back or is that pipe in the picture for other use, I would recomend you use silicon they are so much better and look nice too I have just recently changed all mine and put stainless steel water pipes on too as the old ones was rusty and had a small leak and they will last much longer seems to make sense as you are able to get to the pipes esaier with the induction unit off, keep us posted on the rebuild and how it goes when you fire it up
Gassing Station | Cerbera | Top of Page | What's New | My Stuff