
Yet another project for my Vantage
Discussion


The "pimp-ification" of my car continues.
I had a spare steering wheel since I bought a replacement to get the cruise control option. Not willing to leave well enough alone, I decided to bring out my trusty sewing machine and cover the older wheel with blue and black Alcantara to match the diamond quilting I had done in my previous project. In reality, 99% of the stitching I wound up doing by hand. I only used the machine to reinforce the joints between the two colors. Before any of you ask: no, I have never done anything like this before.
I also figured out a way to move the steering wheel cruise and stereo/phone controls from the other wheel back to this wheel. It turns out it can be done (regardless of what the dealer tells you), but it is definitely not for the timid as it involves chopping the rubber on the wheel hub with an Exacto knife.
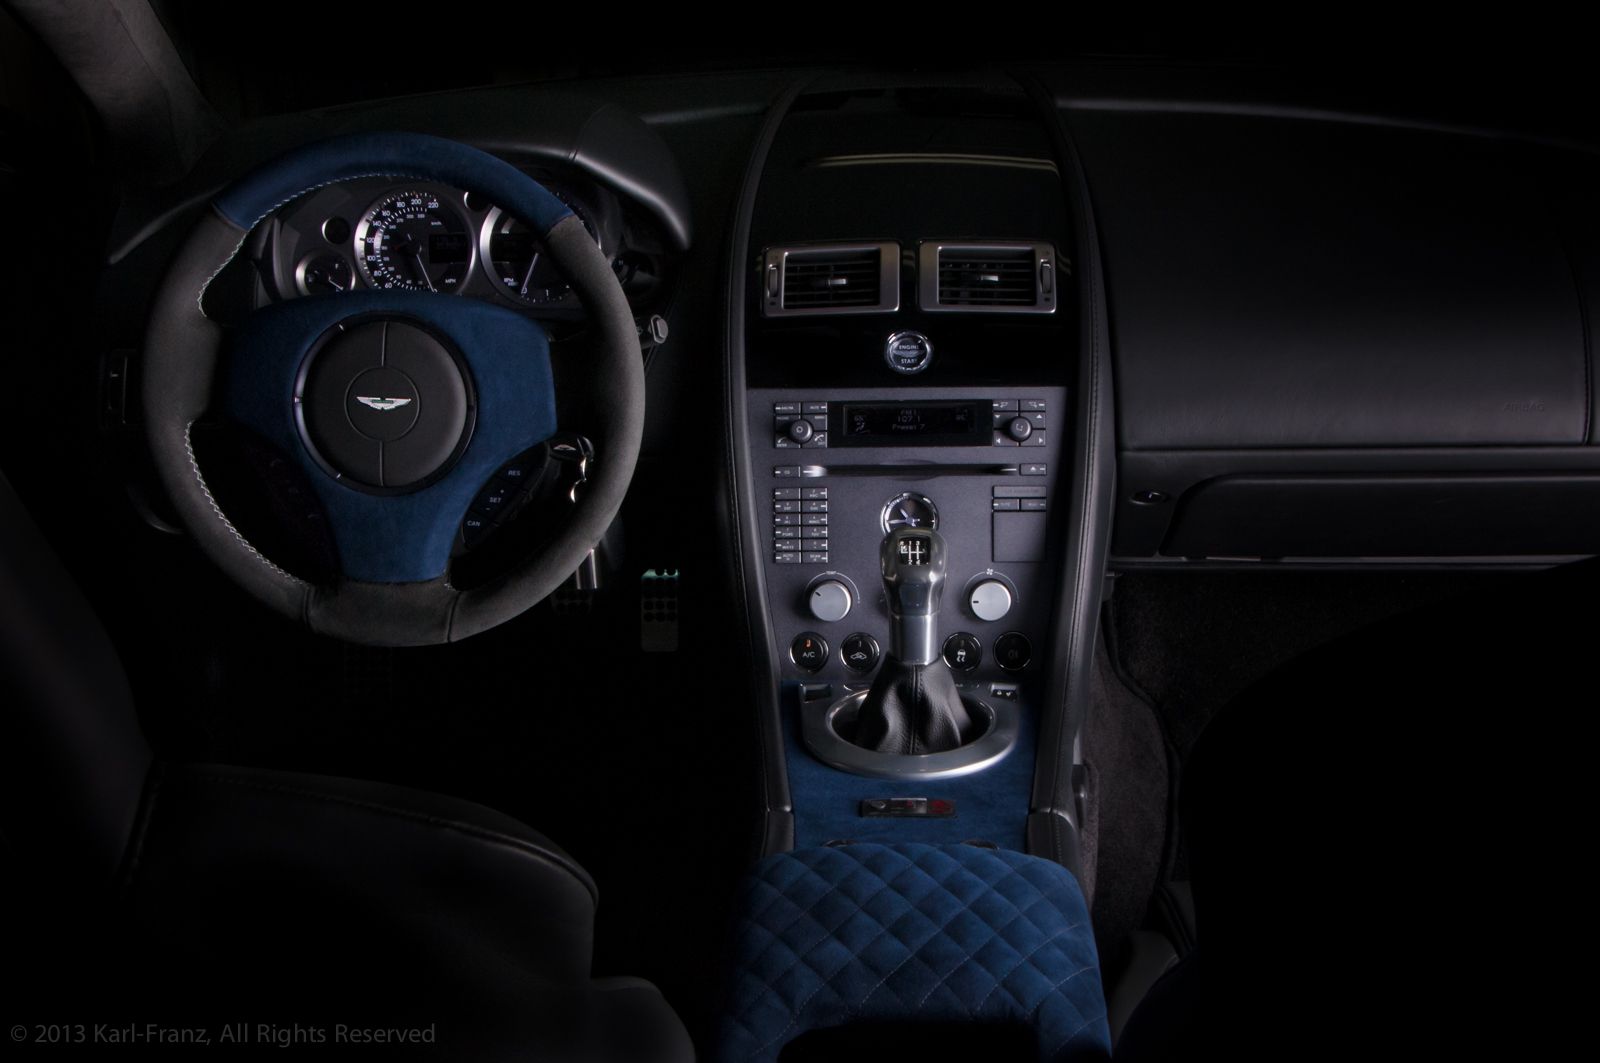
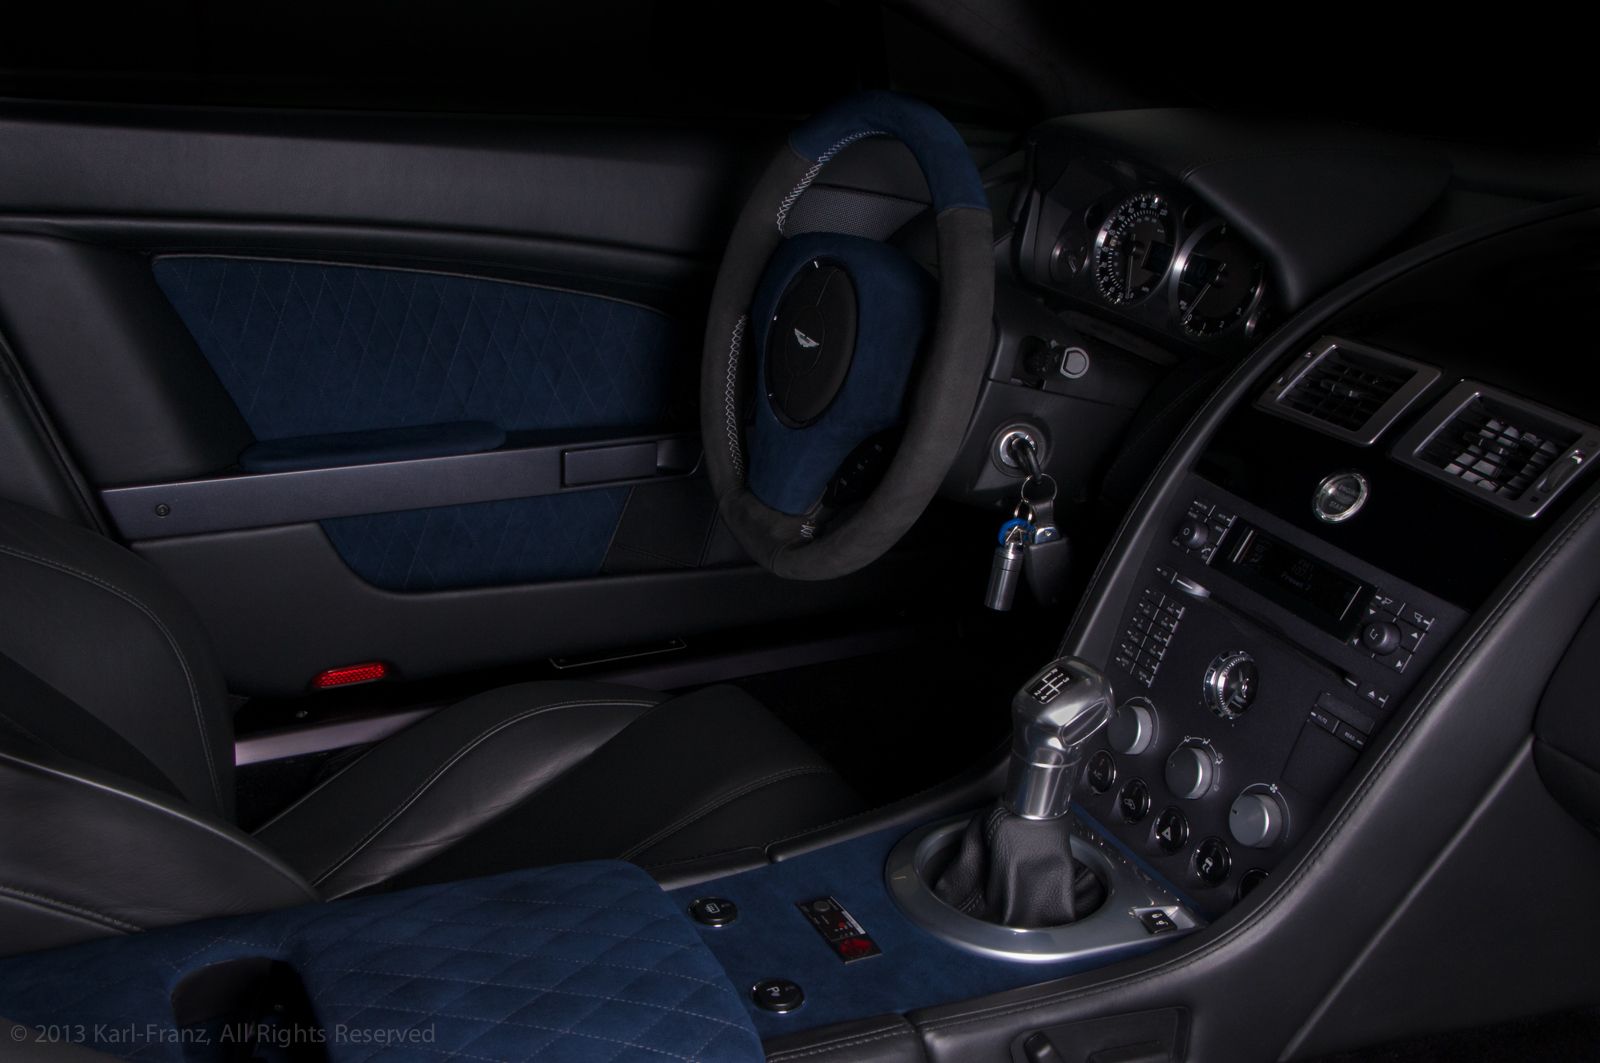
Below are a few pics I took tonight after I installed the wheel in the car. Also note my new V12V/DBS shifter which I installed at the same time.
I will post more pics/details of my project in a little while.

I had a spare steering wheel since I bought a replacement to get the cruise control option. Not willing to leave well enough alone, I decided to bring out my trusty sewing machine and cover the older wheel with blue and black Alcantara to match the diamond quilting I had done in my previous project. In reality, 99% of the stitching I wound up doing by hand. I only used the machine to reinforce the joints between the two colors. Before any of you ask: no, I have never done anything like this before.
I also figured out a way to move the steering wheel cruise and stereo/phone controls from the other wheel back to this wheel. It turns out it can be done (regardless of what the dealer tells you), but it is definitely not for the timid as it involves chopping the rubber on the wheel hub with an Exacto knife.
Below are a few pics I took tonight after I installed the wheel in the car. Also note my new V12V/DBS shifter which I installed at the same time.
I will post more pics/details of my project in a little while.
Top quality work as normal, wish I had your patience or even your imagination!!
Don't think I have ever seen the airbag cover re-trimmed before... Looks great!
How dark is the blue really, is the photo accurate? Wouldn't work with a light colour I don't think...
Hmm, tempted to ring BR now... My wheel and gaiter are up there being retrimmed...
Don't think I have ever seen the airbag cover re-trimmed before... Looks great!
How dark is the blue really, is the photo accurate? Wouldn't work with a light colour I don't think...
Hmm, tempted to ring BR now... My wheel and gaiter are up there being retrimmed...
yeti said:
Top quality work as normal, wish I had your patience or even your imagination!!
Don't think I have ever seen the airbag cover re-trimmed before... Looks great!
How dark is the blue really, is the photo accurate? Wouldn't work with a light colour I don't think...
Hmm, tempted to ring BR now... My wheel and gaiter are up there being retrimmed...
Thanx. After I had already re-trimmed my airbag crashpad cover, I did a google image search for "Aston Martin Alcantara steering wheel" and found several pictures where Aston had also factory-trimmed the crashpad in Alcantara.Don't think I have ever seen the airbag cover re-trimmed before... Looks great!
How dark is the blue really, is the photo accurate? Wouldn't work with a light colour I don't think...
Hmm, tempted to ring BR now... My wheel and gaiter are up there being retrimmed...
The color is navy blue, so the pictures are pretty accurate. I had taken some pictures with my iphone previously, but the flash on the phone made the blue look lighter than it really is. Alcantara also makes a lighter blue (sort of Superman medium blue), but I didn't like the look because it was too bright for my taste.
Glendower said:
Hmmm.....I haven't read the whole thread, but I would have thought a bit more on performance and handling rather than a bit of bling? I just had Bamford Rose do my V8 Roadster, it looks the same, sounds f****** awesome, and drives like the bats coming out of Hell....
That's your choice, as the OP has said - this was self done and at a guess I'd say considerably less than a trip to BRGlendower said:
Hmmm.....I haven't read the whole thread, but I would have thought a bit more on performance and handling rather than a bit of bling? I just had Bamford Rose do my V8 Roadster, it looks the same, sounds f****** awesome, and drives like the bats coming out of Hell....
Really, you couldn't be bothered to read the 'whole thread' of 5 posts? If you did, you'd probably notice the steering wheel on the left as he's in the US... Pretty hard to get it modified usefully over there 
Pics of your roadster on a new thread please and some details of the work done would be good too

Glendower said:
Hmmm.....I haven't read the whole thread, but I would have thought a bit more on performance and handling rather than a bit of bling? I just had Bamford Rose do my V8 Roadster, it looks the same, sounds f****** awesome, and drives like the bats coming out of Hell....
Ha! Yes, I'll make sure to put my car on a plane, ship it to the UK from Melbourne, FL, spend tens of thousands of dollars at Bamford, then put it on a plane for the trip back. That definitely sounds more reasonable than doing some silly bling on my own in the comfort of my own home. …and I agree with Yeti: you didn't read the "whole thread"? It prolly took longer to type the snide two-line response than to read the darn thing. Yeesh...

Thanks for the compliments, guys. Here are some of the details of the project:
I removed the airbag cover from the car. This is a pretty simple task, but all the usual caveats apply since you are toying with a highly explosive device, you do this at your own risk.
There are 2 Torx screws that hold the airbag to the wheel. Turn the wheel 90º and remove one screw from the top rear. Turn the wheel 180º and remove the other screw. The airbag will be loose now. To remove it, you will need to pry it off with a little bit of force up and towards you. It clips onto the 3 horn buttons below it. This is a 2-stage airbag, so there are 2 connectors going to it. To remove them, you must slide the yellow plastic latch and then pinch the 2 side pins as you pull.
The picture below shows the wheel installed with the airbag removed.
1: Horn buttons
2: Phone/Stereo switchpack
3: Cruise control switchpack
4: Airbag connectors with sliding yellow latches
5: Steering wheel retaining Torx bolt
6: Horn and switchpack plug
7: Horn and switchpack connector on steering wheel clock spring.

Here's what the airbag looks like removed from the car:

and here's the back side:

The following 2 pics show the airbag being covered in alcantara. Originally, this is as far as I was going to go; but my projects seem to take on a mind of their own.


Here's the airbag covered in alcantara back on the car:

These pictures show me unstitching and removing the leather cover from my OEM wheel:


Here's the wheel without any leather, front and back:


These pictures show the physical differences of the wheels with and without switchpack controls. The arrows point to the areas where notches need to be in order for the controls to fit and attach.


Here's what the wiring and horn buttons look like if you do not have steering wheel controls:
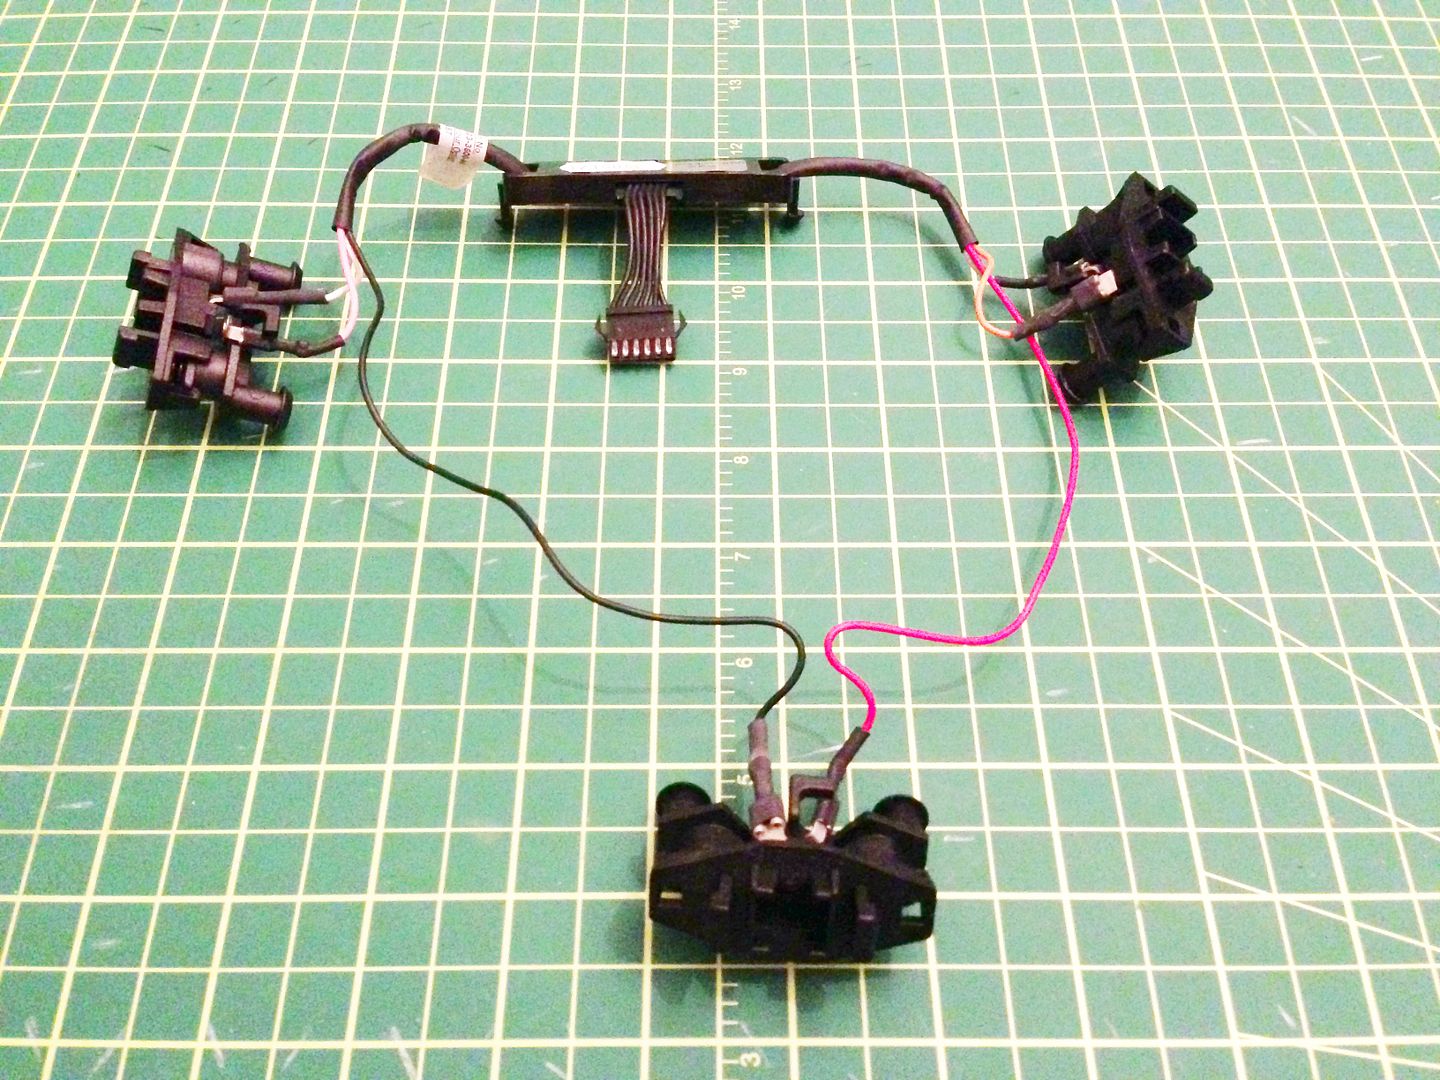
And here is the wiring, horn buttons and switchpacks if you do have steering wheel controls. Note, there are multiple combinations of these; i.e. you can get a wheel with stereo controls, but no cruise; cruise but no stereo controls; or both. Also, there have been 2 different versions of the left switchpack. The older version controls the phone only, the newer one is for both phone and stereo control. You can tell them apart because the older controls have an icon of a human head on them where as the newer ones don't.
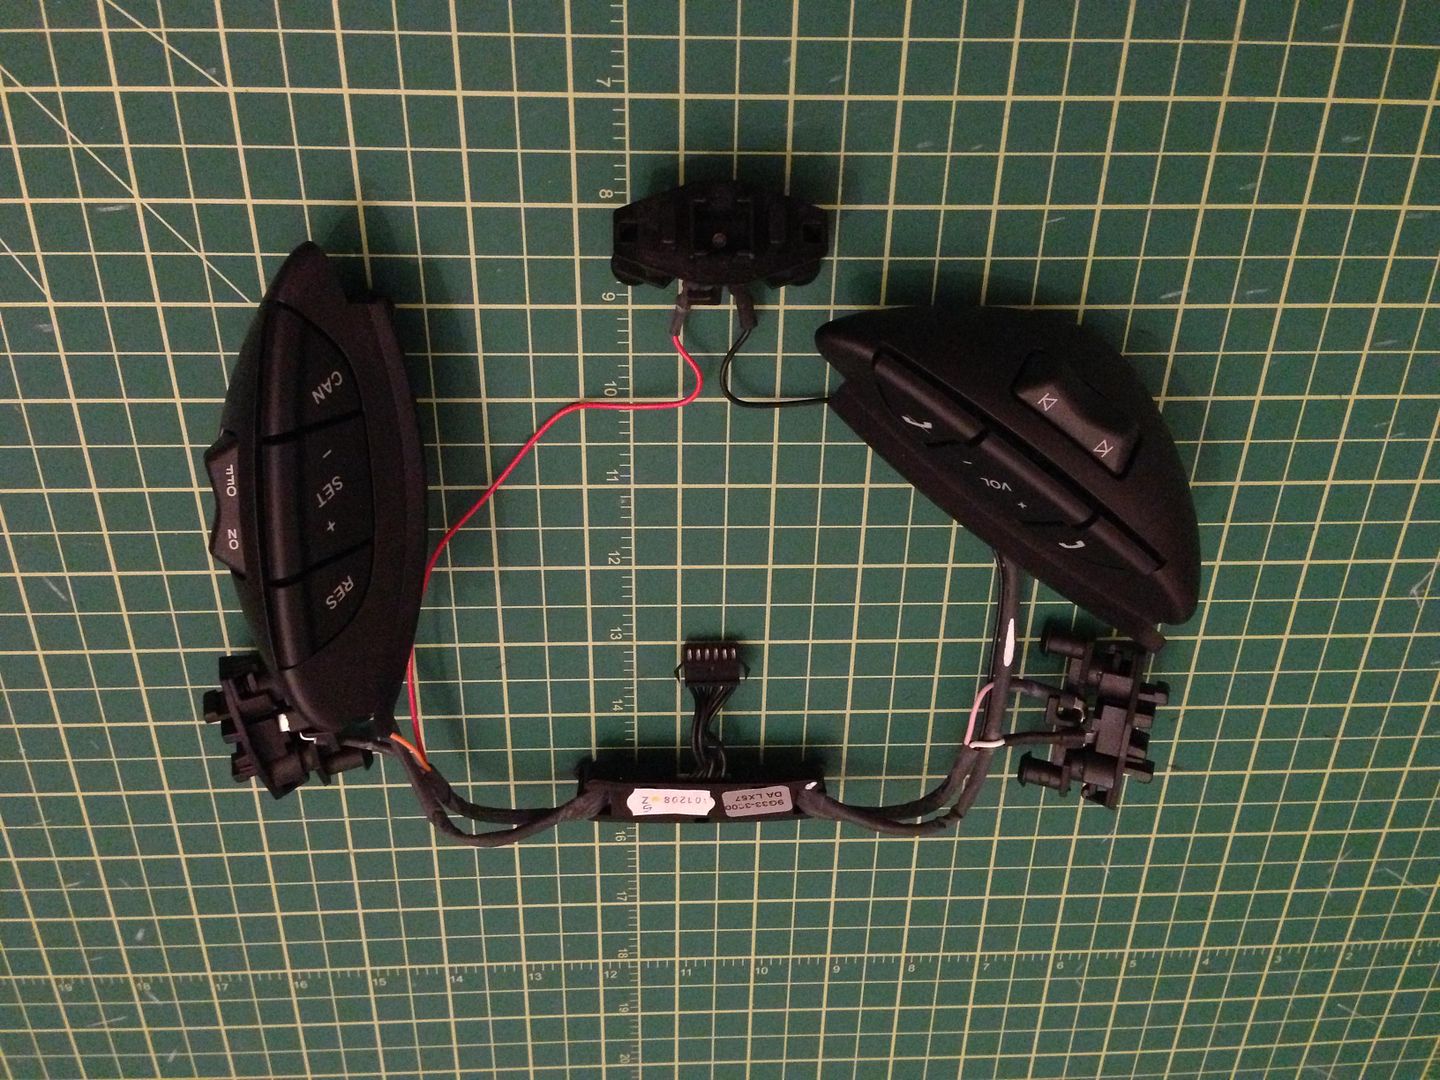
In order to migrate the switchpacks to the original wheel, I would have to cut notches in the rubber hub to match those on the wheel with the controls. Here is where I made two very interesting discoveries. First, all wheels are manufactured the same. If you have left, right or both controls, the notches are cut accordingly. and the wheel has a score line where the cuts need to go. Second, the wheel has 4 metal nuts embedded into the rubber that the switchpacks screw into. I thought I was going to have to improvise something here, but after cutting the first notch with and Exacto knife along the score line, I realized that the nut was already embedded into the rubber!
This picture shows a closeup of the first notch being cut. The arrow points to the metal nut I discovered was already buried about 1cm below the surface:

This picture was after I cut the notches for the left switchpack. The yellow arrows show the two-step notch and the buried metal nuts to attach the switchpack. The blue arrows point to the score line for cutting the notches for the right switchpack.

Here is a test-fit of the steering wheel controls migrated from my cruise control wheel to my original wheel:

I forgot to take a bunch of pictures during the process of making the Alcantara cover, but essentially here's what I did:
I undid the stitching that held together all the individual components of the original leather cover. This left me with 4 individual pieces of leather.
The pieces were very deformed from having been stretched over the wheel so they would not lay flat. I used a damp rag and an iron at very low heat to help flatten them down.
I then used the 4 pieces to make some templates of the shapes I would need for the Alcantara.
Alcantara is not a really cheap fabric. It costs over $100 per yard, so I didn't want to experiment with it. I wound up making some (many) prototypes using other fabrics and vinyl to get a feel for what I was going to have to do.
I did some research on Youtube on how to sew steering wheels. Youtube is a wonderful resource and I use it quite often whenever I want to learn a new task. There always seems to be some tutorial videos on just about any topic. Many videos are horrible, but I always come across a few gems that get me on the right track.
What I learned is that there are several stitch styles for steering wheels, the one I wanted is similar to what the factory did. Essentially you do a straight stitch along the opposite edges of the piece of fabric and then you zigzag another thread along the loops of those stitches to draw them together tightly.
Here is a diagram I found that details this:

You can do the zigzag through every loop or every other loop. The choice is based on the look you want and the length of each straight stitch loop. If the stitch is pretty long (mine was almost 7mm) you want to do each one, because skipping a loop leaves too big a gap.
This image I found on the web shows the BMW M-Style stitching in 3 colors. Notice the zigzag thread is skipping a loop.

This picture shows two other stitch styles. The one on the left is the one Aston uses and the one I chose for my wheel:
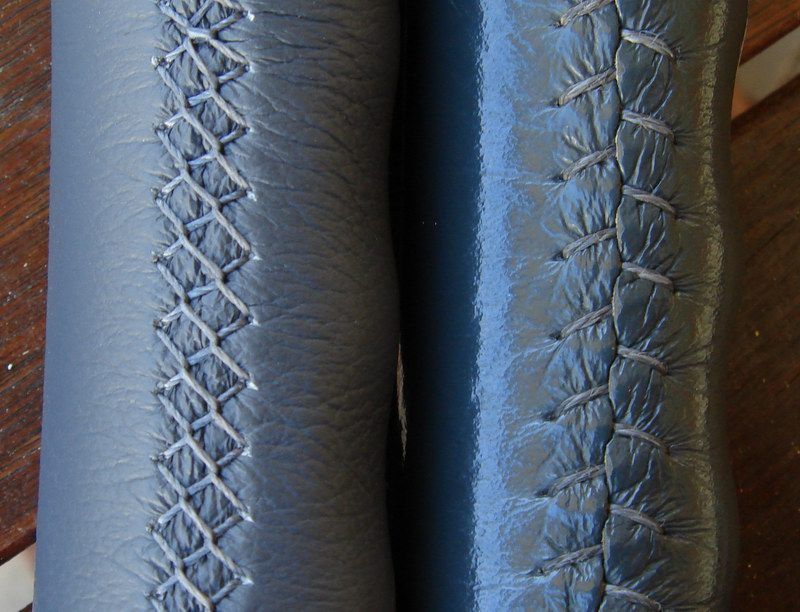
I decided to use a silver thread to accentuate the stitching on the wheel. My car has black stitching in the leather, but I figured the silver on the wheel would be complemented by the aluminum on the shift knob, surround, gauges, air vents, etc. so it wouldn't look totally out of place. Besides, it would look more sporty and custom. The problem with accentuating it, however, is that any screw-ups would be more noticeable. Mine isn't bad, but it's not perfect. If I pointed out some areas you might notice issues, but most people would never see them.
Once I was happy with my prototypes, it was time to do the real thing. In order to do the straight stitches, I used the original leather to transfer the holes and spacing to the Alcantara. I did this by hand because my sewing machines will not do a stitch that long or handle that thick a thread.
Here is a picture of one of the side pieces and the bottom piece stitched along the edges and then stitched together. This was a complex task due to the compound curves in both pieces.

Here is the wheel cover fully stitched and stretched over the original wheel:

Here's a look from the back side. Note that the cover needs to be glued to the wheel as well as sewn. I haven't done that yet in this picture:

Here is the cover glued down and part of the zigzag stitching done:

Once I was done, I removed the other wheel from my car, transferred the switchpacks over, then attached the newly-covered wheel, and replaced the airbag. I also took the opportunity to install my new V12V/DBS shift knob while I had the car apart.
Thanks for reading along.
I removed the airbag cover from the car. This is a pretty simple task, but all the usual caveats apply since you are toying with a highly explosive device, you do this at your own risk.
There are 2 Torx screws that hold the airbag to the wheel. Turn the wheel 90º and remove one screw from the top rear. Turn the wheel 180º and remove the other screw. The airbag will be loose now. To remove it, you will need to pry it off with a little bit of force up and towards you. It clips onto the 3 horn buttons below it. This is a 2-stage airbag, so there are 2 connectors going to it. To remove them, you must slide the yellow plastic latch and then pinch the 2 side pins as you pull.
The picture below shows the wheel installed with the airbag removed.
1: Horn buttons
2: Phone/Stereo switchpack
3: Cruise control switchpack
4: Airbag connectors with sliding yellow latches
5: Steering wheel retaining Torx bolt
6: Horn and switchpack plug
7: Horn and switchpack connector on steering wheel clock spring.
Here's what the airbag looks like removed from the car:
and here's the back side:
The following 2 pics show the airbag being covered in alcantara. Originally, this is as far as I was going to go; but my projects seem to take on a mind of their own.
Here's the airbag covered in alcantara back on the car:
These pictures show me unstitching and removing the leather cover from my OEM wheel:
Here's the wheel without any leather, front and back:
These pictures show the physical differences of the wheels with and without switchpack controls. The arrows point to the areas where notches need to be in order for the controls to fit and attach.
Here's what the wiring and horn buttons look like if you do not have steering wheel controls:
And here is the wiring, horn buttons and switchpacks if you do have steering wheel controls. Note, there are multiple combinations of these; i.e. you can get a wheel with stereo controls, but no cruise; cruise but no stereo controls; or both. Also, there have been 2 different versions of the left switchpack. The older version controls the phone only, the newer one is for both phone and stereo control. You can tell them apart because the older controls have an icon of a human head on them where as the newer ones don't.
In order to migrate the switchpacks to the original wheel, I would have to cut notches in the rubber hub to match those on the wheel with the controls. Here is where I made two very interesting discoveries. First, all wheels are manufactured the same. If you have left, right or both controls, the notches are cut accordingly. and the wheel has a score line where the cuts need to go. Second, the wheel has 4 metal nuts embedded into the rubber that the switchpacks screw into. I thought I was going to have to improvise something here, but after cutting the first notch with and Exacto knife along the score line, I realized that the nut was already embedded into the rubber!
This picture shows a closeup of the first notch being cut. The arrow points to the metal nut I discovered was already buried about 1cm below the surface:
This picture was after I cut the notches for the left switchpack. The yellow arrows show the two-step notch and the buried metal nuts to attach the switchpack. The blue arrows point to the score line for cutting the notches for the right switchpack.
Here is a test-fit of the steering wheel controls migrated from my cruise control wheel to my original wheel:
I forgot to take a bunch of pictures during the process of making the Alcantara cover, but essentially here's what I did:
I undid the stitching that held together all the individual components of the original leather cover. This left me with 4 individual pieces of leather.
The pieces were very deformed from having been stretched over the wheel so they would not lay flat. I used a damp rag and an iron at very low heat to help flatten them down.
I then used the 4 pieces to make some templates of the shapes I would need for the Alcantara.
Alcantara is not a really cheap fabric. It costs over $100 per yard, so I didn't want to experiment with it. I wound up making some (many) prototypes using other fabrics and vinyl to get a feel for what I was going to have to do.
I did some research on Youtube on how to sew steering wheels. Youtube is a wonderful resource and I use it quite often whenever I want to learn a new task. There always seems to be some tutorial videos on just about any topic. Many videos are horrible, but I always come across a few gems that get me on the right track.
What I learned is that there are several stitch styles for steering wheels, the one I wanted is similar to what the factory did. Essentially you do a straight stitch along the opposite edges of the piece of fabric and then you zigzag another thread along the loops of those stitches to draw them together tightly.
Here is a diagram I found that details this:
You can do the zigzag through every loop or every other loop. The choice is based on the look you want and the length of each straight stitch loop. If the stitch is pretty long (mine was almost 7mm) you want to do each one, because skipping a loop leaves too big a gap.
This image I found on the web shows the BMW M-Style stitching in 3 colors. Notice the zigzag thread is skipping a loop.
This picture shows two other stitch styles. The one on the left is the one Aston uses and the one I chose for my wheel:
I decided to use a silver thread to accentuate the stitching on the wheel. My car has black stitching in the leather, but I figured the silver on the wheel would be complemented by the aluminum on the shift knob, surround, gauges, air vents, etc. so it wouldn't look totally out of place. Besides, it would look more sporty and custom. The problem with accentuating it, however, is that any screw-ups would be more noticeable. Mine isn't bad, but it's not perfect. If I pointed out some areas you might notice issues, but most people would never see them.
Once I was happy with my prototypes, it was time to do the real thing. In order to do the straight stitches, I used the original leather to transfer the holes and spacing to the Alcantara. I did this by hand because my sewing machines will not do a stitch that long or handle that thick a thread.
Here is a picture of one of the side pieces and the bottom piece stitched along the edges and then stitched together. This was a complex task due to the compound curves in both pieces.
Here is the wheel cover fully stitched and stretched over the original wheel:
Here's a look from the back side. Note that the cover needs to be glued to the wheel as well as sewn. I haven't done that yet in this picture:
Here is the cover glued down and part of the zigzag stitching done:
Once I was done, I removed the other wheel from my car, transferred the switchpacks over, then attached the newly-covered wheel, and replaced the airbag. I also took the opportunity to install my new V12V/DBS shift knob while I had the car apart.
Thanks for reading along.
Edited by KarlFranz on Thursday 17th January 20:19
KarlFranz said:
Thanks for reading along.
You are thanking us ..... no no, it is us that must thank you. Anyone who can rip off their leather from their steering wheel then take a knief to the rubber and then retrim a complete steering wheel themselves has my complete respect. Not to mention a top notch write up.....
I'm just wondering if you can change the title, its just there must be other people in the same boat as you, and when they google, "retrim a steering wheel", it is a pity they cannot be directed to your explaination, its a very detailed thread.
10/10
MaverickV12 said:
You are thanking us ..... no no, it is us that must thank you.
Anyone who can rip off their leather from their steering wheel then take a knief to the rubber and then retrim a complete steering wheel themselves has my complete respect. Not to mention a top notch write up.....
I'm just wondering if you can change the title, its just there must be other people in the same boat as you, and when they google, "retrim a steering wheel", it is a pity they cannot be directed to your explaination, its a very detailed thread.
10/10
Thanks for the kind words. I agree with renaming the thread but I don't know if I can do it. Maybe it requires a forum moderator.Anyone who can rip off their leather from their steering wheel then take a knief to the rubber and then retrim a complete steering wheel themselves has my complete respect. Not to mention a top notch write up.....
I'm just wondering if you can change the title, its just there must be other people in the same boat as you, and when they google, "retrim a steering wheel", it is a pity they cannot be directed to your explaination, its a very detailed thread.
10/10
Bravo73 said:
That is a remarkable amount of work. Kudos to you.
Now then, how about those hi-fi and heater knobs? Are you not tempted by some off Tony?
Thanx. I am the proud owner of a set of custom sill plaques (prolly the first set made in silver text on a black background). I have a couple of issues with the knobs that have been discussed here at length. One is the difference in materials/finishes to rest of the metals in the car which I think looks incongruous. The other is the lack of backlighting. Now then, how about those hi-fi and heater knobs? Are you not tempted by some off Tony?
What I would really like to get and think would set off the look of my interior very nicely is a set of the new glass switches that AM is offering. I think the are just lovely. In fact, if they could make matching glass and chrome knobs for the stereo and heater controls I think they could look fantastic.


Gassing Station | Aston Martin | Top of Page | What's New | My Stuff