
Gearbox question for the masses...
Discussion


Im looking for some advice on where to get some spare parts for the SEAC box.
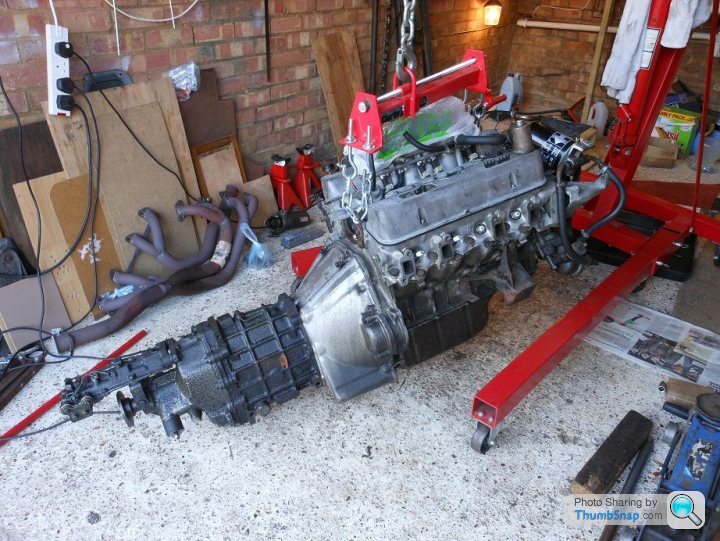
Ive got the engine out and the box out for the pre spring sorting, ive rebuild the prop shaft with new bearings and also in the process of replacing the rear flex pipe as i think its original.
Also the normal things...a bit of spring cleaning in the engine bay and checking the back bone of the chassis for any cracks rust (plenty of oil greas keeping things in good nick..) so today i desided to have a look at the remote gear stick, last year i replaced the very shot rubber bushes but desided to strip it off for cleaning, the selector shaft bushes have at least 20tho play so they are shot and one of the nylon ball carriers is allowing a some play.
What im wondering is there any one out there doing replacement parts that i can put back in before the box goes back in.
Looking at how the bushes are put in it may requre a specialist to do but i what to take out some of the slop from grear chamged and with use it will only get worse through time plus i dont realy wasnt to take it all out again any time soon.
Plus dose any one have any tips and hints on putting the engine and box back in togeather as one.
Cheers for the help pointers direction chaps...
Cambelt
Hi Cambel,
I've taken an LT77 box apart and there isn't mugh you can do with a working one apart from check the bushes on the remote are in good nick, and I think maybe you can get at the oil pump at one end with a view to changing the impeller (which is fibre and prone to wearing out). You have to take the rear off the box to get at this though.
See here for an excdellent guide to opening the box and what's inside here: http://www.roversd1.nl/sd1web/
Hi Campbell,
When I first got my 400SE one of the remote selector shaft bushes was missing. Gear selection was a bit iffy for 3rd gear.
I made a replacement using phosphor bronze, which has worked fine for the last 12 years.
If you are stuck I could do another, but would need dimensions or access to the parts to measure them.
Rgds
Hamish
Campbell,
Technique I use for replacing engine and gearbox as one unit is as follows (as far as I can remember:-
Note my engine crane is not long enough to reach right back in to the engine's final position with the engine/gearbox balanced only on the engine crane.
PREPARATION
Car needs to be on axle stands, (or hoist/ramp) abt 2 feet off ground, with wheels off so you can reach through chassis to engine mounts etc.
Power steering pump and bracket, alternator etc dismounted from engine.
Nearside engine mount bracket in place, offside one removed.
Engine mounts off, gearbox mounts on.
Manifolds on, but not tightened (if I remember correctly).
Put some cardboard/soft packing on nose of car where engine hoist may touch it in latter stages of the operation.
1. Sling engine from crane with a short strop near the front, and a strop with something adjustable to the rear (yale/ratchet block, or multi-pulley tackle or similar. Use 2 slinging points at front and 2 at rear, so you can alter angle fore and aft, without engine rolling sideways.
2. Engine needs to be roughly horizontal to get over the nose of the car.
3. As rear of gearbox approaches bulkhead slacken rear strop/tackle and feed engine/gearbox in to engine bay, as you roll engine crane towards car.
4. As Gearbox output shaft nears chassis cross member, put a trolley jack under gearbox, or bell housing, and support gearbox in a position where it will enter between chassis tubes. Gradually transfer engine support arrgt to only front strop and trolley jack as you edge it in to final position.
5. If necessary, the rear strop/tackle can be re-fitted at the front of the engine and used to roll the engine slightly to align gearbox and engine mounts.
Sometimes it is handy to use 2 trolley jacks - first one under gearbox output shaft as engine is entering body, but not as far back as chassis cross member, then replace it with a second trolley jack under the gearbox or bell, housing, as the gearbox output shaft nears chassis cross member.
Engine angle changes from initially being near horizontal, to near 45 degrees, back to near horizontal as you work it in to place.
It is a bit fiddley, but with a bit of care crankshaft pulley will just clear front of bonnet aperture, and engine hoist will be very close/touching nose of car.
Good luck!
Rgds
Hamish
Top tip for removing/replacing the engine...
Buy a load leveller. You can control the angle of the engine/gearbox combo as it goes in/out, plus (BIG PLUS THIS) you can put a jack under the gearbox and wind the load leveller to the front position which has the same effect as having a longer jib on the crane.
I struggled as Hamish suggests the first time, with a load leveller it's a piece of cake. They're not expensive either.

Buy a load leveller. You can control the angle of the engine/gearbox combo as it goes in/out, plus (BIG PLUS THIS) you can put a jack under the gearbox and wind the load leveller to the front position which has the same effect as having a longer jib on the crane.
I struggled as Hamish suggests the first time, with a load leveller it's a piece of cake. They're not expensive either.

Thanks chaps for the advice and web link.
I found a place to get most of the remote gear link kit i was looking for.
I have a load leveller and its a good but of kit in helping get an engine in out, ill let you know how i get on put the engine box back in.
Thanks for you help and advice
Cheers
Cambelt
I found a place to get most of the remote gear link kit i was looking for.
I have a load leveller and its a good but of kit in helping get an engine in out, ill let you know how i get on put the engine box back in.
Thanks for you help and advice
Cheers
Cambelt
Gassing Station | Wedges | Top of Page | What's New | My Stuff