Renewing the Thermostat on the MG ZS 120 or Rover 45. (K4)
Discussion


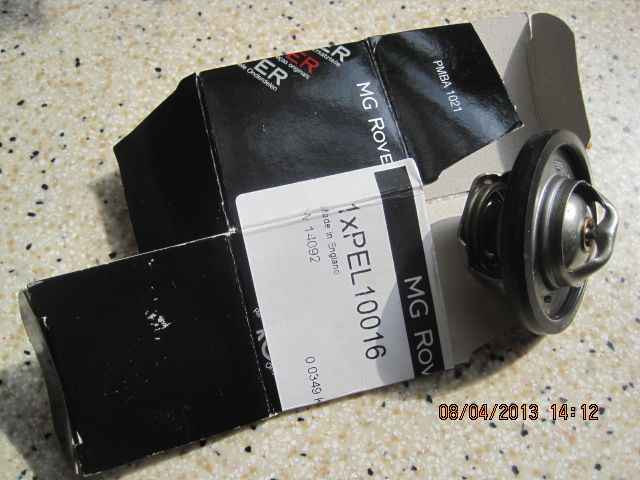
Here's the new MG-Rover item. Note: Made In England ~ now that's rare to see nowadays :~
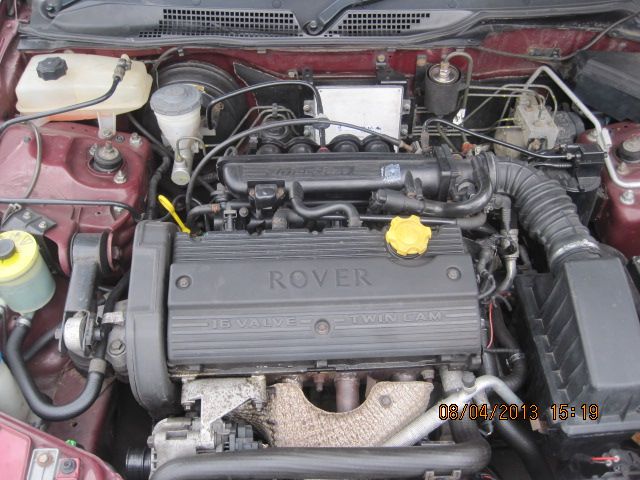
Now, somewhere under that lot is the Thermostat Housing. The MG ZS :~

... and the identical looking 1.8 in the Rover 45. It was this car that needed a new Thermostat :~
I asked my son Martin, who has far more experience fettling K-Series than I, if it was possible to renew the Thermostat from above the engine without removing the Inlet Manifold. He said it is possible even with this lot in the way restricting access :~
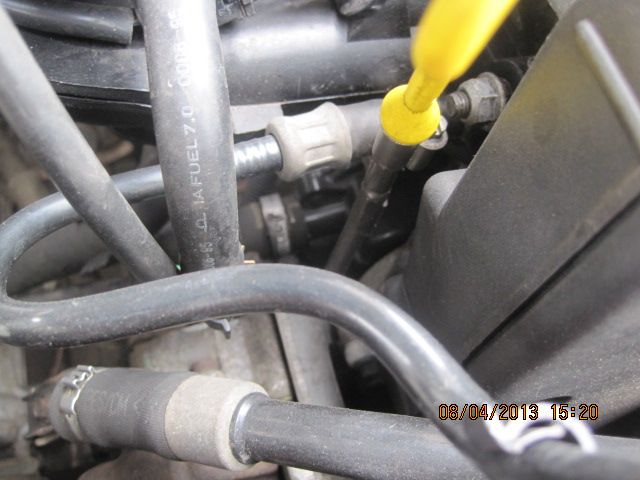
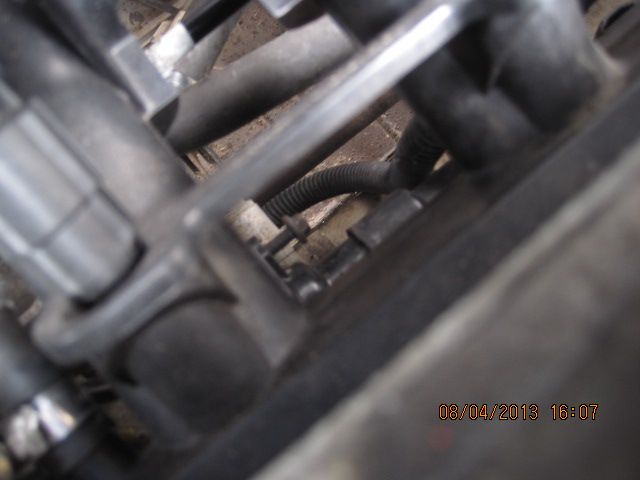
Before starting the job, because I will be working 'blind using sense of touch', I had a look at a spare 1.6 K-Series out of the car to familiarise myself with the locations of the various bolts needing to be removed. There are two 10 mm Bolts which secure the metal coolant pipe to the back of the cylinder block that runs from the Plastic Thermostat Housing along and behind the engine below the Inlet Manifold. There are three 8mm bolts holding the Plastic Thermostat housing. These pictures show the locations and the tools I offered up to see which would be suitable. These should do it :~

Yeah, right ... as I would realise later ... So, first things first, drain the coolant, collecting it in a bowl under the engine for reuse later. It was good OAT stuff in there only a year old and clear and clean. Here's a close up of the Thermostat Housing :~
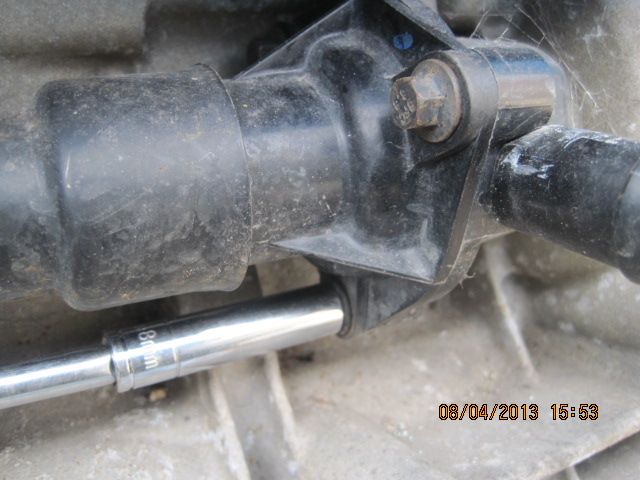
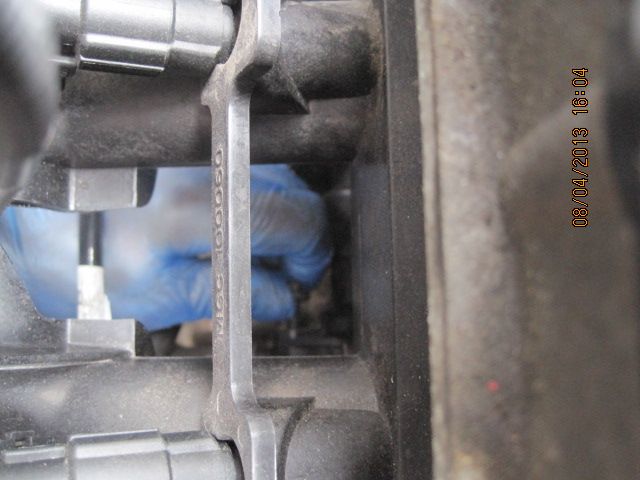
Using those tools I was actually able to loosen all three 8 mm Bolts and remove two using only my fingers :~
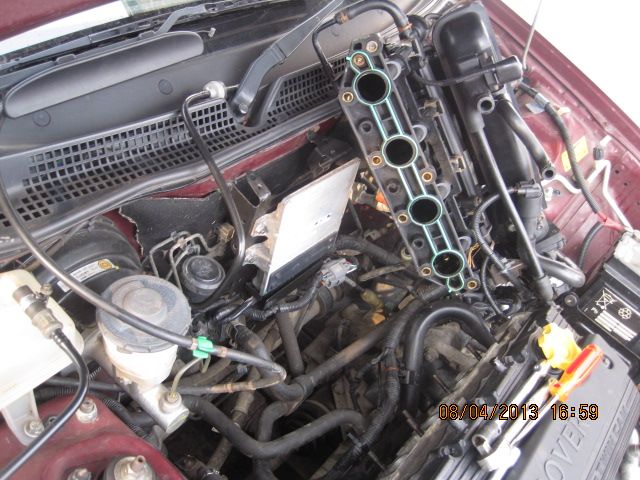
Best laid plans. I was able to loosen the third 8 mm bolt but no way would the limited access allow me to remove it. After a nice cuppa, nothing for it but to remove the Inlet Manifold, particularly as my 1/4" drive 8mm socket became detached from the extension bar and dropped down behind the coolant tube...
About half an hour later I had removed the Inlet Manifold which allowed superb access to do the job. Next time I do this job, I'll remove the Inlet Manifold as although more work, it saves time in the longer run and less stressful on the patience ..
Soon had the new Thermostat in place :~
Then refitted all the disturbed parts ~ there's a lot of them including the hoses disconnected for coolant system draining.
Refilled the coolant and started the engine. Then the sometimes tricky part, bleeding the cooling system to exclude air. Did the routine squeezing of top and bottom Radiator Hoses alternatively and soon felt warmth in the top hose. So far so good. Inside the car was disappointed to note not much heat from the heater. Should be hot by now. Obviously still air in the system.
So, with engine switched off, S L O W L Y undoing, not removing the Coolant Expansion Bottle Cap, there was a lot of pressure released. I allowed that to happen with the Cap still in place so the coolant and trapped air boiled up filling the bottle. I then tightened the Cap firmly by hand. Lots of gurgling and I could feel movement of both air and coolant in the top hose as I continued to squeeze the two hoses alternatively. Then noticed the coolant level drop in the bottle from full up to below the MAX level. Good sign that. When movement settled and stopped, slowly undid the cap again and noticed just a slight Hiss of escaping pressure this time and no 'boiling up'.. Another good sign.. Used neat OAT Anti-freeze to top up to MAX and then restarted engine allowing it to run for several minutes, This time inside the car, lots of lovely heat from the heater and temperature gauge needle spot on a tad below mid-way. I always regard that as a good sign too. Took the car for a five mile run to the local supermarket keeping an eye on that gauge, just in case. That was last night. I used the car again today and noticed the coolant level has settled a bit more. Needed half a litre to top up and now nice and stable after another trip today of about twelve miles.
By the way, the above process will be much the same on any K4 Engine, 1.1, 1.4, 1.6 or 1.8
Now, somewhere under that lot is the Thermostat Housing. The MG ZS :~
... and the identical looking 1.8 in the Rover 45. It was this car that needed a new Thermostat :~
I asked my son Martin, who has far more experience fettling K-Series than I, if it was possible to renew the Thermostat from above the engine without removing the Inlet Manifold. He said it is possible even with this lot in the way restricting access :~
Before starting the job, because I will be working 'blind using sense of touch', I had a look at a spare 1.6 K-Series out of the car to familiarise myself with the locations of the various bolts needing to be removed. There are two 10 mm Bolts which secure the metal coolant pipe to the back of the cylinder block that runs from the Plastic Thermostat Housing along and behind the engine below the Inlet Manifold. There are three 8mm bolts holding the Plastic Thermostat housing. These pictures show the locations and the tools I offered up to see which would be suitable. These should do it :~
Yeah, right ... as I would realise later ...
So, first things first, drain the coolant, collecting it in a bowl under the engine for reuse later. It was good OAT stuff in there only a year old and clear and clean. Here's a close up of the Thermostat Housing :~Using those tools I was actually able to loosen all three 8 mm Bolts and remove two using only my fingers :~
Best laid plans. I was able to loosen the third 8 mm bolt but no way would the limited access allow me to remove it. After a nice cuppa, nothing for it but to remove the Inlet Manifold, particularly as my 1/4" drive 8mm socket became detached from the extension bar and dropped down behind the coolant tube...
About half an hour later I had removed the Inlet Manifold which allowed superb access to do the job. Next time I do this job, I'll remove the Inlet Manifold as although more work, it saves time in the longer run and less stressful on the patience ..
Soon had the new Thermostat in place :~
Then refitted all the disturbed parts ~ there's a lot of them including the hoses disconnected for coolant system draining.
Refilled the coolant and started the engine. Then the sometimes tricky part, bleeding the cooling system to exclude air. Did the routine squeezing of top and bottom Radiator Hoses alternatively and soon felt warmth in the top hose. So far so good. Inside the car was disappointed to note not much heat from the heater. Should be hot by now. Obviously still air in the system.
So, with engine switched off, S L O W L Y undoing, not removing the Coolant Expansion Bottle Cap, there was a lot of pressure released. I allowed that to happen with the Cap still in place so the coolant and trapped air boiled up filling the bottle. I then tightened the Cap firmly by hand. Lots of gurgling and I could feel movement of both air and coolant in the top hose as I continued to squeeze the two hoses alternatively. Then noticed the coolant level drop in the bottle from full up to below the MAX level. Good sign that. When movement settled and stopped, slowly undid the cap again and noticed just a slight Hiss of escaping pressure this time and no 'boiling up'.. Another good sign.. Used neat OAT Anti-freeze to top up to MAX and then restarted engine allowing it to run for several minutes, This time inside the car, lots of lovely heat from the heater and temperature gauge needle spot on a tad below mid-way. I always regard that as a good sign too. Took the car for a five mile run to the local supermarket keeping an eye on that gauge, just in case. That was last night. I used the car again today and noticed the coolant level has settled a bit more. Needed half a litre to top up and now nice and stable after another trip today of about twelve miles.
By the way, the above process will be much the same on any K4 Engine, 1.1, 1.4, 1.6 or 1.8
Next time,if you look along that pipe you removed to get the stat out,you will see an 8 mm bolt sticking out of the top of the pipe near the bend.
Take that out while you fill the cooling system(slowly)with the heater set to hot,when the air stops coming out of the hole put the bolt back in while still pouring and you will find it ready to go.
Take that out while you fill the cooling system(slowly)with the heater set to hot,when the air stops coming out of the hole put the bolt back in while still pouring and you will find it ready to go.
shoehorn said:
Next time,if you look along that pipe you removed to get the stat out,you will see an 8 mm bolt sticking out of the top of the pipe near the bend.
Take that out while you fill the cooling system(slowly)with the heater set to hot,when the air stops coming out of the hole put the bolt back in while still pouring and you will find it ready to go.
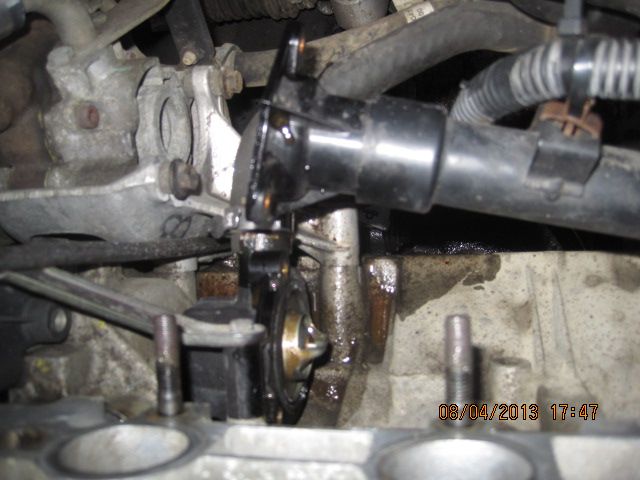
Thanks for pointing that Bleed Bolt out. I did in fact do as you advise but did not mention it in the description. Yes, it's important to have the heater control at fully on. For the benefit of those tackling the job for the first time, this is the 8mm Bleed Bolt in that Coolant tube where it bends around the gearbox side of the engine :~Take that out while you fill the cooling system(slowly)with the heater set to hot,when the air stops coming out of the hole put the bolt back in while still pouring and you will find it ready to go.

Here's is the coolant emerging from the bleed bolt hole. When you see this, that's the time to put the 8mm bolt back in its location :~

Here is another showing the Bleed Bolt top right of the picture :~

Unlike the O and T-Series engines which almost self-bleed their cooling systems, bleeding the cooling system on these Rover K-Series engines can be a little tricky as it's easy to leave some air in the engine where none should be. This is particularly the case with the MGF/TF because of the rear engine location. When I first bleed one some years ago all looked well until I took the car for a little run after changing the coolant at the interval recommended by the manufacturer. Within a mile or so, I was concerned to see the temperature gauge needle climb past the normal temperature setting and onwards up to the red.
Allowed engine to cool at the roadside then drove carefully back home and re-bled the system as described in my original post. Alternate squeezing of both top and bottom hoses with the engine running and with the Expansion Bottle Cap firmly in place soon had that air out of the engine and into the Bottle. Watch those fingers in case the fan switches on. Car fine ever since.
I do not think it's pure bad luck or coincidence that many so called Cylinder Head Gasket repeat "failures" on these cars occurs soon after work or routine servicing. Particularly involving disturbing the cooling system even with a simple Anti-freeze renewal where the system has not been bled correctly .... even in a pro-garage environment.
It aint Rocket Science but does require some care and attention to get it right.
Gassing Station | Home Mechanics | Top of Page | What's New | My Stuff