
Help with Photoshop. Colour code bumpers ?
Discussion


Right first off I am not asking for anyone to do this for me. I want to learn how to do it myself.
So I am about to buy a transit van and turn it into a surf bus/camper. I would like to have a play around with photoshop to add graphics, larger wheels etc. First thing is clour coding the bumpers.
Now how do you do select just the bumper and then change the colour ? The bumper is this one

Lots of bits and angles.
I normally use paintshop pro at home and am pretty handy with that, but I am completely self taught so don;t know "proper" ways of doing things just ways I have figured out.
As I am on holiday in france I am using Splashup web based editior. The only way I can figure it is to highlight the different areas by hand and then change each colour. That seems like it would take forever and I can;t seem to get the function of clicking on a color in the pics and that being the brush or fill colour.
Any help or links to youtube vids explaining the proceedure?
So I am about to buy a transit van and turn it into a surf bus/camper. I would like to have a play around with photoshop to add graphics, larger wheels etc. First thing is clour coding the bumpers.
Now how do you do select just the bumper and then change the colour ? The bumper is this one
Lots of bits and angles.
I normally use paintshop pro at home and am pretty handy with that, but I am completely self taught so don;t know "proper" ways of doing things just ways I have figured out.
As I am on holiday in france I am using Splashup web based editior. The only way I can figure it is to highlight the different areas by hand and then change each colour. That seems like it would take forever and I can;t seem to get the function of clicking on a color in the pics and that being the brush or fill colour.
Any help or links to youtube vids explaining the proceedure?
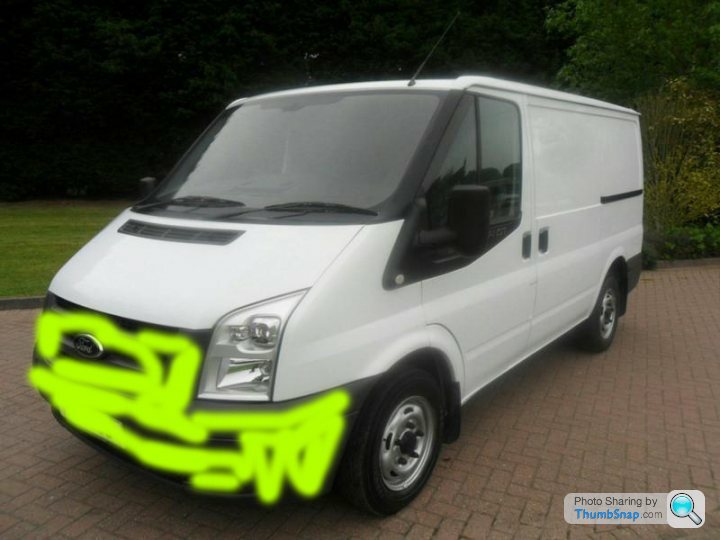
Well I found some vids so will be using that. http://www.youtube.com/watch?v=fIdMOJHz5cs
But genuinely your work has brought a tear to my eye. So kind.
But genuinely your work has brought a tear to my eye. So kind.
Tampon said:
The only way I can figure it is to highlight the different areas by hand and then change each colour. That seems like it would take forever and I can;t seem to get the function of clicking on a color in the pics and that being the brush or fill colour.
Any help or links to youtube vids explaining the proceedure?
Thats how you do it, Lasso tool around the bumper, unselect the bits you don't want to change and then do the colouring on it.Any help or links to youtube vids explaining the proceedure?

Oldred_V8S said:
A very quick effort in PS using channel mixer. Do not use hue and saturation adjustment it is sh!t.

Brilliant thankyou, much better than my flat coloured attempt.How did you keep the different shades on the angles of the bumper? when selecting the channel mixer does it alter them differently being different shades to start with? or did you do them seperately?

As above, use the channels mixer to do the actual colour change.
use the selection tool to pick out the bumper (hold alt when selecting to delect the grill and badge etc. You can then use the "refine selection" tool to smooth out and alter your selction. Paste it as a new layer (or you could make the selection a mask and use an adjustment layer on the mask). Use the channels mixer, because its black to white, select the monochrome box. Use the constant slider to bring it up to a suitable looking white. You'll notice it wont be the same shade of white, but get the brightness about right. Now use colour balance to tweek the shade. I put a bit of yellow in to warm it up.
Looks pretty good but looks a little flat. I used the dodge and burn tools to add some shadows and give the bumper a little more depth.
Looks ok I think. Could be better for for 10 mins work, it will do

 we're not worthy
 I use (a very old) PSP too, not sure how easy or hard it'd be to do the same in that. Don't think it's particularly easy to tweak selections, can you just sort of "paint" bits of it in and out? I suppose in PSP you would copy the whole layer as a new layer, erase the bulk of it then apply a mask and use the mask editing mode to tidy it up.
That's the theory. Not sure I could get those results in practice. Nice work

scarble said:
we're not worthy I use (a very old) PSP too, not sure how easy or hard it'd be to do the same in that. Don't think it's particularly easy to tweak selections, can you just sort of "paint" bits of it in and out? I suppose in PSP you would copy the whole layer as a new layer, erase the bulk of it then apply a mask and use the mask editing mode to tidy it up.
That's the theory. Not sure I could get those results in practice. Nice work
The above is quite as easy thing to do. PSP will have a selection tool, like a Lasso, although I use the point to point selection tool rather than a freehand section. You will then be able to paste that selection as a new layer. No doubt you will then be able to alter the properties of that layer. PSP will likely have a channels mixer or similar. It just might not work in the same way.
It will no doubt have it's own equivalent of the dodge and burn tools though, they are basically a paint brush that lightens and darkens the areas you select.
Yes it has a lasso, free hand or point to point and some kind of funny curvey one too I think and it has a channel mixer or similar and dodge and burn.
I wouldn't say it's trying to be PSP any more than GIMP or paint is (although GIMP is very much the Blender of the 2D world in that nothing is quite as you'd expect )
)
Last I used PS was something like.. CS3 or something? It was actually clunkier than my go to PSP 5 and did the individual-windows-for-image-and-tools thing that GIMP does whereas PSP (5 at least) contains it all together in one window (with a "desktop" of sorts within) which I much prefer.
'course they're both owned by adobe now
Just like happened to Maya.
I wouldn't say it's trying to be PSP any more than GIMP or paint is (although GIMP is very much the Blender of the 2D world in that nothing is quite as you'd expect
)Last I used PS was something like.. CS3 or something? It was actually clunkier than my go to PSP 5 and did the individual-windows-for-image-and-tools thing that GIMP does whereas PSP (5 at least) contains it all together in one window (with a "desktop" of sorts within) which I much prefer.
'course they're both owned by adobe now
Just like happened to Maya.
MysteryLemon said:
I've not used PSP in years (probs 2003ish), so would be familiar with a very, very old version. Since then on I've used Photoshop in various forms. It wasn't much of a learning curve switching between the two. PSP was always trying to be photoshop, so they made it similar. I think these days, they are trying to make it it's own thing, so it's probably going to be more of a curve between the two but still, i'm sure the basic tools underneath are the same as they always have been... Much like Photoshop.
I used to use PSP too, till about PSP8, and I really liked some of the features that Photoshop didn't/doesn't have, e.g. JPEG compression was in 100 levels unlike 12 in Photoshop; you could select the final JPEG size (in kb) then PSP would choose the appropriate compression level; you could choose the feather to be inside or out the selection, etc, etc, although I have no idea what their current versions are like. 

Gassing Station | Photography & Video | Top of Page | What's New | My Stuff