Building up a complete dashboard Vixen S3, RDO 106J
Discussion


Hello you all,
Before my shell is going to the painter I want to build up the dashboard. I do have the front, all the correct clocks, ventilator with matrix and the wiring loom (lot of black).
The rest I have to find out through pictures of your cars on this forum.
I go for an dashboard that is good accessible but how?
The top easy removable or the front?
How do I get the symetrical waves in the top.
I have seen alu bracketing so easy fixing/support of the front and side paneling (with air vents).
possibly a bar across the full width?
So who has a good idea, possibly with pictures?
Thanx, Hans

The crash pad on the top of the dash is a single piece of moulded GRP. I think you will have to see if you can borrow one to use as a mould. I don't know if anyone has a mould for this part? I suggest picking up the phone to see if there is such a piece for sale in the Cheshire museum! Making this part from scratch would IMO be a very difficult job.
Covering the GRP with foam and vynyl is fiddly but no too difficult. The dash itself is screwed to the front face of the GRP moulding and the whole lot held in place with two screws going through the bulkhead to a small angle plate screwed, or rivetted to the back of the crash pad. You might just be able to see the bracket in the pic below located just behind the central vent tube. You can also see the angle brackets that bolt to the transmission tunnel and there are also two screws that hold the edges of the dash via the door recess.
 [url]
[url]
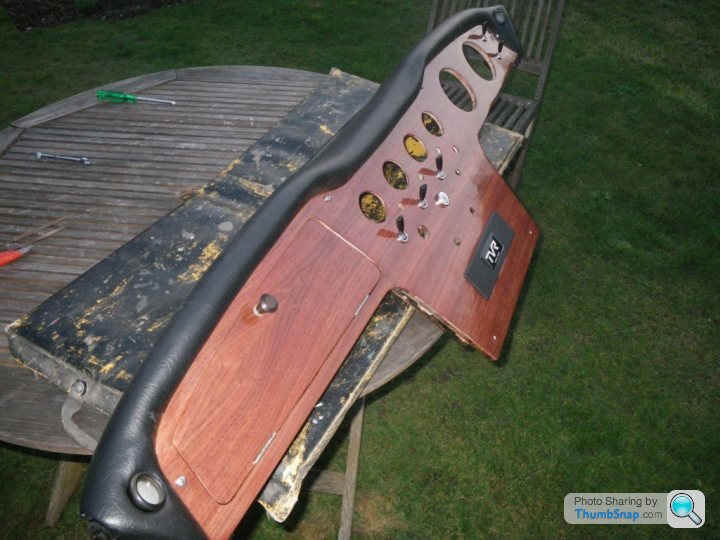
Covering the GRP with foam and vynyl is fiddly but no too difficult. The dash itself is screwed to the front face of the GRP moulding and the whole lot held in place with two screws going through the bulkhead to a small angle plate screwed, or rivetted to the back of the crash pad. You might just be able to see the bracket in the pic below located just behind the central vent tube. You can also see the angle brackets that bolt to the transmission tunnel and there are also two screws that hold the edges of the dash via the door recess.
[url]Grantura MKI said:
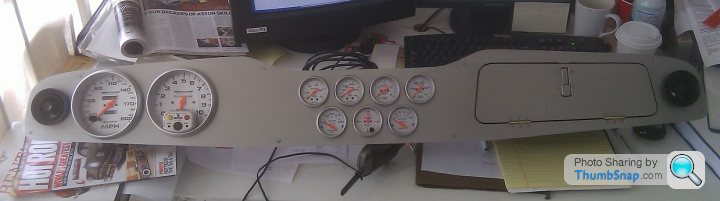
I do like B's layout, but you may find that the large dials are grouped too close?
Regards,
D.
The large dials are slightly larger, in diameter, than the originals. I moved them toward center, from the original layout, in order to not cover too much information with the steering wheel rim. It's a compromise. Regards,
D.
Best,
B.
Thank you for your quick responses.
The layout is not my problem, but more the fixing and accesebility.
Mister B has the upper part of the dashboard separate from the middle part where the radio and ventilation is situated.
Most cars have, also mine, one bigger part.
For what reason have you made it in 2 parts?
Hope to get more info.
Hans
tomtrout said:
The crash pad on the top of the dash is a single piece of moulded GRP. I think you will have to see if you can borrow one to use as a mould. I don't know if anyone has a mould for this part? I suggest picking up the phone to see if there is such a piece for sale in the Cheshire museum! Making this part from scratch would IMO be a very difficult job.
Covering the GRP with foam and vynyl is fiddly but no too difficult. The dash itself is screwed to the front face of the GRP moulding and the whole lot held in place with two screws going through the bulkhead to a small angle plate screwed, or rivetted to the back of the crash pad. You might just be able to see the bracket in the pic below located just behind the central vent tube. You can also see the angle brackets that bolt to the transmission tunnel and there are also two screws that hold the edges of the dash via the door recess.
[url]
Hi Tomtrout,Covering the GRP with foam and vynyl is fiddly but no too difficult. The dash itself is screwed to the front face of the GRP moulding and the whole lot held in place with two screws going through the bulkhead to a small angle plate screwed, or rivetted to the back of the crash pad. You might just be able to see the bracket in the pic below located just behind the central vent tube. You can also see the angle brackets that bolt to the transmission tunnel and there are also two screws that hold the edges of the dash via the door recess.
[url]This is more the info I need.
So you made longer cables to get behind. It looks you used another type of cable? If so for what reason?
Your info on the top is the hardest part for me. But time will bring the solution.
Do you also cover the underside ?
Hans
Hansoplast said:
Thank you for your quick responses.
The layout is not my problem, but more the fixing and accesebility.
Mister B has the upper part of the dashboard separate from the middle part where the radio and ventilation is situated.
Most cars have, also mine, one bigger part.
For what reason have you made it in 2 parts?
Hope to get more info.
Hans
Hans, The layout is not my problem, but more the fixing and accesebility.
Mister B has the upper part of the dashboard separate from the middle part where the radio and ventilation is situated.
Most cars have, also mine, one bigger part.
For what reason have you made it in 2 parts?
Hope to get more info.
Hans
That's the way mine came from the factory. The piece between the dash and transmission tunnel, which held six switches and the cigarette lighter, is sloped. In this version, the lover portion removes independently, and is mounted to two angled brackets on the tunnel. There is yet another iteration, that has the radio, and a cubby hole in that area, with the sides closed off. In mine, the radio was originally in the bottom center of the dash. The picture below shows the radio clearance cut into the fiberglass, and also the foam deleted below, to make space for the intermediate switch panel.

Best,
B.
heightswitch said:
You can also use a 1 piece fibreglass dash shell which are available and build from there similar to griffith dash if you are not too worried about originality.
N.
Hello N,N.
For the top of the dashboard I do not worry about organility.
Where can I buy the fiber top? And what about the difference in width beween Vixen en Griffith?
Hans

thegamekeeper said:

The museum is slowly but surely emptying
My apologies, just read your last post regarding originality. The museum has stopped emptying for the immediate time. Good luck.
Edited by thegamekeeper on Tuesday 1st October 20:38
That table needs some teak oil and a bit of love and attention.
are flights released yet??

heightswitch said:
You,ve been busy with the armourall.....
That table needs some teak oil and a bit of love and attention.
are flights released yet??
That table needs some teak oil and a bit of love and attention.
are flights released yet??
Just a quick squirt of WD 40 and that proved to be too much effort. Seriously thinking about joining the "polishing the turd" club, bought a big tub of bulls
 t today. Teak oil least of my worries because my teak doesn,t squeak.
Not checked on flights but will do.
TVRHTV said:
I've made an Autocad drawing from a tracing of a Mk 1 Vixen dash which I'm about to use to build a new dashboard for my 1800S. your welcome to a copy. You would need to check that I've got the overall scale correct but it looks good for mine.
Hi,Please send me the drawing.
Possibly I can use it for my mould.
Hans
Thanx for all the info.
To many to reply on in one, so start with another questions.
Ventilation front window is by bullit eyes and slots according to the pictures in the posts. What type is originaliteit and where to buy the sloten type? This type is not in the Vixen party's bible.
Hans
To many to reply on in one, so start with another questions.
Ventilation front window is by bullit eyes and slots according to the pictures in the posts. What type is originaliteit and where to buy the sloten type? This type is not in the Vixen party's bible.
Hans
Gassing Station | TVR Classics | Top of Page | What's New | My Stuff