
Coil-Overs...........repost
Discussion


Ok guys, I have done a fair bit of work on the new suspension now, in fact, everything apart from the installation and testing. That is where we find whether my calculations were correct or close, or whether I need to go back to school!
This is going to be a lengthy post to read, but took a lot longer to post, so grab a beer or a coffee, and settle down. I have done the pictorial part first, so that if you are getting bored by the end, you need not troll through the technicalities.
Firstly, I will explain the form and function of the components, apart from the threaded damper bodies discussed earlier in this thread.
To install the Eibach ERS (Eibach Race System) springs, which are parallel coiled, the original top mount needed modification. As the ERS springs are ground ended, ie flat, whereas the Aston Martin springs are simply a cut coil, the top mount had to be machined flat for the spring seat, and the guide machined parallel......
[pic]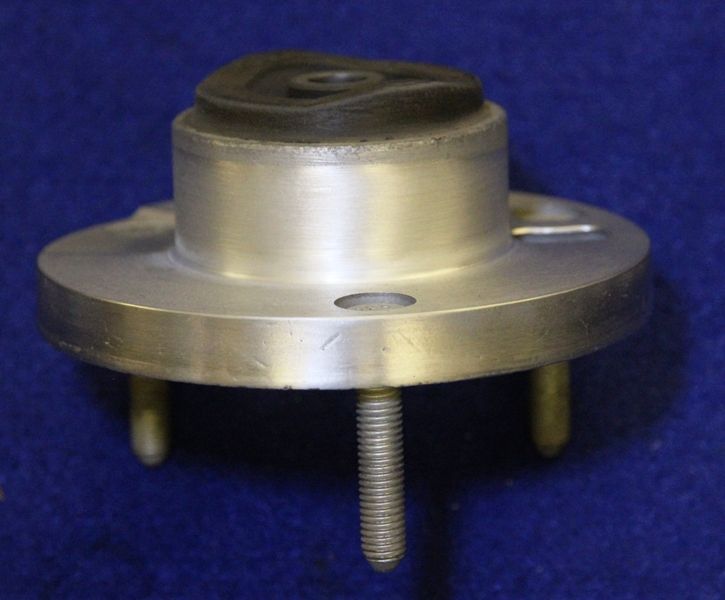 [/pic]
To accurately locate the upper end of the spring, and to give a bearing surface to the spring so that it could rotate, I manufactured a "Delrin" top-hat bush. This material has a very low friction coefficient and feels "waxy" to the touch. It is very strong and suitable as a sliding (but not running) bearing surface.
[pic]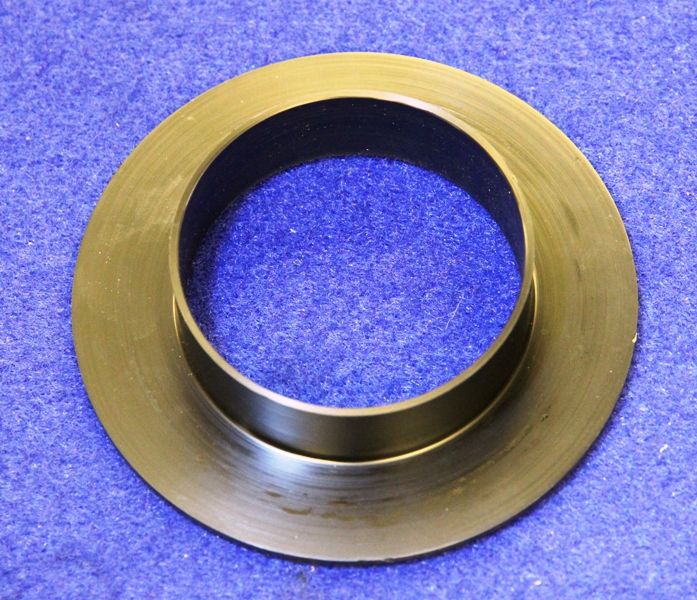 [/pic]
As previously seen, the new strut body is threaded so a pair of lower spring mounts were made, one (blue) as a locking ring, and the other (red) as the lower adjustable spring mount, similarly machined to the Delrin top to accurately locate the lower end of the spring.
[pic]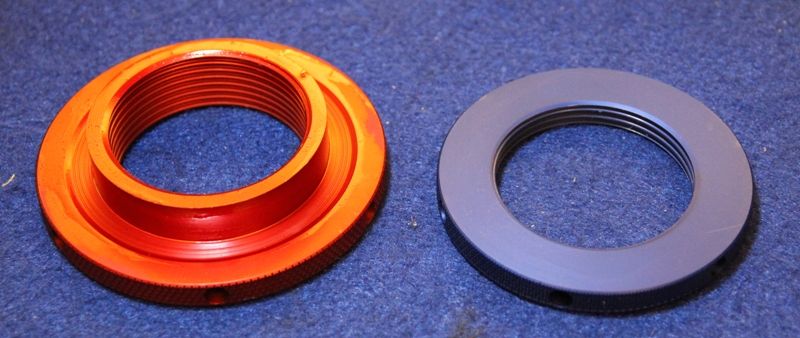 [/pic]
Here, we can see the location for either end. Top.........
[pic]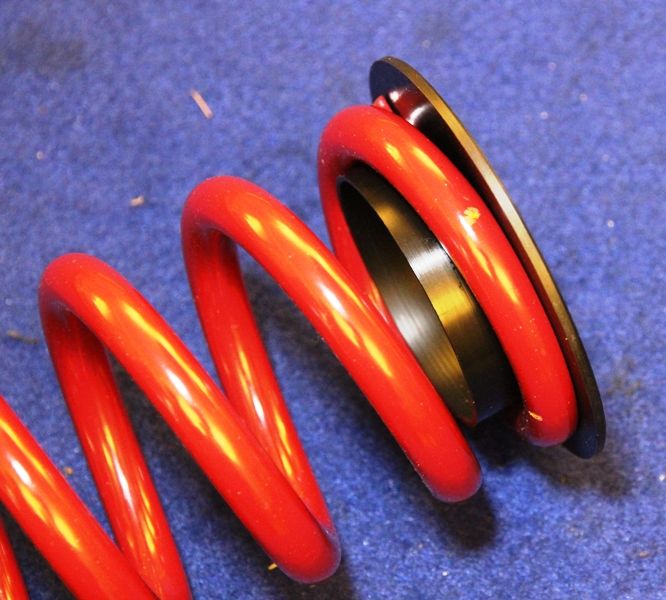 [/pic]
and bottom.......
[pic]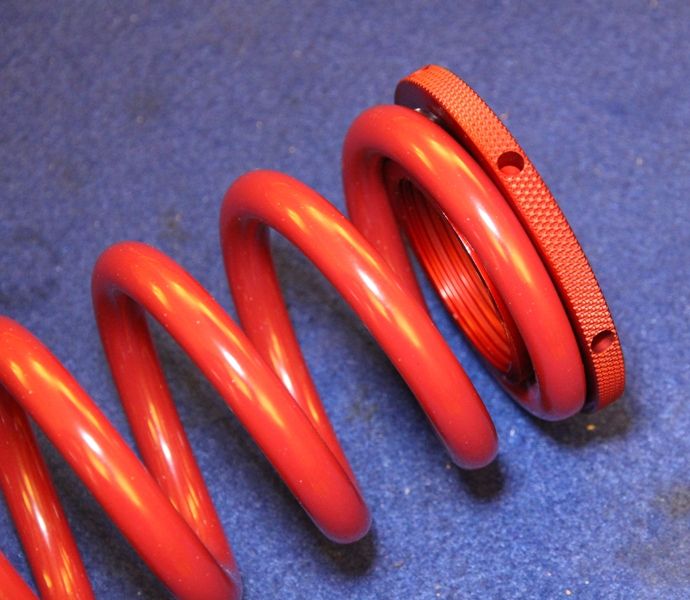 [/pic]
You can see here why I machined the upper mount parallel, so that the Delrin bush was a snug fit.
[pic]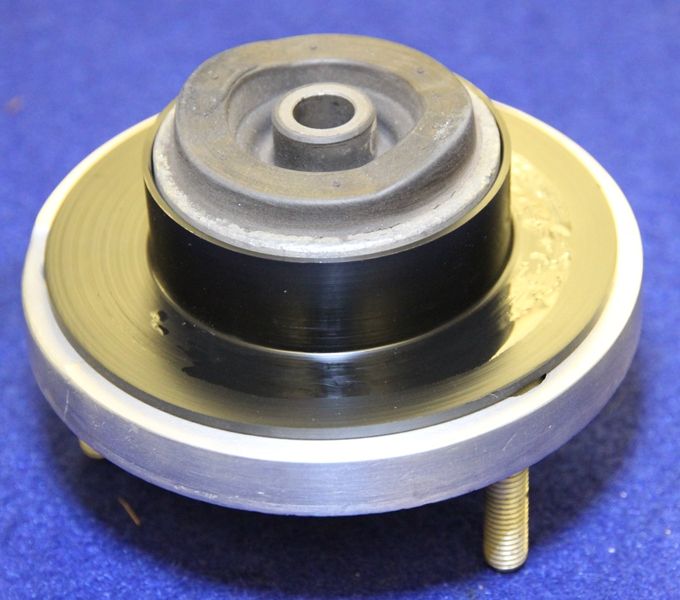 [/pic]
When a coil spring is compressed, it tries to unwind, and this is known as the torsion reaction, and can have a notable effect on component stress as well as the winding action actually affecting the spring rate, so I have installed some torsion release bearings on the lower mount instead of the Delrin I have used on the top. These 3 piece needle roller bearings........
[pic]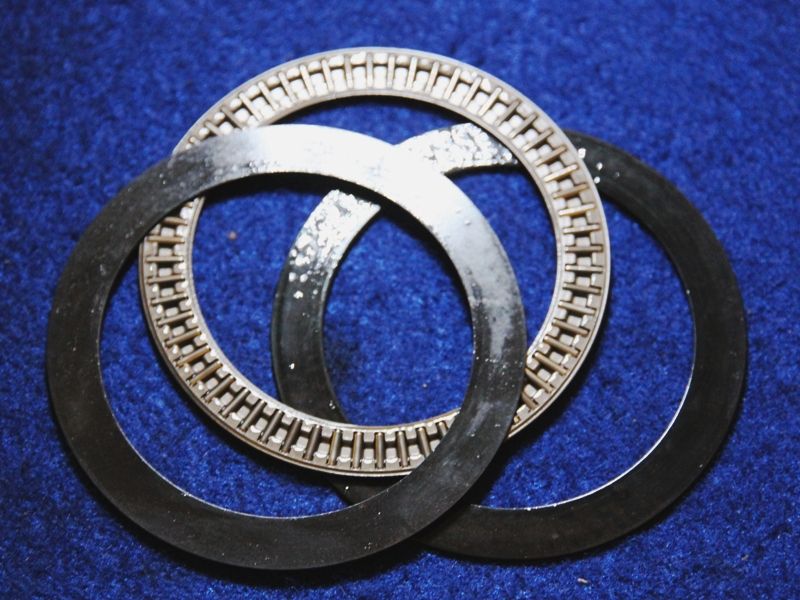 [/pic]
also have the advantage of making on-vehicle adjustments easier by reducing the seat friction. In this case, they are installed on my lower mount.
[pic]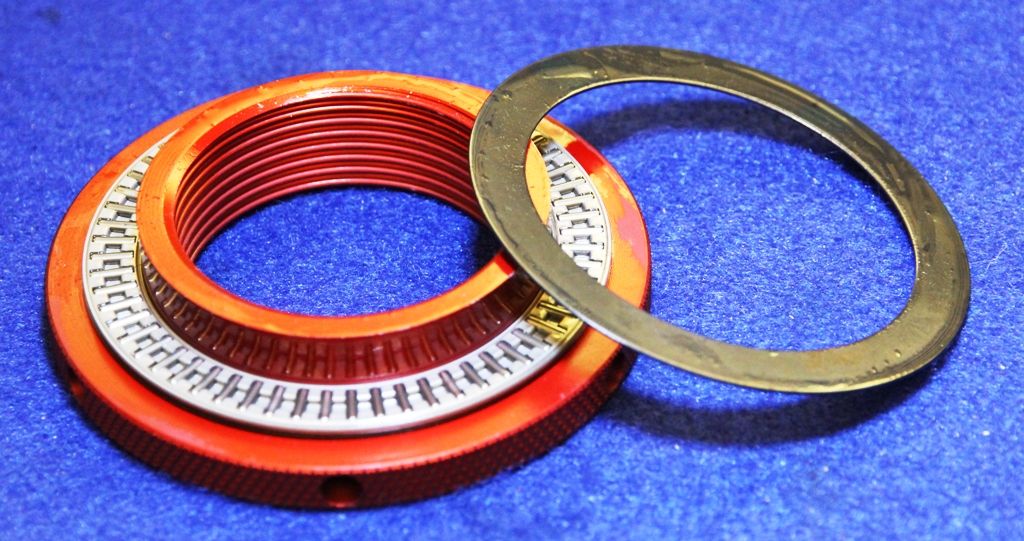 [/pic]
So here we have the strut assembly procedure........
After applying a light oil to the strut body threads, the locking ring is attached and wound to the bottom of the strut body.......
[pic]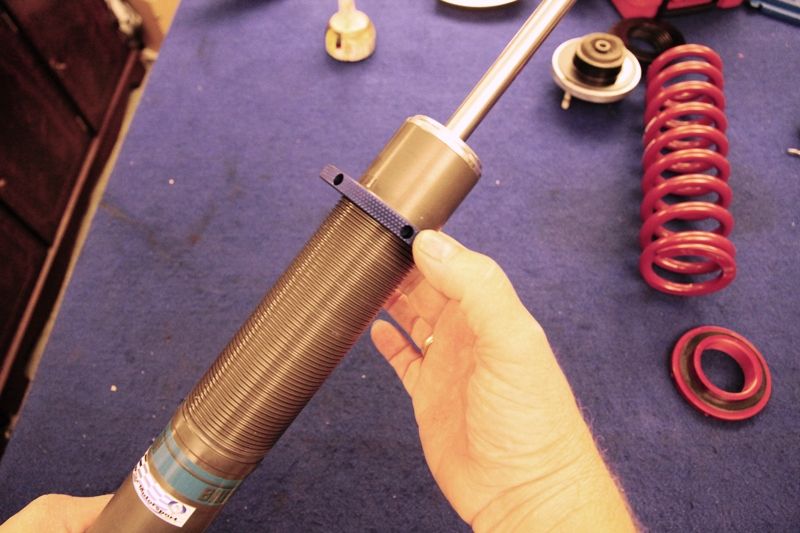 [/pic]
followed by the lower seat and torsion release bearing...........
[pic]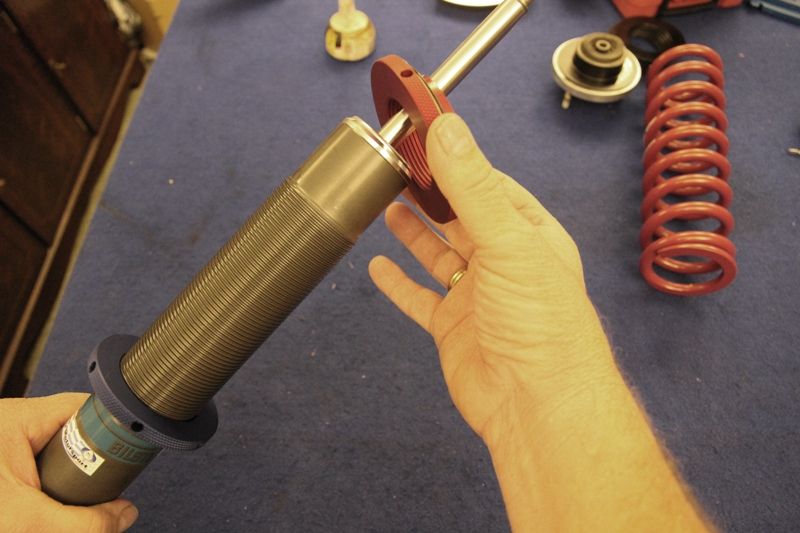 [/pic]
We can now install the 4 piece bump-stop/gaiter assembly.........
[pic]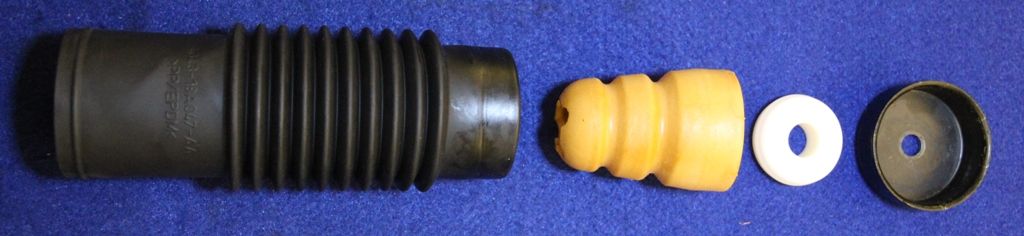 [/pic]
These consist of the soft plastic dirt shield, a nylon block that presses into the top of the bump-stop, and a metal shield washer.
After installing this, pre-assembled onto the strut body..........
[pic]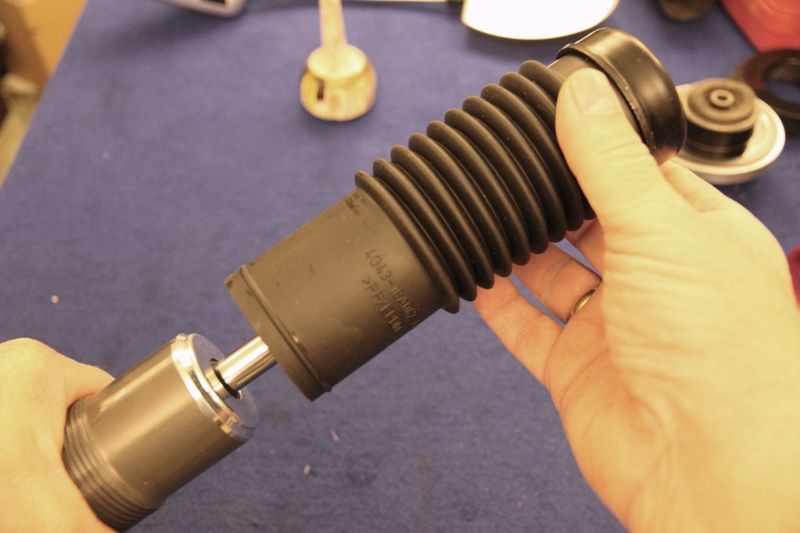 [/pic]
We can install the new spring..........
[pic]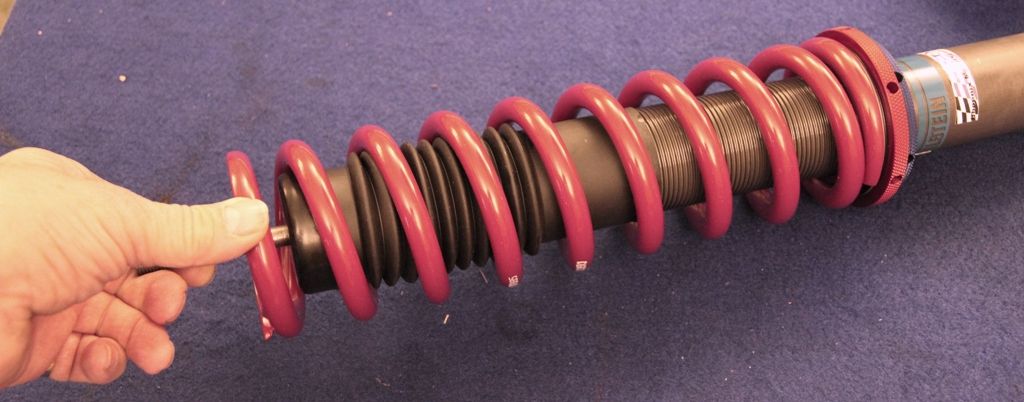 [/pic]
followed by the Delrin guide.........
[pic]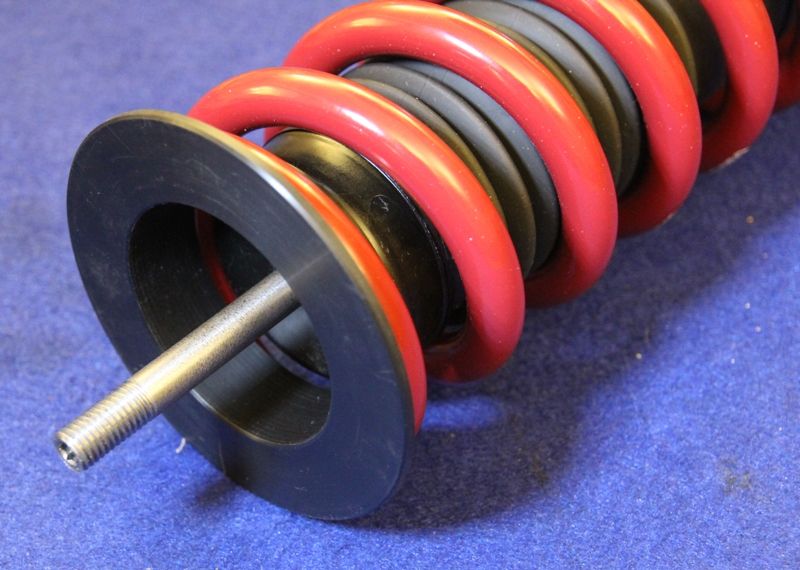 [/pic]
and top mount.
[pic]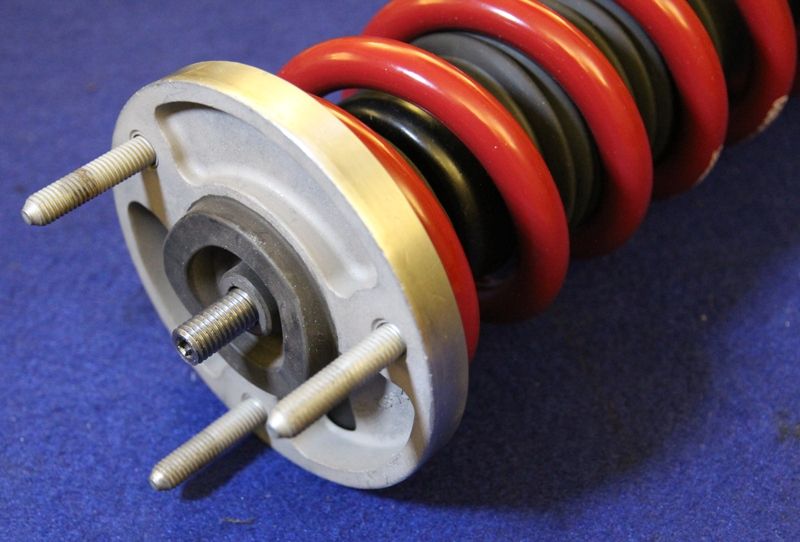 [/pic]
washer and new nyloc nut.
[pic]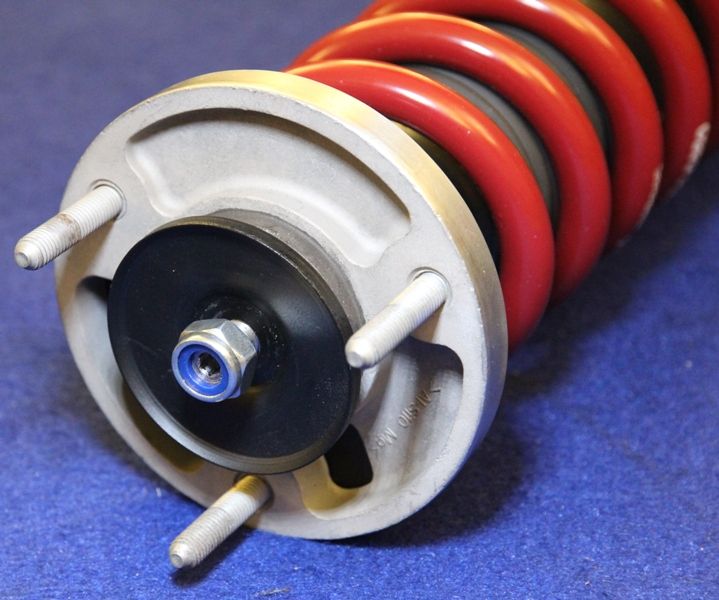 [/pic]
Using a go-thru 17mm socket and hex key, the top mount can now be fully tightened.
[pic]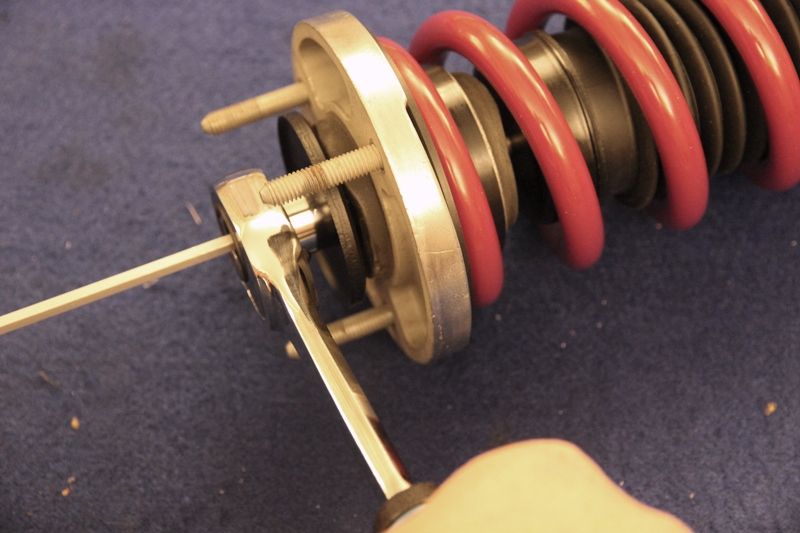 [/pic]
We can now screw the lower mount upwards to take up the slack in the spring, and as soon as the spring is properly located, with all the play adjusted out with the lower seat, we have the complete strut.
[pic]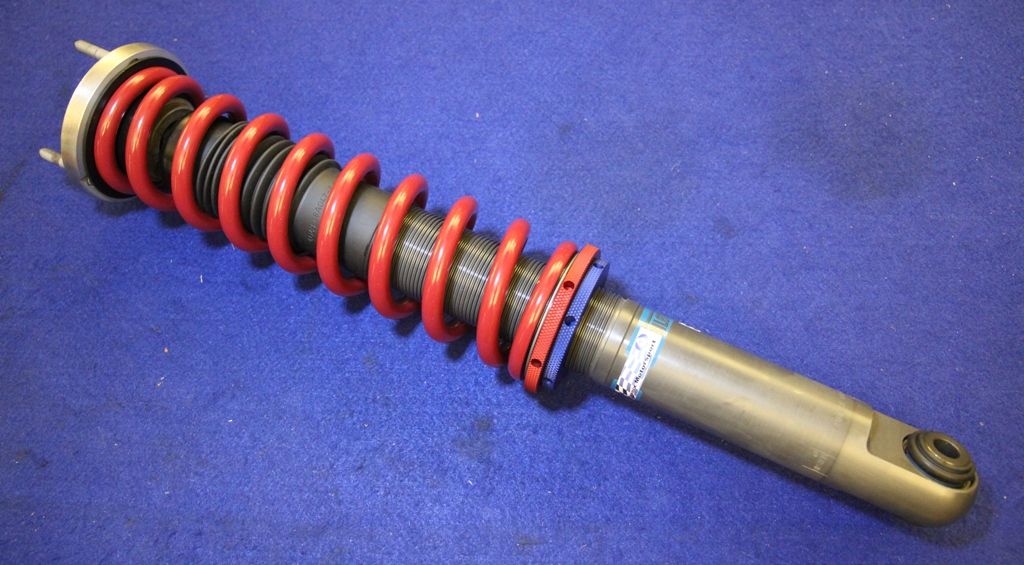 [/pic]
As I have selected a 12" free length spring, clearly the installation without pre-load will have an assembled free length of 12".
[pic]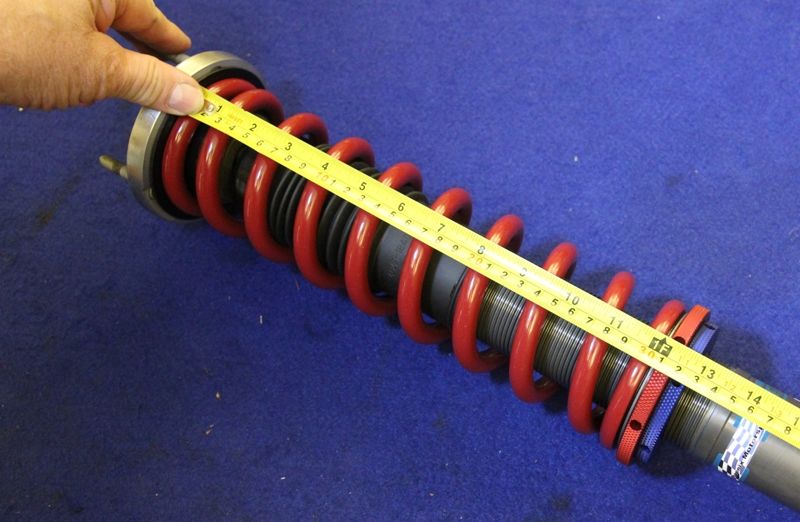 [/pic]
HOWEVER, as my calculations will show (hopefully!!), having no preload on the spring will have the car sitting too low, so I have calculated the required pre-load, and therefore installed length of the new, higher rate spring as 9.5" on the rear, and 9.75" on the front, with the new spring rates, to obtain the same ride height as the original softer springs at their original fixed installed length of 10.5" on 14" free length springs.
[pic]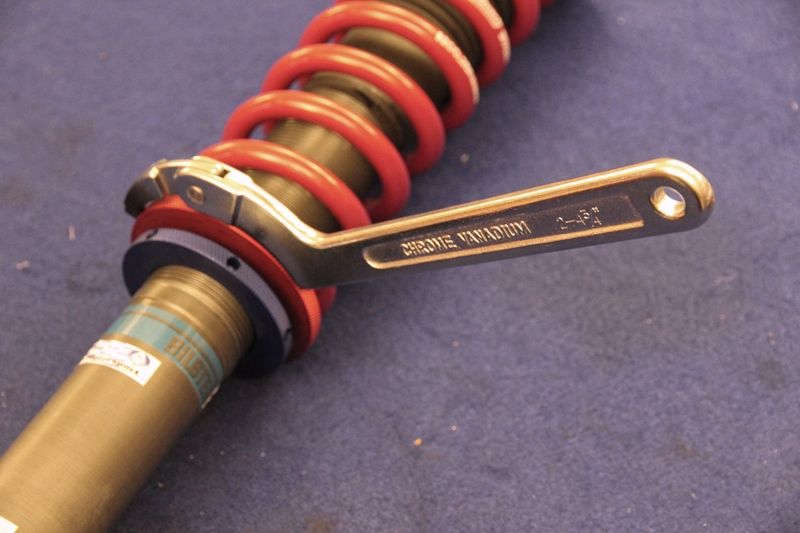 [/pic]
[pic]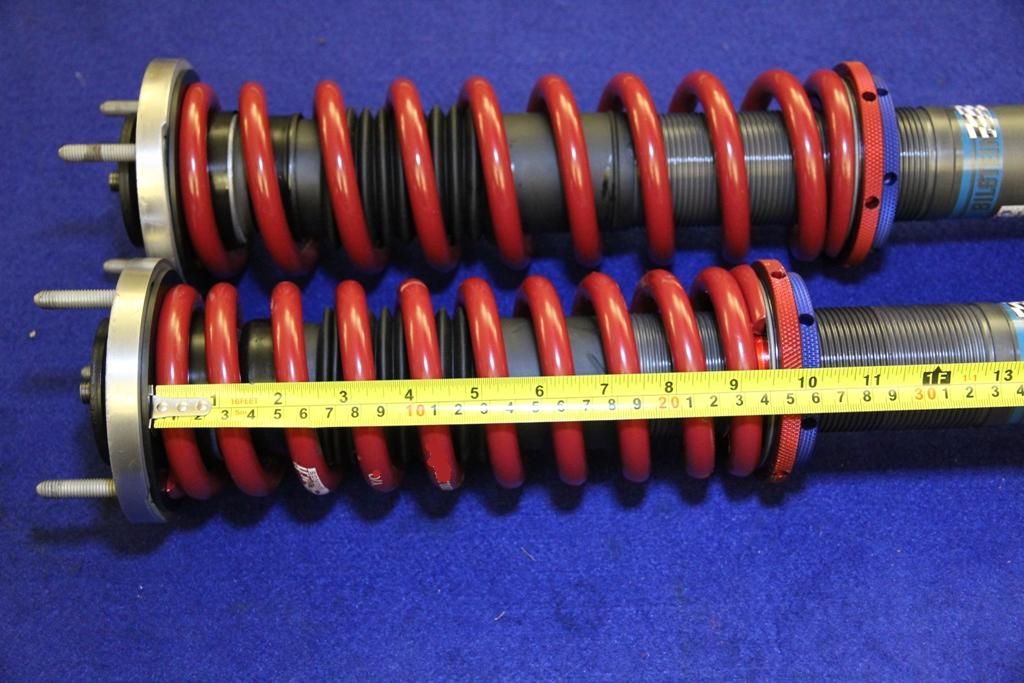 [/pic]
My choice of springs has now shown that at standard ride height, the spring adjustment is as near as dammit, smack in the middle of the adjustment range, making my selected length seem, at this point in time, correct.
[pic]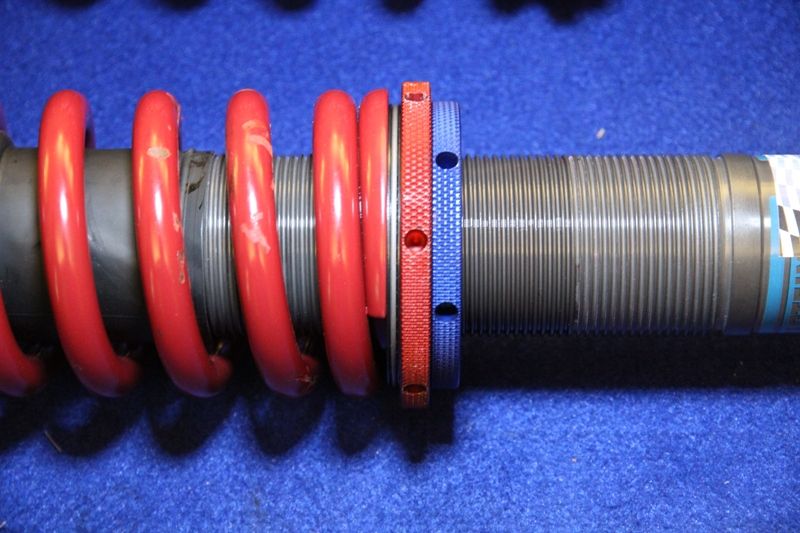 [/pic]
Of course, theory is one thing and results are another, so until the new struts are installed, and tested, there is still a margin of error possible, hopefully within the range of adjustment to fine-tune.
The Mathematics of the design.:
From my previous post, we found on the spring dynomometer, that the original spring rates were linear, and approximately 225lb/in for the front, and 315lb/in for the rear. I have decided to use a 50% uprated spring rate and have therefore selected a 350lb/in front and 450lb/in rear spring.
To find the support, ie upward force, offered by the original springs, we need to know their spring rates, and their compression. As they are 14" free length, and have a 10.5" installed length, this is a simple calculation.
Front = spring rate x compression = 225 x 3.5 = 780 lbs
Rear = spring rate x compression = 315 x 3.5 = 1100 lbs
So to calculate the required compression of our new springs to offer the same support:
Spring rate x compression = load, so compression = load / spring rate =
front = 780 / 350 = 2.25", rear = 1100 / 450 = 2.5".
Therefore, whatever spring free length we choose, they will need to be compressed by 2.25" and 2.5" respectively to offer the same support load, and therefore ride height as the original springs with a 3.5" compression.
Initial measurements showed that the length of the strut body would allow either a 14",12" or 10" free length spring to be fitted. As the 12" spring would hopefully be nearer the central adjustment position, and the reduction of travel offered by the median length spring was still within useable limits, there was a more important thing to consider. I examined the specs of each spring under consideration and here are the specifications........
Spring Spring Weight (Mass) Mass Mass (pair) Travel
14"x350lb 6.19lb 2810g 5620g 8.0"
14"x450lb 7.34lb 3330g 6660g 7.5"
12"x350lb 5.05lb 2290g 4580g 6.9"
12"x450lb 5.51lb 2500g 5000g 6.8"
As can be seen, as the total installed spring travel is under 2", and preload accounts for another 2.5", there is at least a further 2" travel available on even the most restricted 12" spring.
However, using 12" springs instead of 14" springs saves a total of (5620 + 6660) - (4580 + 5000) = 2700g.
With convention suggesting 50% of the spring mass being accepted as unsprung weight, we are saving a stonking 1350g of unsprung weight, just by using the shorter springs. Consider that AM consider a £400 set of Titanium wheel nuts saving just a few grams as noteworthy and you can see the advantage. I decided against using 10" springs as they brought the travel issue too close to coil bind on the shorter spring.
I have had the dampers valved to compensate for the increase in spring rate.
We can now calculate the spring rate as seen at the wheel, called, surprisingly, the wheel rate. This is not the same as the spring rate because the wheel has a mechanical (leverage) advantage over the strut, and to calculate this, we need to know the "Motion Ratio".
Diagram courtesy of Eibach Motorsport.
[pic]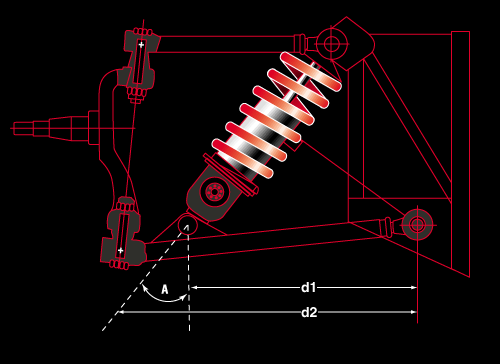 [/pic]
As the Aston Martin has "A-Arm" suspension rather than the more common McPherson strut arrangement, then the Motion Ratio is simply the mechanical advantage the wheel has, pushing the balljoint up, over the strut has resisting it.
This ratio is calculated as Motion Ratio = Spring centerline distance D1 / Balljoint pivot distance D2.
Unfortunately, as the Aston Martin strut is not parallel to the direction of travel, but sits at an angle "A", then we need to include the cosine of this angle into the calculation.
The formula then becomes........
wheel rate = motion ratio squared x spring rate x cosine "A".
Once we have the wheel rate as seen by the car, we can calculate the natural frequency of the suspension front and rear. We need to do this because it is this frequency that gives the impression of an uncomfortable ride quality. The human body persieves frequencies between 1 and 2 Hz (cycles per second) vertically as comfortable, and this is believed to be due to that being the body's verticl rate between walking and running. Lower ratescan induce motion sickness and higher rates feel very harsh.
The suspension frequency can now be calculated from the following.......
Suspension frequency = 188 x (wheel rate / vehicle sprung weight) / 60
As I have had to estimate the unsprung weight, by knowing the corner weights of the car and subtracting 15% as an estimate for the unsprung weight, and calculate the motion ratio from angles measured under adverse conditions, this could be where my calculations are more estimates, but I am fairly confident, I am in the right area at 2.0 - 2.5 Hz, the frequency of a high performance sports car. Rear suspension frequency is marginally higher than the front so that following a bump, the rear frequency will "catch up" with the front and the car will not pitch front to rear.
I have not taken into consideration the tyre spring and damping effect as it will only account for a 2% error at most.
A very simplistic explanation of damping ration would be the actual errect it has. A ration of 0.0 would be undamped and so the spring would keep the vehicle bouncing almost indefinately, so most passenger cars have a ratio of 0.2 where following a bump, the vehicle will bounce up and down a couple of times before settling, 0.4 and it will bounce once and 0.6 will damp it to the extent that it will settle after just the rebound. Critical damping of 1.0 damps the strut so that there is no overshoot of the suspension position prior to the bump. Values over 1.0 will damp the travel, delaying the rebound against the spring force. I have set damping at 0.3, a value between a normal passenger car and a car set up mainly as a track car.
Certainly better than just changing a set of springs and doing nothing else.
I will report when all fitted and tested.
8Tech.
This is going to be a lengthy post to read, but took a lot longer to post, so grab a beer or a coffee, and settle down. I have done the pictorial part first, so that if you are getting bored by the end, you need not troll through the technicalities.
Firstly, I will explain the form and function of the components, apart from the threaded damper bodies discussed earlier in this thread.
To install the Eibach ERS (Eibach Race System) springs, which are parallel coiled, the original top mount needed modification. As the ERS springs are ground ended, ie flat, whereas the Aston Martin springs are simply a cut coil, the top mount had to be machined flat for the spring seat, and the guide machined parallel......
[pic]
 [/pic]
To accurately locate the upper end of the spring, and to give a bearing surface to the spring so that it could rotate, I manufactured a "Delrin" top-hat bush. This material has a very low friction coefficient and feels "waxy" to the touch. It is very strong and suitable as a sliding (but not running) bearing surface.
[pic]
 [/pic]
As previously seen, the new strut body is threaded so a pair of lower spring mounts were made, one (blue) as a locking ring, and the other (red) as the lower adjustable spring mount, similarly machined to the Delrin top to accurately locate the lower end of the spring.
[pic]
 [/pic]
Here, we can see the location for either end. Top.........
[pic]
 [/pic]
and bottom.......
[pic]
 [/pic]
You can see here why I machined the upper mount parallel, so that the Delrin bush was a snug fit.
[pic]
 [/pic]
When a coil spring is compressed, it tries to unwind, and this is known as the torsion reaction, and can have a notable effect on component stress as well as the winding action actually affecting the spring rate, so I have installed some torsion release bearings on the lower mount instead of the Delrin I have used on the top. These 3 piece needle roller bearings........
[pic]
 [/pic]
also have the advantage of making on-vehicle adjustments easier by reducing the seat friction. In this case, they are installed on my lower mount.
[pic]
 [/pic]
So here we have the strut assembly procedure........
After applying a light oil to the strut body threads, the locking ring is attached and wound to the bottom of the strut body.......
[pic]
 [/pic]
followed by the lower seat and torsion release bearing...........
[pic]
 [/pic]
We can now install the 4 piece bump-stop/gaiter assembly.........
[pic]
 [/pic]
These consist of the soft plastic dirt shield, a nylon block that presses into the top of the bump-stop, and a metal shield washer.
After installing this, pre-assembled onto the strut body..........
[pic]
 [/pic]
We can install the new spring..........
[pic]
 [/pic]
followed by the Delrin guide.........
[pic]
 [/pic]
and top mount.
[pic]
 [/pic]
washer and new nyloc nut.
[pic]
 [/pic]
Using a go-thru 17mm socket and hex key, the top mount can now be fully tightened.
[pic]
 [/pic]
We can now screw the lower mount upwards to take up the slack in the spring, and as soon as the spring is properly located, with all the play adjusted out with the lower seat, we have the complete strut.
[pic]
 [/pic]
As I have selected a 12" free length spring, clearly the installation without pre-load will have an assembled free length of 12".
[pic]
 [/pic]
HOWEVER, as my calculations will show (hopefully!!), having no preload on the spring will have the car sitting too low, so I have calculated the required pre-load, and therefore installed length of the new, higher rate spring as 9.5" on the rear, and 9.75" on the front, with the new spring rates, to obtain the same ride height as the original softer springs at their original fixed installed length of 10.5" on 14" free length springs.
[pic]
 [/pic]
[pic]
 [/pic]
My choice of springs has now shown that at standard ride height, the spring adjustment is as near as dammit, smack in the middle of the adjustment range, making my selected length seem, at this point in time, correct.
[pic]
 [/pic]
Of course, theory is one thing and results are another, so until the new struts are installed, and tested, there is still a margin of error possible, hopefully within the range of adjustment to fine-tune.
The Mathematics of the design.:
From my previous post, we found on the spring dynomometer, that the original spring rates were linear, and approximately 225lb/in for the front, and 315lb/in for the rear. I have decided to use a 50% uprated spring rate and have therefore selected a 350lb/in front and 450lb/in rear spring.
To find the support, ie upward force, offered by the original springs, we need to know their spring rates, and their compression. As they are 14" free length, and have a 10.5" installed length, this is a simple calculation.
Front = spring rate x compression = 225 x 3.5 = 780 lbs
Rear = spring rate x compression = 315 x 3.5 = 1100 lbs
So to calculate the required compression of our new springs to offer the same support:
Spring rate x compression = load, so compression = load / spring rate =
front = 780 / 350 = 2.25", rear = 1100 / 450 = 2.5".
Therefore, whatever spring free length we choose, they will need to be compressed by 2.25" and 2.5" respectively to offer the same support load, and therefore ride height as the original springs with a 3.5" compression.
Initial measurements showed that the length of the strut body would allow either a 14",12" or 10" free length spring to be fitted. As the 12" spring would hopefully be nearer the central adjustment position, and the reduction of travel offered by the median length spring was still within useable limits, there was a more important thing to consider. I examined the specs of each spring under consideration and here are the specifications........
Spring Spring Weight (Mass) Mass Mass (pair) Travel
14"x350lb 6.19lb 2810g 5620g 8.0"
14"x450lb 7.34lb 3330g 6660g 7.5"
12"x350lb 5.05lb 2290g 4580g 6.9"
12"x450lb 5.51lb 2500g 5000g 6.8"
As can be seen, as the total installed spring travel is under 2", and preload accounts for another 2.5", there is at least a further 2" travel available on even the most restricted 12" spring.
However, using 12" springs instead of 14" springs saves a total of (5620 + 6660) - (4580 + 5000) = 2700g.
With convention suggesting 50% of the spring mass being accepted as unsprung weight, we are saving a stonking 1350g of unsprung weight, just by using the shorter springs. Consider that AM consider a £400 set of Titanium wheel nuts saving just a few grams as noteworthy and you can see the advantage. I decided against using 10" springs as they brought the travel issue too close to coil bind on the shorter spring.
I have had the dampers valved to compensate for the increase in spring rate.
We can now calculate the spring rate as seen at the wheel, called, surprisingly, the wheel rate. This is not the same as the spring rate because the wheel has a mechanical (leverage) advantage over the strut, and to calculate this, we need to know the "Motion Ratio".
Diagram courtesy of Eibach Motorsport.
[pic]
 [/pic]
As the Aston Martin has "A-Arm" suspension rather than the more common McPherson strut arrangement, then the Motion Ratio is simply the mechanical advantage the wheel has, pushing the balljoint up, over the strut has resisting it.
This ratio is calculated as Motion Ratio = Spring centerline distance D1 / Balljoint pivot distance D2.
Unfortunately, as the Aston Martin strut is not parallel to the direction of travel, but sits at an angle "A", then we need to include the cosine of this angle into the calculation.
The formula then becomes........
wheel rate = motion ratio squared x spring rate x cosine "A".
Once we have the wheel rate as seen by the car, we can calculate the natural frequency of the suspension front and rear. We need to do this because it is this frequency that gives the impression of an uncomfortable ride quality. The human body persieves frequencies between 1 and 2 Hz (cycles per second) vertically as comfortable, and this is believed to be due to that being the body's verticl rate between walking and running. Lower ratescan induce motion sickness and higher rates feel very harsh.
The suspension frequency can now be calculated from the following.......
Suspension frequency = 188 x (wheel rate / vehicle sprung weight) / 60
As I have had to estimate the unsprung weight, by knowing the corner weights of the car and subtracting 15% as an estimate for the unsprung weight, and calculate the motion ratio from angles measured under adverse conditions, this could be where my calculations are more estimates, but I am fairly confident, I am in the right area at 2.0 - 2.5 Hz, the frequency of a high performance sports car. Rear suspension frequency is marginally higher than the front so that following a bump, the rear frequency will "catch up" with the front and the car will not pitch front to rear.
I have not taken into consideration the tyre spring and damping effect as it will only account for a 2% error at most.
A very simplistic explanation of damping ration would be the actual errect it has. A ration of 0.0 would be undamped and so the spring would keep the vehicle bouncing almost indefinately, so most passenger cars have a ratio of 0.2 where following a bump, the vehicle will bounce up and down a couple of times before settling, 0.4 and it will bounce once and 0.6 will damp it to the extent that it will settle after just the rebound. Critical damping of 1.0 damps the strut so that there is no overshoot of the suspension position prior to the bump. Values over 1.0 will damp the travel, delaying the rebound against the spring force. I have set damping at 0.3, a value between a normal passenger car and a car set up mainly as a track car.
Certainly better than just changing a set of springs and doing nothing else.
I will report when all fitted and tested.
8Tech.
 ks
 but fascinating stuff

I am hoping to install them next week if I get time to do them. I cannot do a back to back test as it will take too long to swap everything over in the same day to test although I can do this on the road test.
I have set the suspension up for the road rather than as a track day hero because if I had done so, it would be too harsh for the road. The general improvements though should make a California soggy cruiser into a proper performance car, at least with some ability as a trackday car so as not to embarass itself.
I have done the ultimate track day suspension on a car before and within a year of road use, the shell had started to split the seams on the chassis.
There is also the risk of mission creep once I start stripping everything off. I have already planned adjustable roll bar droplinks!
Great stuff, and a brilliant write up! Will be interested to hear of the difference post conversion.
Just a point, why did you put the annular roller race at the bottom of the spring instead of at the top where it might have been a little more protected from road grime?
Your point about hard suspension cracking shells is germane. Seam weld and plating is essential.
Just a point, why did you put the annular roller race at the bottom of the spring instead of at the top where it might have been a little more protected from road grime?
Your point about hard suspension cracking shells is germane. Seam weld and plating is essential.
I agree on the seam welding and plating, too late now as my road legal Sierra Cosworth Touring Car is long gone.
After discussing with Eibach about lubrication and positioning of the thrust bearing, and them not having any recommendations as to position or lubrication, I decided on the bottom because access is easy for cleaning as required, and as the lower spring seat is the main rotating part, I wanted to set it against the bearing rather than rotate the spring over its entire length against the Delrin bush.
Ideally, I could have a sealed bearing at both ends of the spring, but than I have yet to find a sealed one, and would also then need 8 of them, and just one basic, unsealed one is £40.00. I am hoping the very fine bed of oil will seal out the dirt, keep everything lubricated nicely and clean, as the rotational motion is only a few degrees.
Hope that helps,
8Tech.
Following the suggestion of a sealed bearing at the lower end of the strut, I believe I have found a solution.
I have manufactured an oversize Delrin spring seat to install on top of the lower bearing.........
[pic] [/pic]
Then after having greased the bearing, I have used the oil filter "O" ring from a VW Polo 1.2 engine, and inserted it half way around........
[pic] [/pic]
into the slot left between the original alloy spring platform and the new Delrin seat.
I then drip in a few drops of heavy weight oil, before seating the ring rully, sealing in the bearing lube and sealing out the dirt.
[pic] [/pic]
Obviously, the "O" ring is slightly flexible, and oil resistant, so this should hopefully pre-empt any future bearing fouling, before the fault has even occurred.
Just as a side note, despite there being around 1100 lbs force on the rear springs as installed, I can still rotate the spring on the damper with my hands, without tools, so I am very hopeful that the bearings and Delrin bush design has been successful.
Am hopefully installing the full kit next Wednesday.
Cheers,
8Tech.
I have manufactured an oversize Delrin spring seat to install on top of the lower bearing.........
[pic]
 [/pic]
Then after having greased the bearing, I have used the oil filter "O" ring from a VW Polo 1.2 engine, and inserted it half way around........
[pic]
 [/pic]
into the slot left between the original alloy spring platform and the new Delrin seat.
I then drip in a few drops of heavy weight oil, before seating the ring rully, sealing in the bearing lube and sealing out the dirt.
[pic]
 [/pic]
Obviously, the "O" ring is slightly flexible, and oil resistant, so this should hopefully pre-empt any future bearing fouling, before the fault has even occurred.
Just as a side note, despite there being around 1100 lbs force on the rear springs as installed, I can still rotate the spring on the damper with my hands, without tools, so I am very hopeful that the bearings and Delrin bush design has been successful.
Am hopefully installing the full kit next Wednesday.
Cheers,
8Tech.
Edited by 8Tech on Tuesday 22 October 18:20
Firstly, nice work.
A suggestion if I may.
O Rings quickly age and crack under those environmental conditions. You might want to consider making the POM seat to completely cover the bearing like an inverted cup. This will stop the O ring from drying out.
Just a thought.
I just thought of an easier solution to long term sealing. Check here and look at the PTFE and other material O rings. - http://www.polymax.co.uk/o-rings/
EPDM, Viton and nitrile just done last long outside.
ATB,
Brent
Edited by divetheworld on Tuesday 22 October 20:50

Yes...interesting...so can you adjust damping on the stock struts by valving them? Sorry if it's a dumb question but somebody told me that higher rate springs without damping would likely leave me under damped.
The bounce effect is much better after spring install, but I would like to improve what I have rather than replace existing where possible. If I lived in England I would however go with the Bamford Rose active damping conversion.
Looking forward to hearing more...
The bounce effect is much better after spring install, but I would like to improve what I have rather than replace existing where possible. If I lived in England I would however go with the Bamford Rose active damping conversion.
Looking forward to hearing more...
WildBob said:
Yes...interesting...so can you adjust damping on the stock struts by valving them? Sorry if it's a dumb question but somebody told me that higher rate springs without damping would likely leave me under damped.
Yes, the higher spring rate will require an increased damping rate, and this can be done to the coil-over bodies when they are assembled. From the original post........"I have had the dampers valved to compensate for the increase in spring rate."

8Tech said:
Yes, the higher spring rate will require an increased damping rate, and this can be done to the coil-over bodies when they are assembled. From the original post........
"I have had the dampers valved to compensate for the increase in spring rate."
So how does one go about valving the stock dampers to your recommended spec? "I have had the dampers valved to compensate for the increase in spring rate."
WildBob said:
8Tech said:
Yes, the higher spring rate will require an increased damping rate, and this can be done to the coil-over bodies when they are assembled. From the original post........
"I have had the dampers valved to compensate for the increase in spring rate."
So how does one go about valving the stock dampers to your recommended spec? "I have had the dampers valved to compensate for the increase in spring rate."
Gassing Station | Aston Martin | Top of Page | What's New | My Stuff