
PDQ's Saxo VTR Track Build
Discussion


In October 2013 stared looking for a small car, non-turbo that would provide fun on track days and be compliant to enter some hill climbs with small mods. The idea was that I would build it myself at home on my drive as I enjoy tinkering and doing work myself where possible. I am no engineer though. (38yr old IT Consultant).
After a false start buying a non-running 106 Gti I vowed to buy a running car, ideally one that had been upgraded by the previous owner. I did some research and found that pretty much the most common ‘stock hatch’ car was the Citroen Saxo VTR.
So I scoured eBay again – and bought a running car with Tax & MOT for £630 located approx. 120 miles from me .The owner had stripped the interior, fitted a rear cage, fitted some old bucket seats and EBC brake pads. In this form, he had done some track days in the car before selling it.
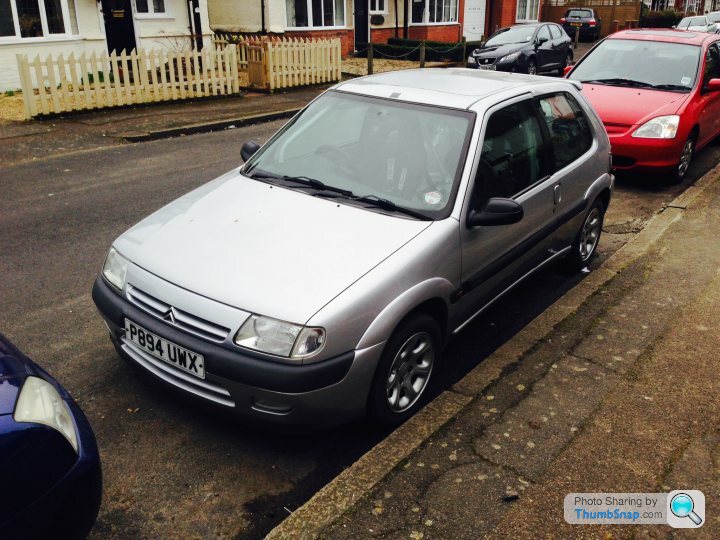
My friend Andy came with me and drove it the 120miles home from north Essex back to south Kent. It drove OK and to my relief showed no issues. However, my friend suffered a little, coming out of his 911 Turbo into the Saxo was a bit of a come down but he got out of the car with a smile on his face and ringing in his ears.
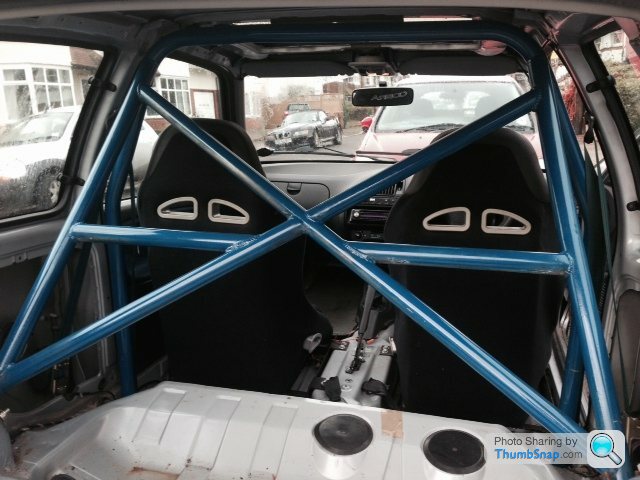
I removed the rear roll cage and sold that for £100 to a fellow ebayer. As I wanted to replace it with a known MSA compliant cage for Safety also in case I ever sold it.
I removed the front seats which were old Cobra Clubman’s and sold them for £40, but I kept the seat mounts as they looked solid and I knew I would be fitting some new seats myself.

I now had a working car, which was a few steps forward than I had been so far. I began the shopping spree to buy the basic things a decent track car needs;
• FIA/MSA Spec Roll Cage
• Roll Cage Foam Padding
• Pair of Seats
• Pair of Harness’s
• Harness Eye Bolts & Spreader Plates
• Plumbed-In Extinguisher
• FIA Spec Electrical Cut-Off
• Bonnet Pins
• Boot Catches
• Tow Straps
• Steering Wheel & Boss
I read the stock hatch regulations from the 750mc website and ordered those bits that seemed mandatory!
As things began to arrive from my shopping spree, I set about beginning the project in earnest. I finished stripping out the interior ready for cage to go in. I found a lot of rust and some patches were welded in and coated with a dose of underseal.

At this point, I did not get the car up on a ramp which was a mistake – if I had I would probably have stopped at this point as the shell was suffering a lot of rust than I first thought. However, the trusty welder came out and the shell was patched up, and everything underneath liberally coated with waxoil.
Sparco Bolt-In FIA Spec Cage
I contacted JJCRaceandRally and they were able to supply the next day a Bolt-In Sparco cage.
The picture on the ebay advert was actually more basic than the cage they sent me, so I was very pleased. It came with the rear cross-section assembled and welded, with the front legs and door bars bolt-on. The upper front bar that goes across the top of the windscreen needed to be welded in place though.

I had bought bolt-in cages before so I expected it to arrive with spreader plates that bolted between the feet and floor – but it seemed that wouldn’t be MSA compliant so I had to put welded strengthening plates sections in to bolt the cage to.
Another surprise was that the cage did not come with the mounts welded on for the front upper roll cage bar, so these had to get done once the cage was trial fitted.
It was also unpainted, so I hung it up in my garage and sprayed it with metal primer and then 4 coats of standard white paint to make it look a little nicer.


Before I could fit the cage, I knew I had to remove the glass sunroof and replace it with some kind of sheet. I read on some car forums that Perspex was often used, but the MSA book wanted a metal sheet, so that is what was done. I unbolted the old sunroof and lifted it out. A replacement sheet of steel was cut and riveted to the roof with a healthy dose of silicon sealer. I think it does not look bad and does not leak either.

This was the trickiest thing that had to be done, when I came to look at where the cage feet mounted I noticed that the fuel feed and return pipes were right in the way on the passenger side.

So these were moved and the footplate welded in to the floor and sill.
The front feet needed additional supports as well so these were welded in. This also meant that as I wanted the cage to be removable some captive nuts were sorted.
On the drivers side the fuel lines go under the cage mount – no idea if this is MSA compliant or not, I guess the feet mounts need to be fully boxed in?

Whilst the welder was out doing the feet, it was also the best time to weld into the shell the harness bolt spreader plates. I wanted to use 5/6 point harness so one was put directly under each seat

and 2 were put either side of the rear tunnel.

Also the final fitment of the upper front bar, and it was bolted into place


 |http://thumbsnap.com/4WHxTMuH[/url]
Dashboard
Once the cage was bolted in place, it came time to try and refit the dashboard, I took the easy route and just cut the ends off. Its mounted by 3 bolts to the bulkhead and a bracket centrally at the bottom to the tunnel.

Seats
I have had a few track cars before so I knew that I needed to find some quality seats that would hold me in place and wouldn’t weigh too much more than the standards ones. I bidded on many pairs on eBay but they were just going out of my price range.
Eventually I found a set of Cobra Suzuka’s that had slightly faded on the fabric but were intact and no rips or tears. I won the auction and travelled 40 miles to collect them in the family people carrier complete with baby inside.

Luckily, the seats came with sliders in pieces in a plastic bag – no idea what that the previous owner had planned to mount into his car somehow. My friend Andy came to my rescue again here, he arranged for his friends at Powerspeed to drill the seat mounts I already had to enable the sliders to be bolted to them, and the sliders bolted to the side mounts – neat.
• Cobra Suzuka Seats bolted to Sparco side mounts
• Side Mounts bolt to ‘unknown’ rails
• Rails bolt to homemade flat bar mounts
• Flatbar mounts bolt into standard saxo mounting positions.

Steering Wheel & Boss
It took me a while to pluck up the courage to tackle the removal of the steering wheel, and to be honest with the help of a youtube clip it was simple. Once the airbag was removed, the wheel came off easy enough.
I have been watching some WRC on TV and spotted the wheel I wanted on an Msport Fiesta JWRC car – so I got on ebay and soon an OMP WRC wheel with matching OMP Boss for the saxo was on its way from JYBRacing

Bonnet & Boot Pins
This was a nice job to do – probably the simplest on the car so far, except for clipping in the harnesses.
I used trusty spring clip type to hold the rear hatch in place and pins/sliders on the bonnet.
The rear catches was a case of simply drilling a hole in the rear wing and bolting the spring in place, then offered up the clip to roughly where I wanted it, marked with pen and then drilled 2 small holes and used rivets to hold it securely.


If you look carefully, you will see tip-ex on top of the bonnet pin. This was how I knew where to drill the hole in the bonnet. I fixed the bolt to the slam panel, then covered the top of it in tip-ex, then gently closed the bonnet. This left a nice mark where the centre of the hole had to be. So I used an 8mm drill bit and drilled 2 holes, one just above and one just below the mark, thinking that using a bigger drill bit the 2 wholes will join – which they did. It is a very snug fit.
Towing eyes
Not a lot to say about these except that it’s easy to just bolt the new straps directly into the existing mount locations and with a minor chop of the bumpers – hey presto

Things still to do:
Fit Multi-Point Extinguisher Kit & Cable Pulls

Fit FIA battery Cut-Out & Cable Pull

1st Track Day - booked for Monday 14th April @ MSV Brands Hatch
After a false start buying a non-running 106 Gti I vowed to buy a running car, ideally one that had been upgraded by the previous owner. I did some research and found that pretty much the most common ‘stock hatch’ car was the Citroen Saxo VTR.
So I scoured eBay again – and bought a running car with Tax & MOT for £630 located approx. 120 miles from me .The owner had stripped the interior, fitted a rear cage, fitted some old bucket seats and EBC brake pads. In this form, he had done some track days in the car before selling it.
My friend Andy came with me and drove it the 120miles home from north Essex back to south Kent. It drove OK and to my relief showed no issues. However, my friend suffered a little, coming out of his 911 Turbo into the Saxo was a bit of a come down but he got out of the car with a smile on his face and ringing in his ears.
I removed the rear roll cage and sold that for £100 to a fellow ebayer. As I wanted to replace it with a known MSA compliant cage for Safety also in case I ever sold it.
I removed the front seats which were old Cobra Clubman’s and sold them for £40, but I kept the seat mounts as they looked solid and I knew I would be fitting some new seats myself.
I now had a working car, which was a few steps forward than I had been so far. I began the shopping spree to buy the basic things a decent track car needs;
• FIA/MSA Spec Roll Cage
• Roll Cage Foam Padding
• Pair of Seats
• Pair of Harness’s
• Harness Eye Bolts & Spreader Plates
• Plumbed-In Extinguisher
• FIA Spec Electrical Cut-Off
• Bonnet Pins
• Boot Catches
• Tow Straps
• Steering Wheel & Boss
I read the stock hatch regulations from the 750mc website and ordered those bits that seemed mandatory!
As things began to arrive from my shopping spree, I set about beginning the project in earnest. I finished stripping out the interior ready for cage to go in. I found a lot of rust and some patches were welded in and coated with a dose of underseal.
At this point, I did not get the car up on a ramp which was a mistake – if I had I would probably have stopped at this point as the shell was suffering a lot of rust than I first thought. However, the trusty welder came out and the shell was patched up, and everything underneath liberally coated with waxoil.
Sparco Bolt-In FIA Spec Cage
I contacted JJCRaceandRally and they were able to supply the next day a Bolt-In Sparco cage.
The picture on the ebay advert was actually more basic than the cage they sent me, so I was very pleased. It came with the rear cross-section assembled and welded, with the front legs and door bars bolt-on. The upper front bar that goes across the top of the windscreen needed to be welded in place though.
I had bought bolt-in cages before so I expected it to arrive with spreader plates that bolted between the feet and floor – but it seemed that wouldn’t be MSA compliant so I had to put welded strengthening plates sections in to bolt the cage to.
Another surprise was that the cage did not come with the mounts welded on for the front upper roll cage bar, so these had to get done once the cage was trial fitted.
It was also unpainted, so I hung it up in my garage and sprayed it with metal primer and then 4 coats of standard white paint to make it look a little nicer.
Before I could fit the cage, I knew I had to remove the glass sunroof and replace it with some kind of sheet. I read on some car forums that Perspex was often used, but the MSA book wanted a metal sheet, so that is what was done. I unbolted the old sunroof and lifted it out. A replacement sheet of steel was cut and riveted to the roof with a healthy dose of silicon sealer. I think it does not look bad and does not leak either.
This was the trickiest thing that had to be done, when I came to look at where the cage feet mounted I noticed that the fuel feed and return pipes were right in the way on the passenger side.
So these were moved and the footplate welded in to the floor and sill.
The front feet needed additional supports as well so these were welded in. This also meant that as I wanted the cage to be removable some captive nuts were sorted.
On the drivers side the fuel lines go under the cage mount – no idea if this is MSA compliant or not, I guess the feet mounts need to be fully boxed in?
Whilst the welder was out doing the feet, it was also the best time to weld into the shell the harness bolt spreader plates. I wanted to use 5/6 point harness so one was put directly under each seat
and 2 were put either side of the rear tunnel.
Also the final fitment of the upper front bar, and it was bolted into place
|http://thumbsnap.com/4WHxTMuH[/url]Dashboard
Once the cage was bolted in place, it came time to try and refit the dashboard, I took the easy route and just cut the ends off. Its mounted by 3 bolts to the bulkhead and a bracket centrally at the bottom to the tunnel.
Seats
I have had a few track cars before so I knew that I needed to find some quality seats that would hold me in place and wouldn’t weigh too much more than the standards ones. I bidded on many pairs on eBay but they were just going out of my price range.
Eventually I found a set of Cobra Suzuka’s that had slightly faded on the fabric but were intact and no rips or tears. I won the auction and travelled 40 miles to collect them in the family people carrier complete with baby inside.
Luckily, the seats came with sliders in pieces in a plastic bag – no idea what that the previous owner had planned to mount into his car somehow. My friend Andy came to my rescue again here, he arranged for his friends at Powerspeed to drill the seat mounts I already had to enable the sliders to be bolted to them, and the sliders bolted to the side mounts – neat.
• Cobra Suzuka Seats bolted to Sparco side mounts
• Side Mounts bolt to ‘unknown’ rails
• Rails bolt to homemade flat bar mounts
• Flatbar mounts bolt into standard saxo mounting positions.
Steering Wheel & Boss
It took me a while to pluck up the courage to tackle the removal of the steering wheel, and to be honest with the help of a youtube clip it was simple. Once the airbag was removed, the wheel came off easy enough.
I have been watching some WRC on TV and spotted the wheel I wanted on an Msport Fiesta JWRC car – so I got on ebay and soon an OMP WRC wheel with matching OMP Boss for the saxo was on its way from JYBRacing
Bonnet & Boot Pins
This was a nice job to do – probably the simplest on the car so far, except for clipping in the harnesses.
I used trusty spring clip type to hold the rear hatch in place and pins/sliders on the bonnet.
The rear catches was a case of simply drilling a hole in the rear wing and bolting the spring in place, then offered up the clip to roughly where I wanted it, marked with pen and then drilled 2 small holes and used rivets to hold it securely.
If you look carefully, you will see tip-ex on top of the bonnet pin. This was how I knew where to drill the hole in the bonnet. I fixed the bolt to the slam panel, then covered the top of it in tip-ex, then gently closed the bonnet. This left a nice mark where the centre of the hole had to be. So I used an 8mm drill bit and drilled 2 holes, one just above and one just below the mark, thinking that using a bigger drill bit the 2 wholes will join – which they did. It is a very snug fit.
Towing eyes
Not a lot to say about these except that it’s easy to just bolt the new straps directly into the existing mount locations and with a minor chop of the bumpers – hey presto
Things still to do:
Fit Multi-Point Extinguisher Kit & Cable Pulls
Fit FIA battery Cut-Out & Cable Pull
1st Track Day - booked for Monday 14th April @ MSV Brands Hatch
Edited by PDQ on Friday 11th April 17:42
spec is standard mechanically including cat. Only change was brake pads to ebc yellow stuff, oh and it has a foam filter instead of the plastic boxes.
Tyres are a random mixture. I thought I would do a few track days (low budget fun) then work out what to buy.
Now its almost finished i just want to start using it, although racing wise i dont know if its eligible for anything.
I got 25miles up the motorway began a horrible vibration and when I lifted off the throttle a buzzing feeling through the floor - so trip aborted and I am back home again 
I am going to get it up in the air and check out the front end now in detail and give it some new ball joints and engine mounts if needed.
I am going to get it up in the air and check out the front end now in detail and give it some new ball joints and engine mounts if needed.

Gassing Station | Readers' Cars | Top of Page | What's New | My Stuff