
Build it before summer ends?
Discussion


Thought I'd do another build diary, mainly so I can actually remember what's been done.
It really all started when I went to Willow Sports Cars for a suspension set and he couldn't do anything as there were so many problems. Needed new discs and pads all round, track rod ends, ball joints.
So I thought I'd take her off the road and get everything sorted, but I keep adding jobs to the list so after hundreds of hours she's still in bits. Getting there slowly though and hopefully i'll be done in time for summer and some meets. I enjoy working on the car as much as driving it I think, well, I've definitely spent a lot more time working on it.
Having a garage would make like so much easier instead of being on the drive, but I need to get her finished so I can then build a garage.
As with everything I've done, I don't think I would have been able to without Pistonheads as I don't really know what I'm doing, just learning as I go along. They are quite simple to work on and I don't really think there is much you need to pay a specialist to do.
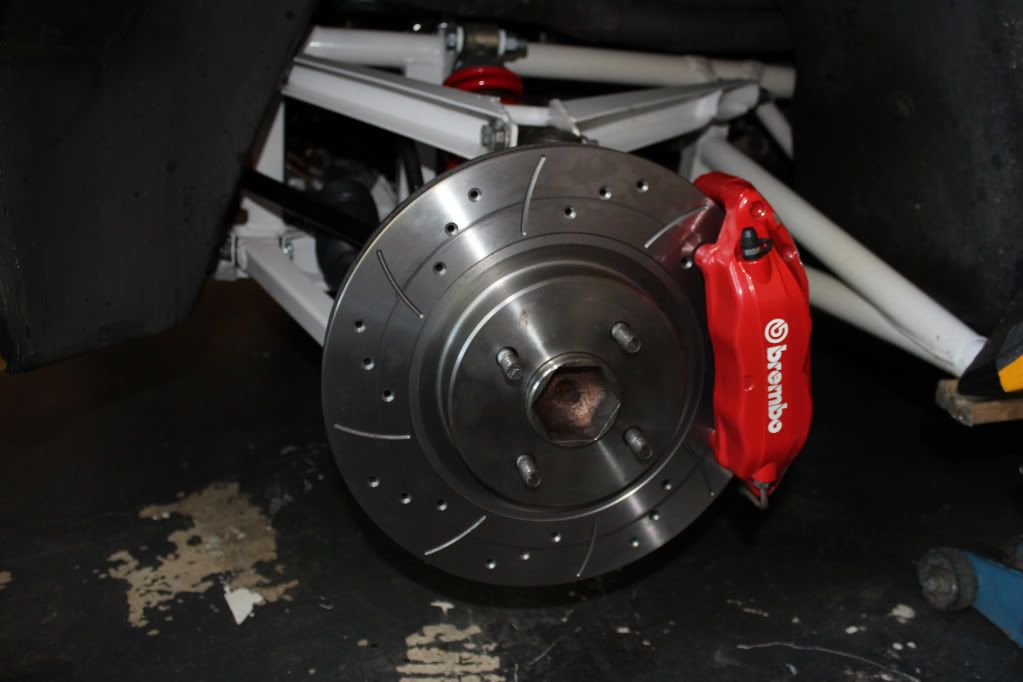
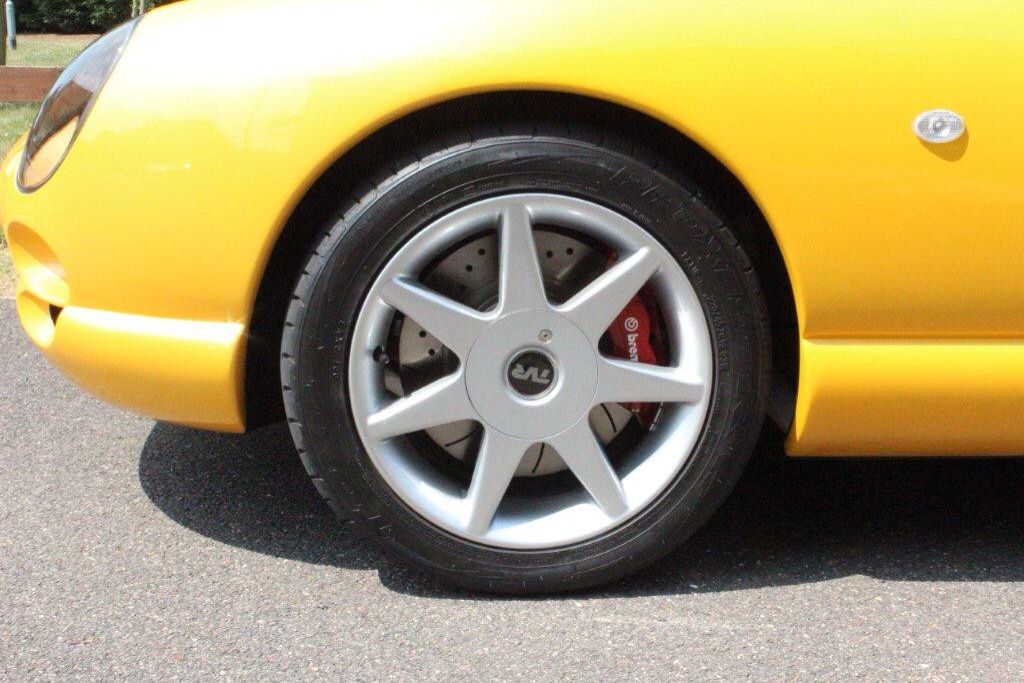
Never really thought the brakes were great, even with decent pads, so I decided to go for 324mm discs from a Focus RS, with E38 7 series callipers attached via a steel bracket from eBay. When comparing different brake kits out there it just seemed by far the cheapest way to go.
All that needed doing was to drill and tap the original bolt holes, but if you wanted you could just drill them as there is plenty of room so i've nyloc'd them as well.


Then I realised the wheels didn't fit because of the design/offset of the spokes. So I had to get some spacers and fit longer studs, they are still close.

At the same time I went about improving the handling as it has always been a little scary and just not very pleasant, mainly due to work components it turns out. New upper and lower ball joints, steve heath rose jointed drop links on the front new track rod ends. There isn't a rear anti roll bar as the mount is missing, I'm not going to replace it as most people think it's better without. Luckily it was already poly bushed all round but the front ones under the exhaust had melted so I replaced though.
If anyone is thinking of doing poly bushes I would recommend Superflex instead of power flex, the design is much easier to fit and they are cheaper.
Nearly everything was corroded or stuck, so blow torch and angle grinder came in very handy

The shocks were changed from some knackered old Gaz to some new Monos, rear brakes all replaced with standard. I might upgrade to the later spec larger ones at some point.


Warning on the M1144 pads, I wonder if anyone takes any notice?

The engine bay had loads of bits painted purple and just looked really untidy so I thought i'd clean it up a little, then one think leads to another.

I bought a megasquirt off Daz so time to start removing unneeded parts. The dizzy is being cut down as it's a pre serp and it's needed for the oil pump

May as well do something properly if I'm going to this much trouble. Luckily the engine is very good, hardly looks to be any wear at all, is was replaced not too long before I bought the car I think.
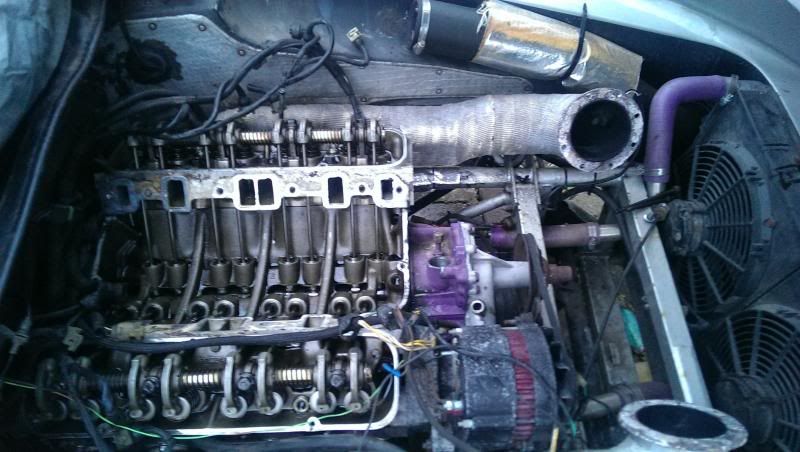
Removed the exhausts as the nearside was blowing, I replaced gaskets on the off side last year but that came loose as well. I cut slots in the bottom holes to make refitting easier. This time I will be using ARP bolts for the holes underneath, with nordlock washer and high temp thread lock. Last time I used a kit from ebay but it's supplied with 8 bolts and 8 nord locks, i didn't realise this was wrong and you need two washers per bolt. I don't think the ARP bolts are long enough really, so the top holes I bought some allan head m4 stainless.
Pre cats removed and also de-catted the original manifold, hopefully it won't be too loud (cherry bomb centre silencers) I also had the manifolds shot blasted and I've painted with POR20 which is about the only stuff I've found to not just burn off.


It took quite a few coats of paint stripper and hours of scraping and wire brushing but the inlet was finally cleaned and rockers sprayed with engine enamel. I found out the heater hose solid pipe was just stuck inside some larger hose, don't know how they are done normally but it definitely isn't going back the same.


Then I just thought everything still looked scruffy so radiator, alternator, water pump and steering rack come out for lots of cleaning and spraying. I think i'll get the alternator blade plated as I'm not sure on the painted look yet?


The chassis was galvanised and properly painted about 7 years ago and is still in good condition but it just looked very dirty so I sanded and painted in hammerite. Not the ideal solution but I want to get the body off this winter and do it properly with some POR15, so this will do for summer.


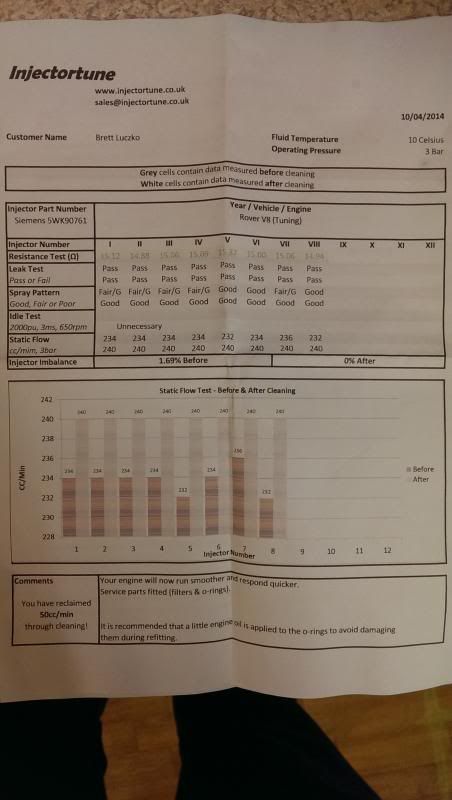
A while ago I got a carbon plenum from eBay so I was happy when I finally got to test fit it, until I realised the throttle linkage it came with was all wrong. So I had to dremel out some bits of the original so now it fits. The stepper motor has been removed and a bosche idle valve is being used instead. The trumpets were sorted luckily, 47mm and inlet manifold ported to match. I ditched the standard injectors, bought some vectra ones from eBay and sent them off to be flow matched and cleaned, these were back within a couple days with new seals and a nice report of how much better they now are.
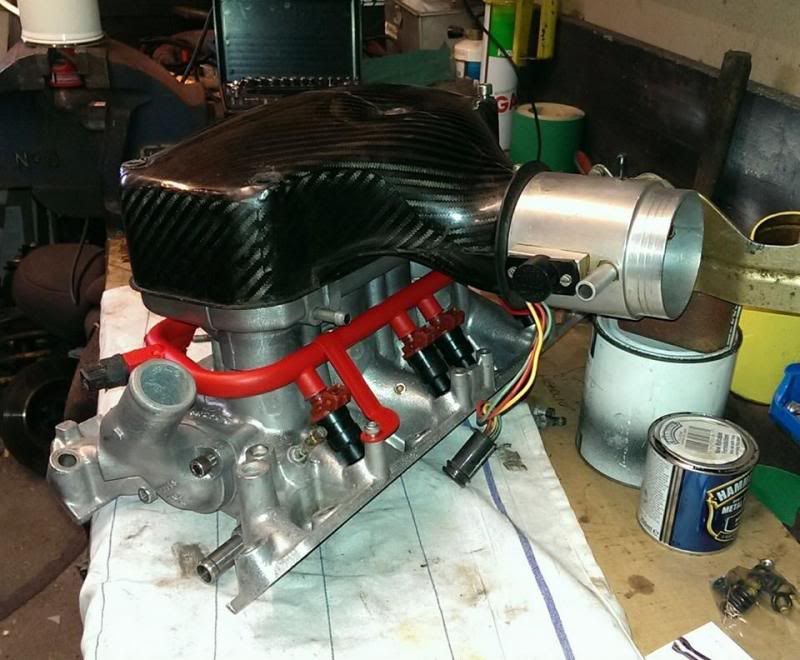
The fuel lines were completely knackered and leaking so next up was fixing these. It turns out the hard pipes had been removed and just normal hose used throughout. So I bought some 8mm copper to put the hard lines back in, couplers soldered on the end to grip the hose better. I'm only running the hard lines up to just behind the gearbox so you can easily get to the joint from underneath. Then it's braided from there to the inlet. I didn't realise the different types of fuel line, but I originally bought the wrong stuff which was R6, so I then had to order some r9 instead. The original was R7 and it's only lasted about 6 years from looking at the receipts that came with the car

Finally starting to get things back together now, lots more cleaning and polishing seems to be worth while in the end.
Test fit of the plenum and rockers gave me some more motivation to hurry up and finish everything


Still quite a lot left to do though Tomorrow I'll be removing the original ECU and wiring and starting to make a relay board and loom for the MS, spraying engine bay satin black and wasting ages trying to drill out the knackered old radiator rubber mounts.
It really all started when I went to Willow Sports Cars for a suspension set and he couldn't do anything as there were so many problems. Needed new discs and pads all round, track rod ends, ball joints.
So I thought I'd take her off the road and get everything sorted, but I keep adding jobs to the list so after hundreds of hours she's still in bits. Getting there slowly though and hopefully i'll be done in time for summer and some meets. I enjoy working on the car as much as driving it I think, well, I've definitely spent a lot more time working on it.
Having a garage would make like so much easier instead of being on the drive, but I need to get her finished so I can then build a garage.
As with everything I've done, I don't think I would have been able to without Pistonheads as I don't really know what I'm doing, just learning as I go along. They are quite simple to work on and I don't really think there is much you need to pay a specialist to do.
Never really thought the brakes were great, even with decent pads, so I decided to go for 324mm discs from a Focus RS, with E38 7 series callipers attached via a steel bracket from eBay. When comparing different brake kits out there it just seemed by far the cheapest way to go.
All that needed doing was to drill and tap the original bolt holes, but if you wanted you could just drill them as there is plenty of room so i've nyloc'd them as well.
Then I realised the wheels didn't fit because of the design/offset of the spokes. So I had to get some spacers and fit longer studs, they are still close.
At the same time I went about improving the handling as it has always been a little scary and just not very pleasant, mainly due to work components it turns out. New upper and lower ball joints, steve heath rose jointed drop links on the front new track rod ends. There isn't a rear anti roll bar as the mount is missing, I'm not going to replace it as most people think it's better without. Luckily it was already poly bushed all round but the front ones under the exhaust had melted so I replaced though.
If anyone is thinking of doing poly bushes I would recommend Superflex instead of power flex, the design is much easier to fit and they are cheaper.
Nearly everything was corroded or stuck, so blow torch and angle grinder came in very handy
The shocks were changed from some knackered old Gaz to some new Monos, rear brakes all replaced with standard. I might upgrade to the later spec larger ones at some point.
Warning on the M1144 pads, I wonder if anyone takes any notice?
The engine bay had loads of bits painted purple and just looked really untidy so I thought i'd clean it up a little, then one think leads to another.
I bought a megasquirt off Daz so time to start removing unneeded parts. The dizzy is being cut down as it's a pre serp and it's needed for the oil pump
May as well do something properly if I'm going to this much trouble. Luckily the engine is very good, hardly looks to be any wear at all, is was replaced not too long before I bought the car I think.
Removed the exhausts as the nearside was blowing, I replaced gaskets on the off side last year but that came loose as well. I cut slots in the bottom holes to make refitting easier. This time I will be using ARP bolts for the holes underneath, with nordlock washer and high temp thread lock. Last time I used a kit from ebay but it's supplied with 8 bolts and 8 nord locks, i didn't realise this was wrong and you need two washers per bolt. I don't think the ARP bolts are long enough really, so the top holes I bought some allan head m4 stainless.
Pre cats removed and also de-catted the original manifold, hopefully it won't be too loud (cherry bomb centre silencers) I also had the manifolds shot blasted and I've painted with POR20 which is about the only stuff I've found to not just burn off.
It took quite a few coats of paint stripper and hours of scraping and wire brushing but the inlet was finally cleaned and rockers sprayed with engine enamel. I found out the heater hose solid pipe was just stuck inside some larger hose, don't know how they are done normally but it definitely isn't going back the same.
Then I just thought everything still looked scruffy so radiator, alternator, water pump and steering rack come out for lots of cleaning and spraying. I think i'll get the alternator blade plated as I'm not sure on the painted look yet?
The chassis was galvanised and properly painted about 7 years ago and is still in good condition but it just looked very dirty so I sanded and painted in hammerite. Not the ideal solution but I want to get the body off this winter and do it properly with some POR15, so this will do for summer.
A while ago I got a carbon plenum from eBay so I was happy when I finally got to test fit it, until I realised the throttle linkage it came with was all wrong. So I had to dremel out some bits of the original so now it fits. The stepper motor has been removed and a bosche idle valve is being used instead. The trumpets were sorted luckily, 47mm and inlet manifold ported to match. I ditched the standard injectors, bought some vectra ones from eBay and sent them off to be flow matched and cleaned, these were back within a couple days with new seals and a nice report of how much better they now are.
The fuel lines were completely knackered and leaking so next up was fixing these. It turns out the hard pipes had been removed and just normal hose used throughout. So I bought some 8mm copper to put the hard lines back in, couplers soldered on the end to grip the hose better. I'm only running the hard lines up to just behind the gearbox so you can easily get to the joint from underneath. Then it's braided from there to the inlet. I didn't realise the different types of fuel line, but I originally bought the wrong stuff which was R6, so I then had to order some r9 instead. The original was R7 and it's only lasted about 6 years from looking at the receipts that came with the car
Finally starting to get things back together now, lots more cleaning and polishing seems to be worth while in the end.
Test fit of the plenum and rockers gave me some more motivation to hurry up and finish everything
Still quite a lot left to do though
Tomorrow I'll be removing the original ECU and wiring and starting to make a relay board and loom for the MS, spraying engine bay satin black and wasting ages trying to drill out the knackered old radiator rubber mounts.Thanks Daz, I can't remember but it was some TVR. I'm sure it's by ACT, not on their site though. I've looked online and the only mention I can find is here, it's the same description having a 76mm jaguar throttle body
http://www.actproducts.co.uk/about/press/
http://www.actproducts.co.uk/about/press/


brett84 said:
Never really thought the brakes were great, even with decent pads, so I decided to go for 324mm discs from a Focus RS, with E38 7 series callipers attached via a steel bracket from eBay. When comparing different brake kits out there it just seemed by far the cheapest way to go.
All that needed doing was to drill and tap the original bolt holes, but if you wanted you could just drill them as there is plenty of room so i've nyloc'd them as well.
I have this setup and have to say it stops really well. Have different pads though.All that needed doing was to drill and tap the original bolt holes, but if you wanted you could just drill them as there is plenty of room so i've nyloc'd them as well.

Thanks all.
Rib - I really like the wheels but might change them this year for ones which fit around the calipers better.
Nick - Yeah I remember you saying that you were talking to the guy when I bought it, sorry about that
Andav469 - They look really nice and good to know they are holding up after those miles. I went for solid discs as I want to start doing track days and the driller/vented ones are weaker under extreme use from what I read?
Today has been a full day on it again but not too much to report on. Took ages to get the rad fitted because the old mounts had snapped off, so angle grinder came in handy again. Painted the engine bay, just black with hammerite for now. It's not great but a lot better than it was and I'll do it properly with new heat shields when the engine comes out.
Also sanded down the other rocker cover and painted it, just need to finish the sanding/polishing on the raised sections tomorrow.
It's finally all starting to go back together which is such a good feeling after quite a while of doing what seemed never ending jobs which seemed to disassemble the car more each time.
Tomorrow I need to blow torch the manifolds to cure the POR20, cut the dizzy down, fit rockers properly, remove old wiring and start making the new loom


Rib - I really like the wheels but might change them this year for ones which fit around the calipers better.
Nick - Yeah I remember you saying that you were talking to the guy when I bought it, sorry about that
Andav469 - They look really nice and good to know they are holding up after those miles. I went for solid discs as I want to start doing track days and the driller/vented ones are weaker under extreme use from what I read?
Today has been a full day on it again but not too much to report on. Took ages to get the rad fitted because the old mounts had snapped off, so angle grinder came in handy again. Painted the engine bay, just black with hammerite for now. It's not great but a lot better than it was and I'll do it properly with new heat shields when the engine comes out.
Also sanded down the other rocker cover and painted it, just need to finish the sanding/polishing on the raised sections tomorrow.
It's finally all starting to go back together which is such a good feeling after quite a while of doing what seemed never ending jobs which seemed to disassemble the car more each time.
Tomorrow I need to blow torch the manifolds to cure the POR20, cut the dizzy down, fit rockers properly, remove old wiring and start making the new loom
It's your fault Alun, I saw your thread and thought sod it I may as well clean it up while I'm at it. Glad yours is coming together as well.
They look really nice filling up those wheels, have you got a side on shot which shows both front and back? I've just realised I've not actually looked with the wheels on yet to see if the rears look tiny or not?
They look really nice filling up those wheels, have you got a side on shot which shows both front and back? I've just realised I've not actually looked with the wheels on yet to see if the rears look tiny or not?
Been working on it this week when I can and got a few things done, it's a nice feeling that things are going back and and its starting to look more like a car again.
Got some metal TVR emblems for the rockers

I had a hose braiding kit in the shed from many years ago so I thought I would cover up those horrible purple hoses where possible although i'm not sure about the plenum one yet, might just go back to black and see how it looks

Fitted the air temp sensor down next to the filter mount, sealed with black gasket. Tapped out the exhaust manifolds because the early cars have the smaller lambda holes.
Ordered a coil pack bracket which didn't quite fit right as i think it's meant for other RV8 applications with a different water pump and thermostat housing. So had to take out one of the holes a little bit then bolt and nylon in place, it's solid now though.


Started to fit the OS manifold back but gave up after a bit of messing around trying to get the top bolts back in as the manifolds don't quite seem right, the holes are quite tight. So i'll take it back off tomorrow and open them out a bit. The bottom is easy as the manifolds are slotted now. I'm using ARP and nord locks on the bottom, then allan cap longer bolts on top with nordlock and high temp thread lock. Hopefully they won't work loose again.
Took a while spacing out the alternator and trying to get everything lined up as I couldn't find the original bolts/spacers. It's the little things that take up all the time I think, plus I want all allan cap bolts so lots of them i'm chopping to size. Not sure about the alternator fan blade yet, think i'll paint it black or get it plated instead of red.
Also started the wiring, well kind of. Reconnecting the alternator and start, running air temp sensor inside the intake heat shielding (which is radiator insulation).

Got some metal TVR emblems for the rockers
I had a hose braiding kit in the shed from many years ago so I thought I would cover up those horrible purple hoses where possible although i'm not sure about the plenum one yet, might just go back to black and see how it looks
Fitted the air temp sensor down next to the filter mount, sealed with black gasket. Tapped out the exhaust manifolds because the early cars have the smaller lambda holes.
Ordered a coil pack bracket which didn't quite fit right as i think it's meant for other RV8 applications with a different water pump and thermostat housing. So had to take out one of the holes a little bit then bolt and nylon in place, it's solid now though.
Started to fit the OS manifold back but gave up after a bit of messing around trying to get the top bolts back in as the manifolds don't quite seem right, the holes are quite tight. So i'll take it back off tomorrow and open them out a bit. The bottom is easy as the manifolds are slotted now. I'm using ARP and nord locks on the bottom, then allan cap longer bolts on top with nordlock and high temp thread lock. Hopefully they won't work loose again.
Took a while spacing out the alternator and trying to get everything lined up as I couldn't find the original bolts/spacers. It's the little things that take up all the time I think, plus I want all allan cap bolts so lots of them i'm chopping to size. Not sure about the alternator fan blade yet, think i'll paint it black or get it plated instead of red.
Also started the wiring, well kind of. Reconnecting the alternator and start, running air temp sensor inside the intake heat shielding (which is radiator insulation).

sanded and polished the top, then smeared in grease, sprayed the covers and wiped the grease off which gets most of the paint off then we sand and polish. They look better in the pictures than real life as they are a bit pitted which sanding didn't completely get out but I quite like how they aren't perfect.
Hotrod boys seem to use a little bit of thread lock on exhaust bolts, I suppose i'll find out when I try to remove them.
Hotrod boys seem to use a little bit of thread lock on exhaust bolts, I suppose i'll find out when I try to remove them.
Gassing Station | Chimaera | Top of Page | What's New | My Stuff