Monaro audio improvement project…
Discussion


I finally cracked, after having no wireless at all for 13 months I have decided to finally finish installing some additional noise. Two days into ownership I unplugged the power wires to the old unit the previous owner had butchered in to ensure I was never tempted to listen to something so awful again. Thankfully, the exhaust note of the cut-outs has kept me company for just over 11,000 miles. But the time has come. This is fairly lengthy and photo heavy, apologies in advance if I end up driveling too much!
With 13 months of planning you’d think I would have got this right, but sadly I have still done a couple of things in hindsight I would have done differently – which I may change prior to finishing. Hopefully this may help someone else planning on doing a complete reinstallation of audio gear in their Monaro. It still isn’t finished (though not far away now!) and as always time and lack of indoor space has hampered proceedings.
The plan has always been to keep everything looking factory and not lose any of the pitiful boot space. No big nasty boxes visible, no tweeters hanging off A-pillars or modified door panels. System diagram and list of equipment that is going into her follows, some gear old (twenty years or so…) all new speakers and remaining kit bought second hand from a popular auction site:
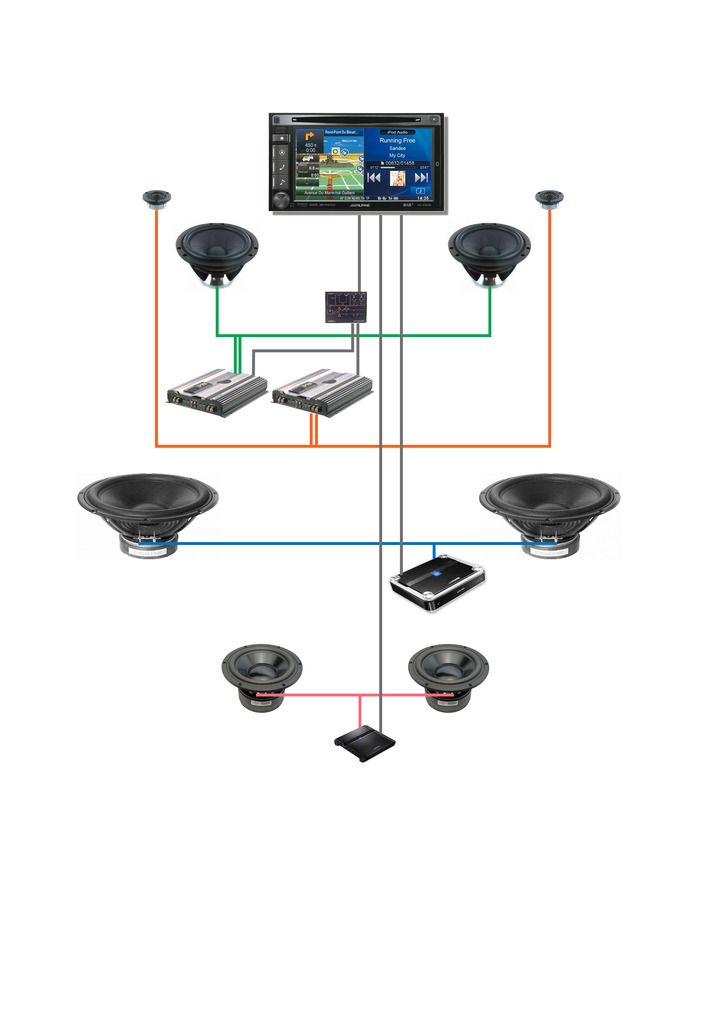
• Head Unit – Alpine INE-W925R
• Front stage –
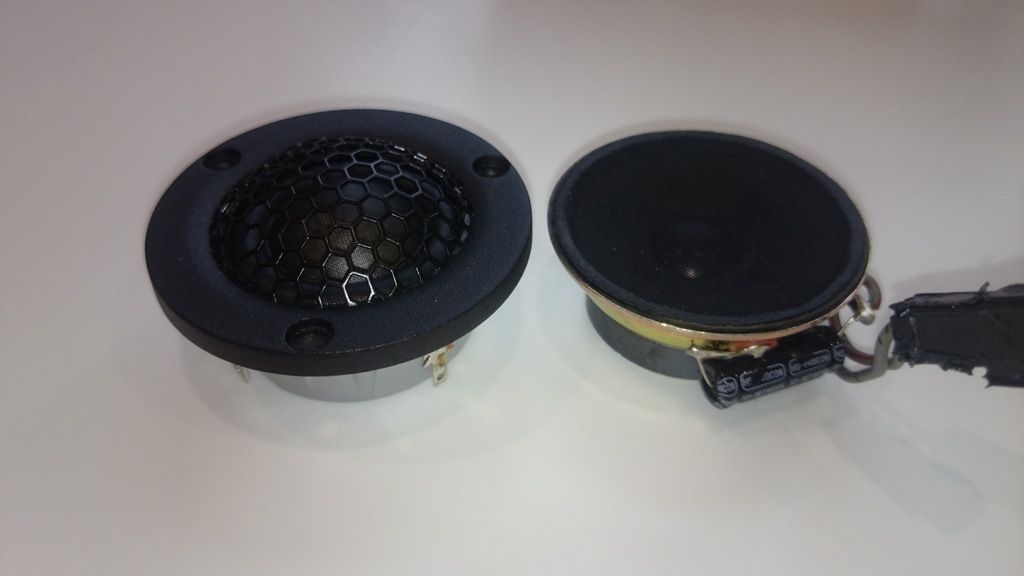
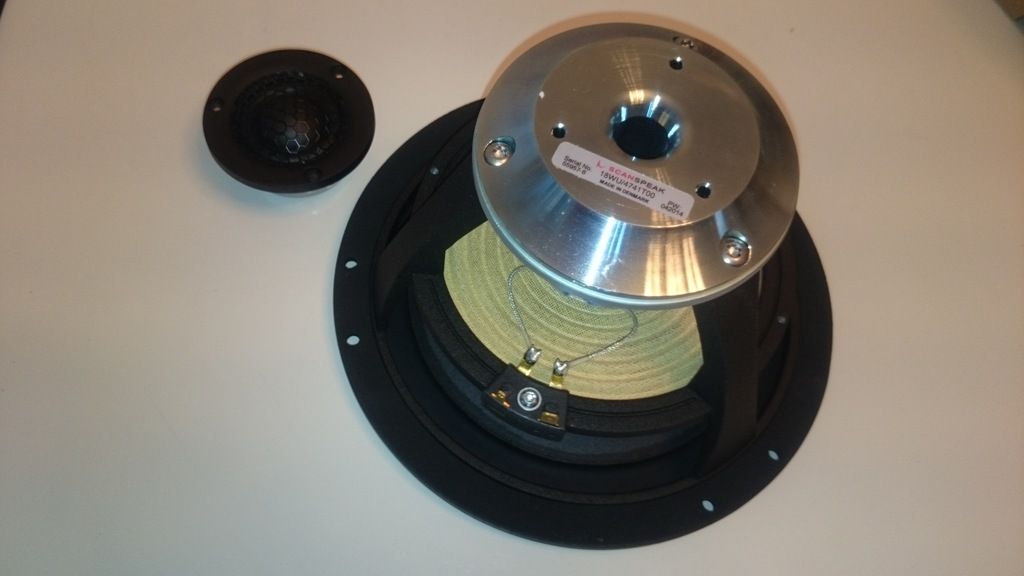
o Scanspeak 18WU/4741T00 6.5” Midrange
o Scanspeak D3004/602000 Tweeters
o 2x Alpine MRV T505 V12 amps (1x for mids 1x for tweeters)
o Alpine 3653 active crossover (single front rca feed in, two rca feeds out for high and low with selectable crossover point)
• Subs –
o 2x Peerless XLS-P830452 10” (8ohm, running bridged @ 4ohms)
o Alpine PDX 1.1000 amp
• Rear stage –
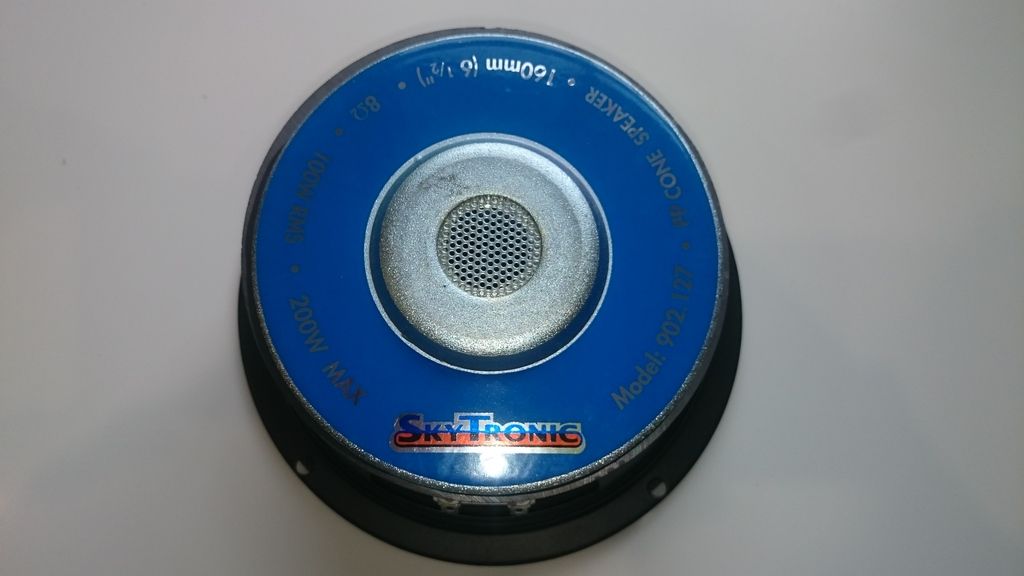
o Skytec 6.5” Midbass (8ohm, running bridged mono @ 4ohms)
o Alpine PMX T320 amp
o 3 way passive crossover (running speakers from woofer part)
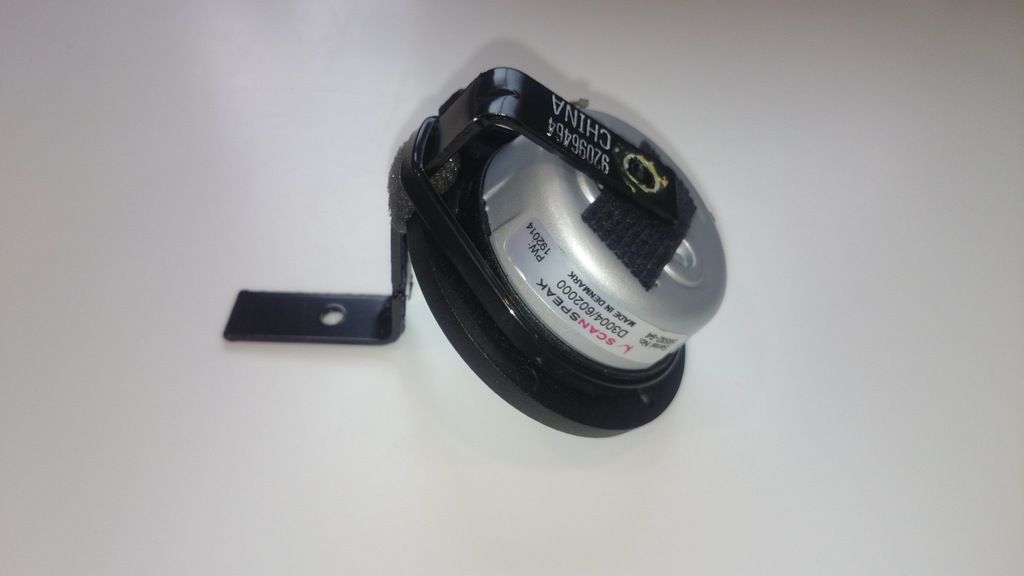
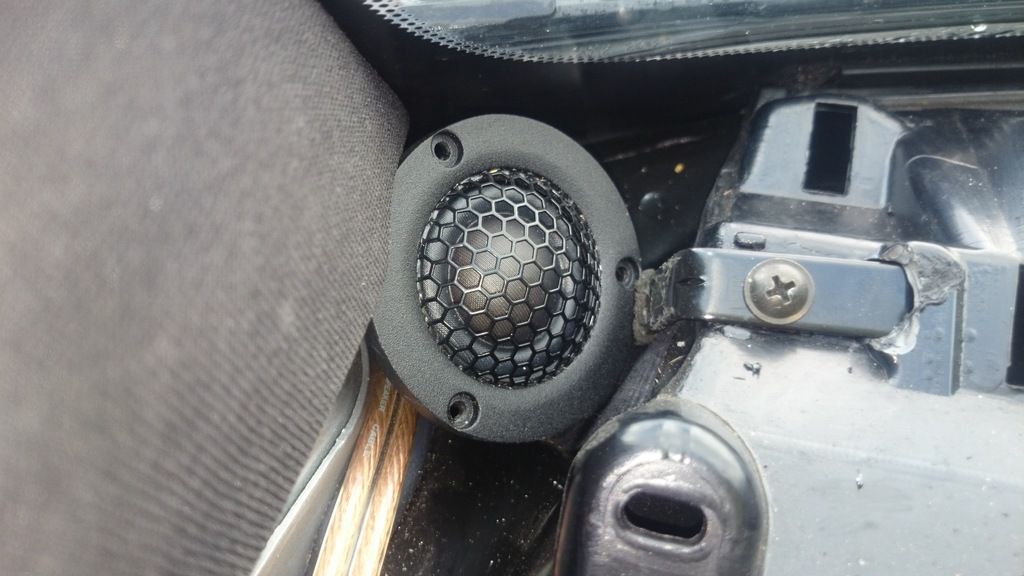
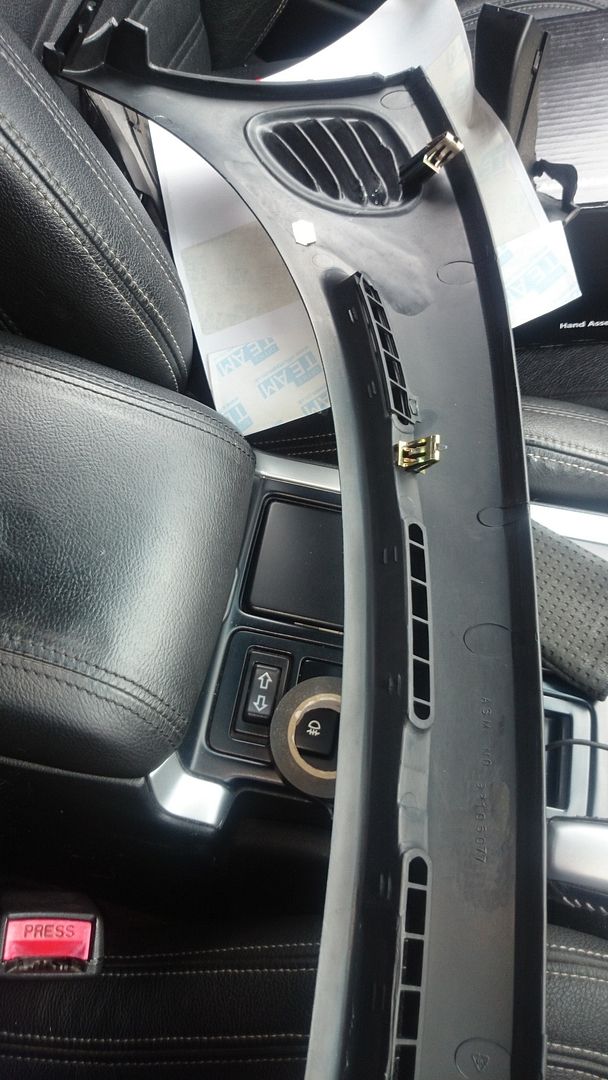
Tweeters are mounted in the original location, under the top panel of the dash. Photo of the back of the panel also follows as it may help understand how it comes off if you are a tad nervous! I had to (badly) remove a little of the plastic to get the larger tweeters to fit in, just couldn’t quite get the bracket into position without minor modification. No idea how they sound yet as I haven’t finished the front speakers – fitted them 12 months ago so quite keen to find out now!
Next to the original tweeter
Elaborate mounting system which has held firm over the last 11,000 miles…
In position
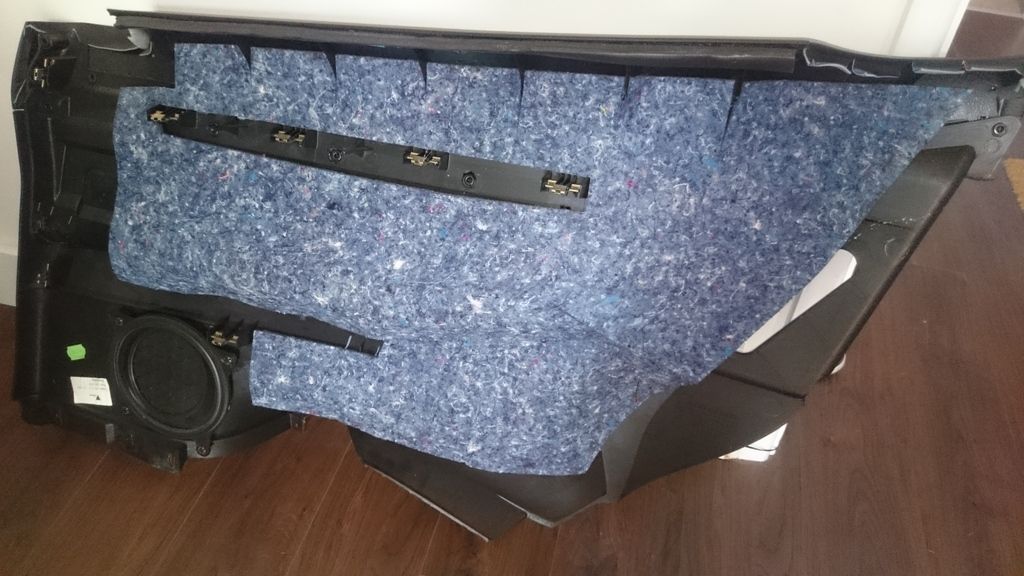
Back of the dash panel – other side of the car though!
The midrange, still to go in need to make a wee spacer for it and pray there is enough clearance behind the door pod
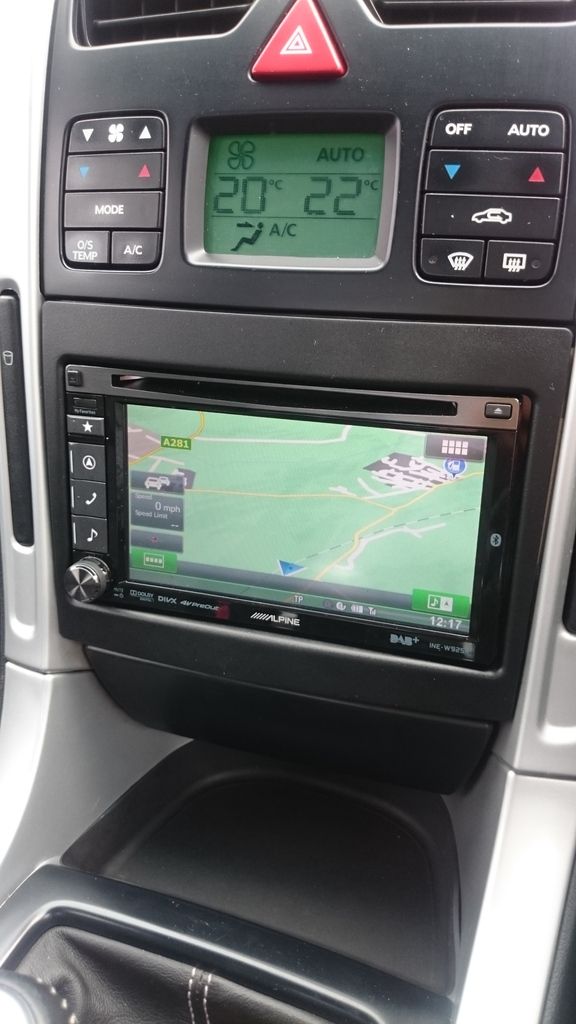
Head unit was next, went in about 6 weeks or so ago. Can’t rush these things. Thanks again to Nick (Ferret) for the metal mounting brackets, makes a huge difference – the plastic ones that come with the surrounds are truly awful! No photos of the installation but any questions just ask away. Impressed with the Alpine deck, works well and navigation is excellent.
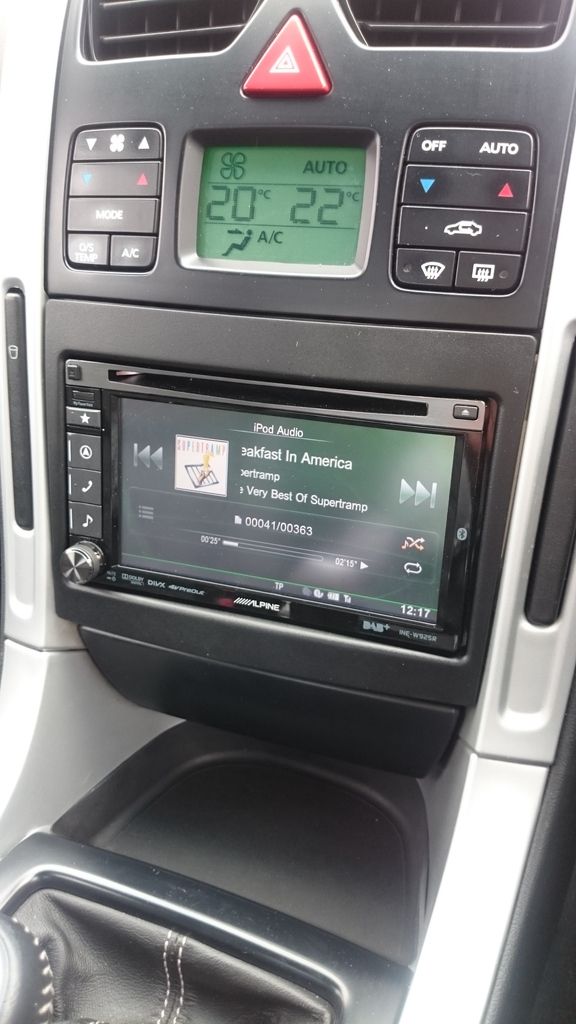
In case there was any confusion over branding…
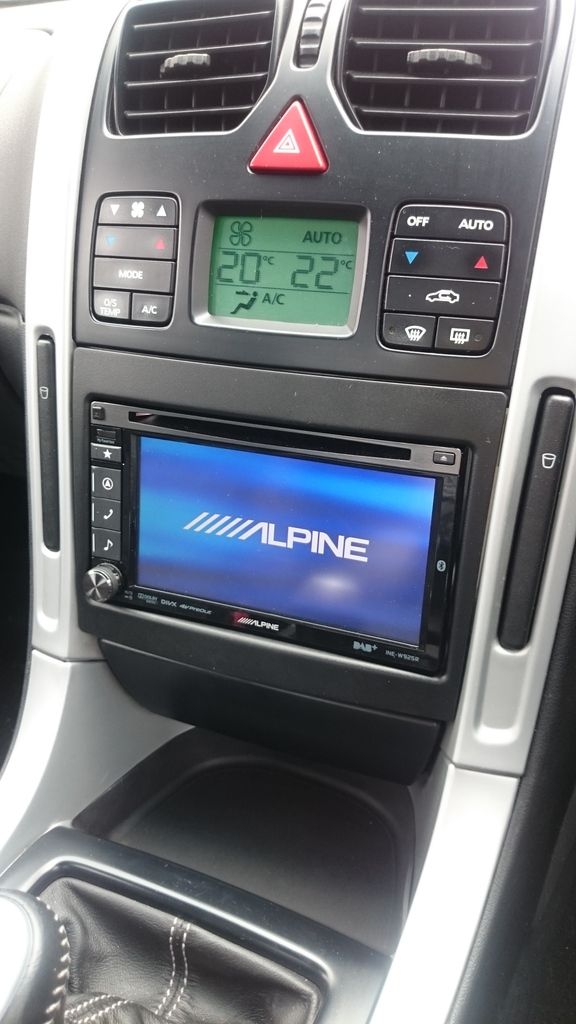
All working, and finally some navigation again
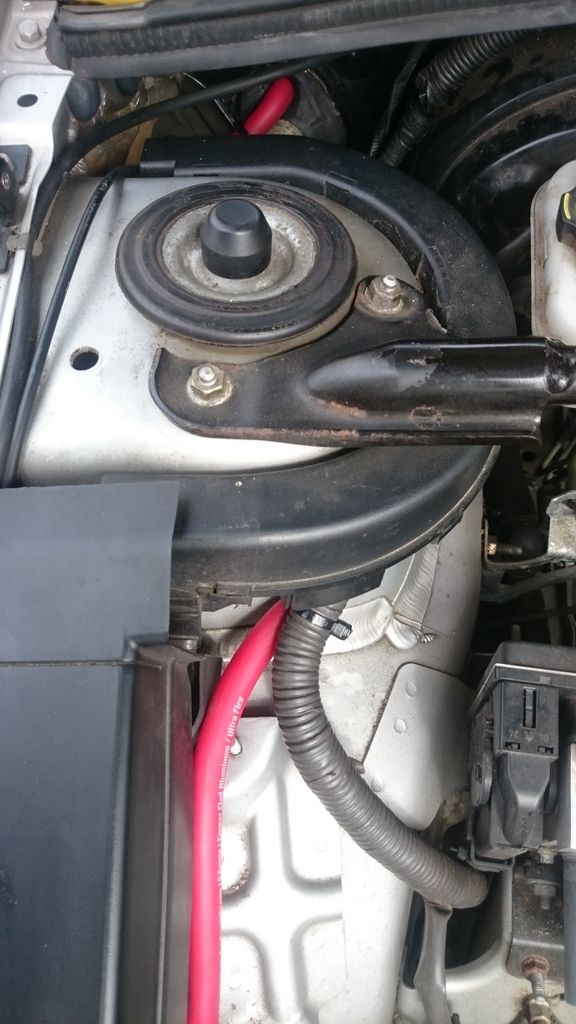
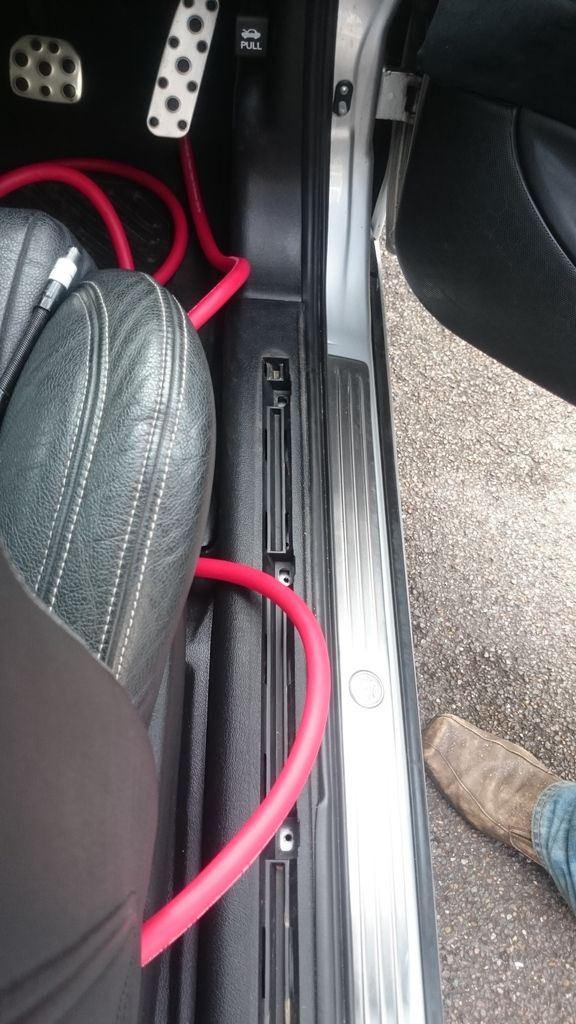
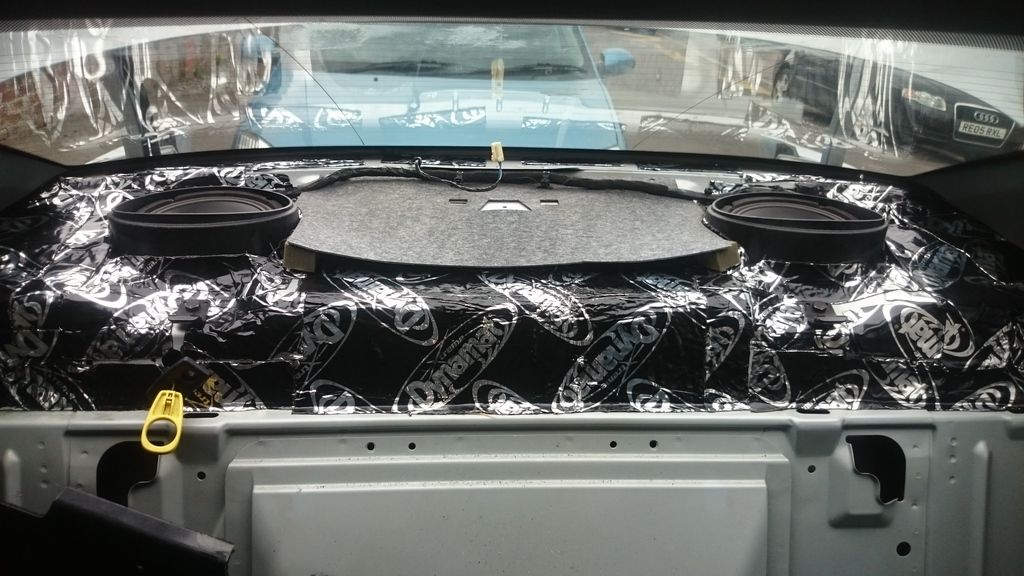
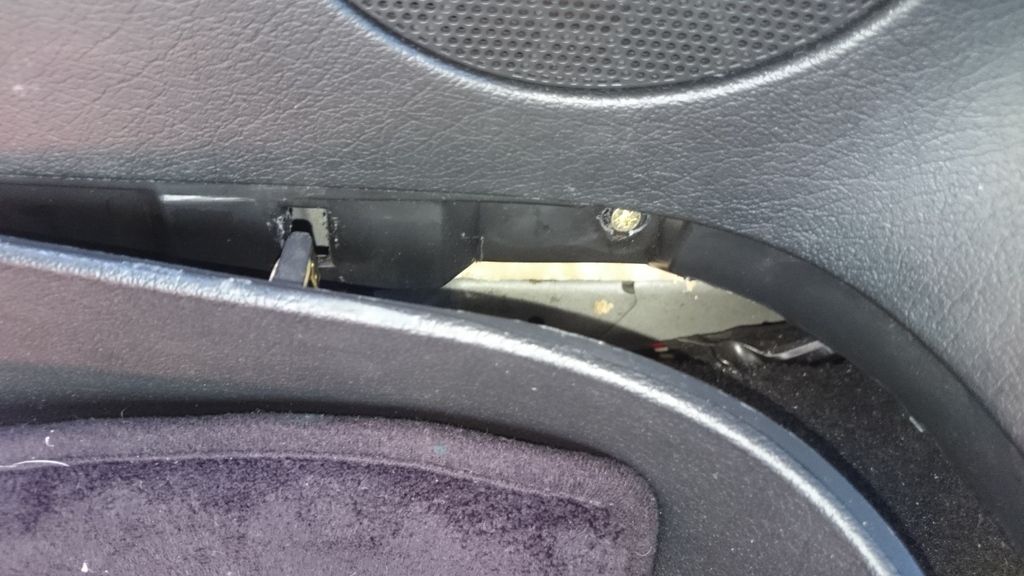
Then it was time for some power cable to be run through, and the rear end to get ripped out. I went overboard on the power cable, in hindsight don’t run 0 gauge unless you really need to. It goes in ok, but 2 gauge would have been fine for what I have ended up doing and would have made life easier. It isn’t too bad to run it through the grommet shown below, just be very careful not to snick any of the main wire loom when making a cut into the rubber to get it through. Ends up nicely placed under the dash, easy run through to the back just need to watch how you go by the seats to make sure the sill panel and the bit between that and the seat still fit ok.
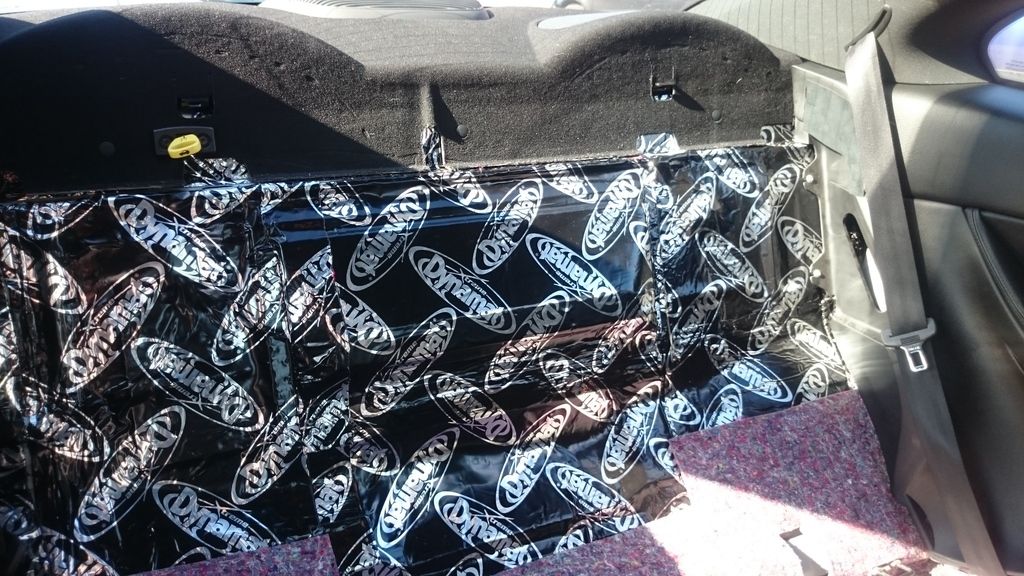
With the rear end came a sea of Dynamat. If you are in doubt, just buy some. It makes a huge difference – even my wife noted how much quieter she was with it in there. There are other brands out there, probably cheaper, but I have no experience of them so went with what I have used in the past.
The rear stage speakers fit nicely in where the existing subs go and as an added bonus they screwed straight in to the existing surrounds. Nice. These are PA speakers, 8ohm, cheap and cheerful just to add a bit of rear fill in the lower to upper bass range. Running them in parallel from a small Alpine amp bridged so it sees 4 ohms, and mono should help imaging when the front is actually up and running. They sound surprisingly good, and work better at producing bass than the factory speakers that were there even though they are crossed over at 80hz (18db roll-off)
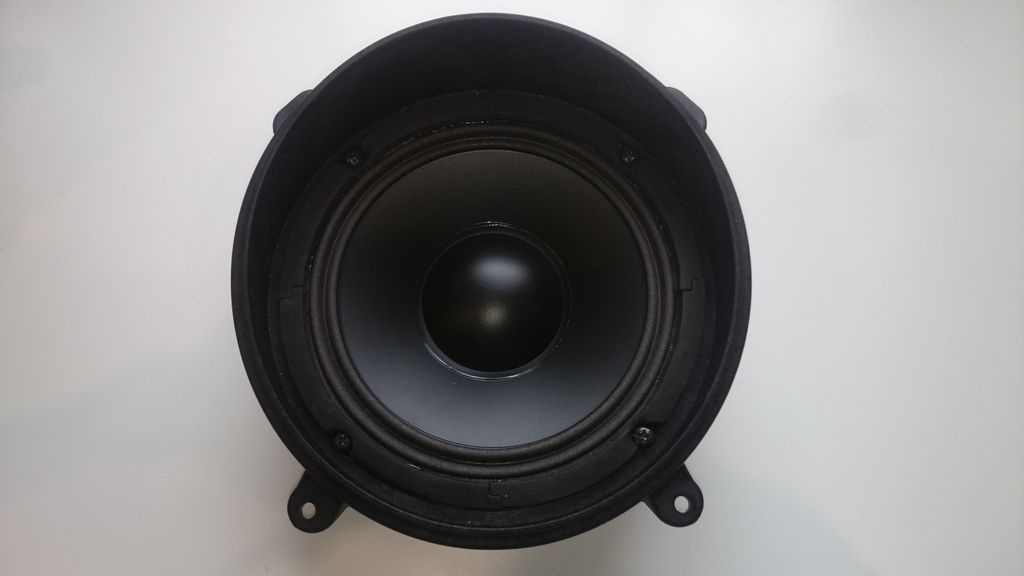
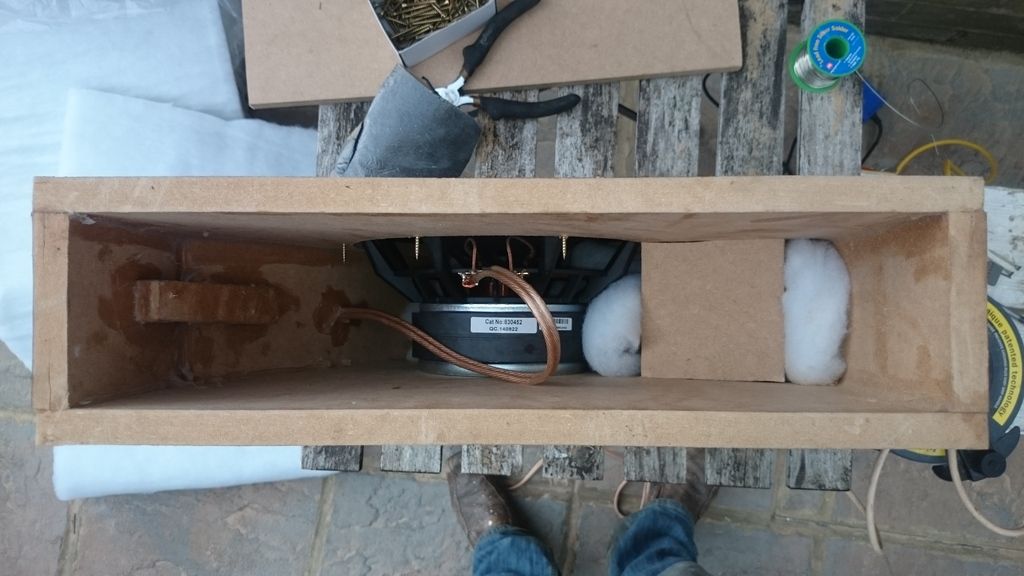
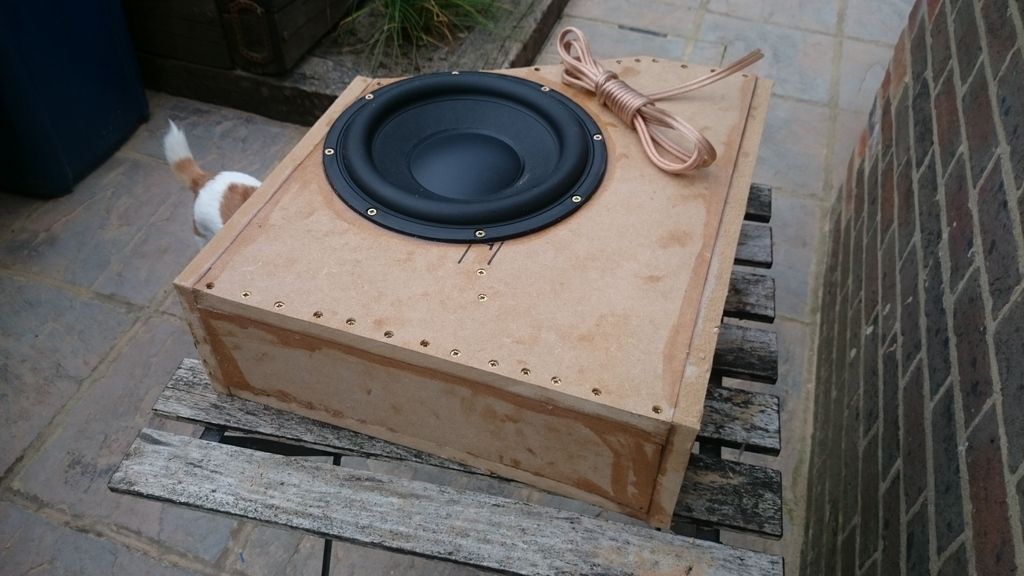
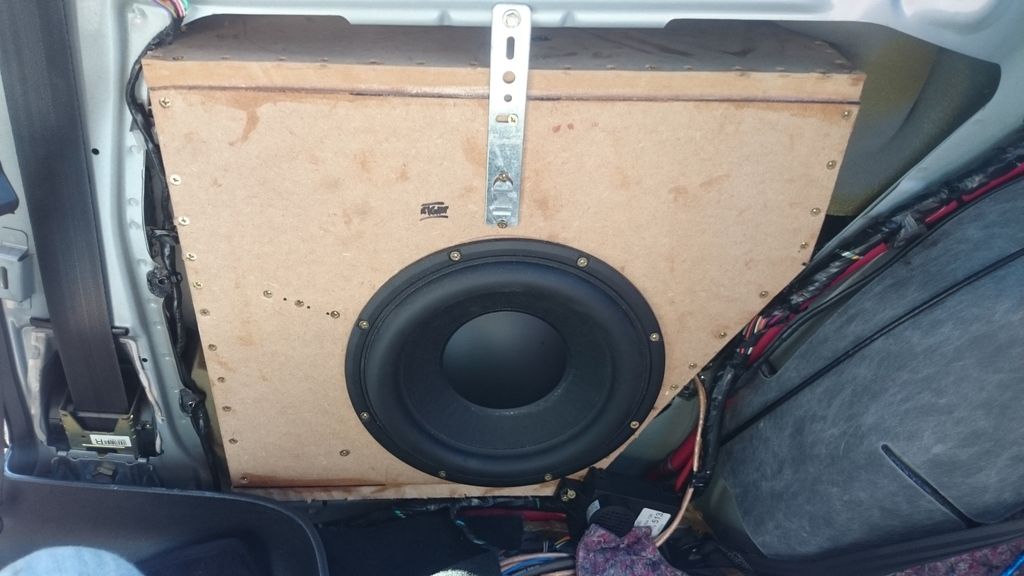
The subs are running in enclosures built into the rear quarter (side) panels, where the original 6.5” coaxials were located. Seen a few people in the GTO forums running them like this, and they do actually work surprisingly well. The subs are more suited for a home theatre setup, but they are shallow(ish) and don’t vent through the rear of the magnet like most subs so I could get away with hard mounting the sub against the back of the enclosure. The boxes are 5.2cuft before the sub goes in, and I have packed them with Dacron to help with the small size. I am staggered how much bass they knock out, much better than expected. Having had 15s and 12s in the past I wasn’t expecting much, but really happy with the output from them.
One change I made to the setups I looked at across the pond was running the subs in the bottom of the enclosure. When I stuck my hand up behind the panel it seemed the most space available was down low, these are long stroke subs and the cones move a fair bit so wanted to make sure I had space in front of them. In hindsight, I probably could have made a spacer for them to move them further out as there is plenty of room.
Remove the metal panel whichever way you like – I used the pliers bending the tab trick to remove the rivet as the sodding thing kept spinning when I tried to drill it out. They only took a few minutes to get out his way and no damage done to either the panel or the fixings. Also a picture of the back of the side panel to help understand space and where the locating clips are. I removed the ones that go into metal panel as I didn’t need them now, and just to make sure they didn’t foul on the enclosures.
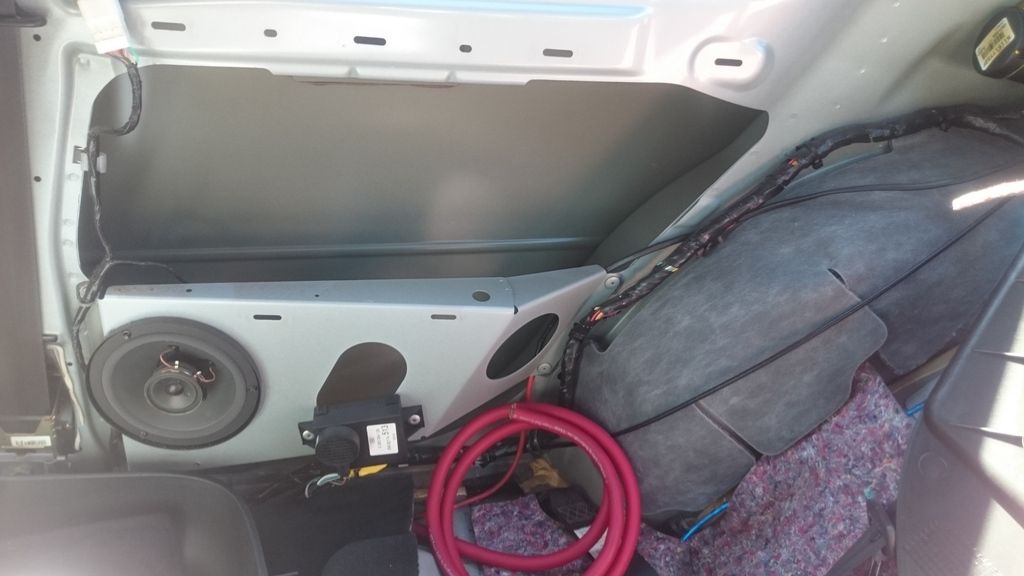
Plenty of Dynamat in behind. You can really here the difference when you tap the outside of the panel, really solid, and helps stop any resonance issue with the enclosures being hard up again the body.

Box under construction. Skilled craftsman I am not… The original (!) plan was to do the enclosures and the front speak spaces in fibreglass, but I realised due to time and lack of decent workspace this was never going to happen so MDF it was.
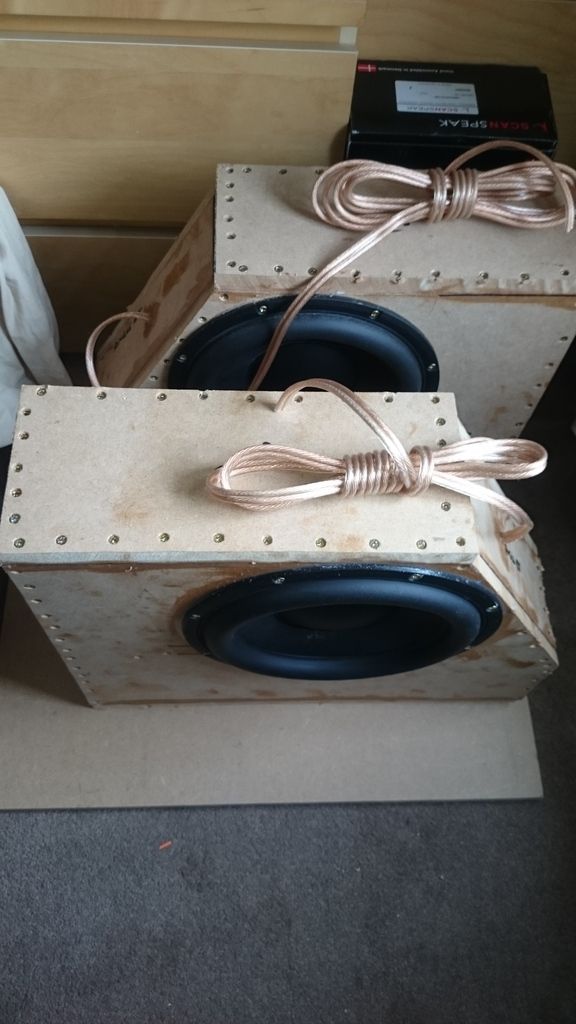
In terms of mounting they are incredibly solid with just a top bracket holding them as they sit on the lip of the body, but there is another out of camera shot holding them down there just in case. Re-used the original foam that is in the panel, along with leftover Dacron behind and on the sides to reduce risk of vibrations.
Managed to get a screw back in where the original (T20?) silver one is that holds the sill panel on – perfect fit.
And that is where it is up to. No shots of the amps yet as they are ‘temporarily…’ in situation in the rear panels of the boot. I will end up losing a litre or so of pretty much unusable boot space by the time I make a custom panel to hide them (they are second hand and not going on show). Three amps on the driver’s side, sub amp on the passenger’s side – in hindsight I probably should have run the rear channel amp over with the sub amp to free up some space. Crossovers are also next to the three amps.
Hope this helps others who may be considering butchering some 10”s in to get some decent bottom end as opposed to the free-air 8” option in the back parcel shelf. Just running the rears, subs and 1 front OEM door speaker off the head unit I am happy with the sound so it will only get better from here. The bottom end is very, very tight and punchy and holds long deep bass notes surprisingly well.
I will update the thread with front door shots and images of the amps when they are situated more tidily.
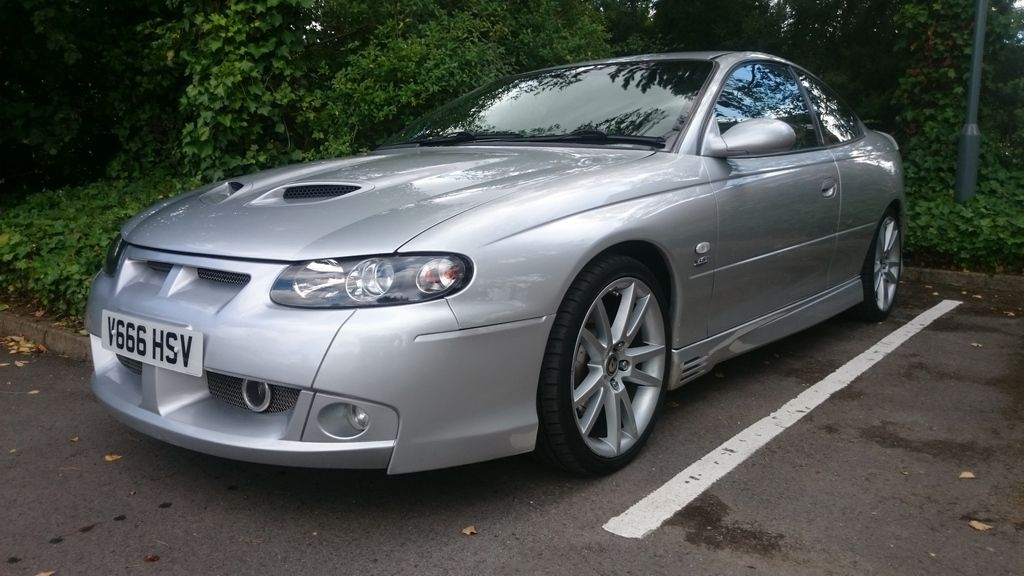
That just leaves the gratuitous recently cleaned Monaro photo...
With 13 months of planning you’d think I would have got this right, but sadly I have still done a couple of things in hindsight I would have done differently – which I may change prior to finishing. Hopefully this may help someone else planning on doing a complete reinstallation of audio gear in their Monaro. It still isn’t finished (though not far away now!) and as always time and lack of indoor space has hampered proceedings.
The plan has always been to keep everything looking factory and not lose any of the pitiful boot space. No big nasty boxes visible, no tweeters hanging off A-pillars or modified door panels. System diagram and list of equipment that is going into her follows, some gear old (twenty years or so…) all new speakers and remaining kit bought second hand from a popular auction site:
• Head Unit – Alpine INE-W925R
• Front stage –
o Scanspeak 18WU/4741T00 6.5” Midrange
o Scanspeak D3004/602000 Tweeters
o 2x Alpine MRV T505 V12 amps (1x for mids 1x for tweeters)
o Alpine 3653 active crossover (single front rca feed in, two rca feeds out for high and low with selectable crossover point)
• Subs –
o 2x Peerless XLS-P830452 10” (8ohm, running bridged @ 4ohms)
o Alpine PDX 1.1000 amp
• Rear stage –
o Skytec 6.5” Midbass (8ohm, running bridged mono @ 4ohms)
o Alpine PMX T320 amp
o 3 way passive crossover (running speakers from woofer part)
Tweeters are mounted in the original location, under the top panel of the dash. Photo of the back of the panel also follows as it may help understand how it comes off if you are a tad nervous! I had to (badly) remove a little of the plastic to get the larger tweeters to fit in, just couldn’t quite get the bracket into position without minor modification. No idea how they sound yet as I haven’t finished the front speakers – fitted them 12 months ago so quite keen to find out now!
Next to the original tweeter
Elaborate mounting system which has held firm over the last 11,000 miles…
In position
Back of the dash panel – other side of the car though!
The midrange, still to go in need to make a wee spacer for it and pray there is enough clearance behind the door pod
Head unit was next, went in about 6 weeks or so ago. Can’t rush these things. Thanks again to Nick (Ferret) for the metal mounting brackets, makes a huge difference – the plastic ones that come with the surrounds are truly awful! No photos of the installation but any questions just ask away. Impressed with the Alpine deck, works well and navigation is excellent.
In case there was any confusion over branding…
All working, and finally some navigation again
Then it was time for some power cable to be run through, and the rear end to get ripped out. I went overboard on the power cable, in hindsight don’t run 0 gauge unless you really need to. It goes in ok, but 2 gauge would have been fine for what I have ended up doing and would have made life easier. It isn’t too bad to run it through the grommet shown below, just be very careful not to snick any of the main wire loom when making a cut into the rubber to get it through. Ends up nicely placed under the dash, easy run through to the back just need to watch how you go by the seats to make sure the sill panel and the bit between that and the seat still fit ok.
With the rear end came a sea of Dynamat. If you are in doubt, just buy some. It makes a huge difference – even my wife noted how much quieter she was with it in there. There are other brands out there, probably cheaper, but I have no experience of them so went with what I have used in the past.
The rear stage speakers fit nicely in where the existing subs go and as an added bonus they screwed straight in to the existing surrounds. Nice. These are PA speakers, 8ohm, cheap and cheerful just to add a bit of rear fill in the lower to upper bass range. Running them in parallel from a small Alpine amp bridged so it sees 4 ohms, and mono should help imaging when the front is actually up and running. They sound surprisingly good, and work better at producing bass than the factory speakers that were there even though they are crossed over at 80hz (18db roll-off)
The subs are running in enclosures built into the rear quarter (side) panels, where the original 6.5” coaxials were located. Seen a few people in the GTO forums running them like this, and they do actually work surprisingly well. The subs are more suited for a home theatre setup, but they are shallow(ish) and don’t vent through the rear of the magnet like most subs so I could get away with hard mounting the sub against the back of the enclosure. The boxes are 5.2cuft before the sub goes in, and I have packed them with Dacron to help with the small size. I am staggered how much bass they knock out, much better than expected. Having had 15s and 12s in the past I wasn’t expecting much, but really happy with the output from them.
One change I made to the setups I looked at across the pond was running the subs in the bottom of the enclosure. When I stuck my hand up behind the panel it seemed the most space available was down low, these are long stroke subs and the cones move a fair bit so wanted to make sure I had space in front of them. In hindsight, I probably could have made a spacer for them to move them further out as there is plenty of room.
Remove the metal panel whichever way you like – I used the pliers bending the tab trick to remove the rivet as the sodding thing kept spinning when I tried to drill it out. They only took a few minutes to get out his way and no damage done to either the panel or the fixings. Also a picture of the back of the side panel to help understand space and where the locating clips are. I removed the ones that go into metal panel as I didn’t need them now, and just to make sure they didn’t foul on the enclosures.
Plenty of Dynamat in behind. You can really here the difference when you tap the outside of the panel, really solid, and helps stop any resonance issue with the enclosures being hard up again the body.
Box under construction. Skilled craftsman I am not… The original (!) plan was to do the enclosures and the front speak spaces in fibreglass, but I realised due to time and lack of decent workspace this was never going to happen so MDF it was.
In terms of mounting they are incredibly solid with just a top bracket holding them as they sit on the lip of the body, but there is another out of camera shot holding them down there just in case. Re-used the original foam that is in the panel, along with leftover Dacron behind and on the sides to reduce risk of vibrations.
Managed to get a screw back in where the original (T20?) silver one is that holds the sill panel on – perfect fit.
And that is where it is up to. No shots of the amps yet as they are ‘temporarily…’ in situation in the rear panels of the boot. I will end up losing a litre or so of pretty much unusable boot space by the time I make a custom panel to hide them (they are second hand and not going on show). Three amps on the driver’s side, sub amp on the passenger’s side – in hindsight I probably should have run the rear channel amp over with the sub amp to free up some space. Crossovers are also next to the three amps.
Hope this helps others who may be considering butchering some 10”s in to get some decent bottom end as opposed to the free-air 8” option in the back parcel shelf. Just running the rears, subs and 1 front OEM door speaker off the head unit I am happy with the sound so it will only get better from here. The bottom end is very, very tight and punchy and holds long deep bass notes surprisingly well.
I will update the thread with front door shots and images of the amps when they are situated more tidily.
That just leaves the gratuitous recently cleaned Monaro photo...
Edited by Kiwi LS2 on Tuesday 25th August 15:33
Edited by Kiwi LS2 on Tuesday 25th August 15:37


Cheers guys.
Mud - yeah they are in there bloody solid, the enclosures are slightly too big so the mdf gets a shave on the way in. I was trying to move then to check for squeaks and what not and they are going no where any time soon! I doubled up the Dynamat behind them too to make the panel flex minimal.
Mud - yeah they are in there bloody solid, the enclosures are slightly too big so the mdf gets a shave on the way in. I was trying to move then to check for squeaks and what not and they are going no where any time soon! I doubled up the Dynamat behind them too to make the panel flex minimal.
I earlier on this year completed a not too dissimilar install.
Pioneer sat Nav DVD head unit
Genesis 5 way profile amplifier 4x90w rms plus 370w rms sub channel
Audison prima 5 1/4" 100w rms components in front doors and dash.
JL audio 6" coaxils rear quarters
Hertz 250w rms 8" subwoofers installed on MDF frames under the shelf.
Reverse camera.
Dyno matted car.
No cutting required plenty of bottom end, great mids and tops. Went for a high sq system. As the subs are not enclosed you can't go crazy volume levels before they loose control. However it's about 10 times louder than stock before this happens and 500 times better in terms of tone. The amp fitted into the recess in the back of the boot and the only notable thing is the subs hang down about 3" more than stock, but don't impact on boot space in my big boot 5.7vxr. Plus of course you can see the genesis amplifier. Great addition to the car particularly for a daily driver like mine.
Gassing Station | HSV & Monaro | Top of Page | What's New | My Stuff