
Suspension and chassis refurb
Discussion


I have decided to change all the bushes / TRE & ball joints and freshen up the chassis over the next few weekends.
After spending some time with the search facility on here I think I have most of the information that I need but have some questions that I would appreciate some help with:
1. I have bought a set of standard metalelastic bushes, do they need grease on reassembly and if so, what type should I use?
2. My engine mounts look a little tired, is it worth changing these while the wishbones are off or can it be done later on and if so, do I just get the standard ones of these too?
3. Will I need a tool to split the balljoints or do they come out in one piece as they are?
4. How much height /space under the car is preferable to have with axle stands in order to clean and recoat the chassis? I have 4 ton stands that can go from 50 - 80cm high, will this be high enough?
5. I have recent outriggers that went on about 6 years ago and the rest of the chassis seems to have a few rust spots here and there, which is mostly on the bottom rails. As it is available here, I am going to use silver Rustoleum to coat the steelwork after a rubdown with a wire brush/wheel. How much of the chassis is practically possible to do properly with the body still on the car? Do most do the bottom rails only and leave the crossmembers as they are if they are not rusty?
This is all I can think of but would also very much appreciate any advice you can offer to make the job as smooth as possible for me.
Will take some pics and post them on here if I dont end up making a dogs dinner out of it.
After spending some time with the search facility on here I think I have most of the information that I need but have some questions that I would appreciate some help with:
1. I have bought a set of standard metalelastic bushes, do they need grease on reassembly and if so, what type should I use?
2. My engine mounts look a little tired, is it worth changing these while the wishbones are off or can it be done later on and if so, do I just get the standard ones of these too?
3. Will I need a tool to split the balljoints or do they come out in one piece as they are?
4. How much height /space under the car is preferable to have with axle stands in order to clean and recoat the chassis? I have 4 ton stands that can go from 50 - 80cm high, will this be high enough?
5. I have recent outriggers that went on about 6 years ago and the rest of the chassis seems to have a few rust spots here and there, which is mostly on the bottom rails. As it is available here, I am going to use silver Rustoleum to coat the steelwork after a rubdown with a wire brush/wheel. How much of the chassis is practically possible to do properly with the body still on the car? Do most do the bottom rails only and leave the crossmembers as they are if they are not rusty?
This is all I can think of but would also very much appreciate any advice you can offer to make the job as smooth as possible for me.
Will take some pics and post them on here if I dont end up making a dogs dinner out of it.
1. I have bought a set of standard metalelastic bushes, do they need grease on reassembly and if so, what type should I use?
Are you sure the wishbones are OK ? if they are, the bushes need pressing in, without grease. On assembly I put some copaslip on the shaft where the bushes sit, don't put to much on the nut location, you want them to stay on, preferbly...Greasing once in situ (yearly) with silicone-spray.
2. My engine mounts look a little tired, is it worth changing these while the wishbones are off or can it be done later on and if so, do I just get the standard ones of these too?
Don't know, but others no doubt will (be careful with the engine lifted to not push the car off the stands)
3. Will I need a tool to split the balljoints or do they come out in one piece as they are?
Yes, get a splitter from Machinemart for instance, it will make life a lot easier, split the track-rod and lower balljoint in situ, the top ball joint off the car, in the vice, loosen the nut and then give it a whack with a hamer and drive on the bolt/nut
4. How much height /space under the car is preferable to have with axle stands in order to clean and recoat the chassis? I have 4 ton stands that can go from 50 - 80cm high, will this be high enough?
The higher you go the more unstable the car becomes, but obviously needs to be high enough. Mind, you will not be able to reach the upper longitudinals of the chassis
5. I have recent outriggers that went on about 6 years ago and the rest of the chassis seems to have a few rust spots here and there, which is mostly on the bottom rails. As it is available here, I am going to use silver Rustoleum to coat the steelwork after a rubdown with a wire brush/wheel. How much of the chassis is practically possible to do properly with the body still on the car? Do most do the bottom rails only and leave the crossmembers as they are if they are not rusty?
See above
This is all I can think of but would also very much appreciate any advice you can offer to make the job as smooth as possible for me.
What does help is a set of new bolts for the whole shebang (power or parts, bout £50) a decent tool-kit and a clear head......
Success & be careful
Frank
jazzdude said:
I have decided to change all the bushes / TRE & ball joints and freshen up the chassis over the next few weekends.
I done this very recently - here is my story >>>>1) - tiny bit of oil and a press is what you will need - but how do the wishbones look? I found a crack in my upper front....
2) - again - I changed mine - and glad I did. There are pics in this thread showed what I found.....
3) - loosen bolt - tap with a hammer - I had no problems removing (and mine were in an awful state).
4) - as high as can fit your frame under I suppose - but you will not get at a lot....and you will see bits from above you have missed (at the front). Spend the time to clean / re-seal your wheel arches - stone chip is your friend
5) - I cleaned / painted as much as I could get to. Try and do the same.
Take your time - I had two weeks off work and I still never finished it - but once done and the car set up, it now drives beautiful.
Good luck, enjoy and post yer pics!!
Nosh.
Edited by Nosh on Wednesday 30th December 22:23
As all the points above,, if you are doing it on stands you'll need the car as high as is safe,, I slowly lifted the car using two hydraulic jacks and four axle stands in stages,, until I had the stands on slabs to get the car high enough to work under,,,
You need goggles, it's a big job and preparing the area masking off and protecting or removing various bits in your way will take lots of time,,
Remove as much as is possible if you want to really coat the chassis, all cable ties etc,
I painted my engine bay chassis area with engine in situ,, wrapped the engine in sheets and tape,,
But you have to remove almost everything in the engine bay to do it vaguely properly,,
You simply can't get at the top chassis rails around the gearbox area but with diligence you can get at a lot of the rest of it,,
It will take days of work,, it took me weeks,, it's not the best option really but if your chassis is solid then it will def benefit from a rub down and re sealing,,
Engine mounts,,, always worth changing as they wear badly due to all the heat, when your front wheels are off, if you look at the exhaust manifold through the wheel arch you should see a gap of about 10 mm from manifold to chassis rail, on both sides,
It sort of becomes a case of while you take everything apart then you might as well replace this and that,,
I replaced tonnes of stuff and it was only a few hundred quit really,, OK about £500 but still,, your really bringing the car upto date,,, for years,,, : thumbup:
You need goggles, it's a big job and preparing the area masking off and protecting or removing various bits in your way will take lots of time,,
Remove as much as is possible if you want to really coat the chassis, all cable ties etc,
I painted my engine bay chassis area with engine in situ,, wrapped the engine in sheets and tape,,
But you have to remove almost everything in the engine bay to do it vaguely properly,,
You simply can't get at the top chassis rails around the gearbox area but with diligence you can get at a lot of the rest of it,,
It will take days of work,, it took me weeks,, it's not the best option really but if your chassis is solid then it will def benefit from a rub down and re sealing,,
Engine mounts,,, always worth changing as they wear badly due to all the heat, when your front wheels are off, if you look at the exhaust manifold through the wheel arch you should see a gap of about 10 mm from manifold to chassis rail, on both sides,
It sort of becomes a case of while you take everything apart then you might as well replace this and that,,
I replaced tonnes of stuff and it was only a few hundred quit really,, OK about £500 but still,, your really bringing the car upto date,,, for years,,, : thumbup:
Really appreciated, great advice, and thank you for the very interesting threads.
Is it better to do a corner at a time or take the lot off, to send the wishbones for blasting all together.
On the one hand I am thinking that one at a time seems more manageable but then the car with no suspension on all round will make the chassis clean easier?
Also with the chassis painting, do you advise taking everything off at once (cable ties etc) or just do a little at a time?
I must admit I am not looking forward to days on my back under the car so any tips that sensibly minimise my time under there would be gratefully taken.
Is it better to do a corner at a time or take the lot off, to send the wishbones for blasting all together.
On the one hand I am thinking that one at a time seems more manageable but then the car with no suspension on all round will make the chassis clean easier?
Also with the chassis painting, do you advise taking everything off at once (cable ties etc) or just do a little at a time?
I must admit I am not looking forward to days on my back under the car so any tips that sensibly minimise my time under there would be gratefully taken.
Whilst I appreciate you want to minimise your time under the car the answer to this is there are no short cuts.
If you are going to the effort of getting the car on four stands and you're intending to keep the car then the more effort you do at this point the more you will be rewarded longer term.
I did mine last year and took the car off the road for 3 months over the winter. As ClassicChimi says do as much as you are comfortable doing but I will say that the more you tackle the more confidence you gain and the more you will find you remove to clean up.
Do all 4 corners at the same time, this will be cheaper to send off to the blaster and powder coaters as bulk. I even sent off the rear ARB and the exhaust tray plus many smaller brackets. Cost me around £120 for a boot full of bits. The more you take off the greater the access to the chassis and with a bit of ingenuity a and perseverance you will be surprised at what you can actually gain access to, including large areas of the top rail.
A 4" angle grinder and wire brush drill attachments are going to be your best friends over the winter!
Take your time, be thorough and the benefits will stay with you for many years, it's a pig of a job but the sense of satisfaction once complete is very rewarding.
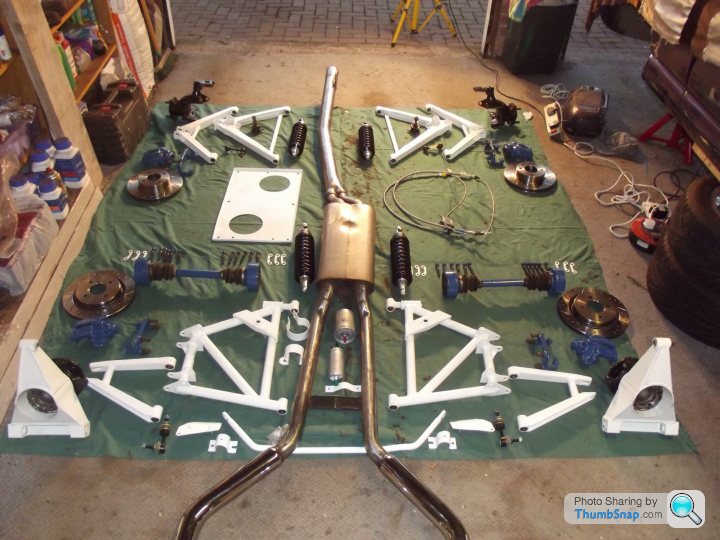
A little taster for you with all the bits off and ready to go back on....
If you are going to the effort of getting the car on four stands and you're intending to keep the car then the more effort you do at this point the more you will be rewarded longer term.
I did mine last year and took the car off the road for 3 months over the winter. As ClassicChimi says do as much as you are comfortable doing but I will say that the more you tackle the more confidence you gain and the more you will find you remove to clean up.
Do all 4 corners at the same time, this will be cheaper to send off to the blaster and powder coaters as bulk. I even sent off the rear ARB and the exhaust tray plus many smaller brackets. Cost me around £120 for a boot full of bits. The more you take off the greater the access to the chassis and with a bit of ingenuity a and perseverance you will be surprised at what you can actually gain access to, including large areas of the top rail.
A 4" angle grinder and wire brush drill attachments are going to be your best friends over the winter!
Take your time, be thorough and the benefits will stay with you for many years, it's a pig of a job but the sense of satisfaction once complete is very rewarding.
A little taster for you with all the bits off and ready to go back on....
mach2 said:
Whilst I appreciate you want to minimise your time under the car the answer to this is there are no short cuts.
If you are going to the effort of getting the car on four stands and you're intending to keep the car then the more effort you do at this point the more you will be rewarded longer term.
I did mine last year and took the car off the road for 3 months over the winter. As ClassicChimi says do as much as you are comfortable doing but I will say that the more you tackle the more confidence you gain and the more you will find you remove to clean up.
Do all 4 corners at the same time, this will be cheaper to send off to the blaster and powder coaters as bulk. I even sent off the rear ARB and the exhaust tray plus many smaller brackets. Cost me around £120 for a boot full of bits. The more you take off the greater the access to the chassis and with a bit of ingenuity a and perseverance you will be surprised at what you can actually gain access to, including large areas of the top rail.
A 4" angle grinder and wire brush drill attachments are going to be your best friends over the winter!
Take your time, be thorough and the benefits will stay with you for many years, it's a pig of a job but the sense of satisfaction once complete is very rewarding.
A little taster for you with all the bits off and ready to go back on....
That's a great picture and a good checklist too. If you are going to the effort of getting the car on four stands and you're intending to keep the car then the more effort you do at this point the more you will be rewarded longer term.
I did mine last year and took the car off the road for 3 months over the winter. As ClassicChimi says do as much as you are comfortable doing but I will say that the more you tackle the more confidence you gain and the more you will find you remove to clean up.
Do all 4 corners at the same time, this will be cheaper to send off to the blaster and powder coaters as bulk. I even sent off the rear ARB and the exhaust tray plus many smaller brackets. Cost me around £120 for a boot full of bits. The more you take off the greater the access to the chassis and with a bit of ingenuity a and perseverance you will be surprised at what you can actually gain access to, including large areas of the top rail.
A 4" angle grinder and wire brush drill attachments are going to be your best friends over the winter!
Take your time, be thorough and the benefits will stay with you for many years, it's a pig of a job but the sense of satisfaction once complete is very rewarding.
A little taster for you with all the bits off and ready to go back on....
Regarding the rear uprights, did you take the hubs off to paint them or were they masked and painted with the hubs on? I don't think my bearings need changing so was not going to strip these.
When you say angle grinder do you put a wire brush on it? I can't see how you could use something like that without it bucking all over the place a few inches from your head. Wouldn't hand tools be safer or are they not up to the job?


jazzdude said:
That's a great picture and a good checklist too.
Regarding the rear uprights, did you take the hubs off to paint them or were they masked and painted with the hubs on? I don't think my bearings need changing so was not going to strip these.
When you say angle grinder do you put a wire brush on it? I can't see how you could use something like that without it bucking all over the place a few inches from your head. Wouldn't hand tools be safer or are they not up to the job?
I just masked and painted the rear uprights, like you I didn't need to replace the bearings so just cleaned them up on the bench and painted them carefully.Regarding the rear uprights, did you take the hubs off to paint them or were they masked and painted with the hubs on? I don't think my bearings need changing so was not going to strip these.
When you say angle grinder do you put a wire brush on it? I can't see how you could use something like that without it bucking all over the place a few inches from your head. Wouldn't hand tools be safer or are they not up to the job?
In terms of the angle grinder I was using a 115mm hand held grinder with surface prep wheels instead of a grinding disc.
I used these....
http://www.screwfix.com/p/non-woven-preparation-wh...
They aren't cheap but do a really nice job of cleaning the chassis without being too harsh on the metal and it's far easier than trying to scrape it back by hand.
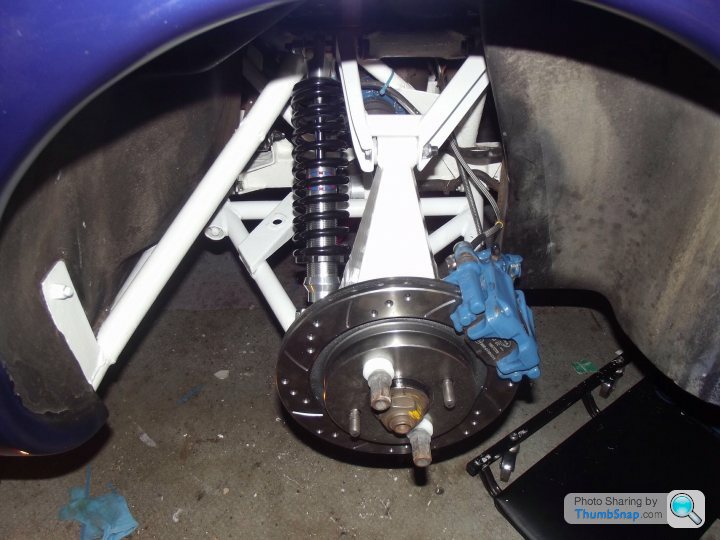
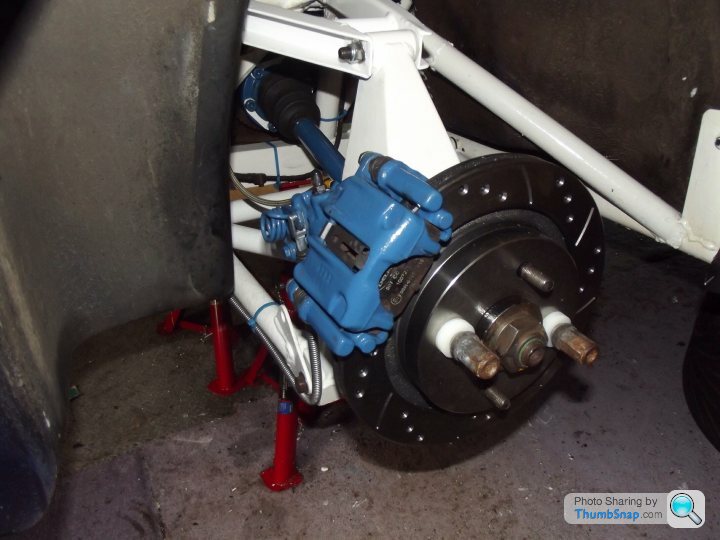
A couple of pics of the bits back on the car.....trouble is I don't like to take it out in the wet now
 :
:
mach2 said:
jazzdude said:
That's a great picture and a good checklist too.
Regarding the rear uprights, did you take the hubs off to paint them or were they masked and painted with the hubs on? I don't think my bearings need changing so was not going to strip these.
When you say angle grinder do you put a wire brush on it? I can't see how you could use something like that without it bucking all over the place a few inches from your head. Wouldn't hand tools be safer or are they not up to the job?
I just masked and painted the rear uprights, like you I didn't need to replace the bearings so just cleaned them up on the bench and painted them carefully.Regarding the rear uprights, did you take the hubs off to paint them or were they masked and painted with the hubs on? I don't think my bearings need changing so was not going to strip these.
When you say angle grinder do you put a wire brush on it? I can't see how you could use something like that without it bucking all over the place a few inches from your head. Wouldn't hand tools be safer or are they not up to the job?
In terms of the angle grinder I was using a 115mm hand held grinder with surface prep wheels instead of a grinding disc.
I used these....
http://www.screwfix.com/p/non-woven-preparation-wh...
They aren't cheap but do a really nice job of cleaning the chassis without being too harsh on the metal and it's far easier than trying to scrape it back by hand.
A couple of pics of the bits back on the car.....trouble is I don't like to take it out in the wet now
:One big recommendation is to use new bolts / washers and nuts throughout. It really isn't worth the aggro of re-using bolts that have been on the car 15 years or more.
When removing the driveshafts rather than extract them from the diff disconnect them at the bolts. Put the car in gear and this will act as a brake against the bolt and it's easier to undo. Put a mark on the flange of both the shaft and the diff to re-align on assembly. This will also give you a chance to re-grease the cv joints as well.
Whilst it's all off replace the handbrake cable, for the sake of £25 it's an easy job at this point. Undo at the joint with the handbrake (pin and split pin) as this will slacken everything off and make removal a lot easier, especially at the caliper end.
I also replaced the fuel pump, fuel hose and brake hoses whilst it was all apart in the knowledge the underneath of the car would be good for a long time to come with just routine maintenance going forward.
Putting the new bushes back in I used a large vice but made up a wooden block template the ends of the bush could sit in
on each end and then squeezed them in. If you have the wishbones powder coated make sure you remove any residue that may have got into the holes.
You will get times when you wonder why you've taken on so much but hopefully as you can see the results are well worth the effort.
When removing the driveshafts rather than extract them from the diff disconnect them at the bolts. Put the car in gear and this will act as a brake against the bolt and it's easier to undo. Put a mark on the flange of both the shaft and the diff to re-align on assembly. This will also give you a chance to re-grease the cv joints as well.
Whilst it's all off replace the handbrake cable, for the sake of £25 it's an easy job at this point. Undo at the joint with the handbrake (pin and split pin) as this will slacken everything off and make removal a lot easier, especially at the caliper end.
I also replaced the fuel pump, fuel hose and brake hoses whilst it was all apart in the knowledge the underneath of the car would be good for a long time to come with just routine maintenance going forward.
Putting the new bushes back in I used a large vice but made up a wooden block template the ends of the bush could sit in
on each end and then squeezed them in. If you have the wishbones powder coated make sure you remove any residue that may have got into the holes.
You will get times when you wonder why you've taken on so much but hopefully as you can see the results are well worth the effort.
mach2 said:
I also replaced the fuel pump, fuel hose and brake hoses whilst it was all apart in the knowledge the underneath of the car would be good for a long time to come with just routine maintenance going forward
This is a good tip - I did mine post the refurb and was a PITA.Nosh
ClassiChimi said:
Hey, I've just noticed the blue drive shafts,,,, nice 
Edited to add,,, blue cable ties,,,, loving it,,,

I did get a bit OCD with it all Alun, I even painted the locking tabs for the shafts in white and the heads of the bolts blue!Edited to add,,, blue cable ties,,,, loving it,,,
Edited by ClassiChimi on Thursday 31st December 22:27
Very sad but it made me smile when it all went back on.....
mach2 said:
One big recommendation is to use new bolts / washers and nuts throughout. It really isn't worth the aggro of re-using bolts that have been on the car 15 years or more.
When removing the driveshafts rather than extract them from the diff disconnect them at the bolts. Put the car in gear and this will act as a brake against the bolt and it's easier to undo. Put a mark on the flange of both the shaft and the diff to re-align on assembly. This will also give you a chance to re-grease the cv joints as well.
Whilst it's all off replace the handbrake cable, for the sake of £25 it's an easy job at this point. Undo at the joint with the handbrake (pin and split pin) as this will slacken everything off and make removal a lot easier, especially at the caliper end.
I also replaced the fuel pump, fuel hose and brake hoses whilst it was all apart in the knowledge the underneath of the car would be good for a long time to come with just routine maintenance going forward.
Putting the new bushes back in I used a large vice but made up a wooden block template the ends of the bush could sit in
on each end and then squeezed them in. If you have the wishbones powder coated make sure you remove any residue that may have got into the holes.
You will get times when you wonder why you've taken on so much but hopefully as you can see the results are well worth the effort.
Many thanks, Mach2!When removing the driveshafts rather than extract them from the diff disconnect them at the bolts. Put the car in gear and this will act as a brake against the bolt and it's easier to undo. Put a mark on the flange of both the shaft and the diff to re-align on assembly. This will also give you a chance to re-grease the cv joints as well.
Whilst it's all off replace the handbrake cable, for the sake of £25 it's an easy job at this point. Undo at the joint with the handbrake (pin and split pin) as this will slacken everything off and make removal a lot easier, especially at the caliper end.
I also replaced the fuel pump, fuel hose and brake hoses whilst it was all apart in the knowledge the underneath of the car would be good for a long time to come with just routine maintenance going forward.
Putting the new bushes back in I used a large vice but made up a wooden block template the ends of the bush could sit in
on each end and then squeezed them in. If you have the wishbones powder coated make sure you remove any residue that may have got into the holes.
You will get times when you wonder why you've taken on so much but hopefully as you can see the results are well worth the effort.
Totally agree with the above comments on the fuel lines (especially the ones from the fuel tank to the fuel pump and handbrake cable.
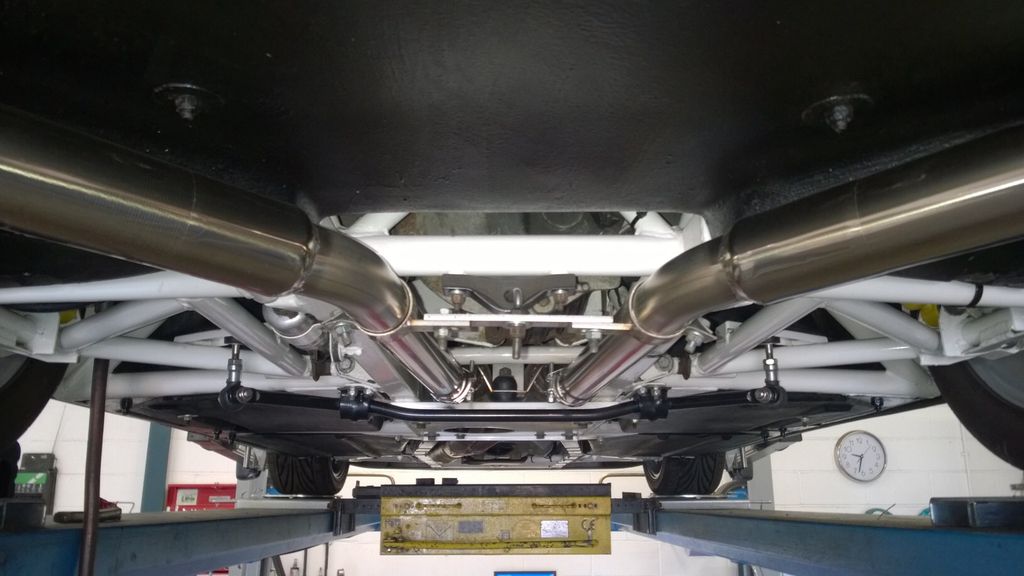
I replaced my front wishbones, there wasn't a lot in it after having them blasted, then powdercoated and fitting new bushes, I just bought new, with bushes fitted, then used new boots all round.
I have left it all white, with no waxoil and check it regularly for damage or corrosion, one of the benefits of white is it shows up any rust stains long before the rust gets chance to take hold.
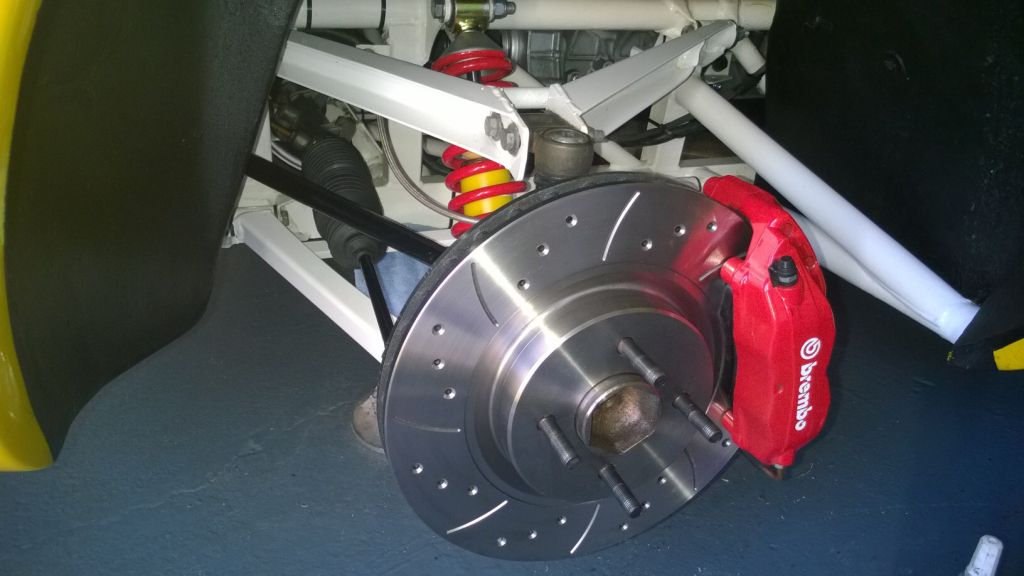
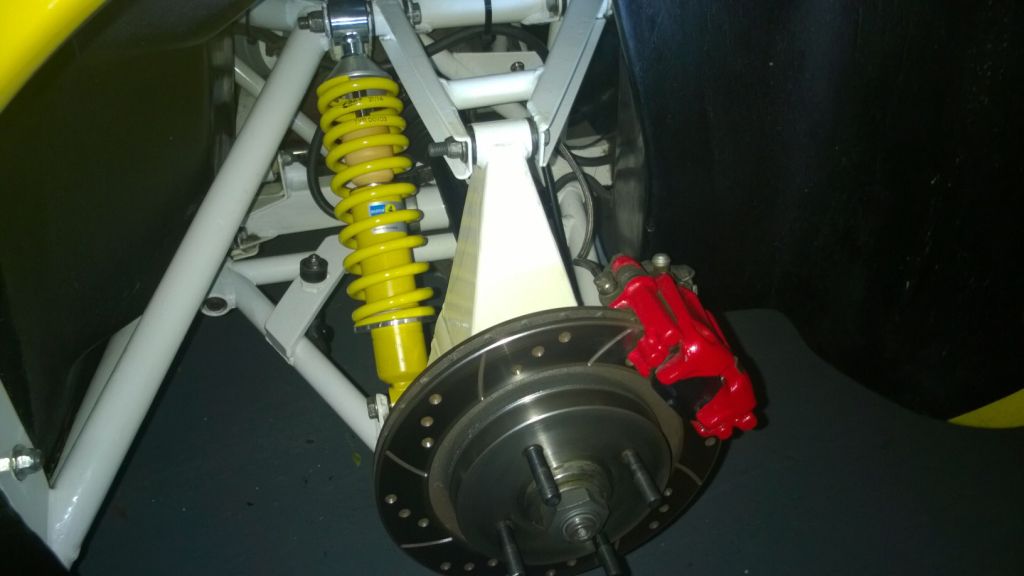
I replaced my front wishbones, there wasn't a lot in it after having them blasted, then powdercoated and fitting new bushes, I just bought new, with bushes fitted, then used new boots all round.
I have left it all white, with no waxoil and check it regularly for damage or corrosion, one of the benefits of white is it shows up any rust stains long before the rust gets chance to take hold.
mach2 said:
A couple of pics of the bits back on the car.....trouble is I don't like to take it out in the wet now :
That's the big worry where I have been using my car everyday rain or shine and then after you finished it becomes all precious. :I suppose it is nice though when it is up in the air getting something done to it, like at a tyre shop or getting geo done that it looks good, rather than scruffy.
I had the waxoyl steam cleaned off and with patches of surface rust, bits of black gunk and dirt, it looks rough even though the chassis is sound.
http://www.pistonheads.com/gassing/topic.asp?h=0&a...
I would most certainly manufacture some protector's both front and rear, these are the area's that get hit with those corrosion nasties, l especially likes MACS stainless ones.
I would most certainly manufacture some protector's both front and rear, these are the area's that get hit with those corrosion nasties, l especially likes MACS stainless ones.

On Wednesday hopefully Christmas decorations will be back in storage so I get my workshop space back and I can make a start.
With jacking the car up onto high axle stands, I was wondering if I jack the heavier front end first, the back will be almost touching the ground so how do you get the trolley jack under to lift it up?
Then once the car is in the air (I've cut a few railway sleepers to place under the car as backup) what is the most sensible sequence in dismantling the suspension? I'm thinking brake caliper, TRE, top wishbone,bottom wishbone with hub and strut on and the rest on the workbench, will this work?
The same in reverse on the bench for fitting or is it best putting together on the car?
I am dreading any bolts that have fused to the bush inner and the fun and games I am going to have getting them off.
Has anyone tried acetone/atf mix for loosening stubborn nuts/bolts?
With jacking the car up onto high axle stands, I was wondering if I jack the heavier front end first, the back will be almost touching the ground so how do you get the trolley jack under to lift it up?
Then once the car is in the air (I've cut a few railway sleepers to place under the car as backup) what is the most sensible sequence in dismantling the suspension? I'm thinking brake caliper, TRE, top wishbone,bottom wishbone with hub and strut on and the rest on the workbench, will this work?
The same in reverse on the bench for fitting or is it best putting together on the car?
I am dreading any bolts that have fused to the bush inner and the fun and games I am going to have getting them off.
Has anyone tried acetone/atf mix for loosening stubborn nuts/bolts?
Gassing Station | Chimaera | Top of Page | What's New | My Stuff