Photoshop - easier than expected
Discussion


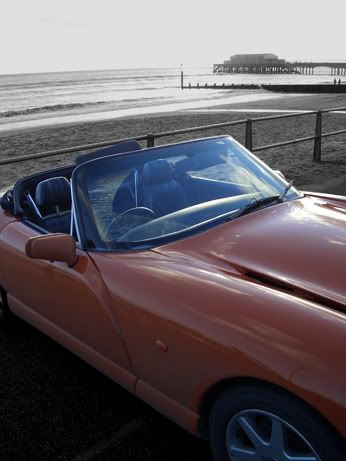
A thread on another car forum made me decide to have a quick go on Photoshop. Previously only used it for cropping and re-sizing but its amazed me how easy it is to get some arty farty effects in really short periods of time.
I took this pic a few weeks back:

Using the filter toolbar, i set it to ink outline:

Then went back to the original and changed it to watercolour

(doesn't show up as well than on the full-sized)
Then back to original then coloured pencil

I posted this as I'm sure there are many people like me who haven't got much of a clue about Photoshop, but these pics show that you can get some pretty cool results just by using one filter. Enjoy
>>> Edited by rico on Thursday 17th February 17:58
I took this pic a few weeks back:
Using the filter toolbar, i set it to ink outline:
Then went back to the original and changed it to watercolour
(doesn't show up as well than on the full-sized)
Then back to original then coloured pencil
I posted this as I'm sure there are many people like me who haven't got much of a clue about Photoshop, but these pics show that you can get some pretty cool results just by using one filter. Enjoy
>>> Edited by rico on Thursday 17th February 17:58
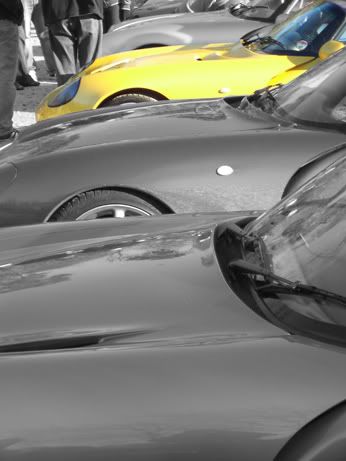
I was pottering around yesterday and found an image that I rather liked from the Auto italia show last year...
So I threw it into PS and got this... :

Then I started fiddling a bit more this evening and came up with this strange effort...

but I'm not so sure about that one...
I'd intended to pick out the cars in spot colour, but the reflections always tend to look a little dodgy when the car is on grass... so I decided to do a weird selection and just use the colour in those areas..
thoughts?
slinky
>> Edited by slinky on Thursday 17th February 18:39
So I threw it into PS and got this... :
Then I started fiddling a bit more this evening and came up with this strange effort...
but I'm not so sure about that one...
I'd intended to pick out the cars in spot colour, but the reflections always tend to look a little dodgy when the car is on grass... so I decided to do a weird selection and just use the colour in those areas..
thoughts?
slinky
>> Edited by slinky on Thursday 17th February 18:39
murph7355 said:
Layers are the way to go. Get used to using them and it'ss not much slower, plus gives you a lot more flexibility.
PS Is built around the layers concept.
I'd second this wholeheartedly. Always try and leave your original layer unchanged and then make changes as adjustment and copy layers. Then if you're not sure of changes you have made you just delete the layer and start that bit again. Layers are a very powerful tool.
Chris
rico said:
Slinky. Thats a long way round.
I've found by using lasoo tool to highlight the area you want, then use the colour tools to remove colour. If you want to leave an area coloured, highlight it, then click 'deselect' then remove the colour.
But with the lasso you have to go thru the fiddly arse that is selection...
Layers and an eraser are far easier in my book..
slinky

I used to laso tool for spot colour and agree that it's much more fiddly, plus (and more importantly) it can create some harsh transitions between bw and colour.
I use one of the other recommended methods which is to destaturate the image and then use the history brush. the beauty of the history brush is that you can use an airbrush bush and hence create a smoother blend.
Steve
I use one of the other recommended methods which is to destaturate the image and then use the history brush. the beauty of the history brush is that you can use an airbrush bush and hence create a smoother blend.
Steve
TRACKDEMON said:Wow - that's so easy! Quick and dirty job - two minutes including finding the file and waititng for Photoshop to open!
The ultimate (and extremely easy!) way to do spot colour:
De-saturate / gray scale / apply B&W tones to your desire.
Use history brush to bring back colour on selected objects.
Thats it!

TRACKDEMON said:
The ultimate (and extremely easy!) way to do spot colour:
De-saturate / gray scale / apply B&W tones to your desire.
Use history brush to bring back colour on selected objects.
Thats it!
Actually there is another way, which can, depending on the specific photo, be much easier and produce better results. Go to Select>Color Range. You can then select a colour (or multiple colours by holding down the shift key), and the tolerance with which they are selected using the slider bar. There are a few different Preview modes too, so you can see exactly which bits you are selecting. When you are happy, press OK and you will have evrything you wanted selected, and all the edges will be feathered too.
This techniques is made or broken by the photo you are working on. You want the colour that you are selecting to only appear infrequently in the picture, for example a bunch of red roses being held by someone in a suit would be good, because the only red is in the flowers. A grey car on a dull day will not be able to be extracted using this technique, ever.
Actually, to be more specific, it doesn't matter if your chosen colour appears all over the photo, as long and it does not adjoin the area of that colour you want to isolate. Once you have made your selection (including the unwanted bits) it is very easy indeed to bin th ebits you don't want by doing a negative selection with the marquee/lasso tool. This is done by holding down one of the modifier buttons whilst selecting, I think it is CTRL, but a minus sign will come up next to the tool cursor symbol as opposed the the plus sign when you hold down shift.
I hope that all makes sense...


TRACKDEMON said:
The ultimate (and extremely easy!) way to do spot colour:
De-saturate / gray scale / apply B&W tones to your desire.
Use history brush to bring back colour on selected objects.
Thats it!
 What and where is the 'history brush' - looked on the help file and in the book and can't find it
  I have PS Elements 2 - is it on there??
 Gassing Station | Photography & Video | Top of Page | What's New | My Stuff