Found a few more BHP - Technical.
Discussion


Following on from the recent success of achieving an additional 10.7 bhp from porting my throttle bodies and removing my secondary cats, I decided to see how much power could be allocated to each modification and I found that the removal of the cats alone was worth about 4 bhp, leaving a healthy 7+ bhp the result of the throttle body mods.

With actual power output now showing 447.4 bhp, i decided to do some porting and modification work on the inlet manifolds, as these were as roughly finished as the throttle bodies.
As I had already decided to replace the plugs and coils as a matter of preventative maintenance, I purchased a pair of used inlet manifolds and set about porting them.
First area to get my attention was the intake area around the throttle body mounting where as you can see, the manufacturing process had left a severe lip.


The rough cast inner surface of the manifolds around this area do not need to promote fuel atomisation becasue at this point, the fuel is yet to be injected into the airflow so this lip was ported and flowed.


I measured the outermost diameter of the throttle body, downstream of the throttl plate and opened up the intake flanges so that there was no inner lip going into the manifold, but a slightly larger diameter of about 1mm to promote flow into the ported manifold.
I then set about sorting out the rough outlet ports of the manifold where they mounted to the cylinder heads. Here the rough cast can clearly be seen.

Using a combination of flapper wheels in 80, 120 and 240 grit,

600 grade wet and dry paper and a fair bit of elbow grease, I get the ports looking pretty smooth back into the manifold ports.


As you really want a ratchet cut when you get close to the inlet port but I was not removing the heads at this point, I did a slight opening of the manifold port size over the head intake port to resist back flow during valve overlap.

I used the old manifold gaskets as a size and position guide, bolting them down into position without the manifolds on.
The external surfaces of the manifolds were then bead blasted.

The manifolds were then thoroughly cleaned inside and out and then externally painted in a bright silver metallic, highlighting the Aston Martin lettering in black.

Finally I applied some Reflecta-Gold heat protection to the underside of the manifold to reduce intake temperatures due to heat soak from the engine. A cooler intake equals more power.

It was then time to install the nice shint manifolds, so with new stainless steel and lightweight aluminium fasteners, I got started.
First job was to protect the bodywork from blood, sweat and spanners.

I then set about the installation of the plugs, coils and manifolds by firstly removing the strut braces

Which will require removal of the washer filler neck on the upper offside brace.

Now you can access the bolts to remove the central inlet manifold brace.

to reveal the spagetti junction that is the injector fuel rails, injectors, and wiring.

Using these special reusable clip pliers (Clic-R)

we can now remove the inlet pipes to the throttle bodies by releasing the reuseable clips.

and undo the wiring connectors and 4 bolts that retain the throttle bodies, as well as the vacuum and breather hoses..

We can immediately see the rough castings of the original manifolds.

we now remove the small access panel between the wipers at the top rear of the bonnet

and the coolant hose from the top of the thermostat housing.

Releasing the six bolts holding the two injector rails down allows the rails complete with injectors to be removed from position.

Releasing the seven bolts that hold the inlet manifold to the head, one of which is accessed through the removed wiper panel cover,


allows the removal of the manifold. At this point it is very important to cover the inlet ports to prevent anything dropping down into them.

You can now remove the injectors from the injector rail with a slight pull. Note the two different colouired seals which should be replaced. Green on the bottom and blue at the top.

We can now remove the ignition system covers protecting the coils by removing the 10 retaining bolts.

To reveal the coils. Each coil is retained by a single bolt, so with the bolt removed and the electrical connector disconnected, the coil can be withdrawn.

Using a deep magnetic socket, remove the spark plugs.

You can see here that the original Aston Martin plugs were in fact, standard NGK Platinums, which I replaced with NGK Iridiums that I have had great reliability, longevity and success with, and like the Platinums sourced direct from an NGK supplier, come out at a fraction of the cost of AM boxed NGK ones!!

The new plugs can now be installed, torqueing to 16-20 Nm.

With the plugs reinstalled, the coils can be fitted by pushing onto the plugs, (front one must be plugged in before bolting down) and tightening the retaining bolts to 5-7 Nm


With all the coils refitted, the protective cover can be fitted. Again, torque the bolts to 3 Nm.


Repeat the above for the other bank.
We can now begin to reinstall the inlet manifolds.
Using new gaskets, making sure they are fitted the correct way round and located correctly onto the manifolds, reinstall the seven intake manifold bolts with new dowels and seals

I found that prefitting the rearmost bolts into the manifolds siiting proud, but retained with some blu-tac, made fitting those rear bolts far easier. These bolts can now be torqued to spec at 8-12 Nm in the correct order. Starting at the front, then rear, then middle then 2nd from front, 2nd from rear then 3rd from front and finally 3rd from rear.


After installing the new injector seals, offer up the injectors to the manifolds and fuel rails and refit the fuel rail bolts to 8-12n Nm. Reconnect all electrical plugs to the injectors and fuel pressure regulators as well as the vacuum hoses from the rear of the manifolds to the fuel pressure regulators, see here on mine in blue.


You can now reinstall the throttle bodies (8-12 Nm) and intake pipes, breather pipes and intake hoses. Reconnect the coolant pipe and top up the coolant as necessary. Refit the manifold brace (10 Nm) and strut braces.(49 Nm)

It was now time to see if all the effort had been worthwhile, so after getting around 50 miles on the car, checking for any fuel, coolant, air or oil leaks, I changed the oil and filter and headed off to the dyno.
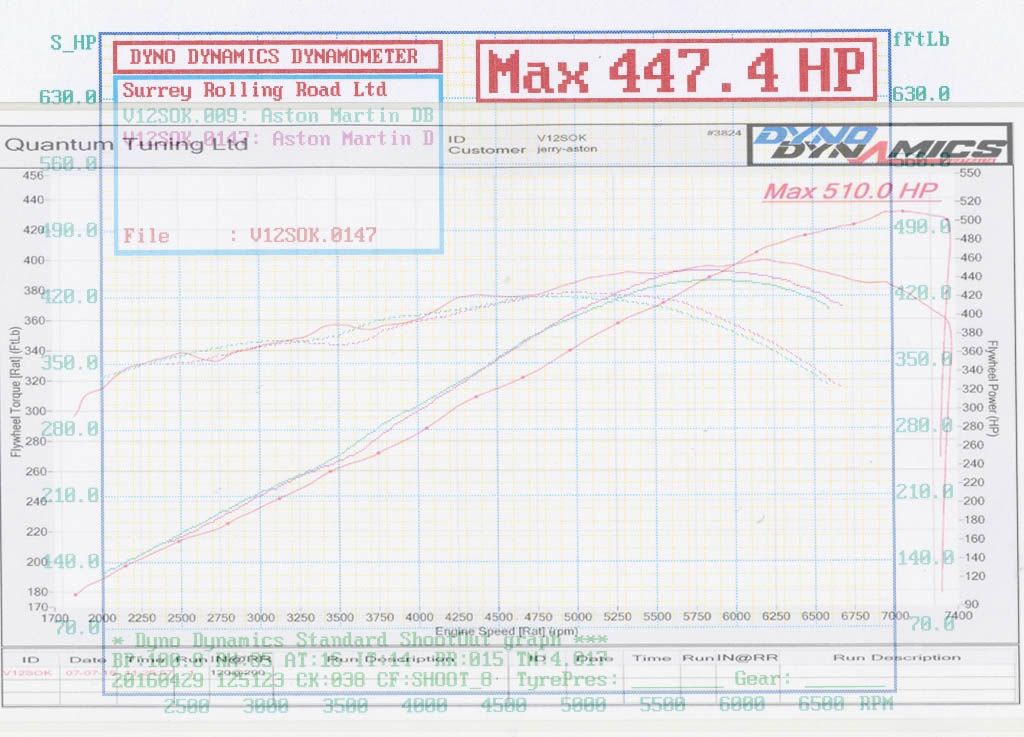
With the “before” dyno printout in hand....
I was eager to see whether the changes would equate to an improvement in performance on a completely independant, unbiased dyno.
Well the result did not disappoint as can be seen from the new dyno print out. Done on a hot day, on a slightly pessimistic dyno, the printout speaks for itself. £1000.00 in parts and a few hours work on top of the routine plugs and coil replacement job.

An increase of over 60 bhp (14%) with only a 20 Ftlb loss in midrange torque (-5%) brings the output in line with a DBS at 510 bhp, and thats the “specified” DBS output, with most, if not all DBS’s falling well short of the specified output.
Not bad for an old DB9.
Total for mods was ported throttle bodies and short runner inlet manifolds, removal of secondary cats, fuse 22 removal to free flow the exhaust and a remap to optomise the fuelling although this was already done before the 447 bhp run anyway.
With actual power output now showing 447.4 bhp, i decided to do some porting and modification work on the inlet manifolds, as these were as roughly finished as the throttle bodies.
As I had already decided to replace the plugs and coils as a matter of preventative maintenance, I purchased a pair of used inlet manifolds and set about porting them.
First area to get my attention was the intake area around the throttle body mounting where as you can see, the manufacturing process had left a severe lip.
The rough cast inner surface of the manifolds around this area do not need to promote fuel atomisation becasue at this point, the fuel is yet to be injected into the airflow so this lip was ported and flowed.
I measured the outermost diameter of the throttle body, downstream of the throttl plate and opened up the intake flanges so that there was no inner lip going into the manifold, but a slightly larger diameter of about 1mm to promote flow into the ported manifold.
I then set about sorting out the rough outlet ports of the manifold where they mounted to the cylinder heads. Here the rough cast can clearly be seen.
Using a combination of flapper wheels in 80, 120 and 240 grit,
600 grade wet and dry paper and a fair bit of elbow grease, I get the ports looking pretty smooth back into the manifold ports.
As you really want a ratchet cut when you get close to the inlet port but I was not removing the heads at this point, I did a slight opening of the manifold port size over the head intake port to resist back flow during valve overlap.
I used the old manifold gaskets as a size and position guide, bolting them down into position without the manifolds on.
The external surfaces of the manifolds were then bead blasted.
The manifolds were then thoroughly cleaned inside and out and then externally painted in a bright silver metallic, highlighting the Aston Martin lettering in black.
Finally I applied some Reflecta-Gold heat protection to the underside of the manifold to reduce intake temperatures due to heat soak from the engine. A cooler intake equals more power.
It was then time to install the nice shint manifolds, so with new stainless steel and lightweight aluminium fasteners, I got started.
First job was to protect the bodywork from blood, sweat and spanners.
I then set about the installation of the plugs, coils and manifolds by firstly removing the strut braces
Which will require removal of the washer filler neck on the upper offside brace.
Now you can access the bolts to remove the central inlet manifold brace.
to reveal the spagetti junction that is the injector fuel rails, injectors, and wiring.
Using these special reusable clip pliers (Clic-R)
we can now remove the inlet pipes to the throttle bodies by releasing the reuseable clips.
and undo the wiring connectors and 4 bolts that retain the throttle bodies, as well as the vacuum and breather hoses..
We can immediately see the rough castings of the original manifolds.
we now remove the small access panel between the wipers at the top rear of the bonnet
and the coolant hose from the top of the thermostat housing.
Releasing the six bolts holding the two injector rails down allows the rails complete with injectors to be removed from position.
Releasing the seven bolts that hold the inlet manifold to the head, one of which is accessed through the removed wiper panel cover,
allows the removal of the manifold. At this point it is very important to cover the inlet ports to prevent anything dropping down into them.
You can now remove the injectors from the injector rail with a slight pull. Note the two different colouired seals which should be replaced. Green on the bottom and blue at the top.
We can now remove the ignition system covers protecting the coils by removing the 10 retaining bolts.
To reveal the coils. Each coil is retained by a single bolt, so with the bolt removed and the electrical connector disconnected, the coil can be withdrawn.
Using a deep magnetic socket, remove the spark plugs.
You can see here that the original Aston Martin plugs were in fact, standard NGK Platinums, which I replaced with NGK Iridiums that I have had great reliability, longevity and success with, and like the Platinums sourced direct from an NGK supplier, come out at a fraction of the cost of AM boxed NGK ones!!
The new plugs can now be installed, torqueing to 16-20 Nm.
With the plugs reinstalled, the coils can be fitted by pushing onto the plugs, (front one must be plugged in before bolting down) and tightening the retaining bolts to 5-7 Nm
With all the coils refitted, the protective cover can be fitted. Again, torque the bolts to 3 Nm.
Repeat the above for the other bank.
We can now begin to reinstall the inlet manifolds.
Using new gaskets, making sure they are fitted the correct way round and located correctly onto the manifolds, reinstall the seven intake manifold bolts with new dowels and seals
I found that prefitting the rearmost bolts into the manifolds siiting proud, but retained with some blu-tac, made fitting those rear bolts far easier. These bolts can now be torqued to spec at 8-12 Nm in the correct order. Starting at the front, then rear, then middle then 2nd from front, 2nd from rear then 3rd from front and finally 3rd from rear.
After installing the new injector seals, offer up the injectors to the manifolds and fuel rails and refit the fuel rail bolts to 8-12n Nm. Reconnect all electrical plugs to the injectors and fuel pressure regulators as well as the vacuum hoses from the rear of the manifolds to the fuel pressure regulators, see here on mine in blue.
You can now reinstall the throttle bodies (8-12 Nm) and intake pipes, breather pipes and intake hoses. Reconnect the coolant pipe and top up the coolant as necessary. Refit the manifold brace (10 Nm) and strut braces.(49 Nm)
It was now time to see if all the effort had been worthwhile, so after getting around 50 miles on the car, checking for any fuel, coolant, air or oil leaks, I changed the oil and filter and headed off to the dyno.
With the “before” dyno printout in hand....
I was eager to see whether the changes would equate to an improvement in performance on a completely independant, unbiased dyno.
Well the result did not disappoint as can be seen from the new dyno print out. Done on a hot day, on a slightly pessimistic dyno, the printout speaks for itself. £1000.00 in parts and a few hours work on top of the routine plugs and coil replacement job.
An increase of over 60 bhp (14%) with only a 20 Ftlb loss in midrange torque (-5%) brings the output in line with a DBS at 510 bhp, and thats the “specified” DBS output, with most, if not all DBS’s falling well short of the specified output.
Not bad for an old DB9.
Total for mods was ported throttle bodies and short runner inlet manifolds, removal of secondary cats, fuse 22 removal to free flow the exhaust and a remap to optomise the fuelling although this was already done before the 447 bhp run anyway.
Edited by 8Tech on Saturday 9th July 21:07
Technical? I can hear the words of Jim Royle ringing in my ears!
Mind you, is quite a pretty installation, which goes hand-in-hand with being Over enthusiastic / under talented - there are a few others on here you could swap stories with who approach jobs in just the same way.
Its technical to compare dyno results spread across 2 different dynos?? I rather think technical is back-to-back testing to ensure robust / repeatable data??
Its technical to base quite small performance gains over 3 tests spread 2 dynos AND over 3 years? test 1 @ 25/7/13, test 2 @ 29/4/16 and test 3 @ 7/7/16?? with no A-B-A testing in the middle??
Its technical to reflash the ECU when the primary cats are still in place?? Bye-Bye ceramic matrix!!
its technical to fit the wrong heat range plugs if indeed you do have the power level you claim?? - hello inlet valve tulip!!
The physical differences between the long runner and short runner curve does not present in the way expected in the 2 curves you display.
Technical would be showing your wheel power / trans losses and correction factors - only when you are a pro, you can be trusted to come straight out with the calculated flywheel, i want to proof read your claims but cant because you dont show working out.
Its technically correct that you claim to have more BHP than DBS yet you don't have the cylinder head inlet port machining / combustion chamber re-design / compression ratio change AND lower oil level in the sump to reduce parasitic losses, all of which the factory needed to get from DB9 450BHP to DBS 510BHP??
As far as i see it, technically, you have a pretty install, down a shed load of time (but you probably foud that enjoyable so all good), down £1k when pretty much that money could have got more power if used wisely, have power nowhere near a DBS 510 BHP - probs you have 470??, you are sitting on a ceramic cat about to go boom (if it don't you don't drive hard enough or as i have seen before, the ECU was never actually changed as was claimed!) and you have a spark plug tip about to drop into the piston (if it don't you either don't drive hard enough or you ain't got the power you reckon).
yeah, good going - technical!!
I have no doubts on Mike expertise on Aston Martin but I find tiresome the permanent bashing on all non BR mods,ie the one one the exhaust manifolds: "I know many of you spotted this, but for clarity the V12 exhaust manifold and cat on the far right in the pic above is of non BR construction used for display / comparison purposes only. We didn't really have to say too much about it - it spoke for itself, but where clarification was needed I tried my best, although if any follow up questions are needed - post up here!".
Other companies and enthusiast also achieve good mods with great results and I don't see the point of criticizing the oposition,if you are doing well it should speak by itself.
Other companies and enthusiast also achieve good mods with great results and I don't see the point of criticizing the oposition,if you are doing well it should speak by itself.
I would be very thankful if an expert pointed out work I had taken great pains to do, had the potential to cause problems. I would also take the time to comprehend it so I can make informed decisions in the future.
However, I've got to say there's a hundred ways to approach telling someone you think they might have made some mistakes and potentially save them from disaster.
I didn't see one of them there.
However, I've got to say there's a hundred ways to approach telling someone you think they might have made some mistakes and potentially save them from disaster.
I didn't see one of them there.
BamfordMike said:
Technical? I can hear the words of Jim Royle ringing in my ears!
Mind you, is quite a pretty installation, which goes hand-in-hand with being Over enthusiastic / under talented - there are a few others on here you could swap stories with who approach jobs in just the same way.
Its technical to compare dyno results spread across 2 different dynos?? I rather think technical is back-to-back testing to ensure robust / repeatable data??
Its technical to base quite small performance gains over 3 tests spread 2 dynos AND over 3 years? test 1 @ 25/7/13, test 2 @ 29/4/16 and test 3 @ 7/7/16?? with no A-B-A testing in the middle??
Its technical to reflash the ECU when the primary cats are still in place?? Bye-Bye ceramic matrix!!
its technical to fit the wrong heat range plugs if indeed you do have the power level you claim?? - hello inlet valve tulip!!
The physical differences between the long runner and short runner curve does not present in the way expected in the 2 curves you display.
Technical would be showing your wheel power / trans losses and correction factors - only when you are a pro, you can be trusted to come straight out with the calculated flywheel, i want to proof read your claims but cant because you dont show working out.
Its technically correct that you claim to have more BHP than DBS yet you don't have the cylinder head inlet port machining / combustion chamber re-design / compression ratio change AND lower oil level in the sump to reduce parasitic losses, all of which the factory needed to get from DB9 450BHP to DBS 510BHP??
As far as i see it, technically, you have a pretty install, down a shed load of time (but you probably foud that enjoyable so all good), down £1k when pretty much that money could have got more power if used wisely, have power nowhere near a DBS 510 BHP - probs you have 470??, you are sitting on a ceramic cat about to go boom (if it don't you don't drive hard enough or as i have seen before, the ECU was never actually changed as was claimed!) and you have a spark plug tip about to drop into the piston (if it don't you either don't drive hard enough or you ain't got the power you reckon).
yeah, good going - technical!!
Gosh, you really do get upset when someone other than yourselves gets good results and you really show yourself the fool when you get much of it wrong. Maybe you should keep the bullsMind you, is quite a pretty installation, which goes hand-in-hand with being Over enthusiastic / under talented - there are a few others on here you could swap stories with who approach jobs in just the same way.
Its technical to compare dyno results spread across 2 different dynos?? I rather think technical is back-to-back testing to ensure robust / repeatable data??
Its technical to base quite small performance gains over 3 tests spread 2 dynos AND over 3 years? test 1 @ 25/7/13, test 2 @ 29/4/16 and test 3 @ 7/7/16?? with no A-B-A testing in the middle??
Its technical to reflash the ECU when the primary cats are still in place?? Bye-Bye ceramic matrix!!
its technical to fit the wrong heat range plugs if indeed you do have the power level you claim?? - hello inlet valve tulip!!
The physical differences between the long runner and short runner curve does not present in the way expected in the 2 curves you display.
Technical would be showing your wheel power / trans losses and correction factors - only when you are a pro, you can be trusted to come straight out with the calculated flywheel, i want to proof read your claims but cant because you dont show working out.
Its technically correct that you claim to have more BHP than DBS yet you don't have the cylinder head inlet port machining / combustion chamber re-design / compression ratio change AND lower oil level in the sump to reduce parasitic losses, all of which the factory needed to get from DB9 450BHP to DBS 510BHP??
As far as i see it, technically, you have a pretty install, down a shed load of time (but you probably foud that enjoyable so all good), down £1k when pretty much that money could have got more power if used wisely, have power nowhere near a DBS 510 BHP - probs you have 470??, you are sitting on a ceramic cat about to go boom (if it don't you don't drive hard enough or as i have seen before, the ECU was never actually changed as was claimed!) and you have a spark plug tip about to drop into the piston (if it don't you either don't drive hard enough or you ain't got the power you reckon).
yeah, good going - technical!!
 t for your own customers who fall for it and spend money with you? Still fitting/rebuilding engines unnecessarily every time someone comes to you and sending them off to your mate for building? Hmmm, no wonder you are scared to answer the phone or emails, it may be one of your customers who caught you out? Possibly one who you told needed an engine rebuild for a simple issue. You have covered that though with "you could swap stories with who approach jobs in just the same way".
Back to back testing can be done on dyno's as they take the transmission losses from the run to calculate the power losses......but you knew that anyway right? And you of course knew that the Dyno Dynamics dyno's take into account ambient temperature and pressure to make the calculations and are probably the most accurate dyno's available? If you could actually read the graphs properly, you would see the parameters used for those calculations on the early graph. And all my runs were done on the same make and model of calibrated dyno? And what the hell would the 3 months difference between the last 2 dyno runs make? If anything, it should lose power with age. And at least I used an independant dyno, not my own that I can fiddle the numbers on. Sound familiar?
http://www.pistonheads.com/gassing/topic.asp?h=0&a...
Mind you, a couple of years ago you swore dyno results were pointless and the "seat of the pants" dyno was the best indication!! Remember that post? I mentioned the changing of the throttle map curve to give the impression of responsiveness rather than delivering power?
I assume you knew the primary cats were not replaced as there was no mention of removing them as I have not replaced the exhaust manifolds, and I did mention the car was mapped before the work was done. You were too worried about impressing the "BR Posse" to actually read that before you wrote it I suppose.
It reminds me of your input recently when some owners were trying to cure the oil into the intakes/manifold problems. Your highly technical response was to slate everyones ideas and point out all you do is replace evrything with the same AM parts again, at great expense, and offering just a temporary repair until it all happens again, and you can charge to do it again.
Is that technical?
Wrong heat range plug? You idiot, the AF ratio is on the rich side of safe, you are really showing your lack of technical expertise now because why would the inlet valve be affected with cool air and fuel passing by them. I think you are getting a bit confused with higher exhaust valve temperatures due to exhaust gas temperatures rising uncontrollably? A fuel mixture slightly rich will sort that out as it does on turbocharged engines. The exhaust gas temperatures will only suffer with a lean mixture. Maybe you misunderstood your google articles?.
You are completely wrong about the power curve difference between the long and short runner curves. It is here in black and white, and almost mirrors the power curves of another dyno print-out posted here recently with the manifold change they had done. I would say you are really guessing now.
http://www.pistonheads.com/gassing/topic.asp?t=158...
Clearly my mods are more technical than just banging on some DBS manifolds at great expense like you do and claim it as a BR GT3 Low Loss Induction System mod? The power is there for all to see and you just dont like it because its not yours. Maybe I should continue to do some head reworking? The increase in DBS compression ratio would account for my 20 FtLbs of torque lacking and I am happy to keep my oil on the safe side thanks.
Overall, your posts are increasingly boring and meant to try and keep the BR Posse loyal to spending their cash with you. Thats fine, but you really show yourself up when all you can ever do is slag off other peoples work who choose not to get blagged by you.
If its not me, its David Appleby Engineering or someone else.
So crawl back into your hole and either shut up or post constructively, thats what this forum is for. Just because you are a sponsor does not mean everyone on here either believes the BS you come out with or wants to hear you slating off everyone elses work.
Damn, you are tiresome.
Edited by 8Tech on Sunday 10th July 01:42
Edited by 8Tech on Sunday 10th July 02:00
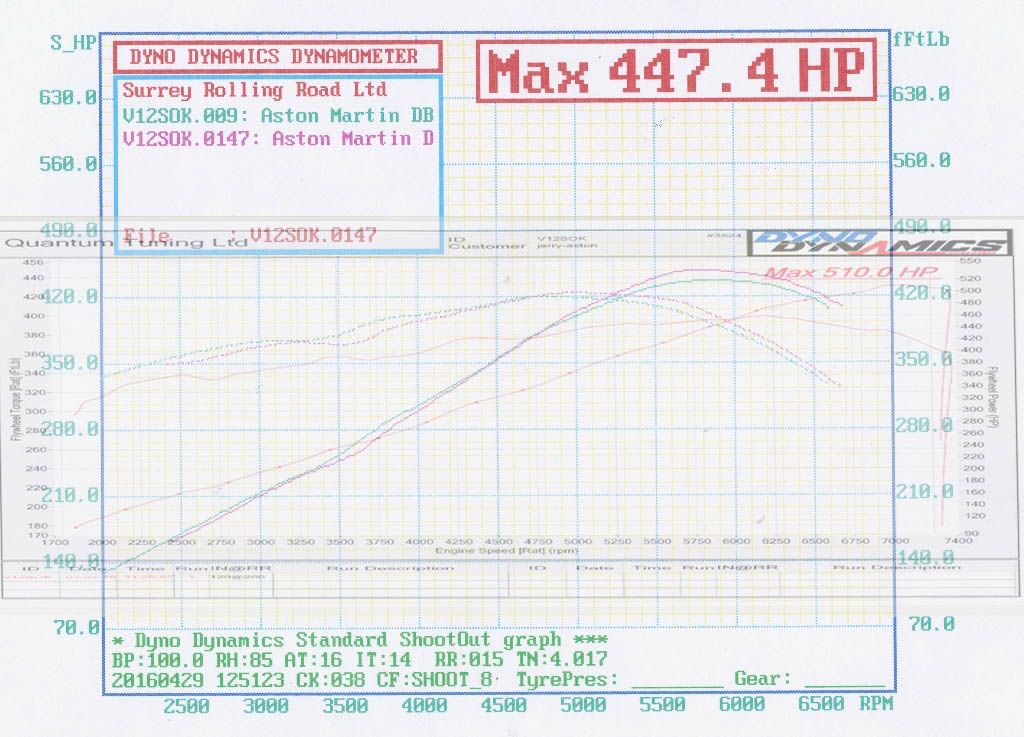
The torque and power peaks on the second chart don't seem to cross at the correct point given the units displayed, whereas they do on the first two. <<Edited to note the scale/start point on the torque axis is different which will explain it - not sure why firms do this  >>
>>
And purely looking at power curve across the rev range it does look like the engine is developing broadly the same power at the peak on the earlier charts. Assuming that's where any additional power is provided it'll still be nice to have (and will sound great) but increased rev limits do come with other downsides (you don't get owt for nowt).
>>And purely looking at power curve across the rev range it does look like the engine is developing broadly the same power at the peak on the earlier charts. Assuming that's where any additional power is provided it'll still be nice to have (and will sound great) but increased rev limits do come with other downsides (you don't get owt for nowt
).Edited by Murph7355 on Sunday 10th July 08:31
btw, 8tech and bamfordmike - regardless of what your respective engines do/don't do, you both need to calm down a couple of thousand revs.
For those of us who are neutral in these petty squabbles/tech wkfests you really spoil this forum with your childish approaches to posting against each other.
I assume you both want to be regarded as professional in this sphere. You both fail equally You'd be much better served taking it offline.
For those of us who are neutral in these petty squabbles/tech w
kfests you really spoil this forum with your childish approaches to posting against each other. I assume you both want to be regarded as professional in this sphere. You both fail equally
You'd be much better served taking it offline.

Murph7355 said:
The torque and power peaks on the second chart don't seem to cross at the correct point given the units displayed, whereas they do on the first two. <<Edited to note the scale/start point on the torque axis is different which will explain it - not sure why firms do this >>
And purely looking at power curve across the rev range it does look like the engine is developing broadly the same power at the peak on the earlier charts. Assuming that's where any additional power is provided it'll still be nice to have (and will sound great) but increased rev limits do come with other downsides (you don't get owt for nowt).
HP curves scaled>>And purely looking at power curve across the rev range it does look like the engine is developing broadly the same power at the peak on the earlier charts. Assuming that's where any additional power is provided it'll still be nice to have (and will sound great) but increased rev limits do come with other downsides (you don't get owt for nowt
).
TQ curves scaled
None technical reply - I think I spotted your car at Burghley.. and actually took a pic of your engine bay.. not everyones cup of tea with the little bits of colour but it doesn't matter.. fook em :-) looks amazing buddy.. good work..
PS I only took two engine bay photos on the day.. yours and the Vulcans ;-)
PS I only took two engine bay photos on the day.. yours and the Vulcans ;-)
Edited by shropshireAston on Sunday 10th July 17:00
divetheworld said:
The scaling overlay wasn't easy to see, but looking at figures at 500rpm intervals, it appears to have reductions all the way up the range and increases at the top end resulting in higher peak readings?
Am I reading it right?
Correct. Torque is lower hence power is lower until 5800 rpm.Am I reading it right?
Beefmeister said:
Get down to Surrey Rolling Road again, only way to give proper measurements of before/after is on the same RR.
Also, Charlie is a master at what he does, there'll be no fudging there...
This, Charlie will overlay your before and after curves. I suspect from what you have done you might see 10-20hp...Also, Charlie is a master at what he does, there'll be no fudging there...

Gassing Station | Aston Martin | Top of Page | What's New | My Stuff