
Yamaha FZS600 1999 Recommission
Discussion


After completing and selling the Honda VRX400 restoration I've been halfheartedly looking for the next project ... work and other life events sidetracking me, hence no decision yet. Options have been narrowed down to 50's BSA, 60's Triumph or 70's Japanese.
In the mean time, someone at work mentioned they had a 1999 Fazer which had been sat unused in their garage for nearly 2 years, and they wanted rid. Some photos, a quick viewing of something covered in cobwebs, and an agreement on aprice was reached.
Grabbed a mate, hired a knackered old van for the cheapest amount I could find locally for just under £50 for 3 hours (the bike was about 25 minutes drive away from home), and after grabbing a length of scaffolding plank and some straps we toddled off at a sedate pace to collect.
Loading and unloading was "Laurel and Hardy" in it's simplicity, due to a combination of a too short plank, the tyres having about 5 psi in them, and both of us being reasonably inept when it came to manhandling motorcycles in and out of vans. The highlight was it grounding out on the lip of the van whilst trying to unload, with the plank slipping off in one direction on the gravel and the bike tottering around sat on its sump.
Any hoo, somehow through more luck than competence we managed to get the bike on the floor and returned the 240k mile knacker-van to whence it came. I then returned to assess.

Yes. It's a lovely shade of gold, n'est ce pas ?
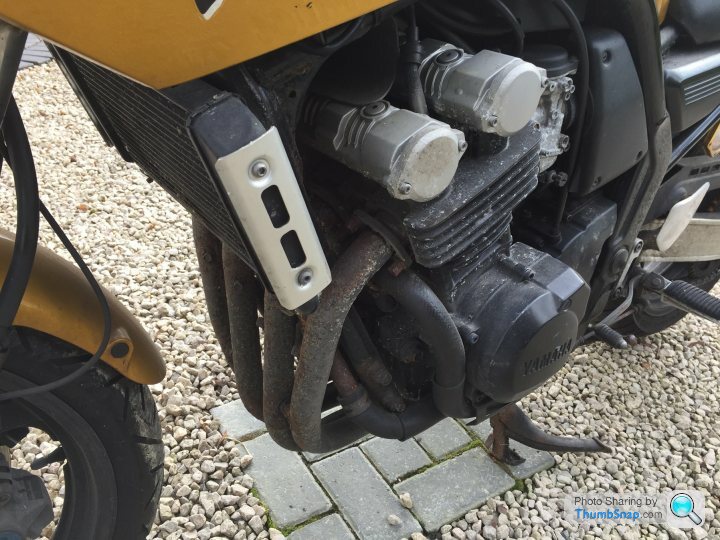
Things are as crumbly as could be expected, bearing in mind it was a daily snotter before being put away in a garage.
A leaky seal is suspected on the forks.
Broken indicator ?
A couple of cracks in the fairing, previously repaired (and well too, solid)
The mileage is either late 20's or mid 50's. He couldn't remember. The battery is deader than my s*x life, so I can't check yet.
Okay, so time to dig out the jetwash and other assorted cleansing items ...
PROJECT PREMISE : Unlike the Honda which was no-expense-spared, this project is going to be done as much on the cheap as possible (though still well/safely ... corners will not be cut)
[EDIT : Sept 17, remove Photobucket embedded images which no longer work]


In the mean time, someone at work mentioned they had a 1999 Fazer which had been sat unused in their garage for nearly 2 years, and they wanted rid. Some photos, a quick viewing of something covered in cobwebs, and an agreement on aprice was reached.
Grabbed a mate, hired a knackered old van for the cheapest amount I could find locally for just under £50 for 3 hours (the bike was about 25 minutes drive away from home), and after grabbing a length of scaffolding plank and some straps we toddled off at a sedate pace to collect.
Loading and unloading was "Laurel and Hardy" in it's simplicity, due to a combination of a too short plank, the tyres having about 5 psi in them, and both of us being reasonably inept when it came to manhandling motorcycles in and out of vans. The highlight was it grounding out on the lip of the van whilst trying to unload, with the plank slipping off in one direction on the gravel and the bike tottering around sat on its sump.
Any hoo, somehow through more luck than competence we managed to get the bike on the floor and returned the 240k mile knacker-van to whence it came. I then returned to assess.
Yes. It's a lovely shade of gold, n'est ce pas ?
Things are as crumbly as could be expected, bearing in mind it was a daily snotter before being put away in a garage.
A leaky seal is suspected on the forks.
Broken indicator ?
A couple of cracks in the fairing, previously repaired (and well too, solid)
The mileage is either late 20's or mid 50's. He couldn't remember. The battery is deader than my s*x life, so I can't check yet.
Okay, so time to dig out the jetwash and other assorted cleansing items ...
PROJECT PREMISE : Unlike the Honda which was no-expense-spared, this project is going to be done as much on the cheap as possible (though still well/safely ... corners will not be cut)
[EDIT : Sept 17, remove Photobucket embedded images which no longer work]
Edited by evil len on Tuesday 19th September 16:40
Edited by evil len on Friday 24th August 06:01
Jazoli said:
I think you overpaid 
Seems to be the going rate on fleabay for non-runners, plus I could Edited by evil len on Sunday 5th March 10:25
jackthelad1984 said:
I have one of those for a daily commuter, good bikes to be fair, if you plan on changeing the header pipes soak the living sh*t out of the studs as they are well known for being made of cheese and snap far to easily!
Thanks for the tip Jack. That whole front area is the worst part of the bike, so I was planning to remove and strip everything (e.g. radiator looks a bit 50/50) ... so I'll get soaking now ! 
evil len said:
Jazoli said:
I think you overpaid
Seems to be the going rate on fleabay for non-runners, plus I could part it out and get my money back for that. Done up, I recon it's worth about a grand, so as long as I keep spend to around the £400-500 mark I'm golden (like the bike).Jazoli said:
I know, it was a bit tongue in cheek really, new headers are cheap from sandys bike spares, I think I paid £89 for mine, admittedly that was 10 years ago, a lot of them are missing the balance pipe between the headers and it affects the midrange a bit, they run an odd size 130 tyre on the front as standard, there are no issues using a 120/70 instead, and as mentioned the exhaust studs are made of cheese, lots of heat and plusgas are your only hope, I'll guarantee you will snap at least one
Despite looking awful I think the headers MAY be solid. Can't seem to find anything other than new stainless ones now, at about £150 a pop, so I'd rather not replace if I can avoid as that'd be a big chunk of the budget blown !If I snap a stud, are they okay to get out (extractor ?) or an utter mare ?
Forgot to mention, the front tyre looks okay, the rear is squared off but it came with a brand new tyre that he'd not fitted.

evil len said:
"I could part it out"
Can I just stop you there "dude", which part of the USA do you hail from partner?Everything was going so well, nice introduction, a tale of near woe getting the bike out of the van and no too smutty quip about your sex life...
Nice project, keep the updates coming with pictures.

evil len said:
If I snap a stud, are they okay to get out (extractor ?) or an utter mare ?
That all depends where it snaps of course, you can drill some of them out in situ if necessary, but not all of them If you can borrow an induction coil it makes life so much easier, great bit of kit but too pricey for a tool that may only be used once a year, hopefully they'll be trouble free and will undo, but I wouldn't bet my house on it
I see the carb to head rubbers have had their usual bodge, they split for fun and are only £20 each to replace, well worth changing as they cause the bike to run like s
 t.
Edited by Jazoli on Sunday 5th March 11:16
evil len said:
jackthelad1984 said:
I have one of those for a daily commuter, good bikes to be fair, if you plan on changeing the header pipes soak the living sh*t out of the studs as they are well known for being made of cheese and snap far to easily!
Thanks for the tip Jack. That whole front area is the worst part of the bike, so I was planning to remove and strip everything (e.g. radiator looks a bit 50/50) ... so I'll get soaking now ! One jetwash / engine degrease / mass-product-use / quick polish later left the bike looking like this, and the gravel on my drive looking rather darker ...
Do not be deceived though ... it's not as good as it looks from the photo ... much improved, but hardly award winning. Lots of marks are left, for example
I think it currently classifies as a "6 footer" (looks good from 6' away)
Note the nicks / rust on the tank, need to try and find something that's at least not a million miles away match wise, for touching in.
There was some white spuff on the seat ... this came off with white spirit
Battery is putting out 2v. Removed it and ordered a cheapy one for £20.
[EDIT : Sept 2017, another Photofukkit swap out]
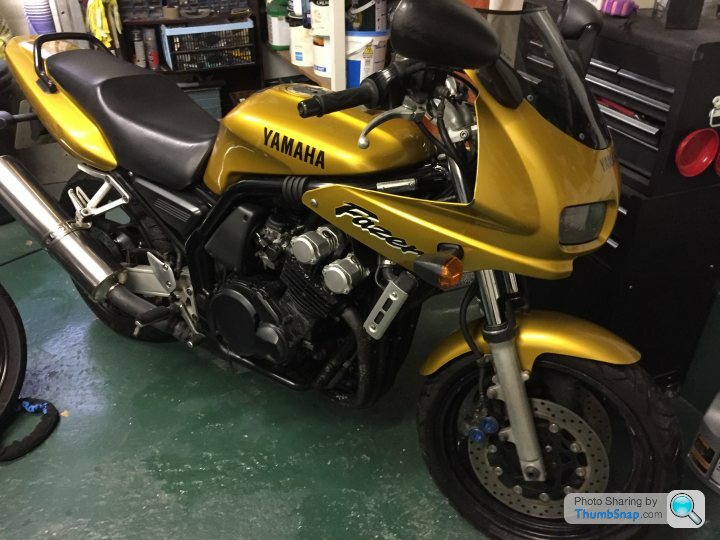


Do not be deceived though ... it's not as good as it looks from the photo ... much improved, but hardly award winning. Lots of marks are left, for example
I think it currently classifies as a "6 footer" (looks good from 6' away)
Note the nicks / rust on the tank, need to try and find something that's at least not a million miles away match wise, for touching in.
There was some white spuff on the seat ... this came off with white spirit
Battery is putting out 2v. Removed it and ordered a cheapy one for £20.
[EDIT : Sept 2017, another Photofukkit swap out]
Edited by evil len on Tuesday 19th September 16:43
Hahaha .... funny dude. Funny. So funny.
(but thanks for the lend of both )
So ... got it running. Fitted the new battery (easy) and lobbed in a couple of gallons of fresh fuel (lobbed being the operative word, as I managed to splash the Fazer, my clothing, the floor, and a couple of near by bikes ... just ... don't ask)
Starting (remembering to turn on the clutch, and after the fuel pump had stopped whirring) went as follows :
Attempt 1 : Nada
Attempt 2 : Ziltch
Attempt 3 : Sod all
Attempt 4 : Just lots of starter motor action
Attempt 5 : Cough, rev, insta-die
Attempt 6 : Cough, rev, insta-die
Attempt 7 : Cough, rev, insta-die
Attempt 8 : Cough, rev, run, slow, die
Attempt 9 : Cough, rev, run, slow, die
Attempt 10 : Run. RUN !
Okay, so it runs like a lumpy 3 legged goat across a ploughed field, but after it heats up it actually smooths out and revs cleanly all the way to 12.5k.
Took it for a TOTALLY LEGAL AND ABOVE BOARD OFFICER run to the end of the road and back. Observations as follows :
a) I should not have used dash cleaner on the seat to clean off those marks as the seat is now VERY slippy.
b) A polished tank doesn't help.
c) Front brakes seem okay
d) Rear brake has two modes ... off, and locking the rear wheel and squirrelling the bike sideways (no ABS of course)
e) Clunks like the gearbox has dropped itself on the floor going into first ("they all do that guv" possibly ?)
f) Seems to potter about okay ... definitely needs a service and setting up though ... stalled 1/2 a dozen times
g) Suspension seems okay, bit soft on the front
h) Some lash/slack in the drive train, may just be the knackered chain and sprockets (hopefully)
i) Just generally felt a bit 'tired' round the rear end ... need to check the swing arm bearings etc
j) No slack in the head bearings
Time to order a service kit then.
(but thanks for the lend of both
)So ... got it running. Fitted the new battery (easy) and lobbed in a couple of gallons of fresh fuel (lobbed being the operative word, as I managed to splash the Fazer, my clothing, the floor, and a couple of near by bikes ... just ... don't ask)
Starting (remembering to turn on the clutch, and after the fuel pump had stopped whirring) went as follows :
Attempt 1 : Nada
Attempt 2 : Ziltch
Attempt 3 : Sod all
Attempt 4 : Just lots of starter motor action
Attempt 5 : Cough, rev, insta-die
Attempt 6 : Cough, rev, insta-die
Attempt 7 : Cough, rev, insta-die
Attempt 8 : Cough, rev, run, slow, die
Attempt 9 : Cough, rev, run, slow, die
Attempt 10 : Run. RUN !
Okay, so it runs like a lumpy 3 legged goat across a ploughed field, but after it heats up it actually smooths out and revs cleanly all the way to 12.5k.
Took it for a TOTALLY LEGAL AND ABOVE BOARD OFFICER run to the end of the road and back. Observations as follows :
a) I should not have used dash cleaner on the seat to clean off those marks as the seat is now VERY slippy.
b) A polished tank doesn't help.
c) Front brakes seem okay
d) Rear brake has two modes ... off, and locking the rear wheel and squirrelling the bike sideways (no ABS of course)
e) Clunks like the gearbox has dropped itself on the floor going into first ("they all do that guv" possibly ?)
f) Seems to potter about okay ... definitely needs a service and setting up though ... stalled 1/2 a dozen times
g) Suspension seems okay, bit soft on the front
h) Some lash/slack in the drive train, may just be the knackered chain and sprockets (hopefully)
i) Just generally felt a bit 'tired' round the rear end ... need to check the swing arm bearings etc
j) No slack in the head bearings
Time to order a service kit then.
On the advice of Andy (yes, that Andy, him up there) I thought I'd check the air filter in case it was a clean-and-reuse jobbie.
Time to take off the tank. It's grebby under there, no surprise really.

Removing the breather pipes and fuel line. They've added a handy fuel switch, which is a good idea.

Tank out of the way, just need to remove the rubber flap to get to the air filter ... which took removing 2 side panels, and lots of fighting / swearing at the awkward rubbery bd to release it's grip.

Paper air filter ... need a new one.
Thought I'd have a quick snifty at the "broken" indicator, you know the one held on with duct tape. Turns out all it needs is a quick tighten of a screw and a blob of super glue, so that's a £0.00p fix !
To get to the indicator I had to remove a fairing "infill" panel, which exposed a previously broken plastic mounting lug. Tried aralditing it in position, and it just fell off again, so I've fabricated a bracket from a bit of offcut metal (painted in "what's this random black I have here, that'll do" spray can) to go underneath it and provide support.

And chemical metal'd in position ... not pretty, but it should be strong ... and it's not seen anyway. And another £0.00p fix.

Time to take off the tank. It's grebby under there, no surprise really.
Removing the breather pipes and fuel line. They've added a handy fuel switch, which is a good idea.
Tank out of the way, just need to remove the rubber flap to get to the air filter ... which took removing 2 side panels, and lots of fighting / swearing at the awkward rubbery b
d to release it's grip.Paper air filter ... need a new one.
Thought I'd have a quick snifty at the "broken" indicator, you know the one held on with duct tape. Turns out all it needs is a quick tighten of a screw and a blob of super glue, so that's a £0.00p fix !
To get to the indicator I had to remove a fairing "infill" panel, which exposed a previously broken plastic mounting lug. Tried aralditing it in position, and it just fell off again, so I've fabricated a bracket from a bit of offcut metal (painted in "what's this random black I have here, that'll do" spray can) to go underneath it and provide support.
And chemical metal'd in position ... not pretty, but it should be strong ... and it's not seen anyway. And another £0.00p fix.
Edited by evil len on Tuesday 19th September 16:46
Mounting bracket fixed, and I've since refitted the infill piece.

I want to tackle this whole front end, as that's the worst mess.

The radiator is a bit mullared and rusty, but appears sound.

So the plan is to remove the front wheel / mudguard, radiator and pipes and exhaust down pipes so I can get to everything and start attacking the front of the engine.
All these pipes have to come off, and the cooling system drained
To remove the radiator I have to disconnect the fan, which is somewhere in this rats nest of connectors ...

For example, one of the coolant pipes off ... these will all need de-rusting and painting.

Radiator and wheel off, time to look at the exhaust. I soaked the 8 mounting studs and nuts with plus-gas (thanks for the borrow Andy) for about a week and a half before carefully trying to remove these rusty nuts, by tapping on a spanner gently with a hammer (to 'shock' the nut and/or stud free). On some the nut came off, on some the whole stud and nut came out, but that's fine as they are cheap and I'll replace the lot.
Exhaust off ...

... BUT ... 7 studs came out fine ... one stud sheered, just the other side of the nut. B*****ks v1.

To improve access I removed two of the engine mounts and canted the engine forward, so it was easier to get to the stud which was the other side of a cross beam.
Attempt 1 : tried to thread two nuts onto the stud (so I can tighten them against each other and wind the stud out). Due to the rust I couldn't get 2 bolts on. B*****ks v2
Attempt 2 : welded a nut onto the end of the stud. Applied a few more days of plus-gas. Applied heat to the block and the same 'shock' routine to the nut. Nut sheered off stud, just the other side of the nut (so, still leaving some stud protruding, but less). B*****ks v3.
Attempt 3 : borrowed a stud extractor like this off a mate, but access is a problem and it wont turn, it's too big (that's what she said). B*****ks v4.

Attempt 4 : purchased a stud extractor which looks like this, which is supposed to go down to 6mm. Doesn't fit ... it just spins on the 6mm stud. B*****ks v5.

Attempt 5 : purchased a 5mm extractor which looks like this. Again, plus-gas, heat, hammer stud extractor on ... tap-tap-tap-turn ... *sheer* ... this time, flush with the block. B*****ks v6.

So now left with this ...

I have two more tricks up my sleeve, but I'll leave those for my next instalment.
Let's have a look at that rusty exhaust and see how bad it is.

An easy way to remove a lot of the crud/rust/old paint from the exhaust is to crack out the jetwash and blast the crap out of it, which actually works quite well. Next thing will be to attack it with the more traditional wire brush and screwdrivers and see what lies beneath ...

The wheel will need repainting. I've bought some weights, so I can remove the old ones for painting and re-apply after.

This is what the bike looks like now. I've bought oil, filters, chain/sprockets and a touch up pen.

I want to tackle this whole front end, as that's the worst mess.
The radiator is a bit mullared and rusty, but appears sound.
So the plan is to remove the front wheel / mudguard, radiator and pipes and exhaust down pipes so I can get to everything and start attacking the front of the engine.
All these pipes have to come off, and the cooling system drained
To remove the radiator I have to disconnect the fan, which is somewhere in this rats nest of connectors ...
For example, one of the coolant pipes off ... these will all need de-rusting and painting.
Radiator and wheel off, time to look at the exhaust. I soaked the 8 mounting studs and nuts with plus-gas (thanks for the borrow Andy) for about a week and a half before carefully trying to remove these rusty nuts, by tapping on a spanner gently with a hammer (to 'shock' the nut and/or stud free). On some the nut came off, on some the whole stud and nut came out, but that's fine as they are cheap and I'll replace the lot.
Exhaust off ...
... BUT ... 7 studs came out fine ... one stud sheered, just the other side of the nut. B*****ks v1.
To improve access I removed two of the engine mounts and canted the engine forward, so it was easier to get to the stud which was the other side of a cross beam.
Attempt 1 : tried to thread two nuts onto the stud (so I can tighten them against each other and wind the stud out). Due to the rust I couldn't get 2 bolts on. B*****ks v2
Attempt 2 : welded a nut onto the end of the stud. Applied a few more days of plus-gas. Applied heat to the block and the same 'shock' routine to the nut. Nut sheered off stud, just the other side of the nut (so, still leaving some stud protruding, but less). B*****ks v3.
Attempt 3 : borrowed a stud extractor like this off a mate, but access is a problem and it wont turn, it's too big (that's what she said). B*****ks v4.
Attempt 4 : purchased a stud extractor which looks like this, which is supposed to go down to 6mm. Doesn't fit ... it just spins on the 6mm stud. B*****ks v5.
Attempt 5 : purchased a 5mm extractor which looks like this. Again, plus-gas, heat, hammer stud extractor on ... tap-tap-tap-turn ... *sheer* ... this time, flush with the block. B*****ks v6.
So now left with this ...
I have two more tricks up my sleeve, but I'll leave those for my next instalment.
Let's have a look at that rusty exhaust and see how bad it is.
An easy way to remove a lot of the crud/rust/old paint from the exhaust is to crack out the jetwash and blast the crap out of it, which actually works quite well. Next thing will be to attack it with the more traditional wire brush and screwdrivers and see what lies beneath ...
The wheel will need repainting. I've bought some weights, so I can remove the old ones for painting and re-apply after.
This is what the bike looks like now. I've bought oil, filters, chain/sprockets and a touch up pen.
Edited by evil len on Saturday 23 September 09:06
Gassing Station | Biker Banter | Top of Page | What's New | My Stuff