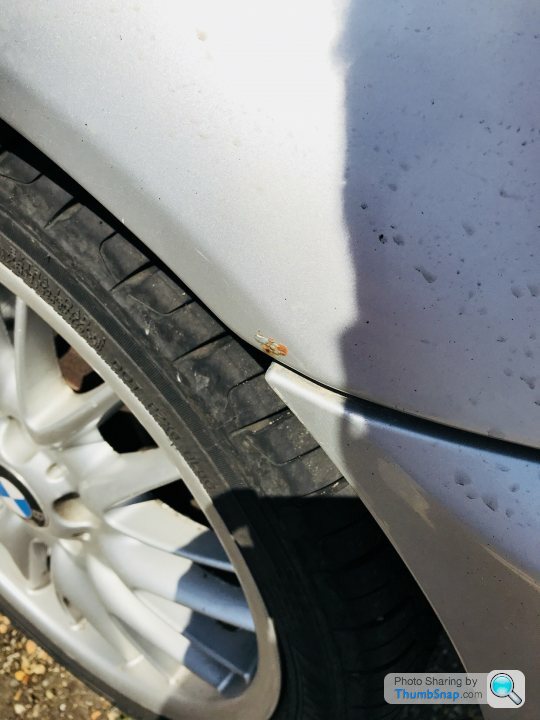
What would you expect to pay to repair this rust?
Discussion


Pericoloso said:
Danxr46 said:
No more than £200 really. Depends how deep and far it goes. Certainly not £350. That I w oils of thought be the cost of a new wing replacement.
200 to replace a rear quarter ,don't think so.To be honest that seems too cheap to me, I'd be concerned as to whether they were going to do the job properly or not. I'm assuming the pictures show rust on both wings. I know it doesn't look much but the area needs prepping, bumper should be removed, any holes need welding, filled, primer, paint and then I'm guessing lacquer too. The paint would need to be blown into the wings (assuming it's both) to get a good colour match, you can't just paint the effected area, it would stand out a mile.Final job would be underseal.
PSH said:
To be honest that seems too cheap to me, I'd be concerned as to whether they were going to do the job properly or not. I'm assuming the pictures show rust on both wings. I know it doesn't look much but the area needs prepping, bumper should be removed, any holes need welding, filled, primer, paint and then I'm guessing lacquer too. The paint would need to be blown into the wings (assuming it's both) to get a good colour match, you can't just paint the effected area, it would stand out a mile.Final job would be underseal.
Just the one arch is affected. One arch is as clean as a whistle. I set about finding the cleanest E46 I could, this was it! Pericoloso said:
Danxr46 said:
No more than £200 really. Depends how deep and far it goes. Certainly not £350. That I w oils of thought be the cost of a new wing replacement.
200 to replace a rear quarter ,don't think so.It's a relatively small rust repair ,a new panel is not in the mix ,I think.
It’s not quite as simple as “welding a bit in and painting”.
Personally I’d suspect £350 is a good deal if they use an arch repair panel, welding, fill it & blend. It’s mettalic so would need fading.
I’m not sure if you can get repair panels for an e46 (just surmising) either way, I’d suggest anything less than £350 would be back in a couple of years.
If the other side isn’t like that it’s probably had a quarter panel on it at some point.....
I'm a panel beater and painter and I'll give you a run through of the repair as if I was to do it myself. There are people out there who may do things differently and there's always more ways to skin a cat.
Its an easy/straightforward repair but time consuming.
Before work commences the rear bumper, tail light, wheel arch liner and 1/4 panel moulding will need to be removed and that side of the boot will need stripping to make sure nothing gets burnt/catches fire. Also I bet there will be sealer on the inside of the 1/4 panel/wheel arch that'll need to be removed before welding.
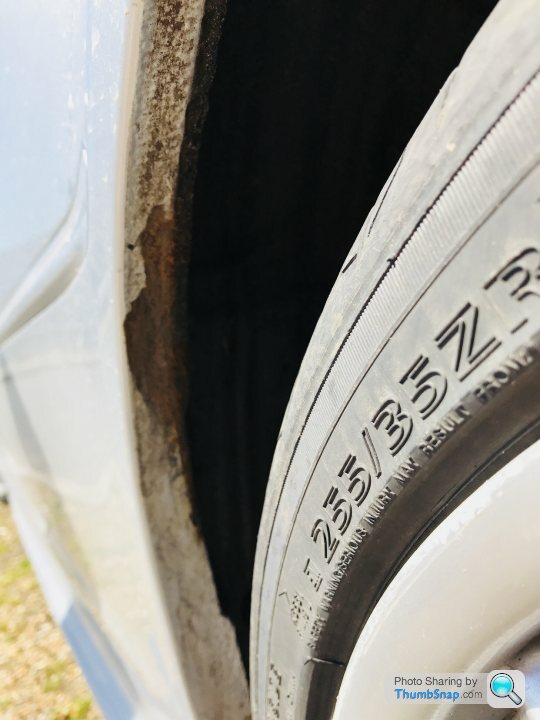
The large area of rust only looks like surface and will clean up back to bare metal using a wire wheel in a drill, MBX wheel or hand held sand blaster. The small area will have a small hole that'll require welding.
Once welded it'll be ground back and the paint sanded/feathered back. A small skim of filler over the repair areas might be needed. Prep areas for priming.
Now the car needs to be masked up for 2k high build priming which will involve thoroughly cleaning out the wheel arch for mud (there will be lots). Mask out the areas then sheet the whole car, cut out the plastic sheeting around the repaired areas and tape it down. Etch prime areas first followed by 3 coats of 2k primer.
After a 45 minute bake in the spray booth it'll be ready for de-masking and flatting/prepping the primer. When the primer is prepped the rest of the 1/4 panel will need to be prepped for paint.
The 1/4 panel will be prepped using 1000 grit on a DA sander and then a grey scotch (wet) when prepped and cleaned and cleaned again it'll be time to mask out the wheel arch for stone chip application (and seem sealer in the boot if needed). When the stone chip is dry it'll be time to mask out the whole 1/4 panel then sheet the whole car and cut the sheet out for the 1/4 panel and taped down.
Being silver in colour your car will be COB (clear over base). The primed areas will be based (colour) up and when the painter is happy with colour and coverage they will then go on to laquer the whole 1/4 panel, usually 2-3 coats. Bake for 45 minutes and de-mask car.
Once painted the freshly painted 1/4 Panel will need to a de-nib and machine polish. Cavity wax applied and refit the tail light, boot, and 1/4 panel moulding. Clean car for collection.
This was just a quick insight into the repair. I could of gone on in much greater detail.
It's a lot of work for not a lot of money when you include paint and materials.
Its an easy/straightforward repair but time consuming.
Before work commences the rear bumper, tail light, wheel arch liner and 1/4 panel moulding will need to be removed and that side of the boot will need stripping to make sure nothing gets burnt/catches fire. Also I bet there will be sealer on the inside of the 1/4 panel/wheel arch that'll need to be removed before welding.
The large area of rust only looks like surface and will clean up back to bare metal using a wire wheel in a drill, MBX wheel or hand held sand blaster. The small area will have a small hole that'll require welding.
Once welded it'll be ground back and the paint sanded/feathered back. A small skim of filler over the repair areas might be needed. Prep areas for priming.
Now the car needs to be masked up for 2k high build priming which will involve thoroughly cleaning out the wheel arch for mud (there will be lots). Mask out the areas then sheet the whole car, cut out the plastic sheeting around the repaired areas and tape it down. Etch prime areas first followed by 3 coats of 2k primer.
After a 45 minute bake in the spray booth it'll be ready for de-masking and flatting/prepping the primer. When the primer is prepped the rest of the 1/4 panel will need to be prepped for paint.
The 1/4 panel will be prepped using 1000 grit on a DA sander and then a grey scotch (wet) when prepped and cleaned and cleaned again it'll be time to mask out the wheel arch for stone chip application (and seem sealer in the boot if needed). When the stone chip is dry it'll be time to mask out the whole 1/4 panel then sheet the whole car and cut the sheet out for the 1/4 panel and taped down.
Being silver in colour your car will be COB (clear over base). The primed areas will be based (colour) up and when the painter is happy with colour and coverage they will then go on to laquer the whole 1/4 panel, usually 2-3 coats. Bake for 45 minutes and de-mask car.
Once painted the freshly painted 1/4 Panel will need to a de-nib and machine polish. Cavity wax applied and refit the tail light, boot, and 1/4 panel moulding. Clean car for collection.
This was just a quick insight into the repair. I could of gone on in much greater detail.
It's a lot of work for not a lot of money when you include paint and materials.
Edited by Turbotechnic on Sunday 22 April 07:56
Turbotechnic said:
I'm a panel beater and painter and I'll give you a run through of the repair as if I was to do it myself. There are people out there who may do things differently and there's always more ways to skin a cat.
Its an easy/straightforward repair but time consuming.
Before work commences the rear bumper, tail light, wheel arch liner and 1/4 panel moulding will need to be removed and that side of the boot will need stripping to make sure nothing gets burnt/catches fire. Also I bet there will be sealer on the inside of the 1/4 panel/wheel arch that'll need to be removed before welding.
The large area of rust only looks like surface and will clean up back to bare metal using a wire wheel in a drill, MBX wheel or hand held sand blaster. The small area will have a small hole that'll require welding.
Once welded it'll be ground back and the paint sanded/feathered back. A small skim of filler over the repair areas might be needed. Prep areas for priming.
Now the car needs to be masked up for 2k high build priming which will involve thoroughly cleaning out the wheel arch for mud (there will be lots). Mask out the areas then sheet the whole car, cut out the plastic sheeting around the repaired areas and tape it down. Etch prime areas first followed by 3 coats of 2k primer.
After a 45 minute bake in the spray booth it'll be ready for de-masking and flatting/prepping the primer. When the primer is prepped the rest of the 1/4 panel will need to be prepped for paint.
The 1/4 panel will be prepped using 1000 grit on a DA sander and then a grey scotch (wet) when prepped and cleaned and cleaned again it'll be time to mask out the wheel arch for stone chip application (and seem sealer in the boot if needed). When the stone chip is dry it'll be time to mask out the whole 1/4 panel then sheet the whole car and cut the sheet out for the 1/4 panel and taped down.
Being silver in colour your car will be COB (clear over base). The primed areas will be based (colour) up and when the painter is happy with colour and coverage they will then go on to laquer the whole 1/4 panel, usually 2-3 coats. Bake for 45 minutes and de-mask car.
Once painted the freshly painted 1/4 Panel will need to a de-nib and machine polish. Cavity wax applied and refit the tail light, boot, and 1/4 panel moulding. Clean car for collection.
This was just a quick insight into the repair. I could of gone on in much greater detail.
It's a lot of work for not a lot of money when you include paint and materials.
That was really insightful thank you! Would you say my quotes are about right?Its an easy/straightforward repair but time consuming.
Before work commences the rear bumper, tail light, wheel arch liner and 1/4 panel moulding will need to be removed and that side of the boot will need stripping to make sure nothing gets burnt/catches fire. Also I bet there will be sealer on the inside of the 1/4 panel/wheel arch that'll need to be removed before welding.
The large area of rust only looks like surface and will clean up back to bare metal using a wire wheel in a drill, MBX wheel or hand held sand blaster. The small area will have a small hole that'll require welding.
Once welded it'll be ground back and the paint sanded/feathered back. A small skim of filler over the repair areas might be needed. Prep areas for priming.
Now the car needs to be masked up for 2k high build priming which will involve thoroughly cleaning out the wheel arch for mud (there will be lots). Mask out the areas then sheet the whole car, cut out the plastic sheeting around the repaired areas and tape it down. Etch prime areas first followed by 3 coats of 2k primer.
After a 45 minute bake in the spray booth it'll be ready for de-masking and flatting/prepping the primer. When the primer is prepped the rest of the 1/4 panel will need to be prepped for paint.
The 1/4 panel will be prepped using 1000 grit on a DA sander and then a grey scotch (wet) when prepped and cleaned and cleaned again it'll be time to mask out the wheel arch for stone chip application (and seem sealer in the boot if needed). When the stone chip is dry it'll be time to mask out the whole 1/4 panel then sheet the whole car and cut the sheet out for the 1/4 panel and taped down.
Being silver in colour your car will be COB (clear over base). The primed areas will be based (colour) up and when the painter is happy with colour and coverage they will then go on to laquer the whole 1/4 panel, usually 2-3 coats. Bake for 45 minutes and de-mask car.
Once painted the freshly painted 1/4 Panel will need to a de-nib and machine polish. Cavity wax applied and refit the tail light, boot, and 1/4 panel moulding. Clean car for collection.
This was just a quick insight into the repair. I could of gone on in much greater detail.
It's a lot of work for not a lot of money when you include paint and materials.
Edited by Turbotechnic on Sunday 22 April 07:56
sparks_E46 said:
That was really insightful thank you! Would you say my quotes are about right?
Personally I think the quotes you have are cheap. I personally would price this job near £500 and do it the way I mentioned. £350 or less I'm sceptical about how thorough/good they would be. I bet when it comes to paint they wouldn't laquer the whole 1/4 panel and instead "roll off" the swage line, therefore keeping all the painting below that line. Problem is it can lead to flakey laquer at a later date.
maybe with the quotes you have been getting you need to have a detailed written agreement of the work to be done, therefore no arguing or confusion once the job is in progress.
What I would say is that there are some excellent bodyshops from some very unassuming premises, one of the best here is in an old remote farm yard. The quality of work far outshines some of the more "professional" looking outfits.
What I would say is that there are some excellent bodyshops from some very unassuming premises, one of the best here is in an old remote farm yard. The quality of work far outshines some of the more "professional" looking outfits.
loskie said:
maybe with the quotes you have been getting you need to have a detailed written agreement of the work to be done, therefore no arguing or confusion once the job is in progress.
What I would say is that there are some excellent bodyshops from some very unassuming premises, one of the best here is in an old remote farm yard. The quality of work far outshines some of the more "professional" looking outfits.
Thank you. I’ve also been told the car will be away 2/3 days. What I would say is that there are some excellent bodyshops from some very unassuming premises, one of the best here is in an old remote farm yard. The quality of work far outshines some of the more "professional" looking outfits.
Turbotechnic said:
I'm a panel beater and painter and I'll give you a run through of the repair as if I was to do it myself. There are people out there who may do things differently and there's always more ways to skin a cat.
Its an easy/straightforward repair but time consuming.
Before work commences the rear bumper, tail light, wheel arch liner and 1/4 panel moulding will need to be removed and that side of the boot will need stripping to make sure nothing gets burnt/catches fire. Also I bet there will be sealer on the inside of the 1/4 panel/wheel arch that'll need to be removed before welding.
The large area of rust only looks like surface and will clean up back to bare metal using a wire wheel in a drill, MBX wheel or hand held sand blaster. The small area will have a small hole that'll require welding.
Once welded it'll be ground back and the paint sanded/feathered back. A small skim of filler over the repair areas might be needed. Prep areas for priming.
Now the car needs to be masked up for 2k high build priming which will involve thoroughly cleaning out the wheel arch for mud (there will be lots). Mask out the areas then sheet the whole car, cut out the plastic sheeting around the repaired areas and tape it down. Etch prime areas first followed by 3 coats of 2k primer.
After a 45 minute bake in the spray booth it'll be ready for de-masking and flatting/prepping the primer. When the primer is prepped the rest of the 1/4 panel will need to be prepped for paint.
The 1/4 panel will be prepped using 1000 grit on a DA sander and then a grey scotch (wet) when prepped and cleaned and cleaned again it'll be time to mask out the wheel arch for stone chip application (and seem sealer in the boot if needed). When the stone chip is dry it'll be time to mask out the whole 1/4 panel then sheet the whole car and cut the sheet out for the 1/4 panel and taped down.
Being silver in colour your car will be COB (clear over base). The primed areas will be based (colour) up and when the painter is happy with colour and coverage they will then go on to laquer the whole 1/4 panel, usually 2-3 coats. Bake for 45 minutes and de-mask car.
Once painted the freshly painted 1/4 Panel will need to a de-nib and machine polish. Cavity wax applied and refit the tail light, boot, and 1/4 panel moulding. Clean car for collection.
This was just a quick insight into the repair. I could of gone on in much greater detail.
It's a lot of work for not a lot of money when you include paint and materials.
Thanks for really insightful post. I’m currently working my way around an old Vito with some rattle cans (I don’t honestly care about finish or longevity) so it’s good to see what a professional job would look like. Based on the size of that repair, I’d probably end up paying more on professional repainting than I spent on the van.Its an easy/straightforward repair but time consuming.
Before work commences the rear bumper, tail light, wheel arch liner and 1/4 panel moulding will need to be removed and that side of the boot will need stripping to make sure nothing gets burnt/catches fire. Also I bet there will be sealer on the inside of the 1/4 panel/wheel arch that'll need to be removed before welding.
The large area of rust only looks like surface and will clean up back to bare metal using a wire wheel in a drill, MBX wheel or hand held sand blaster. The small area will have a small hole that'll require welding.
Once welded it'll be ground back and the paint sanded/feathered back. A small skim of filler over the repair areas might be needed. Prep areas for priming.
Now the car needs to be masked up for 2k high build priming which will involve thoroughly cleaning out the wheel arch for mud (there will be lots). Mask out the areas then sheet the whole car, cut out the plastic sheeting around the repaired areas and tape it down. Etch prime areas first followed by 3 coats of 2k primer.
After a 45 minute bake in the spray booth it'll be ready for de-masking and flatting/prepping the primer. When the primer is prepped the rest of the 1/4 panel will need to be prepped for paint.
The 1/4 panel will be prepped using 1000 grit on a DA sander and then a grey scotch (wet) when prepped and cleaned and cleaned again it'll be time to mask out the wheel arch for stone chip application (and seem sealer in the boot if needed). When the stone chip is dry it'll be time to mask out the whole 1/4 panel then sheet the whole car and cut the sheet out for the 1/4 panel and taped down.
Being silver in colour your car will be COB (clear over base). The primed areas will be based (colour) up and when the painter is happy with colour and coverage they will then go on to laquer the whole 1/4 panel, usually 2-3 coats. Bake for 45 minutes and de-mask car.
Once painted the freshly painted 1/4 Panel will need to a de-nib and machine polish. Cavity wax applied and refit the tail light, boot, and 1/4 panel moulding. Clean car for collection.
This was just a quick insight into the repair. I could of gone on in much greater detail.
It's a lot of work for not a lot of money when you include paint and materials.
Edited by Turbotechnic on Sunday 22 April 07:56
all that will come back through within a year unless you get it replaced with fresh metal.
I've had a few jap cars so i know rust pretty well.
ideally that needs a new arch section, if you can't find one brand new, have a hunt around some breakers for a rust free one that you can have stitched in.
I would say thats £5-600 worth of work down here in the south east.
I've had a few jap cars so i know rust pretty well.
ideally that needs a new arch section, if you can't find one brand new, have a hunt around some breakers for a rust free one that you can have stitched in.
I would say thats £5-600 worth of work down here in the south east.
designforlife said:
all that will come back through within a year unless you get it replaced with fresh metal.
I've had a few jap cars so i know rust pretty well.
ideally that needs a new arch section, if you can't find one brand new, have a hunt around some breakers for a rust free one that you can have stitched in.
I would say thats £5-600 worth of work down here in the south east.
I had my E39 530i repaired and 3 years later it was fine. I don’t think it was all new metal either. But if it’s £500 or £600 it’s getting done, if it keeps it at bay for 4/5 years it’s money well spent.I've had a few jap cars so i know rust pretty well.
ideally that needs a new arch section, if you can't find one brand new, have a hunt around some breakers for a rust free one that you can have stitched in.
I would say thats £5-600 worth of work down here in the south east.
Edited by sparks_E46 on Monday 23 April 21:00
Gassing Station | Bodywork & Detailing | Top of Page | What's New | My Stuff