
Carbon Brush - sticks in retracted position, does not slide.
Discussion


One of my electric windows occasionally doesn't work. This is because one of the carbon brushes is getting stuck in the retracted position. A sharp tap releases it and it flies out. But when pushing it back in, it feels notchy and it gets stuck. What could I use to lubricate this? I've squirted brake cleaner on it but it still sticks. The other brush does slide in and out smoothly but looks like it's a bit on the short side and is possibly not making great contact, if any. I'm guessing it's been doing the work...
This motor is almost 40 years old. Replacements are stupid money.
I guess the correct answer is to remove the base of the motor (not easy as it's soldered up) and get proper access to the brushes and their housing.
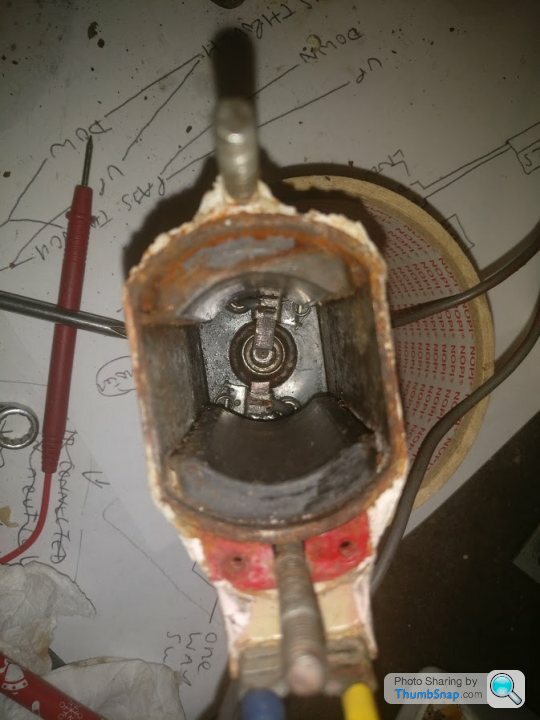
This motor is almost 40 years old. Replacements are stupid money.
I guess the correct answer is to remove the base of the motor (not easy as it's soldered up) and get proper access to the brushes and their housing.
Edited by Andy 308GTB on Tuesday 31st July 00:07

GreenV8S said:
If you can feel roughness, I wonder whether there may have some debris caught between the brush and its slider.
I think that's probably correct, there was some rust on the armature in places and inside the casing - how or why it was there is a different matter!But even if I fix this brush, I think the other one is a problem too and will need replacing.
I'm going to see if the motor is the usual parts bin special and is available at a better price when being sold for other marques. But failing that I will cut the bottom off this motor and whilst I know I won't be able to get replacement brushes specifically for this motor, I should be able to cobble something together.
I think I'd be tempted to try something like this
https://www.amazon.co.uk/WL403-Graphite-Powder/dp/...
https://www.amazon.co.uk/WL403-Graphite-Powder/dp/...
If the problem isn't rust, read on -
The chances are that the orientation of the brush that is sticking is downwards when the motor is fitted in the door, what happens is that when the brush slowly wears with use the worn off carbon/copper particles fall off into its brush holder and lock the brush up, then again maybe it isn't in the downwards position but the same problem exists
You could try soaking the brush box in brake cleaner while moving the brush in and out to free it off, first carry out a test to see that brake cleaner isn't going to dissolve anything
New brushes are easily made from bigger ones if you can't get the exact size, be careful when buying brushes to suit, the brushes in your motor will very likely have a high carbon/graphite to copper ratio....buying brushes with a similar colour will do the job, window motor brushes for another manufacturers motor will do the job even if the colour doesn't match
The other thing worth noting is that the brushes very rarely rely on the brush boxes and their springs to conduct electricity, the chances are that those brushes have fly leads that solder to the brush boxes. If you are going to solder in new brushes you will need to position the brush box so that solder doesnt run all the way down the new brushes fly lead, soldering upside down is the way to do it and even then a little solder will run up the lead but that is allowed for in the design, just make sure the brushes go far enough into the brush box without forcing and breaking them, a little material can be filed off the ends of the brushes if they are a little too long
There looks to be plenty of life left in the most worn brush
The chances are that the orientation of the brush that is sticking is downwards when the motor is fitted in the door, what happens is that when the brush slowly wears with use the worn off carbon/copper particles fall off into its brush holder and lock the brush up, then again maybe it isn't in the downwards position but the same problem exists
You could try soaking the brush box in brake cleaner while moving the brush in and out to free it off, first carry out a test to see that brake cleaner isn't going to dissolve anything
New brushes are easily made from bigger ones if you can't get the exact size, be careful when buying brushes to suit, the brushes in your motor will very likely have a high carbon/graphite to copper ratio....buying brushes with a similar colour will do the job, window motor brushes for another manufacturers motor will do the job even if the colour doesn't match
The other thing worth noting is that the brushes very rarely rely on the brush boxes and their springs to conduct electricity, the chances are that those brushes have fly leads that solder to the brush boxes. If you are going to solder in new brushes you will need to position the brush box so that solder doesnt run all the way down the new brushes fly lead, soldering upside down is the way to do it and even then a little solder will run up the lead but that is allowed for in the design, just make sure the brushes go far enough into the brush box without forcing and breaking them, a little material can be filed off the ends of the brushes if they are a little too long
There looks to be plenty of life left in the most worn brush
Penelope Stopit said:
If the problem isn't rust, read on -
The chances are that the orientation of the brush that is sticking is downwards when the motor is fitted in the door, what happens is that when the brush slowly wears with use the worn off carbon/copper particles fall off into its brush holder and lock the brush up, then again maybe it isn't in the downwards position but the same problem exists
You could try soaking the brush box in brake cleaner while moving the brush in and out to free it off, first carry out a test to see that brake cleaner isn't going to dissolve anything
New brushes are easily made from bigger ones if you can't get the exact size, be careful when buying brushes to suit, the brushes in your motor will very likely have a high carbon/graphite to copper ratio....buying brushes with a similar colour will do the job, window motor brushes for another manufacturers motor will do the job even if the colour doesn't match
The other thing worth noting is that the brushes very rarely rely on the brush boxes and their springs to conduct electricity, the chances are that those brushes have fly leads that solder to the brush boxes. If you are going to solder in new brushes you will need to position the brush box so that solder doesnt run all the way down the new brushes fly lead, soldering upside down is the way to do it and even then a little solder will run up the lead but that is allowed for in the design, just make sure the brushes go far enough into the brush box without forcing and breaking them, a little material can be filed off the ends of the brushes if they are a little too long
There looks to be plenty of life left in the most worn brush
Thanks for that, very interesting. I will check what the orientation of the brushes would be when in situ.The chances are that the orientation of the brush that is sticking is downwards when the motor is fitted in the door, what happens is that when the brush slowly wears with use the worn off carbon/copper particles fall off into its brush holder and lock the brush up, then again maybe it isn't in the downwards position but the same problem exists
You could try soaking the brush box in brake cleaner while moving the brush in and out to free it off, first carry out a test to see that brake cleaner isn't going to dissolve anything
New brushes are easily made from bigger ones if you can't get the exact size, be careful when buying brushes to suit, the brushes in your motor will very likely have a high carbon/graphite to copper ratio....buying brushes with a similar colour will do the job, window motor brushes for another manufacturers motor will do the job even if the colour doesn't match
The other thing worth noting is that the brushes very rarely rely on the brush boxes and their springs to conduct electricity, the chances are that those brushes have fly leads that solder to the brush boxes. If you are going to solder in new brushes you will need to position the brush box so that solder doesnt run all the way down the new brushes fly lead, soldering upside down is the way to do it and even then a little solder will run up the lead but that is allowed for in the design, just make sure the brushes go far enough into the brush box without forcing and breaking them, a little material can be filed off the ends of the brushes if they are a little too long
There looks to be plenty of life left in the most worn brush
Regarding the most worn brush, in the picture it is at its full extent. My thinking was that it's been worn to such an extent that there is insufficient material left to make a decent contact with commutator. But I can check that easily enough this evening.
I am not going to take lightly separating the rear casing of the motor, it will need soldering back together again - which could be an interesting thing to learn to do...
I think you would be best to strip it, take as many measurements as you can & get the closest brushes you can (it is easy to file if a bit bigger) and replace them.
I am sure they will only cost pence on the bay of E.
ETA.
Plenty of options here.
https://www.ebay.co.uk/itm/CARBON-BRUSHES-MOTOR-TO...
I am sure they will only cost pence on the bay of E.
ETA.
Plenty of options here.
https://www.ebay.co.uk/itm/CARBON-BRUSHES-MOTOR-TO...
eBay to the rescue. Not super cheap, but a lot cheaper than a complete new regulator.
BTW are you sure the end of the motor is soldered on? Looks like epoxy on the ones I've found.
BTW are you sure the end of the motor is soldered on? Looks like epoxy on the ones I've found.
Thanks for the advice on this.
Mike - I assumed the base was soldered on. But I think you are probably correct - what do you make of these photos, is it epoxy? If so, what's the best way to separate the pieces, scrape off as much as possible and then brute force?
That not a bad price for the replacement motor - about half of what the usual suppliers want for a new one. If I make a complete pigs ear of the one I have, I may to resort to Ebay!
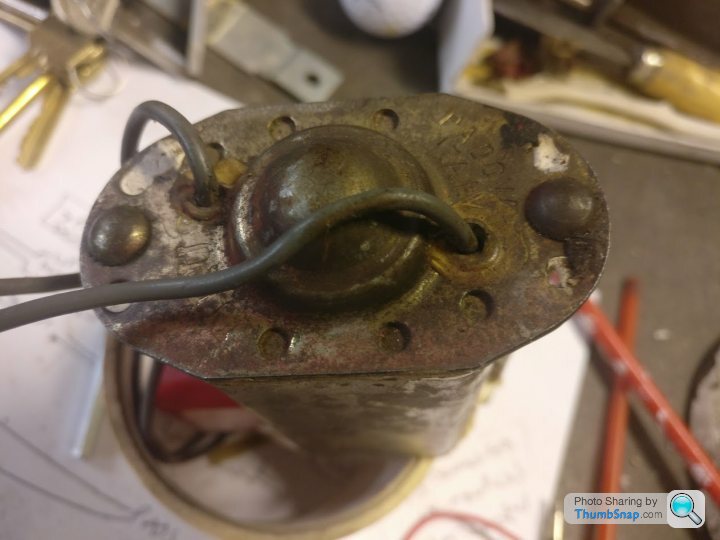


Mike - I assumed the base was soldered on. But I think you are probably correct - what do you make of these photos, is it epoxy? If so, what's the best way to separate the pieces, scrape off as much as possible and then brute force?
That not a bad price for the replacement motor - about half of what the usual suppliers want for a new one. If I make a complete pigs ear of the one I have, I may to resort to Ebay!
Andy 308GTB said:
Thanks for the advice on this.
Mike - I assumed the base was soldered on. But I think you are probably correct - what do you make of these photos, is it epoxy? If so, what's the best way to separate the pieces, scrape off as much as possible and then brute force?
Looks like epoxy. The end caps are clamped by the bolts on the final assembly so the strength of a soldered joint wouldn't be needed and it would be a horrible production process. A scrape with a small screwdriver should quickly reveal the answer.Mike - I assumed the base was soldered on. But I think you are probably correct - what do you make of these photos, is it epoxy? If so, what's the best way to separate the pieces, scrape off as much as possible and then brute force?
You guys are good. Once I unpicked all the sealant the base practically fell off. It's comically simple - I'm saddened that I couldn't suss that out myself!
It looks like the carbon brushes are both the same length and I am now thinking that if I can get them sliding properly they won't need replacing.
When the armature is in place there is only about 1mm/2mm of brush protruding from the carrier. You can see from the pictures that that means there is plenty still inside the carrier to align them properly.
Thanks again for your support.


It looks like the carbon brushes are both the same length and I am now thinking that if I can get them sliding properly they won't need replacing.
When the armature is in place there is only about 1mm/2mm of brush protruding from the carrier. You can see from the pictures that that means there is plenty still inside the carrier to align them properly.
Thanks again for your support.
Nicely done. When you're trying to free off the brushes with the in and out method don't let them spring out on their own, push them in and let them out gently by holding finger pressure against them, if you let them spring out the brushes fly leads could break out of the brushes
I should have mentioned this earlier, I hope I'm not too late
Also polish the commutator with fine wet and dry, if the commutator is of the undercut type run a pin between each segment and polish again, you can tell if it's of the undercut type as there will be cut grooves between each segment
I should have mentioned this earlier, I hope I'm not too late
Also polish the commutator with fine wet and dry, if the commutator is of the undercut type run a pin between each segment and polish again, you can tell if it's of the undercut type as there will be cut grooves between each segment
Penelope Stopit said:
Nicely done. When you're trying to free off the brushes with the in and out method don't let them spring out on their own, push them in and let them out gently by holding finger pressure against them, if you let them spring out the brushes fly leads could break out of the brushes
The visible wire in the pictures appears to be attached to the brush holder, not the brush itself. The entire brush should be dead easy to remove if this is the case, and also makes finding a suitable replacement brushes even easier if they are needed.Mr2Mike said:
Penelope Stopit said:
Nicely done. When you're trying to free off the brushes with the in and out method don't let them spring out on their own, push them in and let them out gently by holding finger pressure against them, if you let them spring out the brushes fly leads could break out of the brushes
The visible wire in the pictures appears to be attached to the brush holder, not the brush itself. The entire brush should be dead easy to remove if this is the case, and also makes finding a suitable replacement brushes even easier if they are needed.And if you think that the brushes don't have fly leads then feel free to keep thinking it (you may even be correct) but please don't quote and play your games with my posts unless you have got your facts right
Mr2Mike said:
Penelope Stopit said:
Nicely done. When you're trying to free off the brushes with the in and out method don't let them spring out on their own, push them in and let them out gently by holding finger pressure against them, if you let them spring out the brushes fly leads could break out of the brushes
The visible wire in the pictures appears to be attached to the brush holder, not the brush itself. The entire brush should be dead easy to remove if this is the case, and also makes finding a suitable replacement brushes even easier if they are needed.But then another piece of copper multi-strand wire was also soldered to the carrier - which then attached to the rear end of the brush. I was able to manoeuvre the brush out of the carrier with the wiring attached.
Penelope Stopit said:
I didn't mention anything about visible wire?
And if you think that the brushes don't have fly leads then feel free to keep thinking it (you may even be correct) but please don't quote and play your games with my posts unless you have got your facts right
I'm genuinely not sure what justified that childish little outburst, exactly what games do you think I am playing? I simply quoted your post and commented that the brushes did not appear to have wires attached, which is not that unusual on small DC motors. The brush wires may simply not be visible in the pictures, and I haven't suggested otherwise.And if you think that the brushes don't have fly leads then feel free to keep thinking it (you may even be correct) but please don't quote and play your games with my posts unless you have got your facts right
Seriously, take another look at my post and your response and then have a word with yourself.
EdIt:
Andy 308GTB said:
The external wires were soldered direct to the carrier/brush holder.
But then another piece of copper multi-strand wire was also soldered to the carrier - which then attached to the rear end of the brush. I was able to manoeuvre the brush out of the carrier with the wiring attached.
Thanks for the clarification. Are they long enough to reuse?But then another piece of copper multi-strand wire was also soldered to the carrier - which then attached to the rear end of the brush. I was able to manoeuvre the brush out of the carrier with the wiring attached.
Edited by Mr2Mike on Saturday 4th August 15:04
Andy 308GTB said:
Mr2Mike said:
Penelope Stopit said:
Nicely done. When you're trying to free off the brushes with the in and out method don't let them spring out on their own, push them in and let them out gently by holding finger pressure against them, if you let them spring out the brushes fly leads could break out of the brushes
The visible wire in the pictures appears to be attached to the brush holder, not the brush itself. The entire brush should be dead easy to remove if this is the case, and also makes finding a suitable replacement brushes even easier if they are needed.But then another piece of copper multi-strand wire was also soldered to the carrier - which then attached to the rear end of the brush. I was able to manoeuvre the brush out of the carrier with the wiring attached.
Yes it is plain to see that the plastic sleeved cables connect to the brush-box
The multi-strand cables brush-box connections aren't so plain to see but it does look like they are welded to the outer of the brush-box
Anyway, I'm happy for you that you've got it sorted
I haven't got a clue what Mr2Mike is attempting to achieve with that latest post but she/he may lose sleep over this now that all has been revealed
Gassing Station | Home Mechanics | Top of Page | What's New | My Stuff