Mini Cooper S mechanical restoration/MacGyver job
Discussion


Not sure if this is of interest to people. I've always loved Minis since I first owned a poop brown 1979 Mini 1000 with matching beige interior. Being 17 & skint, that particular car kind of forced me into learning how to spanner since I was stupid enough to run it out of oil & couldn't afford to scrap it or pay a garage to fix it.
Fast forward a few decades & I bought an R53 Cooper S which I loved to bits, but then sold on to scratch a Porsche itch. I regretted selling the Mini & after it became time to move the Porsche on, I decided to get back into one.
Trouble is, I just don't like the R56 & subsequent versions. To me, the R53 is the aesthetic high water mark for the BMW Minis. I'm aware that some of the redesign was forced on BMW by developing pedestrian safety regulations but nonetheless, they're not for me & the less said about Countrymen & coupés the better, frankly. And where else can you get a 1.6 supercharged hatchback??
So, if it's going to be an R53, then the newest of those will be thirteen years old by now & that means a project & I do love a project. Unfortunately, even a little Mini doesn't fit in my garage & so it's back to teenage me, spannering on the drive.
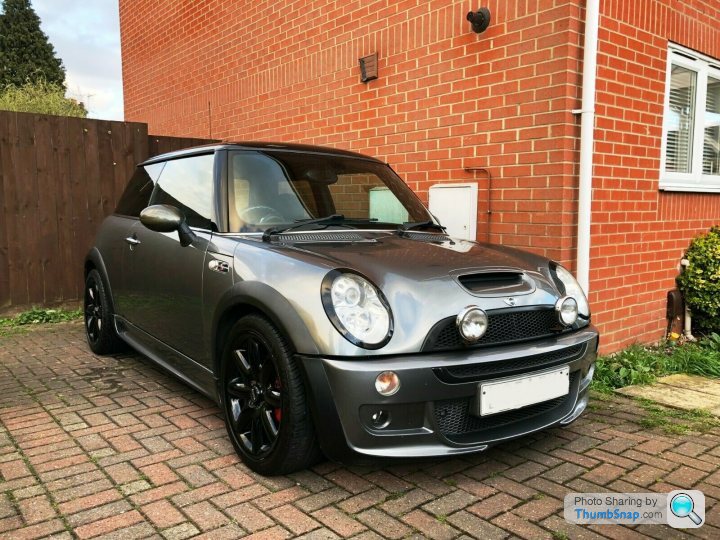
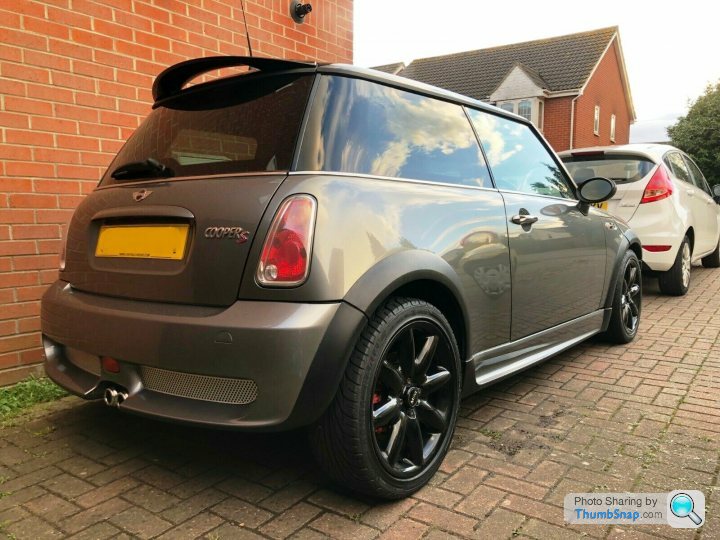
Here it is as bought, 78k on the clock. Busted were at number one when this was built!
The plan is change the clutch. On these, that involves removing the front end & dropping the subframe. In turn that gives excellent access to address all the common faults they suffer from - endless oil leaks, suspension rebuild, service the supercharger, brakes & anything else that comes up.
First, up on stands.
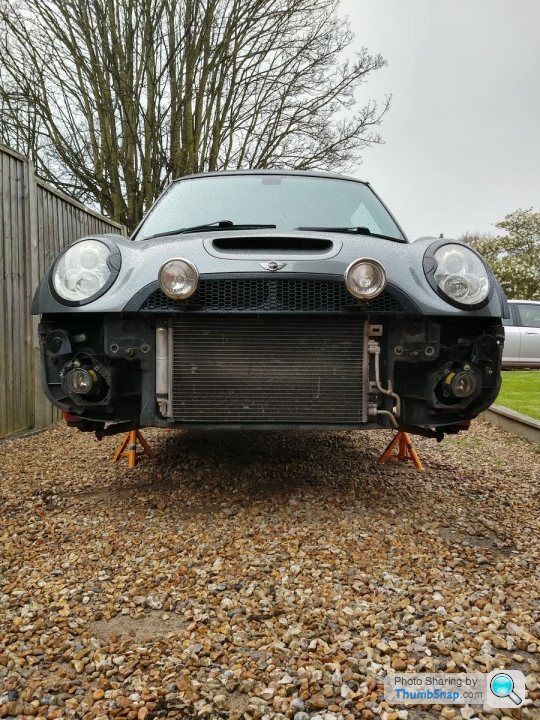
The drive is concrete with an inch of gravel - it's much more solid than at first glance but those stands aren't really up to job, so higher ones incoming.
Front off. Bit of an insight into how cars are built in a modular way doing this. The bumper comes off with six bolts & then the whole radiator & fan sub assembly is about six more. Bit of a find - the dash says -40c when you put the key in. On removing the bumper, I discover some knob has cut off the outside air temperature sensor. Just chopped through the wires. Why would you do that?? At this point, I've removed the supercharger to service it & replace the water pump & its O-rings & the crank position sensor O-ring (notorious for leaking oil) while I have such good access. Sure enough, the front of the engine is caked in oil. Generally a bit corroded & sad looking at this point.
Supercharger out. Given a clean up & new oil both ends.

Next, under the car & subframe out. In theory, this is straightforward - undo the outer ball joints, drop links, tie rods each side, a few cables - brake hose, wear sensor cable etc & then ten bolts & lower it. In practice, fifteen British winters have welded everything together like poop to bear fur & a LOT of hammering goes on.
Once everything is apart, in goes the jack & carefully, it's lowered, checking nothing is caught & stopping halfway to undo the power steering power supply. These cars really pack a lot into a small space. That thing is caked in oil.

Halfway through the tear down. Bit more to add after lunch if anyone wants to see it?
Fast forward a few decades & I bought an R53 Cooper S which I loved to bits, but then sold on to scratch a Porsche itch. I regretted selling the Mini & after it became time to move the Porsche on, I decided to get back into one.
Trouble is, I just don't like the R56 & subsequent versions. To me, the R53 is the aesthetic high water mark for the BMW Minis. I'm aware that some of the redesign was forced on BMW by developing pedestrian safety regulations but nonetheless, they're not for me & the less said about Countrymen & coupés the better, frankly. And where else can you get a 1.6 supercharged hatchback??
So, if it's going to be an R53, then the newest of those will be thirteen years old by now & that means a project & I do love a project. Unfortunately, even a little Mini doesn't fit in my garage & so it's back to teenage me, spannering on the drive.
Here it is as bought, 78k on the clock. Busted were at number one when this was built!
The plan is change the clutch. On these, that involves removing the front end & dropping the subframe. In turn that gives excellent access to address all the common faults they suffer from - endless oil leaks, suspension rebuild, service the supercharger, brakes & anything else that comes up.
First, up on stands.
The drive is concrete with an inch of gravel - it's much more solid than at first glance but those stands aren't really up to job, so higher ones incoming.
Front off. Bit of an insight into how cars are built in a modular way doing this. The bumper comes off with six bolts & then the whole radiator & fan sub assembly is about six more. Bit of a find - the dash says -40c when you put the key in. On removing the bumper, I discover some knob has cut off the outside air temperature sensor. Just chopped through the wires. Why would you do that?? At this point, I've removed the supercharger to service it & replace the water pump & its O-rings & the crank position sensor O-ring (notorious for leaking oil) while I have such good access. Sure enough, the front of the engine is caked in oil. Generally a bit corroded & sad looking at this point.
Supercharger out. Given a clean up & new oil both ends.
Next, under the car & subframe out. In theory, this is straightforward - undo the outer ball joints, drop links, tie rods each side, a few cables - brake hose, wear sensor cable etc & then ten bolts & lower it. In practice, fifteen British winters have welded everything together like poop to bear fur & a LOT of hammering goes on.
Once everything is apart, in goes the jack & carefully, it's lowered, checking nothing is caught & stopping halfway to undo the power steering power supply. These cars really pack a lot into a small space. That thing is caked in oil.
Halfway through the tear down. Bit more to add after lunch if anyone wants to see it?
Go for it! I have a JCW that blew a hole in the No.2 piston so this is both nice to see and bringing back painful memories 
edit: https://www.pistonheads.com/gassing/topic.asp?h=0&...
Theres mine! Havent updated the thread in a long time. I since fitted the original JCW exhaust and a Japspeed decat manifold and got it on the rollers, where it put out a healthy 248hp. It truly was an absolute rocket! Unfortunately, the No.2 injector leaned out once evening without flagging up the AFR tolerance alarms, so I had no idea. This melted the piston and blew a hole in it
Edited by NateWM on Tuesday 14th May 12:57
Okey dokey. Wasn't sure anyone would be up for a bunch of amateur spannering an old Mini but it's a funny old world. I should add that this is intended to be a daily driver, so the driving force is to get it to a point where the mechanicals are spot on, rather than concours standard with the gleaming engine bay & shiny nuts everywhere!
To that end, one of the great things about these now is that they're so old & were produced in such numbers that pretty much everything that you need is available on the Bay for pennies compared with say, the wallet emptying Porsche I've got sat behind it. If you're up for a bit of mechanickery, they are a decent option, the Tritec engine is pretty durable, the faults well documented & can be addressed easily enough & there are thousands of videos & websites for anything you might need guiding with.
Mine came with pretty grim light blue half leather seats & I picked up a mint full leather interior for £175. That's peanuts really but more on the interior later.
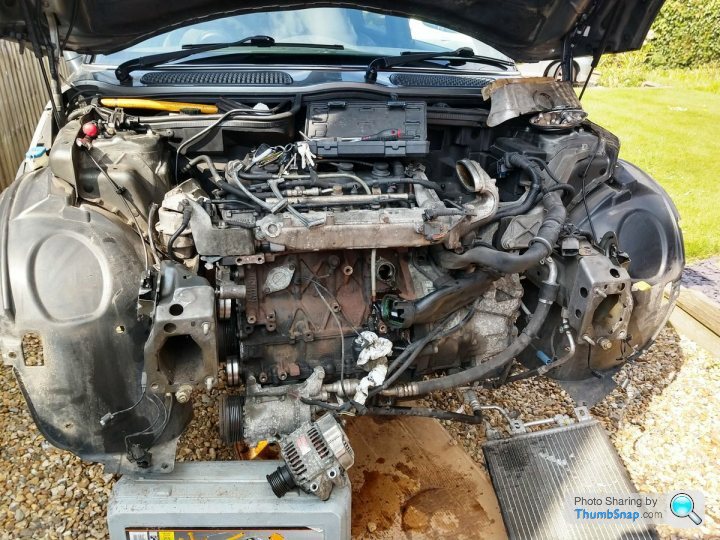
So, I've got the subframe out, done the servicing on the supercharger, water pump & bits & bobs on the front of the engine. Also changed the serpentine belt & decided to leave the timing end of the engine at that. I knew the previous owner had recently changed the timing chain & tensioner, so not much to so over there. Onto the clutch then.
This is a bit of a nightmare & in hindsight, I would have taken the box & engine out together but I didn't so here it is. First up is drain the oil. The torque value of the sump plug is about 25nm or so, people routinely buzz these up to the extent you need a length of scaffold to undo them & mine was like that. My advice is if you need a breaker to undo it, make sure it's pulling towards you rather than pushing toward the sump.

And that now looks like this:

So oil out, then drain the gearbox. Up top, you'll need to remove the airbox & snorkel. This gives access to the gear linkages which pry off their mountings on the bell housing. Slave cylinder off & be careful to keep the piston as level as possible to avoid air getting in (ask me how I know) Once you've done all that, you can start undoing the bell housing bolts. There are nine in total (I think). Six of those are a doddle, the last three aren't. They're buried under a whole bunch of wiring on the top of the gearbox & will take you forever to undo.
By now, you will have removed two heat shields, which lets you undo the starter (whose bolts form part of the engine to gearbox fasteners) & pulled out both axles. At this point, it's time to support the engine, as you're about to undo the gearbox mount. So, jack under the engine & another under the gearbox as the last bell housing bolts come off & you can start to pry the box away from the engine.

This is not a great photo but hopefully you can make out the orange scissor jack holding the engine (MacGyver stuff) As it was, it came up six inches short at full stretch, so there's about four bits of wood on between the jack & the engine, but don't tell anyone.
The box itself is a bit of a nightmare to deal with. It's not flat at the bottom - most aren't tbf - and once it's clear of the pressure plate, you have literally a centimetre of clearance between the end of the bell housing & the inner chassis leg & an aircon pipe runs through that space too. The lesson is take your time & don't break anything. Anyway, it came out in the end & raised a question of it's own.

It's a bit wet inside as you can see but on the engine, the rear main seal isn't leaking. The only other possibility afaics is the input shaft seal, so since I'm hopefully never going to be this deep in the car again, it's a bit of a no brainer to swap the seals & while I'm there, change the clutch release fork bushings & generally clean it right up.
For the clutch itself, I toyed with going single mass flywheel & sprung clutch to lighten things up but in the end, went off the idea after reading mixed reviews of the kits, so installed a stock DMF, clutch & pressure plates. Here you can see the iffy bits of wood on the scissor jack too.

Top tip for reinstalling - I read about a guy who did this & got all the way to dropping the car back on it's wheels, only to discover that the car wouldn't go into gear & worked out that when he put the box back on, he'd managed to tip the release bearing off the clutch fork such that it was loose on the input shaft. So to stop that, cable tie the release fork on the outside of the box to stop the clutch actuating until it's all reinstalled, then after a couple of bellhousing bolts are back on enough that the box is secure-ish, put the slave cylinder back & test the clutch works or at least isn't jammed or whatever.
This is the part I was least looking forward to. Manhandling a heavy gearbox on a gravel drive with basic tools. I'd decided I'd have one try at jacking it back into position & when that inevitably failed, I'd think again. It did. Of course it did!
I'd seen other guys use an engine bar to hoist the box up which seemed ideal, it took all the weight from above & left both hands free to get the millimetre accuracy you need to refit the thing & moreover, stopped you from misaligning it & ending up with the box hanging off the clutch disc by the input shaft which would be all kinds of bad. here's the tool:

It sits on the inner wings & is perfect. I haven't got one of those & I didn't want to buy one to use once. I do though, have one of these

I took out the centre pole, threw a five quid ratchet strap round it & it worked. MacGyver/Bodge, Bodge/Macgyver.
Seriously, I wouldn't recommend it but it did the trick. Box on, suspension next.
To that end, one of the great things about these now is that they're so old & were produced in such numbers that pretty much everything that you need is available on the Bay for pennies compared with say, the wallet emptying Porsche I've got sat behind it. If you're up for a bit of mechanickery, they are a decent option, the Tritec engine is pretty durable, the faults well documented & can be addressed easily enough & there are thousands of videos & websites for anything you might need guiding with.
Mine came with pretty grim light blue half leather seats & I picked up a mint full leather interior for £175. That's peanuts really but more on the interior later.
So, I've got the subframe out, done the servicing on the supercharger, water pump & bits & bobs on the front of the engine. Also changed the serpentine belt & decided to leave the timing end of the engine at that. I knew the previous owner had recently changed the timing chain & tensioner, so not much to so over there. Onto the clutch then.
This is a bit of a nightmare & in hindsight, I would have taken the box & engine out together but I didn't so here it is. First up is drain the oil. The torque value of the sump plug is about 25nm or so, people routinely buzz these up to the extent you need a length of scaffold to undo them & mine was like that. My advice is if you need a breaker to undo it, make sure it's pulling towards you rather than pushing toward the sump.
And that now looks like this:
So oil out, then drain the gearbox. Up top, you'll need to remove the airbox & snorkel. This gives access to the gear linkages which pry off their mountings on the bell housing. Slave cylinder off & be careful to keep the piston as level as possible to avoid air getting in (ask me how I know) Once you've done all that, you can start undoing the bell housing bolts. There are nine in total (I think). Six of those are a doddle, the last three aren't. They're buried under a whole bunch of wiring on the top of the gearbox & will take you forever to undo.
By now, you will have removed two heat shields, which lets you undo the starter (whose bolts form part of the engine to gearbox fasteners) & pulled out both axles. At this point, it's time to support the engine, as you're about to undo the gearbox mount. So, jack under the engine & another under the gearbox as the last bell housing bolts come off & you can start to pry the box away from the engine.
This is not a great photo but hopefully you can make out the orange scissor jack holding the engine (MacGyver stuff) As it was, it came up six inches short at full stretch, so there's about four bits of wood on between the jack & the engine, but don't tell anyone.
The box itself is a bit of a nightmare to deal with. It's not flat at the bottom - most aren't tbf - and once it's clear of the pressure plate, you have literally a centimetre of clearance between the end of the bell housing & the inner chassis leg & an aircon pipe runs through that space too. The lesson is take your time & don't break anything. Anyway, it came out in the end & raised a question of it's own.
It's a bit wet inside as you can see but on the engine, the rear main seal isn't leaking. The only other possibility afaics is the input shaft seal, so since I'm hopefully never going to be this deep in the car again, it's a bit of a no brainer to swap the seals & while I'm there, change the clutch release fork bushings & generally clean it right up.
For the clutch itself, I toyed with going single mass flywheel & sprung clutch to lighten things up but in the end, went off the idea after reading mixed reviews of the kits, so installed a stock DMF, clutch & pressure plates. Here you can see the iffy bits of wood on the scissor jack too.
Top tip for reinstalling - I read about a guy who did this & got all the way to dropping the car back on it's wheels, only to discover that the car wouldn't go into gear & worked out that when he put the box back on, he'd managed to tip the release bearing off the clutch fork such that it was loose on the input shaft. So to stop that, cable tie the release fork on the outside of the box to stop the clutch actuating until it's all reinstalled, then after a couple of bellhousing bolts are back on enough that the box is secure-ish, put the slave cylinder back & test the clutch works or at least isn't jammed or whatever.
This is the part I was least looking forward to. Manhandling a heavy gearbox on a gravel drive with basic tools. I'd decided I'd have one try at jacking it back into position & when that inevitably failed, I'd think again. It did. Of course it did!
I'd seen other guys use an engine bar to hoist the box up which seemed ideal, it took all the weight from above & left both hands free to get the millimetre accuracy you need to refit the thing & moreover, stopped you from misaligning it & ending up with the box hanging off the clutch disc by the input shaft which would be all kinds of bad. here's the tool:
It sits on the inner wings & is perfect. I haven't got one of those & I didn't want to buy one to use once. I do though, have one of these
I took out the centre pole, threw a five quid ratchet strap round it & it worked. MacGyver/Bodge, Bodge/Macgyver.
Seriously, I wouldn't recommend it but it did the trick. Box on, suspension next.

Nice care Nate btw 
Back to work for a bit now, so more later but in passing, I'll mention that I do like to run through the steps when recounting these jobs, which is probably a bit niche, even for a car website but I've left loads out too. There's the dog bone engine mount, offside axle bearing carrier, ecu removal, most of the induction pipework, thermostat, dipstick tube removal...
Chatting with my mate, I reckon it's something in the order of 250-300 fasteners undone & done up so far & I'm far from finished & that's all by hand. I'd swim oceans for a compressor & a ramp.
Cankicker said:
I'll mention that I do like to run through the steps when recounting these jobs, which is probably a bit niche, even for a car website
I can't speak for everyone, but I personally love that s t
t 
The threads with legs in Readers Cars seem to be the ones that go into the detail
The jack under the engine brought back memories....
Of removing the clutch from a Maxi, four cars up in the pile at a scrapyard
A tenner for the clutch, and I found a five-pound note in the glovebox of the Maxi, back when that was the price of half a tank of petrol!
Best of luck with the restoration.
Of removing the clutch from a Maxi, four cars up in the pile at a scrapyard
A tenner for the clutch, and I found a five-pound note in the glovebox of the Maxi, back when that was the price of half a tank of petrol!
Best of luck with the restoration.
Suspension then. First thing to note I've only tackled the front so far, the rear will be for another day. There's a fair bit to say on the suspension design on these & the first thing to acknowledge is how BMW definitely got it right. The Austin Minis were like go-carts. The weird cone dampers & lock to lock in a turn steering made them fantastic fun to drive & BMW caught the spirit of it in the R53 car.
The other obvious thing is how much easier it is to work on if you have access to it. It's a truism but for a reason. The front consists of a standard macpherson strut arrangement interconnected by an anti roll bar. That in turn is connected to a triangular control arm held to the subframe & hub by inner & outer ball joints & a metalastic bushing at the rear.
It's a feature of BMW suspension architecture in this period (don't know about current cars) to use this arrangement & to my mind, it's flawed. The rear control arm bushing is an interference fit in a carrier bracket which in turn in bolted to the body. This bushing faces forward & catches all the salt, dust, grit & water UK roads can throw at it & that makes it both prone to deterioration & difficult to replace. I've pinched a random image of it here.

Any gen 1 Mini by now will be picking up MOT advisories for these bushes. Another weakness is the strut mounts. They connect the strut to the car & take a hammering. Also, it's well known that the strut towers commonly deform on these cars due to the short suspension travel & the fix is to take a block of wood & hammer them flat! Sure enough, the strut mounts on my car were torn.

Removing them is easy enough. Disconnect the droplinks & lower ball joint. Unclip the ABS sensor & brake hose & tap the strut out of the hub with a lump hammer. Then undo the three bolts on top & the strut will wiggle out. To remove the mounts, use spring compressors to release tension & the top mount will undo either with an impact gun or using a hex key to stop the strut spinning as you undo the retaining nut. You can forego spring compressors if you wish, the springs on standard suspension aren't under much pressure at all but it's best practice to use them.
So onto the control arms then & the ball joints. As ever with these, rust is a bugger. They can take a lot of persuasion to remove & it's by fare easier to do with the subframe out of the car. Here's mine after a clean up & with all new bits fitted.

I refitted standard ball joints but opted for polyurethane control arm bushes & anti roll bar bushes - the idea is long lived mechanicals & an easy life rather than anything else & I'll put up with any negative ride characteristics as a trade off.
The big cock up here, if you look closely is the inner ball joints. I completely forgot to reattach the headlight levelling sensor to the inner ball joint bolt & actually refitted the subframe to the car before realising. It's practically impossible to rectify in situ &so I had to remove the subframe a second time. Having done that, it dawned on me the ball joints, whilst identical in operational terms, are handed. The offside one has a hole drilled in it, that takes a locating tab for the levelling sensor bracket to stop it moving around in use. I fitted them the wrong way round.
BMW have a special tool for removing the ball joints which is essentially an oversized ball joint puller. It's £200, so screw that. In the end, I drilled a hole in the ball joint & reassembled it all, but that cost me another day. Always check your parts!
The other obvious thing is how much easier it is to work on if you have access to it. It's a truism but for a reason. The front consists of a standard macpherson strut arrangement interconnected by an anti roll bar. That in turn is connected to a triangular control arm held to the subframe & hub by inner & outer ball joints & a metalastic bushing at the rear.
It's a feature of BMW suspension architecture in this period (don't know about current cars) to use this arrangement & to my mind, it's flawed. The rear control arm bushing is an interference fit in a carrier bracket which in turn in bolted to the body. This bushing faces forward & catches all the salt, dust, grit & water UK roads can throw at it & that makes it both prone to deterioration & difficult to replace. I've pinched a random image of it here.
Any gen 1 Mini by now will be picking up MOT advisories for these bushes. Another weakness is the strut mounts. They connect the strut to the car & take a hammering. Also, it's well known that the strut towers commonly deform on these cars due to the short suspension travel & the fix is to take a block of wood & hammer them flat! Sure enough, the strut mounts on my car were torn.
Removing them is easy enough. Disconnect the droplinks & lower ball joint. Unclip the ABS sensor & brake hose & tap the strut out of the hub with a lump hammer. Then undo the three bolts on top & the strut will wiggle out. To remove the mounts, use spring compressors to release tension & the top mount will undo either with an impact gun or using a hex key to stop the strut spinning as you undo the retaining nut. You can forego spring compressors if you wish, the springs on standard suspension aren't under much pressure at all but it's best practice to use them.
So onto the control arms then & the ball joints. As ever with these, rust is a bugger. They can take a lot of persuasion to remove & it's by fare easier to do with the subframe out of the car. Here's mine after a clean up & with all new bits fitted.
I refitted standard ball joints but opted for polyurethane control arm bushes & anti roll bar bushes - the idea is long lived mechanicals & an easy life rather than anything else & I'll put up with any negative ride characteristics as a trade off.
The big cock up here, if you look closely is the inner ball joints. I completely forgot to reattach the headlight levelling sensor to the inner ball joint bolt & actually refitted the subframe to the car before realising. It's practically impossible to rectify in situ &so I had to remove the subframe a second time. Having done that, it dawned on me the ball joints, whilst identical in operational terms, are handed. The offside one has a hole drilled in it, that takes a locating tab for the levelling sensor bracket to stop it moving around in use. I fitted them the wrong way round.
BMW have a special tool for removing the ball joints which is essentially an oversized ball joint puller. It's £200, so screw that. In the end, I drilled a hole in the ball joint & reassembled it all, but that cost me another day. Always check your parts!
Incidentally, the rear control bushings are horrible to remove. They are pressed in to the carrier bracket & your options are either cut them out with a reciprocating saw or throw the whole thing out & buy something pre assembled or just a new bracket. To fit the poweflex bushes, you need a press or the means to wind them in with a gubbins made up of studding, nuts & oversized washers.
I don't have any of this stuff but found that if I placed the polyurethane bush on the carrier bracket & the carrier bracket on a trolley jack, I could press the bush in to the bracket against the underside of the car. There's always a way.
I don't have any of this stuff but found that if I placed the polyurethane bush on the carrier bracket & the carrier bracket on a trolley jack, I could press the bush in to the bracket against the underside of the car. There's always a way.
Really enjoyed reading this thread, especially the innovative work arounds! Necessity is the mother of invention in home spannering...
I never liked the MINI when it came out, but now I'm harbouring thoughts about an R53 if I ever replace the Corrado. Mostly due to the fact its supercharged.
More updates please when you get the chance.
I never liked the MINI when it came out, but now I'm harbouring thoughts about an R53 if I ever replace the Corrado. Mostly due to the fact its supercharged.
More updates please when you get the chance.
Bringing things more or less up to date but skipping the interior work that I'll do later, I finally got the thing to a point where I could test start it to ensure it actually ran but also refill the coolant & generally check it over for leaks etc. by Wednesday last week.
As with anyone in this position, it's a bit of a moment to turn a car over. As your fingers push on the key, you inevitably get that little voice of doubt - did you do up that bolt? Did you leave a spanner in the gubbins? Have you checked everything? Is there oil in the engine?
But it was fine, it fired up perfectly, settled down immediately & even all the warning lights went out. Success! It was getting on a bit & after refilling & burping the cooling system, I stuck to the general rule that nothing good happens after 7pm, so tidied up & left it for the night. Thursday was put it in gear day. Bearing in mind it's still up on stands & the whole point of this was to change the clutch, flywheel & pressure plate, I owed it a test. So, engine on, deep breath, clutch in, first gear, clutch out...
Massive vibration & intermittent graunching noises coming from the front. I could have cried. All that work & what have I done? Put the release bearing on backwards? Left a socket in the gearbox?
I can't see anything from the drivers seat, so realising the engine is still turning, I gather the courage to leave it running in gear & step out for a look. I can see the wheels are turning, then noise & vibration & they stop. Then start again. Looking up at the bulkhead, I see the ABS unit vibrating & it dawns on me. The ABS is kicking in. Sure enough, the ABS light on the dash is firing on & off. I get round to the wheels & see that somewhere along the line, I've managed to damage the abs sensor wire. This is a massive relief, perversely because the wheels are turning, right? So if this is the worse cock up, then I'll take it. Changing the ABS sensors will be a walk in the park compared to doing the clutch again.
Hold your horses. I get to the sensor & it's become as one with the hub. Balls. It breaks off as I try to remove it. I find some advice where a guy heats up a bolt & screws it in to the sensor body & pulls the rest of the sensor out. I try that, doesn't work & the screw is still in there!

This leaves me with a choice. Drill the sensor but that risks damaging the reluctor ring out or remove the hub altogether & spare the reluctor. The former is quicker, the latter more sensible & I decide on that. The hub nuts are 180nm, so with the help of my daughter stomping on the brake pedal & that steel tube off my bike stand (again) I get the hub nuts off & that brings us to this morning.
Pretty fed up with that really. To finish the whole thing, all I had do was replace the ABS sensors, refit the under tray & bolt it up the the underside of the bumper & I was done. Now I have another fairly involved job on my hands but I'll get there.
One interesting thing - the Tritec engine went into loads of cars & at one point, I dislodged the battered MINI emblem on the valve cover. Although I didn't think to take a picture, underneath it says 1.6L 16 valve!

As with anyone in this position, it's a bit of a moment to turn a car over. As your fingers push on the key, you inevitably get that little voice of doubt - did you do up that bolt? Did you leave a spanner in the gubbins? Have you checked everything? Is there oil in the engine?
But it was fine, it fired up perfectly, settled down immediately & even all the warning lights went out. Success! It was getting on a bit & after refilling & burping the cooling system, I stuck to the general rule that nothing good happens after 7pm, so tidied up & left it for the night. Thursday was put it in gear day. Bearing in mind it's still up on stands & the whole point of this was to change the clutch, flywheel & pressure plate, I owed it a test. So, engine on, deep breath, clutch in, first gear, clutch out...
Massive vibration & intermittent graunching noises coming from the front. I could have cried. All that work & what have I done? Put the release bearing on backwards? Left a socket in the gearbox?
I can't see anything from the drivers seat, so realising the engine is still turning, I gather the courage to leave it running in gear & step out for a look. I can see the wheels are turning, then noise & vibration & they stop. Then start again. Looking up at the bulkhead, I see the ABS unit vibrating & it dawns on me. The ABS is kicking in. Sure enough, the ABS light on the dash is firing on & off. I get round to the wheels & see that somewhere along the line, I've managed to damage the abs sensor wire. This is a massive relief, perversely because the wheels are turning, right? So if this is the worse cock up, then I'll take it. Changing the ABS sensors will be a walk in the park compared to doing the clutch again.
Hold your horses. I get to the sensor & it's become as one with the hub. Balls. It breaks off as I try to remove it. I find some advice where a guy heats up a bolt & screws it in to the sensor body & pulls the rest of the sensor out. I try that, doesn't work & the screw is still in there!
This leaves me with a choice. Drill the sensor but that risks damaging the reluctor ring out or remove the hub altogether & spare the reluctor. The former is quicker, the latter more sensible & I decide on that. The hub nuts are 180nm, so with the help of my daughter stomping on the brake pedal & that steel tube off my bike stand (again) I get the hub nuts off & that brings us to this morning.
Pretty fed up with that really. To finish the whole thing, all I had do was replace the ABS sensors, refit the under tray & bolt it up the the underside of the bumper & I was done. Now I have another fairly involved job on my hands but I'll get there.
One interesting thing - the Tritec engine went into loads of cars & at one point, I dislodged the battered MINI emblem on the valve cover. Although I didn't think to take a picture, underneath it says 1.6L 16 valve!
I used to work at a BMW main dealer when the BMW MINI was launched. Having grown up doing BMW clutches in a couple of hours it was something of a culture shock having to remove the front end to do one!
The workshop floor used to look like one of the Haynes Manual’s strip down shots!
Well done doing it on the drive.
The workshop floor used to look like one of the Haynes Manual’s strip down shots!
Well done doing it on the drive.
Bunked off this afternoon to strip down the hub & drill out the ABS sensor. Here's the axle with everything off. Why do manufacturers insist on using chocolate soft retaining screws on brake discs? They always rust in & always want to strip.

The ABS sensor sits in a threadless hole. Check out the rust in there. I mean literally a ha'penny's grease in the factory would avert all of this pain!

And just for fun, here's the offside inner ball joint that I was talking about earlier. You can see how close it lives to the axle & so why doofus here had to drop the subframe a second time. The less said about that CV boot clip the better, it is on the list of jobs.

The ABS sensor sits in a threadless hole. Check out the rust in there. I mean literally a ha'penny's grease in the factory would avert all of this pain!
And just for fun, here's the offside inner ball joint that I was talking about earlier. You can see how close it lives to the axle & so why doofus here had to drop the subframe a second time. The less said about that CV boot clip the better, it is on the list of jobs.
I should add the ABS sensor was the trouble. It now revs freely & changes gear as it should. Aside from doing up the hub nuts (can't reuse those, so new ones incoming) & bleeding the brakes, that's it. The car is done. I'll do a quick write up on the interior but meanwhile here it is with it's face on again.


Gassing Station | Readers' Cars | Top of Page | What's New | My Stuff