
1991 Pearl Grey Golf MK2 GTi Project
Discussion


A few months ago I acquired this 1991 MK2 Golf GTi 8V, with 170,000 miles on the original clocks (These were broken so it came with a set a GL one installed and the originals in the boot), a recently rebuilt engine, and two non-functional radios included in the price!

Even though the engine had been rebuilt, it hadn't been setup correctly, and combined with the assortment of ancient tyres, broken radiator fan, and the M25 on a hot day made driving it home quite an experience. However, after correctly timing the engine, fitting a new blue temperature sender and fan switch to the radiator, the car was running perfectly. I also swapped the wheels for a set of Ronal Turbo's that had just been refurbished and painted in shadow chrome, wrapped with Toyo Proxies T1R's [SIZE] and these totally transformed the look of the car

Having owned and driven the car for a few months I've fixed several little issues, and I'm in the process of correcting some more major ones that have lead to the car being sat on the drive on jack stands with no suspension, rear axle, wing, trim or radiator.
The next few posts will cover what I've done so far and I hope to keep this thread updated with I do to the car in the future, thanks for reading!
Even though the engine had been rebuilt, it hadn't been setup correctly, and combined with the assortment of ancient tyres, broken radiator fan, and the M25 on a hot day made driving it home quite an experience. However, after correctly timing the engine, fitting a new blue temperature sender and fan switch to the radiator, the car was running perfectly. I also swapped the wheels for a set of Ronal Turbo's that had just been refurbished and painted in shadow chrome, wrapped with Toyo Proxies T1R's [SIZE] and these totally transformed the look of the car
Having owned and driven the car for a few months I've fixed several little issues, and I'm in the process of correcting some more major ones that have lead to the car being sat on the drive on jack stands with no suspension, rear axle, wing, trim or radiator.
The next few posts will cover what I've done so far and I hope to keep this thread updated with I do to the car in the future, thanks for reading!
Edited by NateS2 on Wednesday 29th April 18:18
Thanks!! 
Issue #1: Failed Alternator
The car came fitted with a own-brand GSF alternator that was installed when the engine had been rebuilt. The alternator worked perfectly for a few months, but on the way home from work one day I noticed a clicking sound that changed with the RPM of the engine, followed by a loud crack and much louder clicking sound, which turned out to be...

A bolt (remains of which are on the black part of the alternator), which holds the housing of the housing together, had worked it way loose until it came into contact with the fan (clicking sound 1), which snapped the bolt in half (loud crack), and then bent the bolt head between the fan and the alternator body, ruining the fan and the casing (clicking sound 2).
The car will be getting a new Bosch/Lucas alternator as a result.
Issue #2: Misfires
Ever since I got the car, it had a slight misfire which happened near the very bottom and very top of the rev range and seemed to get worse the hotter the car got, so I assumed it was just the knock sensor or some wiring issue. As I wasn't driving the car much I just lived with it, up until the 28th June, one of the hottest days of the year, where I was on the M1 in slow moving traffic, with it being about 35°C outside and well above inside with the heater on full to even make the car drivable.
The day after, the car only started on 3 cylinders so I had to sort it out. It turned out to be HT leads which looked new, but were unbranded and had deteriorated so much they were no longer connecting properly. After a bit of searching, I found Magnecor and gave them a ring. They actually had one last set of 8mm blue ignitions leads on the shelf at the factory, so I went down to pick them up and they transformed the car! No mis-fire's and the ECU rev-limiter could actually be reached now. Apart from the slightly random lead numbering I would highly recommend!

Issue #3: Oil Cooler
Unfortunately, after coming back from a drive with the new leads, the car emptied quite a lot of oil onto the drive, which seemed to be coming from the gasket where the oil filter housing mounts to the block. The oil filter itself was also in a pretty sorry state so I decided to replace that and all of the gaskets as a matter of course.

The new oil cooler was a HELLA/BEHR (OEM) item which was bought for around £30 including a new gasket, as you can see it looks far better than the old one

Its hard to tell from the picture but the O-ring that was supplied didn't seem very high quality, nor did it fit right. As a result I got a VW seal from TPS, much higher quality but also around £8. [eek] While I was there, I got 3 new bolts to mount the housing to the block, and the large gasket that goes between the two. There are actually two types of seal, a paper and a metal one, with only the metal one still being made by VW. According to its VIN, my car should have the metal one, but of-course it did not, so I had to source a green paper elring alternative off the internet. The cleaned up housing is shown below, not the metal gasket style has different holes
I did the job with the radiator still installed, which is not a good idea and I wouldn't recommend, however I got it done and the leak ceased.
Next post: Electrical issues and modifications
Issues so far: Mechanical
Issue #1: Failed Alternator
The car came fitted with a own-brand GSF alternator that was installed when the engine had been rebuilt. The alternator worked perfectly for a few months, but on the way home from work one day I noticed a clicking sound that changed with the RPM of the engine, followed by a loud crack and much louder clicking sound, which turned out to be...
A bolt (remains of which are on the black part of the alternator), which holds the housing of the housing together, had worked it way loose until it came into contact with the fan (clicking sound 1), which snapped the bolt in half (loud crack), and then bent the bolt head between the fan and the alternator body, ruining the fan and the casing (clicking sound 2).
The car will be getting a new Bosch/Lucas alternator as a result.
Issue #2: Misfires
Ever since I got the car, it had a slight misfire which happened near the very bottom and very top of the rev range and seemed to get worse the hotter the car got, so I assumed it was just the knock sensor or some wiring issue. As I wasn't driving the car much I just lived with it, up until the 28th June, one of the hottest days of the year, where I was on the M1 in slow moving traffic, with it being about 35°C outside and well above inside with the heater on full to even make the car drivable.
The day after, the car only started on 3 cylinders so I had to sort it out. It turned out to be HT leads which looked new, but were unbranded and had deteriorated so much they were no longer connecting properly. After a bit of searching, I found Magnecor and gave them a ring. They actually had one last set of 8mm blue ignitions leads on the shelf at the factory, so I went down to pick them up and they transformed the car! No mis-fire's and the ECU rev-limiter could actually be reached now. Apart from the slightly random lead numbering I would highly recommend!
Issue #3: Oil Cooler
Unfortunately, after coming back from a drive with the new leads, the car emptied quite a lot of oil onto the drive, which seemed to be coming from the gasket where the oil filter housing mounts to the block. The oil filter itself was also in a pretty sorry state so I decided to replace that and all of the gaskets as a matter of course.
The new oil cooler was a HELLA/BEHR (OEM) item which was bought for around £30 including a new gasket, as you can see it looks far better than the old one
Its hard to tell from the picture but the O-ring that was supplied didn't seem very high quality, nor did it fit right. As a result I got a VW seal from TPS, much higher quality but also around £8. [eek] While I was there, I got 3 new bolts to mount the housing to the block, and the large gasket that goes between the two. There are actually two types of seal, a paper and a metal one, with only the metal one still being made by VW. According to its VIN, my car should have the metal one, but of-course it did not, so I had to source a green paper elring alternative off the internet. The cleaned up housing is shown below, not the metal gasket style has different holes
I did the job with the radiator still installed, which is not a good idea and I wouldn't recommend, however I got it done and the leak ceased.
Next post: Electrical issues and modifications
Edited by NateS2 on Wednesday 29th April 18:19

chrismc1977 said:
New bush kit for the gear change, mk3 weighted shift rod & a short shift. New engine mounts & a set of beefier arb’s will transform it....oh lightened flywheel too!
I went 2L AGG block & a big valve head with a Schrick cam in mine. A solid 150hp & loads of torque....
It actually had a new bush kit fitted and I installed a weighted shift rod shortly after buying and it made a huge difference! Short shift will be happening as part of this thread along with mounts and possible ARB's.I went 2L AGG block & a big valve head with a Schrick cam in mine. A solid 150hp & loads of torque....
The engine will be standard for the moment but definitely something that I'd consider in the future!
Thanks for the interest!
Issue #1: The lights

Miraculously, the lights all worked perfectly despite the cut wires and charred insulation, however at some point there was a fault with either overrated bulbs or the dim-dip circuit. Rather than repairing the fault someone must have put a larger fuse in which then over powered the wiring and melted the insulation together, in the picture I've peeled the wires apart because they were all fused together.

Inside its even worse, a wire has been "cut" going to the switch connector, and under the dash the wire is completely bare up to the firewall as all of its insulation has been burnt off. So the cars had quite a lucky escape.
To rectify this, the entire loom will be getting repaired along with additional relays being added to improve the lights and take load off the switch, this will be documented later.
Issue #2: The dials
As mentioned at the start of this thread, the car came fitted with a set of VDO GL clocks, with original MotoMeter items in the boot, with the common failed MFA and rev counter. After a lot of research, testing and buying other broken clocks to compare, I managed to get my originals fixed. If you're interested in what I did, details can be found here.
Issue #3: The radio
When I got the car, it didn't actually come a radio installed, but it has two in the boot, One Pioneer and one Alpine unit including a 6 CD changer. I decided to go with the Alpine which is a TDA-7570R, from 1999 and remarkably good condition:

After connecting the radio with an eBay adaptor harness and turning the key... nothing happened. So I turned the key off and on again and this time the radio came to life for a few seconds before switching off. After much frustration and testing I found out that the switched live going to the radio was intermittent, and just slightly turning the key past the ignition position made it work correctly. After looking through the receipts I got with car it turns out it had a new ignition switch from the same place as the self-dismantling alternator, so that will also be going in the bin.
After getting the radio to come on stay on, the next issue was that only the in-dash tweeters were working. I tested the original VW rear speakers and these were both blown so that was easily explained. As for the door pod speakers, I was pleasantly surprised to find matching Alpine drivers had been installed and just not connected, so some more eBay adaptors later and I had a functional radio.
As the CD changer wouldn't be much use to me, I decided I wanted to add aux, which wasn't actually standard feature. After some research and a post by g164rge on the BMW5 forum, I found that a the "Ai-Port" can be adapted to a 3.5 mm jack with cheap adaptor. The mute line for the radio needs to be grounded and some settings need to be changed and voila, AUX.
Sidenote: if anyone has a pair of oval Alpine speakers for the rear get in touch
Electrical issues
Issue #1: The lights
Miraculously, the lights all worked perfectly despite the cut wires and charred insulation, however at some point there was a fault with either overrated bulbs or the dim-dip circuit. Rather than repairing the fault someone must have put a larger fuse in which then over powered the wiring and melted the insulation together, in the picture I've peeled the wires apart because they were all fused together.
Inside its even worse, a wire has been "cut" going to the switch connector, and under the dash the wire is completely bare up to the firewall as all of its insulation has been burnt off. So the cars had quite a lucky escape.
To rectify this, the entire loom will be getting repaired along with additional relays being added to improve the lights and take load off the switch, this will be documented later.
Issue #2: The dials
As mentioned at the start of this thread, the car came fitted with a set of VDO GL clocks, with original MotoMeter items in the boot, with the common failed MFA and rev counter. After a lot of research, testing and buying other broken clocks to compare, I managed to get my originals fixed. If you're interested in what I did, details can be found here.
Issue #3: The radio
When I got the car, it didn't actually come a radio installed, but it has two in the boot, One Pioneer and one Alpine unit including a 6 CD changer. I decided to go with the Alpine which is a TDA-7570R, from 1999 and remarkably good condition:
After connecting the radio with an eBay adaptor harness and turning the key... nothing happened. So I turned the key off and on again and this time the radio came to life for a few seconds before switching off. After much frustration and testing I found out that the switched live going to the radio was intermittent, and just slightly turning the key past the ignition position made it work correctly. After looking through the receipts I got with car it turns out it had a new ignition switch from the same place as the self-dismantling alternator, so that will also be going in the bin.
After getting the radio to come on stay on, the next issue was that only the in-dash tweeters were working. I tested the original VW rear speakers and these were both blown so that was easily explained. As for the door pod speakers, I was pleasantly surprised to find matching Alpine drivers had been installed and just not connected, so some more eBay adaptors later and I had a functional radio.
As the CD changer wouldn't be much use to me, I decided I wanted to add aux, which wasn't actually standard feature. After some research and a post by g164rge on the BMW5 forum, I found that a the "Ai-Port" can be adapted to a 3.5 mm jack with cheap adaptor. The mute line for the radio needs to be grounded and some settings need to be changed and voila, AUX.
Sidenote: if anyone has a pair of oval Alpine speakers for the rear get in touch
Edited by NateS2 on Wednesday 29th April 18:19
Electrical modifications (so far)
Modification #1: The alarm
The alarm actually worked perfectly when I got the car, hence this not being in the issues sections. However, when taking the trim off, it wasn't exactly happy how it was installed. The relays to control the indicators were just taped together and shoved up the side of the pillar, and the ignition loom had been cut up near the near the barrel, and both end were cut in more or less the same place. This meant I could just snip the wires going to the alarm and twist them together to start the car.


After removing the centre console and part of the blower, I found a metal case containing this, a Thatcham Category 2 Sigma M30, which was actually the alarm fitted to Mk2 Subaru Impreza's in the UK. It has a lot of functionality, including a PIN pad, more can be found here. The is the second alarm that was fitted the car, which I know because there are two ultrasonic sensors neatly fitted to the tweeter grills, then the two for this system just screwed to the pillars.
The alarm uses a 20-pin ATX style connector for its input, this means the gauge of the wire is limited to about 1.5 mm² and as a result, the starter current for the car passed from the factory 6/10 mm² down to a 1.5 mm² and then through unknown switching hardware within the alarm unit. To rectify this, the alarm will be reinstalled with external switching and the correct gauge of wire which will tap the cars looms directly at the connectors, hopefully resulting in an install that is as close to factory as possible.
Modification #2: Mk3 battery leads
This is a really common modification to replace the stock Mk2 battery leads with folded metal terminals (shown below with an aftermarket terminal fitted) with Mk3 items that have cast ends are far more reliable

They are direct swap with the lengths being almost the same, the only difference is the way the alternator control wire connects. On the Mk2 setup, the blue wire (shown above) is connected with what is effectively and spade connector in a big housing. The new leads, shown below, uses single pin junior timer connector, which should be far more reliable as it actually seals

I decided to use the Mk3 connector system, so the old one was cut off and the new one was spliced into the loomed using a glue filled crimp connector, this will be removed and re-pinned correctly further down the line.
That's pretty much everything minor that's been done to the car in the past few months. The next post will be the process of taking suspension off the car and some other issues that I found along the way.
Edited by NateS2 on Wednesday 29th April 18:19
I've been enjoying mine all summer and the number of people who stop me, wave and want to talk to me is amazing!
It is now tucked up in a warm garage and will come out to play when the roads are dry and the sun is out!
I've had lots of Golfs in my time and this one has been with me for 18 years!
Iceboy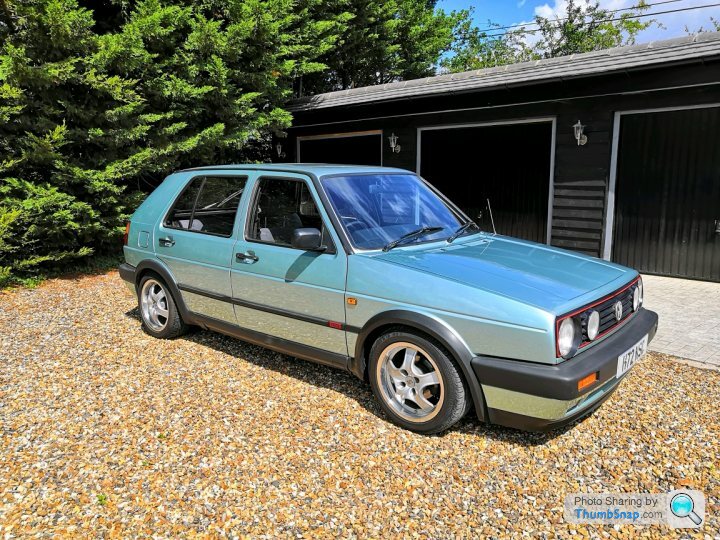
It is now tucked up in a warm garage and will come out to play when the roads are dry and the sun is out!
I've had lots of Golfs in my time and this one has been with me for 18 years!
Iceboy
Apologies for the huge delay in updating this thread, lift got in the way! Hopefully updates should be a little more frequent over the next few months (weather permitting)!
Once I'd got the car up on jack stands, I could remove the wheels and start taking the suspension off, starting at the front. The brakes had recently been replaced by a big chain garage with the previous owner. They were Pagid Rotors and pads however one of the brake slider pins had, at some point, been replaced with a E10 Torx style bolt, and the slider boot cut to suit :/

After removing the rotors, ARB links and strut bolts, I decided to remove the wishbone and hub as one piece as I will be fitting new wishbones anyway. The big bush at the back of the wishbone actually has a thin metal sleeve that is pushed in before the bolt to locate the wishbone in the subframe. Anyone that has attempted to remove the wishbones on a MK2 before knows how much of a pain this is to remove, but after much prying and twisting I managed to get the sleeve and wishbone out. The wishbone on the other side had already been replaced and the sleeve omitted, making removal far easier.

As you can see from the image above, one of the bushes as decided it wanted a new life as rose joint [8-}] The only parts that are being kept are the hubs, and these may even be swapped for 16 valve units at some point
Once I'd got the car up on jack stands, I could remove the wheels and start taking the suspension off, starting at the front. The brakes had recently been replaced by a big chain garage with the previous owner. They were Pagid Rotors and pads however one of the brake slider pins had, at some point, been replaced with a E10 Torx style bolt, and the slider boot cut to suit :/
After removing the rotors, ARB links and strut bolts, I decided to remove the wishbone and hub as one piece as I will be fitting new wishbones anyway. The big bush at the back of the wishbone actually has a thin metal sleeve that is pushed in before the bolt to locate the wishbone in the subframe. Anyone that has attempted to remove the wishbones on a MK2 before knows how much of a pain this is to remove, but after much prying and twisting I managed to get the sleeve and wishbone out. The wishbone on the other side had already been replaced and the sleeve omitted, making removal far easier.
As you can see from the image above, one of the bushes as decided it wanted a new life as rose joint [8-}] The only parts that are being kept are the hubs, and these may even be swapped for 16 valve units at some point
Edited by NateS2 on Wednesday 29th April 18:20
Also thank you for everyone's comments, really appreciate it!
IceBoy said:
I've been enjoying mine all summer and the number of people who stop me, wave and want to talk to me is amazing!
It is now tucked up in a warm garage and will come out to play when the roads are dry and the sun is out!
I've had lots of Golfs in my time and this one has been with me for 18 years!
Iceboy
Are those Porsche wheels? Really suit the carIt is now tucked up in a warm garage and will come out to play when the roads are dry and the sun is out!
I've had lots of Golfs in my time and this one has been with me for 18 years!
Iceboy
NateS2 said:
Also thank you for everyone's comments, really appreciate it!
Think they are OZ Volcanoes. Cool wheels😎IceBoy said:
I've been enjoying mine all summer and the number of people who stop me, wave and want to talk to me is amazing!
It is now tucked up in a warm garage and will come out to play when the roads are dry and the sun is out!
I've had lots of Golfs in my time and this one has been with me for 18 years!
Iceboy
Are those Porsche wheels? Really suit the carIt is now tucked up in a warm garage and will come out to play when the roads are dry and the sun is out!
I've had lots of Golfs in my time and this one has been with me for 18 years!
Iceboy
Jonesy1972 said:
Think they are OZ Volcanoes. Cool wheels??
Ohh okay! Yeah I agree, very cool!Initially, the rear of the car looked to be in good condition compared to the front, with the beam being painted and new calipers, dust guards and discs being fitted:

Eventually, after applying a lot of heat and cutting the brake lines as they were seized solid, I manged to get the axle out. I also had to cut the caliper side of the brake lines as these were also heavily corroded:

After removing the hubs, washing the dirt off and grinding away the remain of any brake piping I was left with a beam which looked like it it had been pulled from the sea, and not from a car. The rust was so bad in parts that it had actually penetrated the metal, however this was only on the bushes and not the beam itself so it should still be safe to re-use

To remove the bushes, i first used a small drill bit to remove the remains of the rubber and the knock out the centre. A hacksaw could then be threaded through the hole in the bush and used to cut the sleeve. The sleeves can then be knocked/pulled out using a chisel, hammer and pliers, leaving me with this

The two bolts towards the bottom of the image are the bolts which hold the shock absorber to the beam. They have captive nuts on spring loaded clips that sit inside the open ends of the beam, these have also been removed and will be treated in rust remover.
As for the beam itself, it will be sandblasted and coated, along with several other underbody parts on the car.
Edited by NateS2 on Wednesday 29th April 18:20
Apologies for the lack of replies over the past few months, but the inclement weather combined with a busy life has put a half to progress. However, I'm aiming to update this thread at-least once every two weeks in the future, especially as the weather gets better!
As for now, I've received most of the suspension "auxiliary parts": including, brake sliders, nuts and bolts, bushes and bump stops, mounts and spring plates. All bushes are Meyle, brake parts TRW, and plastic items and hardware are Febi. They were all purchased from Autodoc who I cannot recommend enough, for both price and variety of parts available.

I also received several underbody parts back from the coaters and I have been incredibly impressed. Below are some before and after pictures:
Engine support BEFORE:

Engine support AFTER:


The process that was applied to these parts is as follows:
As for now, I've received most of the suspension "auxiliary parts": including, brake sliders, nuts and bolts, bushes and bump stops, mounts and spring plates. All bushes are Meyle, brake parts TRW, and plastic items and hardware are Febi. They were all purchased from Autodoc who I cannot recommend enough, for both price and variety of parts available.
I also received several underbody parts back from the coaters and I have been incredibly impressed. Below are some before and after pictures:
Engine support BEFORE:
Engine support AFTER:
The process that was applied to these parts is as follows:
- Blast with garnet abrasive to Sa2½
- Thermal spray with pure zinc | 75µm wet film thickness (dft)
- One coat epoxy sealer
- Two coats polyurethane gloss black | 50µm thickness
Edited by NateS2 on Wednesday 29th April 18:21
So again there hasn't been much progress physically on the car due to life getting in the way, however, I've made several decisions about what's going to happen to the car going forward and I'm in the process of ordering the parts.
Top mounts - Stock Mk2 rear mounts and Mk3 front mounts. I know the front mounts don't really hold much benefit on a standard car but I had some parts already so this made sense
Wishbones - Both wishbones are going to be replaced with Lemforder items, with standard front bushes and R32 rear bushes. The wishbones are a different design to the factory ones and seem to be lighter built, however, they are TUV approved and I may consider welding some reinforcements in anyway.
Expensive OEM parts...
D 314 D37 M2 is 1 litre schultz tin of Volkswagen "Permanent underbody protection", as recommended by the VW repair manual. I can't find anyone who has experience using this so I'm to give it a try and report back my findings. As far as I can tell this product is unique as its a water based natural rubber suspension that dries hard in two hours, while remaining flexible, and be overpainted with water or solvent based paints. This "Uniqueness" comes at a cost however, £55! I'm very aware that products such as U-Pol Raptor exist, however, I'm very curious to give this a try. If anyone knows anything else about it I'd welcome the information!
To the right of the picture are the two Mk3 spring plates 1H0 412 341. Unfortunately, the Klokkerholm parts are no longer produced. I got the genuine parts however they now cost £30 each.

- Suspension - Bilstein B12 Pro kit
- Bushes and Mounts
Top mounts - Stock Mk2 rear mounts and Mk3 front mounts. I know the front mounts don't really hold much benefit on a standard car but I had some parts already so this made sense
Wishbones - Both wishbones are going to be replaced with Lemforder items, with standard front bushes and R32 rear bushes. The wishbones are a different design to the factory ones and seem to be lighter built, however, they are TUV approved and I may consider welding some reinforcements in anyway.
- Anti-Roll Bars and bracing
Expensive OEM parts...
D 314 D37 M2 is 1 litre schultz tin of Volkswagen "Permanent underbody protection", as recommended by the VW repair manual. I can't find anyone who has experience using this so I'm to give it a try and report back my findings. As far as I can tell this product is unique as its a water based natural rubber suspension that dries hard in two hours, while remaining flexible, and be overpainted with water or solvent based paints. This "Uniqueness" comes at a cost however, £55! I'm very aware that products such as U-Pol Raptor exist, however, I'm very curious to give this a try. If anyone knows anything else about it I'd welcome the information!
To the right of the picture are the two Mk3 spring plates 1H0 412 341. Unfortunately, the Klokkerholm parts are no longer produced. I got the genuine parts however they now cost £30 each.
Edited by NateS2 on Wednesday 29th April 18:21
Gassing Station | Readers' Cars | Top of Page | What's New | My Stuff