Anyone interested in home-built sailing dinghies?
Discussion


I'm building a Campion Apple 16 at the moment, a 16ft sailing dinghy with an attractive classical gaff cutter rig. It's a simple stitch-and-glue design made from marine plywood using the same techniques as the famous Mirror Dinghy, but the Apple is a fairly pretty thing.

Any interest?
Any interest?
Edited by jamieduff1981 on Tuesday 31st May 19:55
Yes! This is great. Let's have all the details! How long do you expect it to take...looks like you've done a lot of the work already!
I've done something similar although more of a major conversion/surgery job, rather than a new build, and it was on something a bit quicker! It started out as a very old £300 single wire, tin-rig Cherub, and ended up as a wider, longer, twin-wire big carbon rig boat that I won a National Championships with. There's nothing more satisfying than sailing something you've done a lot of design and building work on.


I've done something similar although more of a major conversion/surgery job, rather than a new build, and it was on something a bit quicker! It started out as a very old £300 single wire, tin-rig Cherub, and ended up as a wider, longer, twin-wire big carbon rig boat that I won a National Championships with. There's nothing more satisfying than sailing something you've done a lot of design and building work on.
Brilliant! Here goes then 
I've always liked things which go but usually motorised things. With boats my interests have either been WWI / WWII era warships mostly, or classic sailing vessels. Whilst I'd love a Riva Aquarama and a pair of Lamborghini V12s on song, for some reason I generally prefer sail to power boats.
I'm a bad sportsman. I expect to be able to win with no effort and if I can't just turn up and win, I won't take part. Watching racing yachts and stuff is cool, but I can't take part in that because I'm the worlds worst loser. So, cruising dinghy it is!
There are designs galore and of course lots you can buy already built. I wanted to build mine, but I try to be realistic now about how much free time I have and a limited attention span. I love watching good quality woodwork such as Sampson Boat Co on Youtube but practically speaking, I would never, ever finish a "proper" boat, which is compounded by the fact that suitable timber for boat building just doesn't really exist in Scotland and even in England you really have to have the right contacts and deep pockets. So, plywood boat it is. Trouble is, most of them are very functional but look more Land Rover Defender than Lamborghini Miura. The Campion Apple looked the part for me, and from doing further research its sailing qualities sounded about what I was looking for too. It's big enough for a weekend out with my wife and 2 daughters, but small enough to single-hand. With ballast it's quite well mannered and stable but is capable of around 7kt in a good breeze.
I bought the marine ply locally, and I have a stash of reclaimed Iroko school science lab benches which I wanted to use as much as is appropriate to save buying new hardwood.
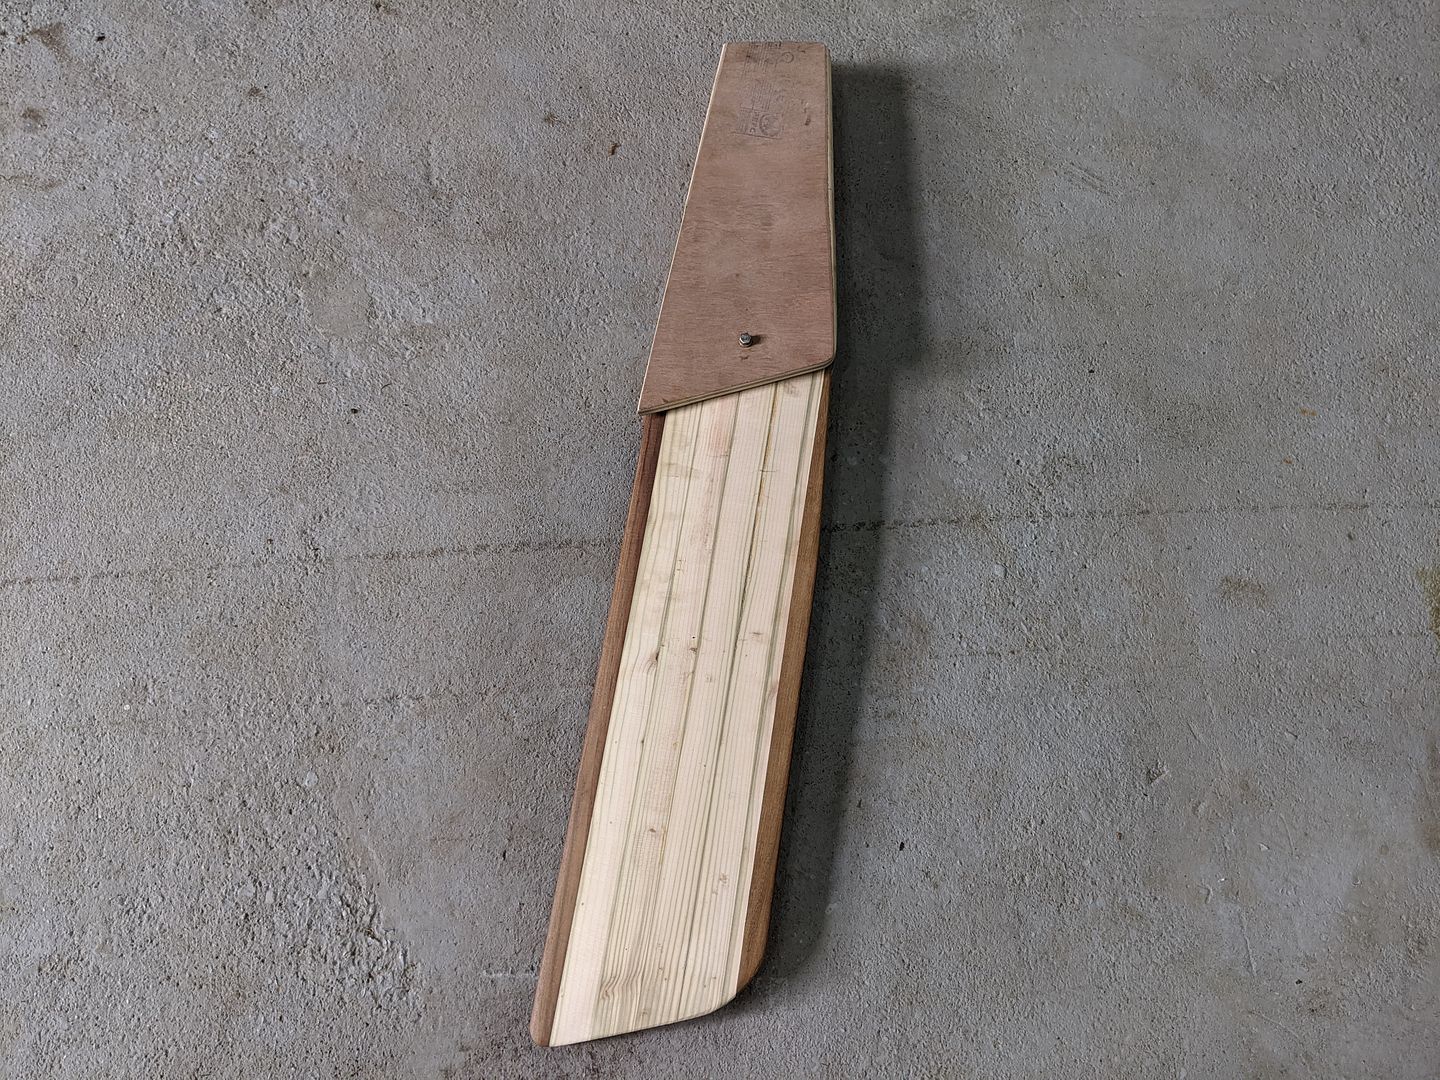
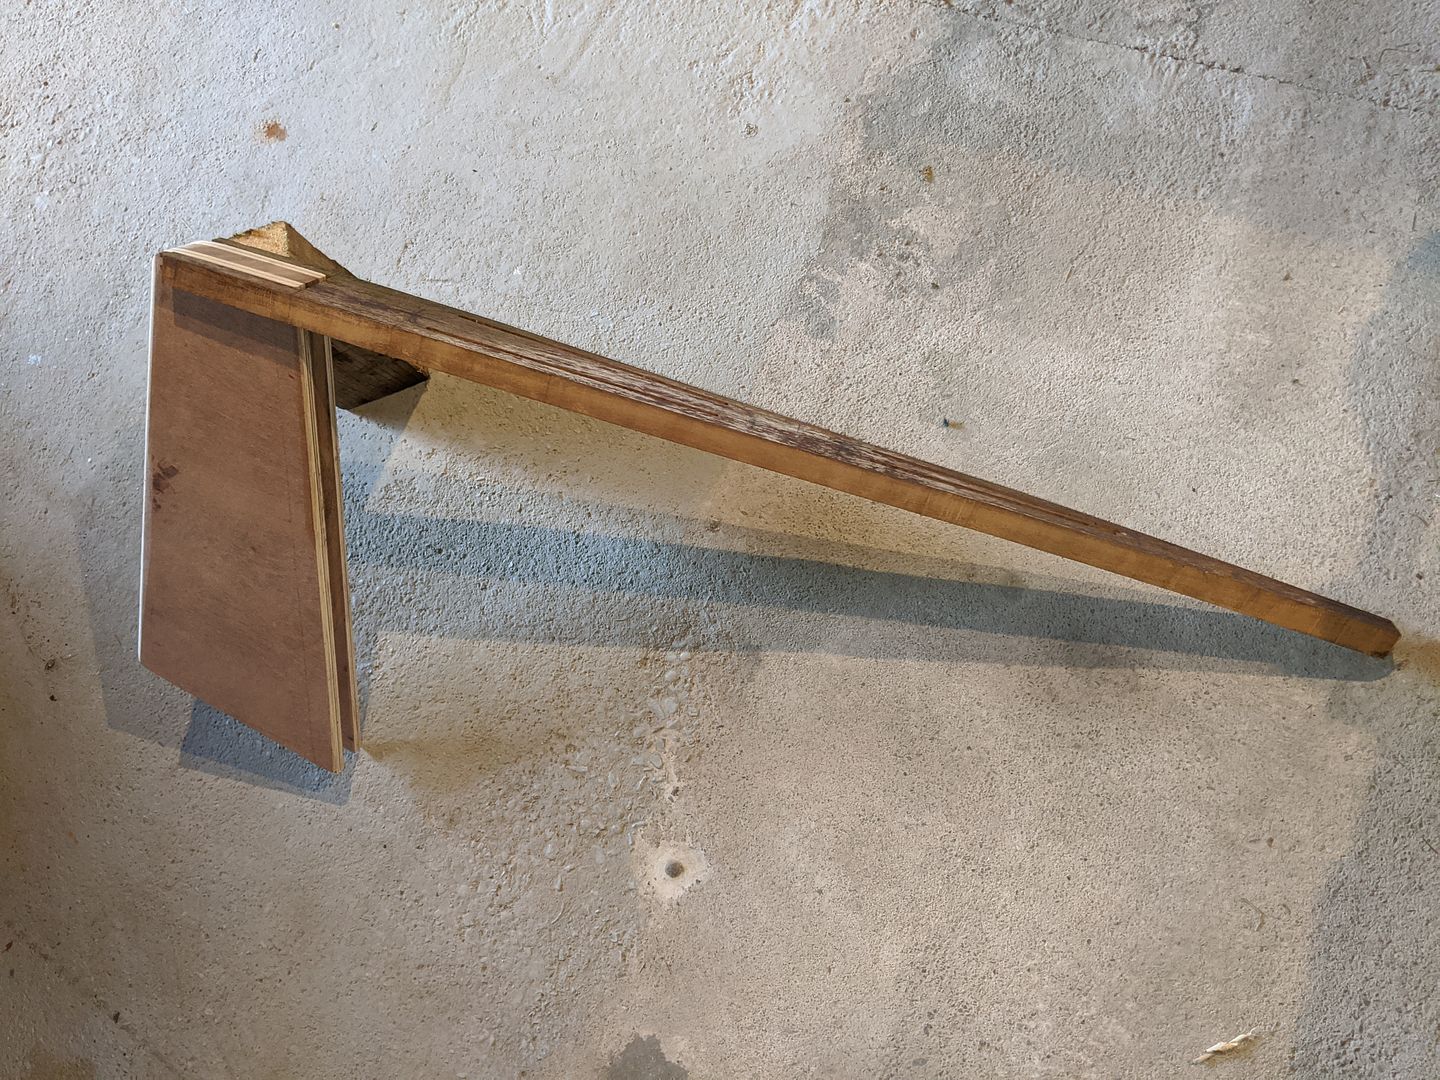
I started with the rudder headstock. It is made from 2 cheeks, each one being 2 laminations of 9mm marine ply for 18mm total per side, spaced out by a block of Iroko. I taught my eldest daughter to use the power sander for this.
I'm using West Systems epoxy for the gluing. In the background I've started laminating rough cut strips for the rudder blade.
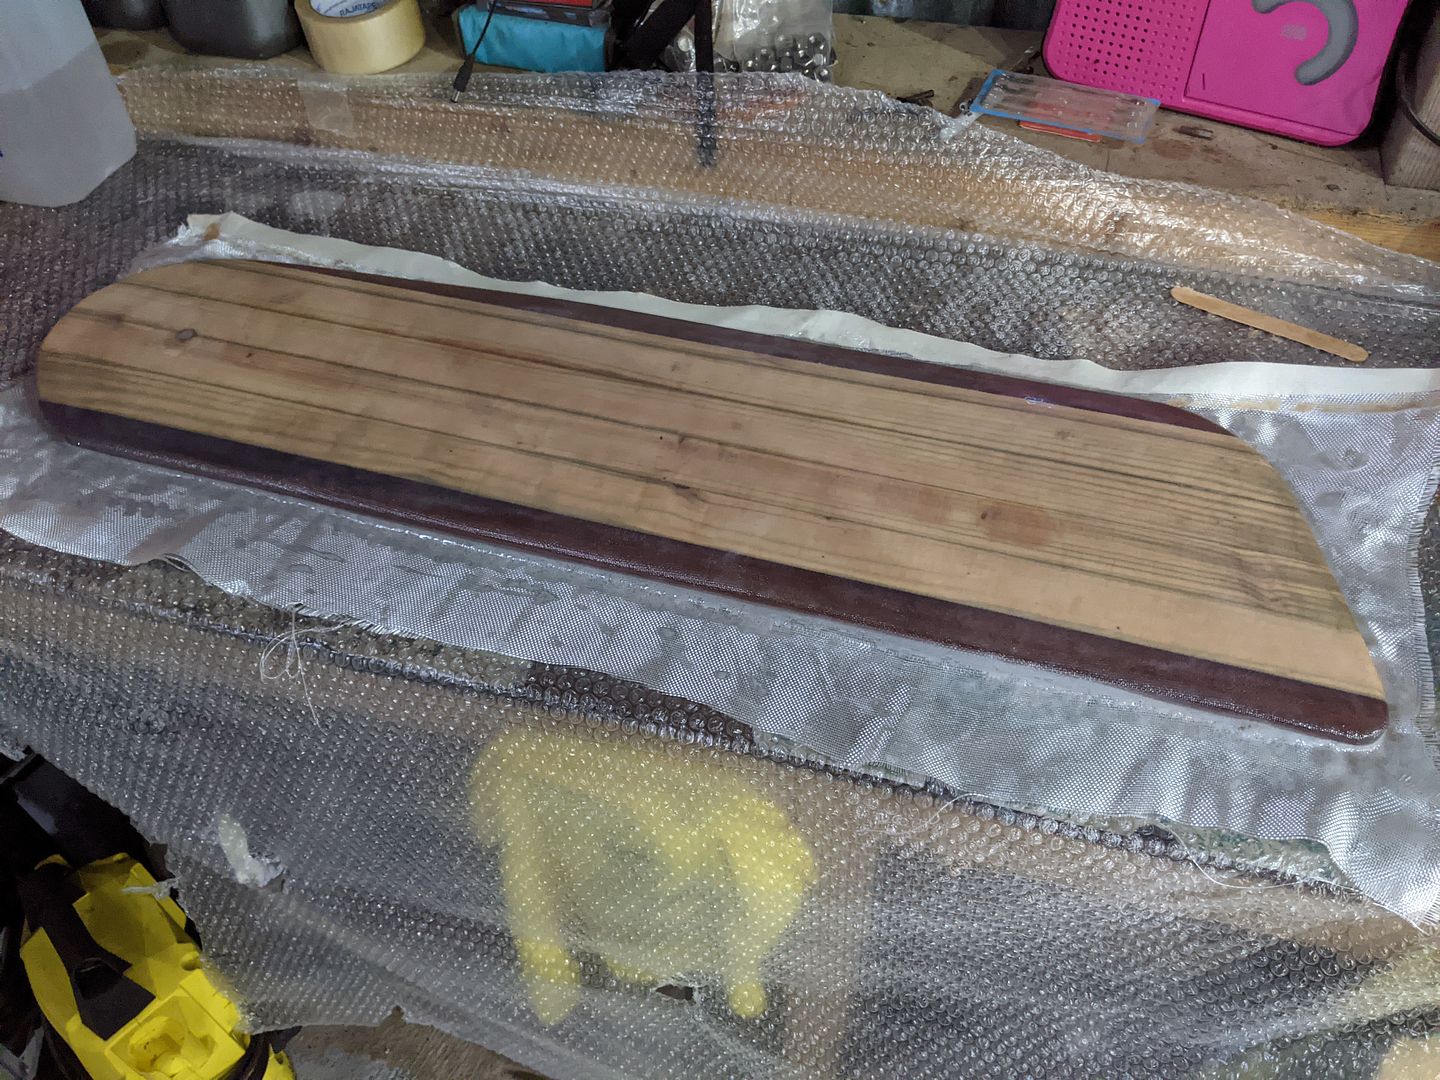
The blade is laminated from softwood strips with Iroko leading and trailing edges. I've upgraded from the plans slightly by fitting Oilite bronze bushes as bearings for the stainless steel through-bolt.

In the usual fashion this allows the blade to be pivoted back for shallow water.
Thus:

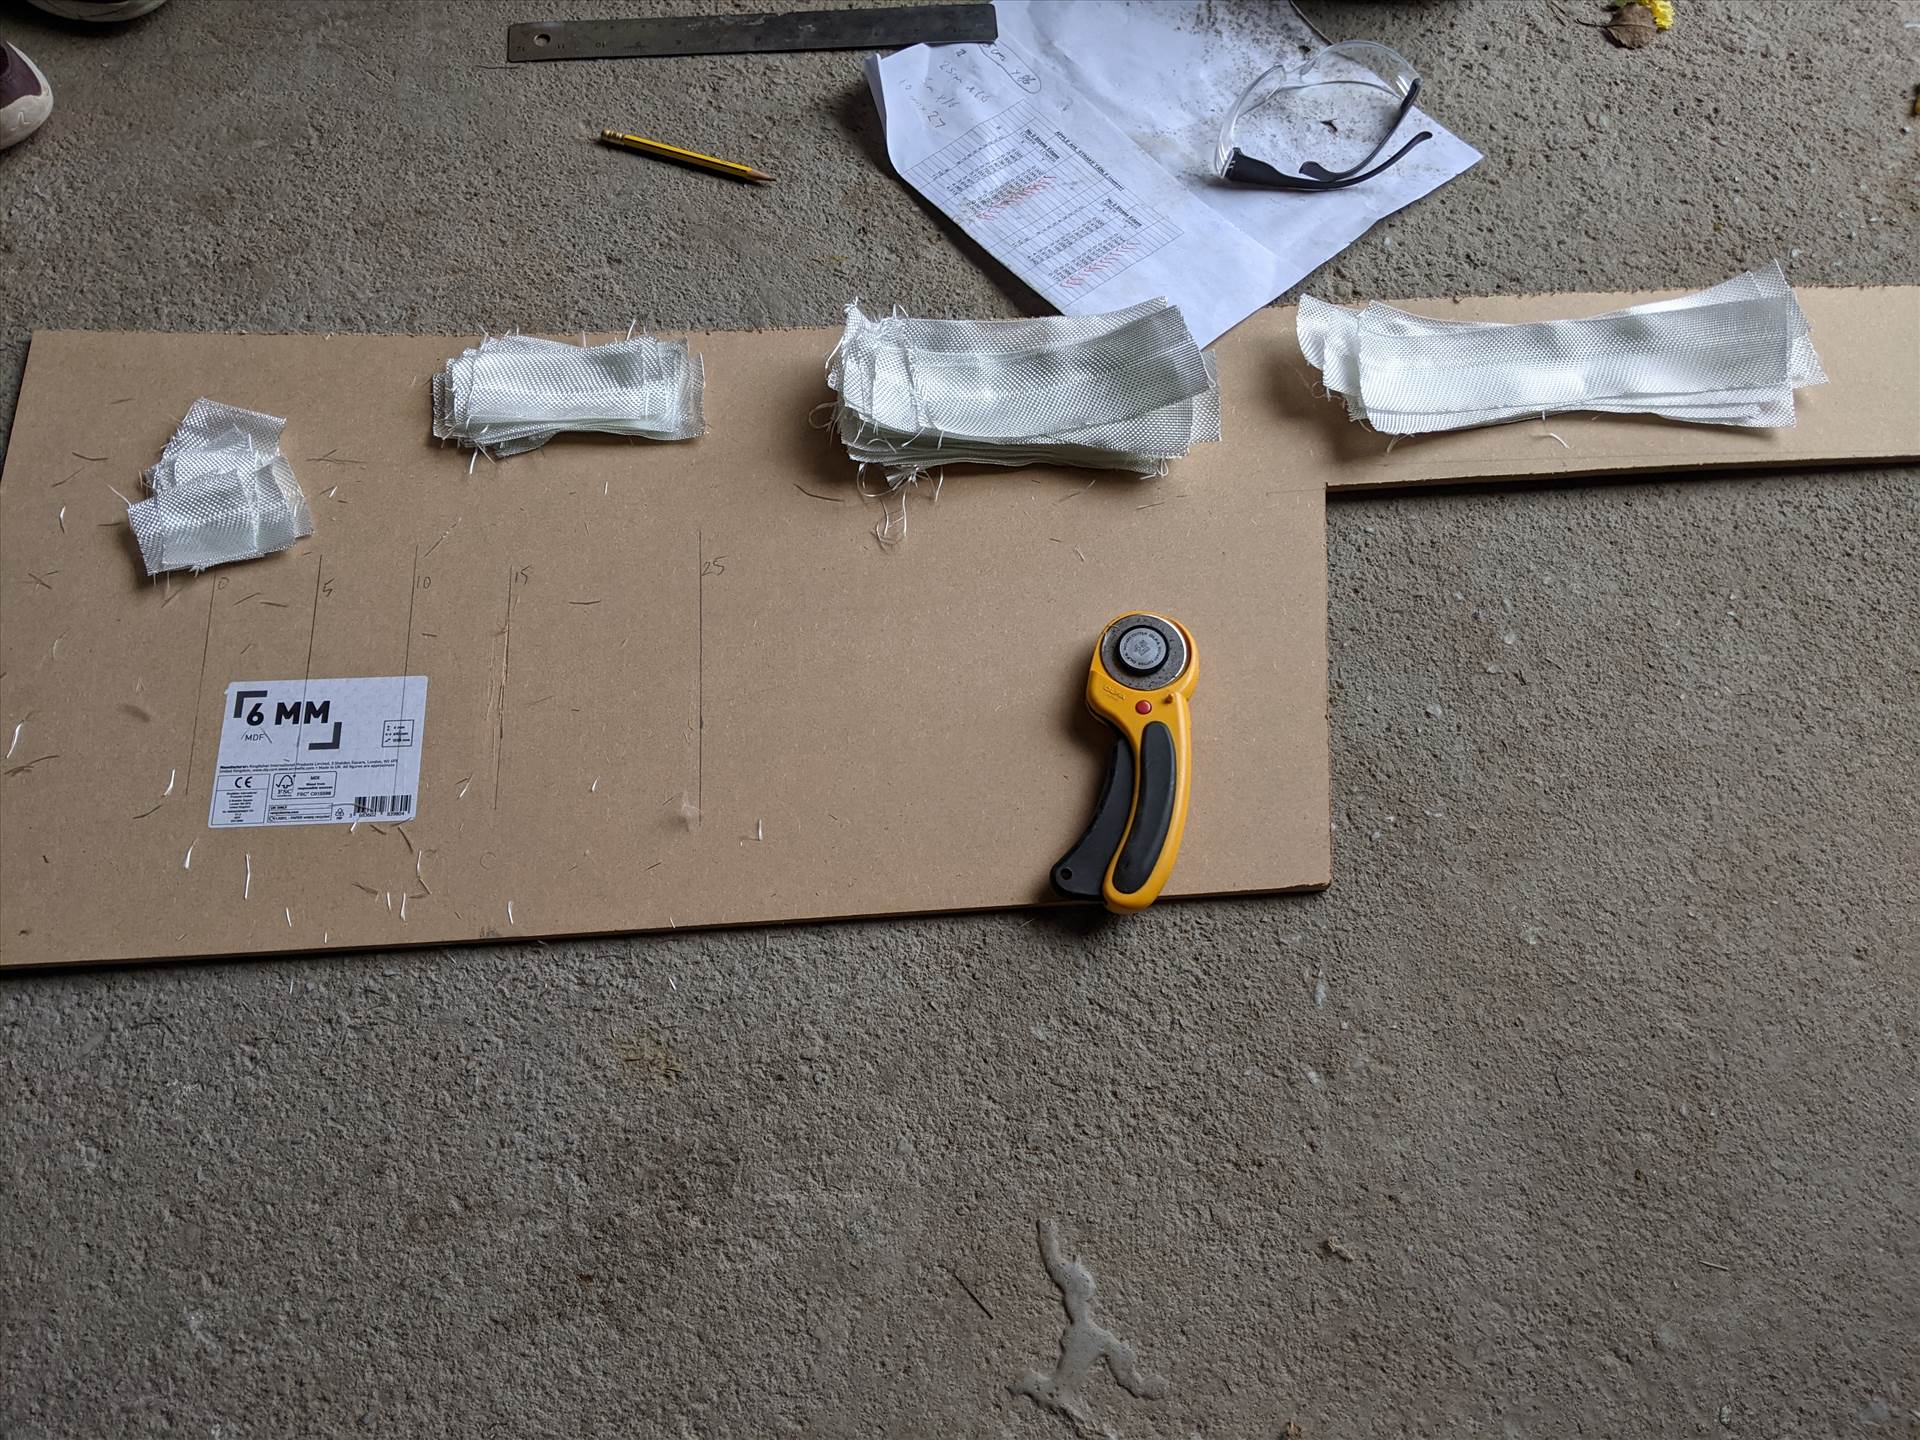
The plans call for the blade to be fibreglassed with bidirectional glass cloth
And I started roughing out a tiller from Iroko which I will refine later.
I've always liked things which go but usually motorised things. With boats my interests have either been WWI / WWII era warships mostly, or classic sailing vessels. Whilst I'd love a Riva Aquarama and a pair of Lamborghini V12s on song, for some reason I generally prefer sail to power boats.
I'm a bad sportsman. I expect to be able to win with no effort and if I can't just turn up and win, I won't take part. Watching racing yachts and stuff is cool, but I can't take part in that because I'm the worlds worst loser. So, cruising dinghy it is!
There are designs galore and of course lots you can buy already built. I wanted to build mine, but I try to be realistic now about how much free time I have and a limited attention span. I love watching good quality woodwork such as Sampson Boat Co on Youtube but practically speaking, I would never, ever finish a "proper" boat, which is compounded by the fact that suitable timber for boat building just doesn't really exist in Scotland and even in England you really have to have the right contacts and deep pockets. So, plywood boat it is. Trouble is, most of them are very functional but look more Land Rover Defender than Lamborghini Miura. The Campion Apple looked the part for me, and from doing further research its sailing qualities sounded about what I was looking for too. It's big enough for a weekend out with my wife and 2 daughters, but small enough to single-hand. With ballast it's quite well mannered and stable but is capable of around 7kt in a good breeze.
I bought the marine ply locally, and I have a stash of reclaimed Iroko school science lab benches which I wanted to use as much as is appropriate to save buying new hardwood.
I started with the rudder headstock. It is made from 2 cheeks, each one being 2 laminations of 9mm marine ply for 18mm total per side, spaced out by a block of Iroko. I taught my eldest daughter to use the power sander for this.
I'm using West Systems epoxy for the gluing. In the background I've started laminating rough cut strips for the rudder blade.
The blade is laminated from softwood strips with Iroko leading and trailing edges. I've upgraded from the plans slightly by fitting Oilite bronze bushes as bearings for the stainless steel through-bolt.
In the usual fashion this allows the blade to be pivoted back for shallow water.
Thus:
The plans call for the blade to be fibreglassed with bidirectional glass cloth
And I started roughing out a tiller from Iroko which I will refine later.
Edited by jamieduff1981 on Tuesday 31st May 20:02
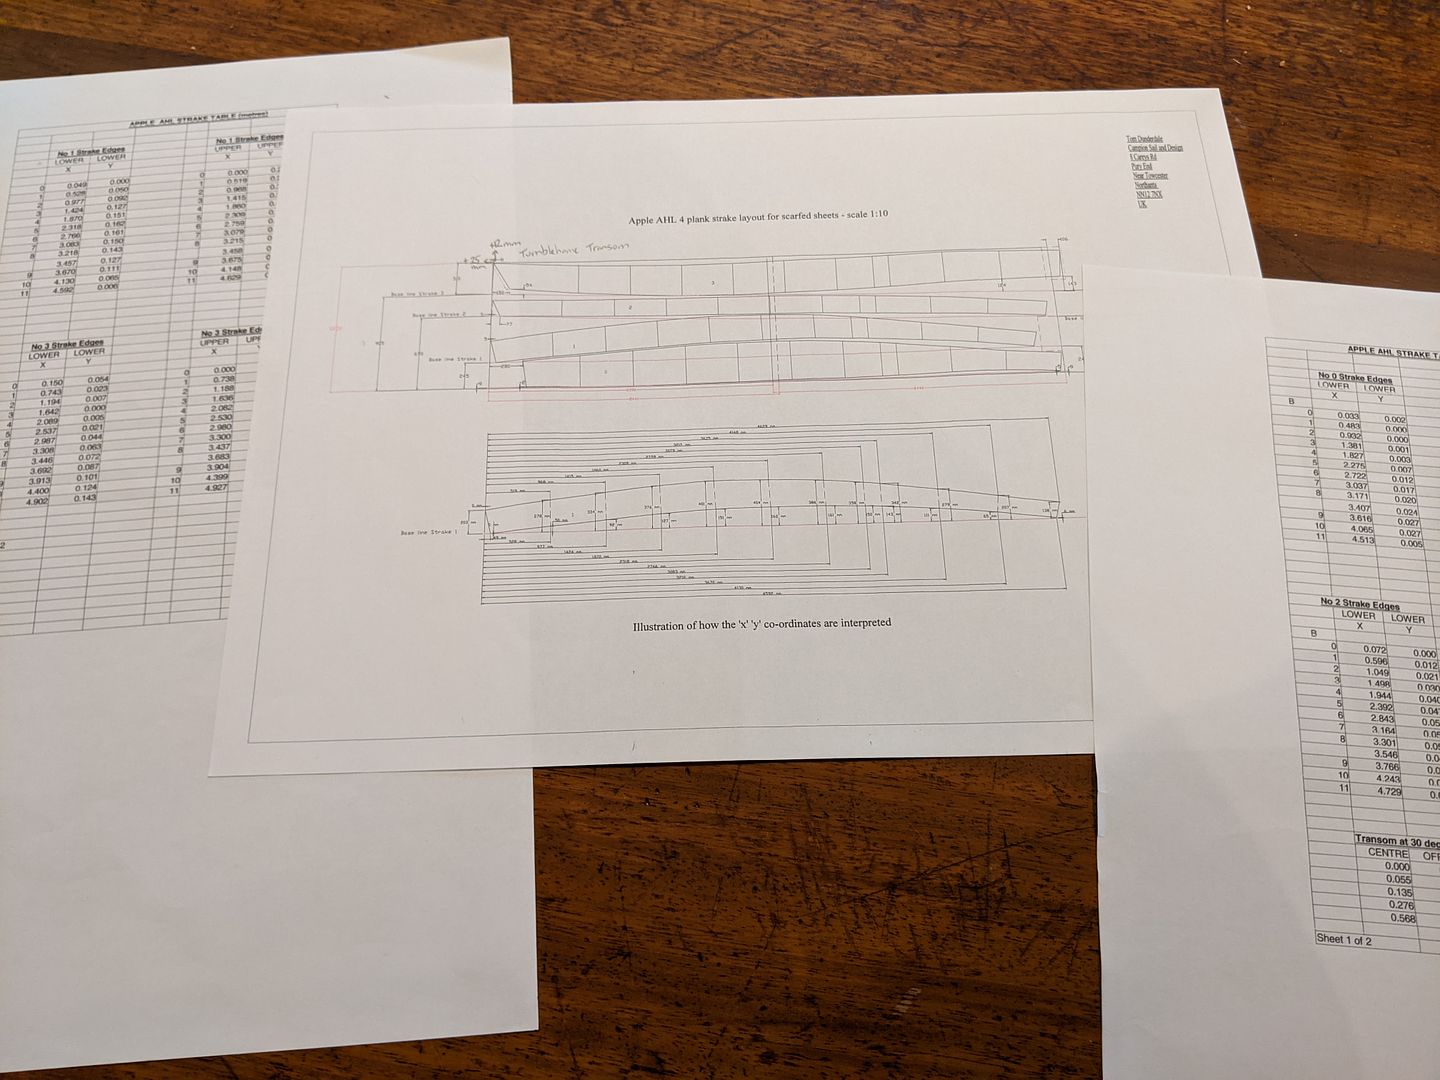
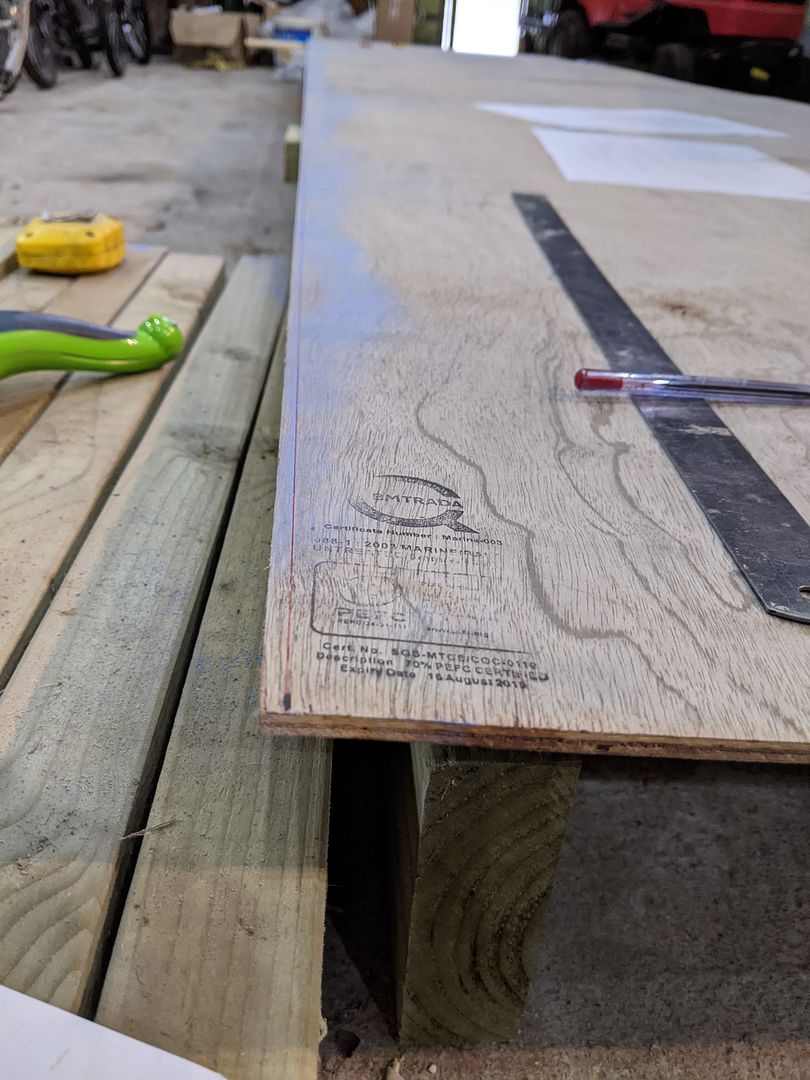
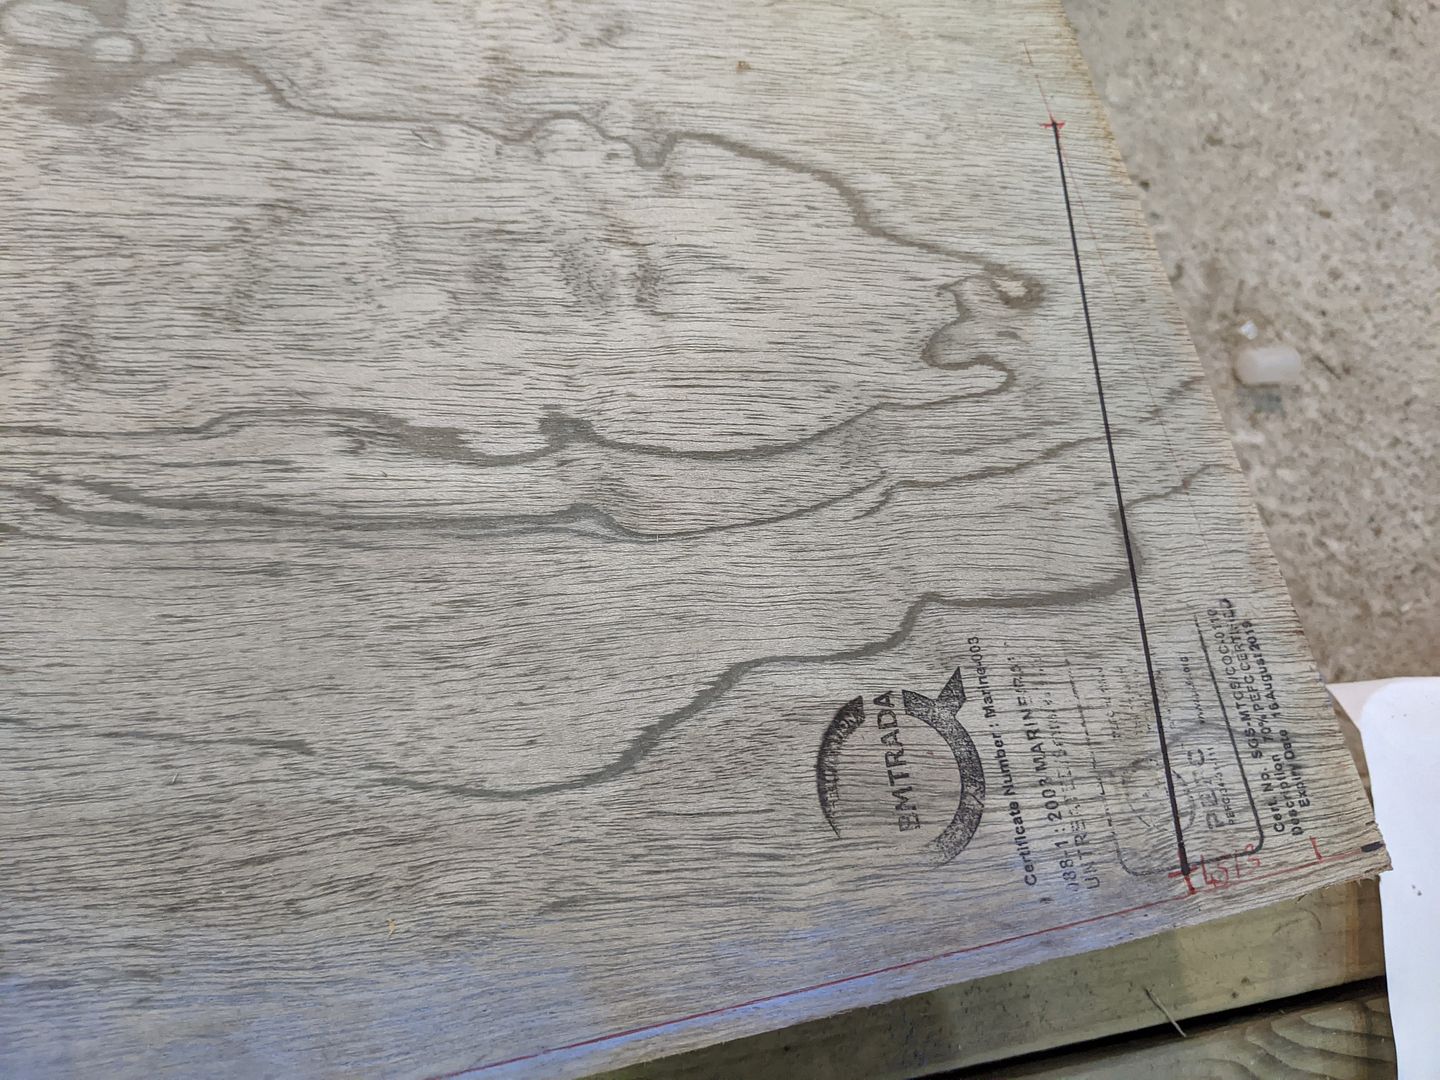
The hull as you've seen is a multi-chine affair and the design uses 4 planks per side and a lower rubbing strip giving the visual impression of 5 per side. The designer, Mr Tom Dunderdale, has very cunningly nested the 2-dimensional shapes of the 4 planks such that each side fits into a single 16ft x 4ft board of 6mm marine ply.
Of course, plywood boards come as 8ft x 4ft so the first job was to scarph them together. It is actually permissible in the plans to butt-join them and fibreglass tape the joint, but I preferred to scarph them.
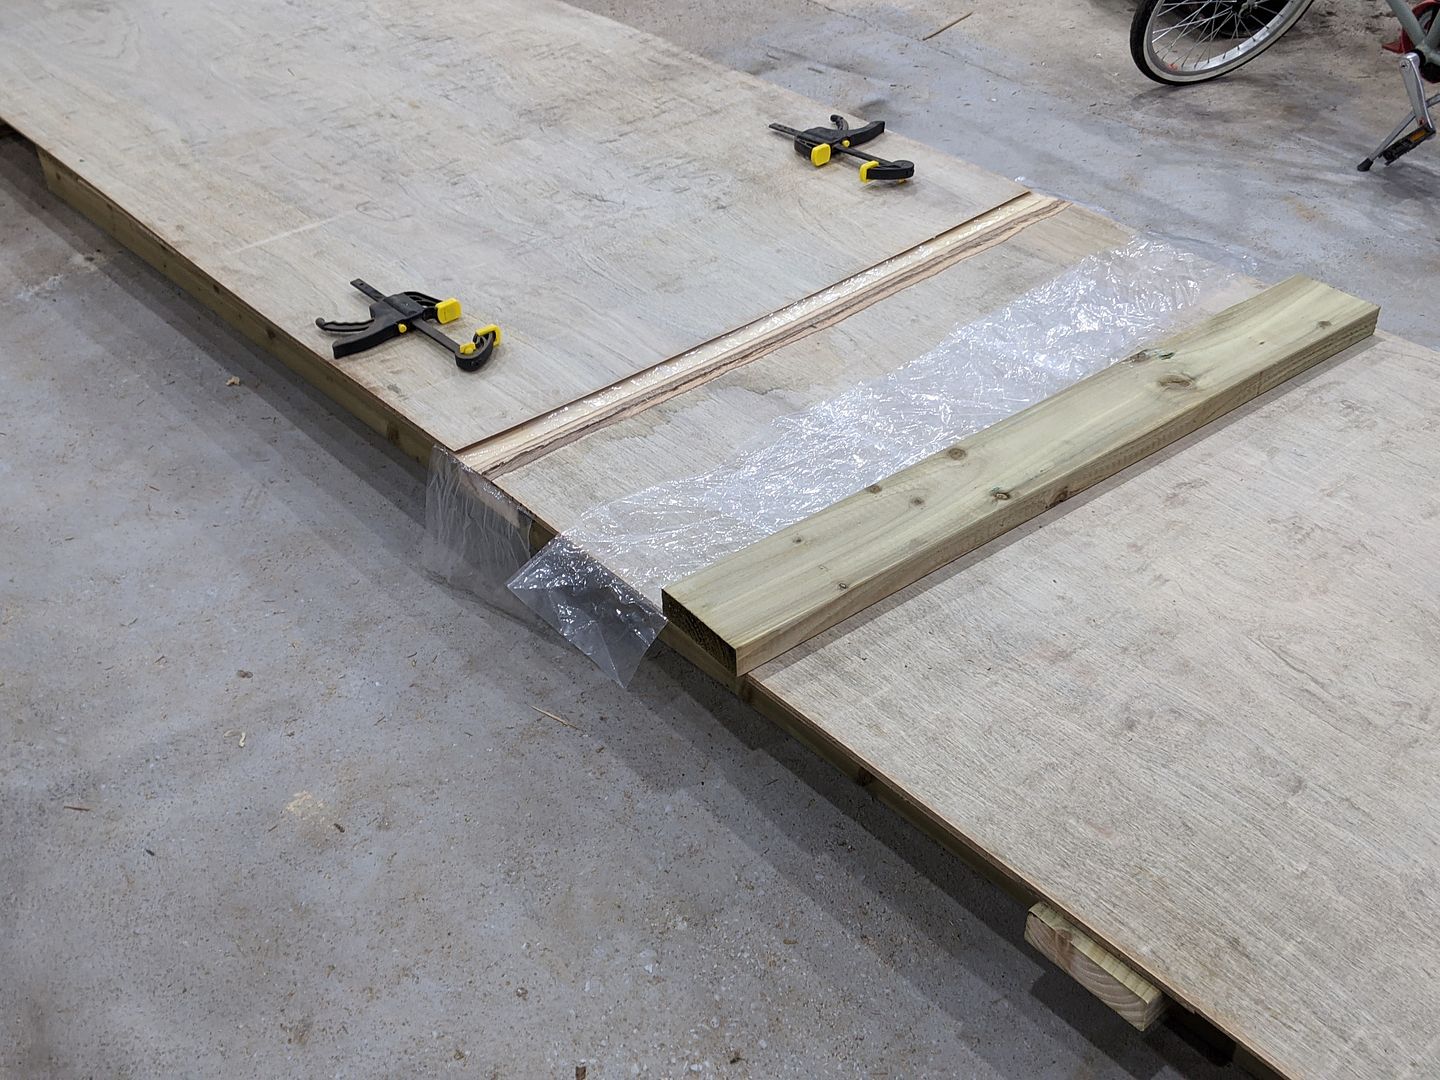
To lazy to make a scarphing jig, I just did it with the power planer and the results were useable but hardly great quality. To make up for lack of quality I thickened up the epoxy a touch with milled fibres.

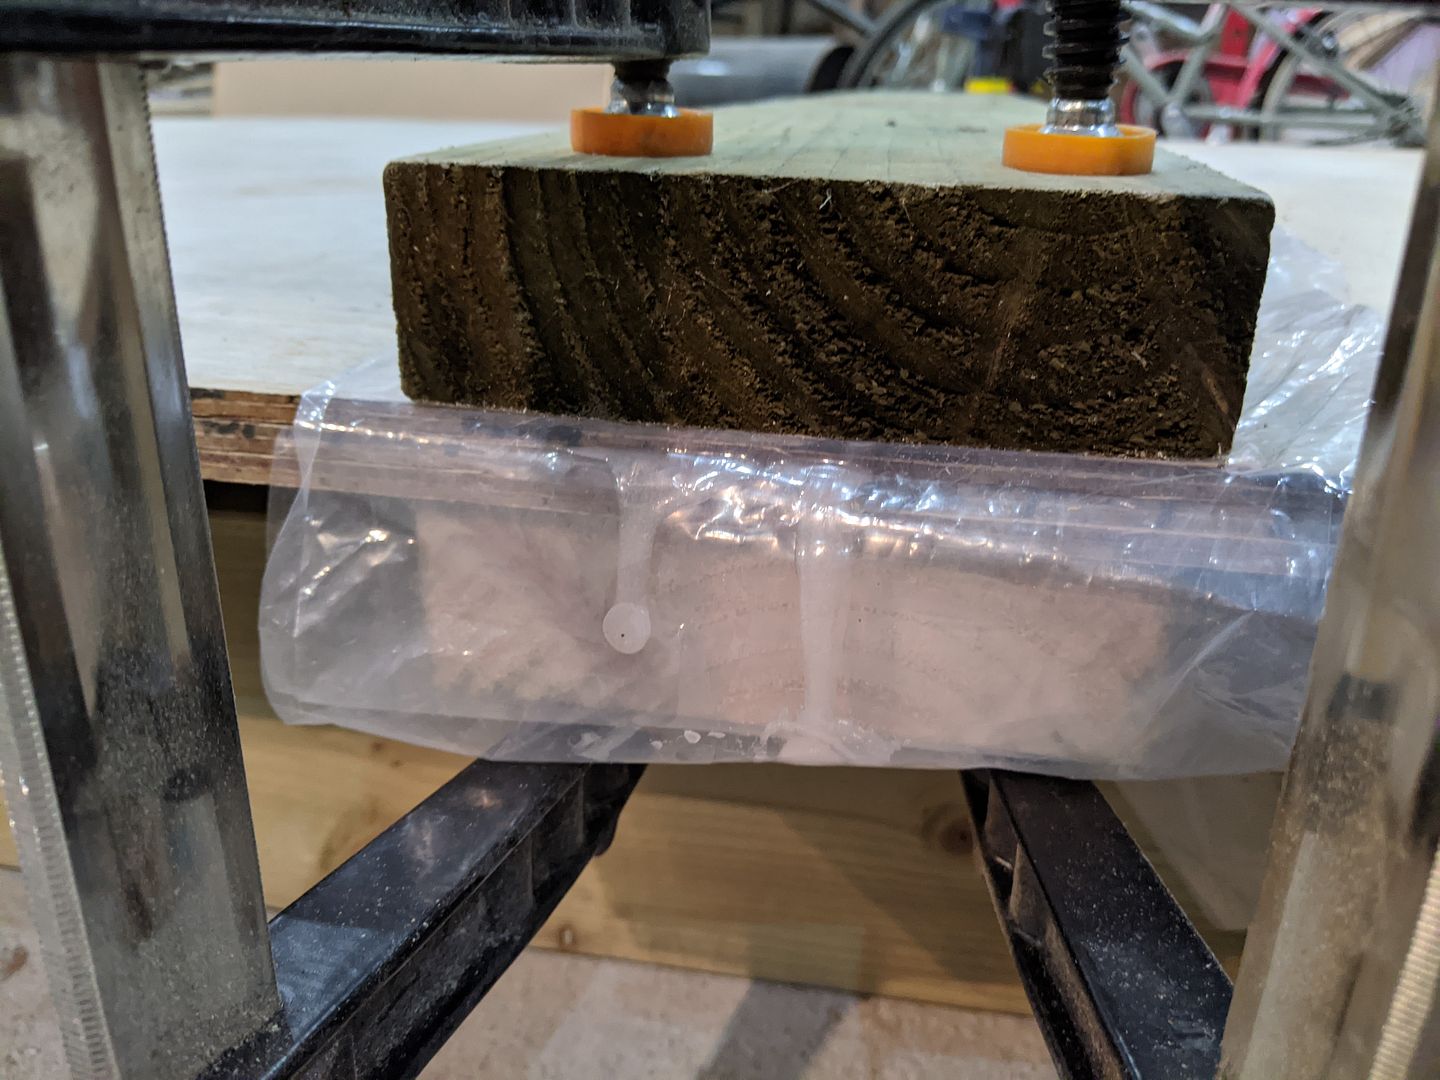
I broke a plastic clamp whilst clamping the scarphs together for gluing and shortly after this photo went all-metal
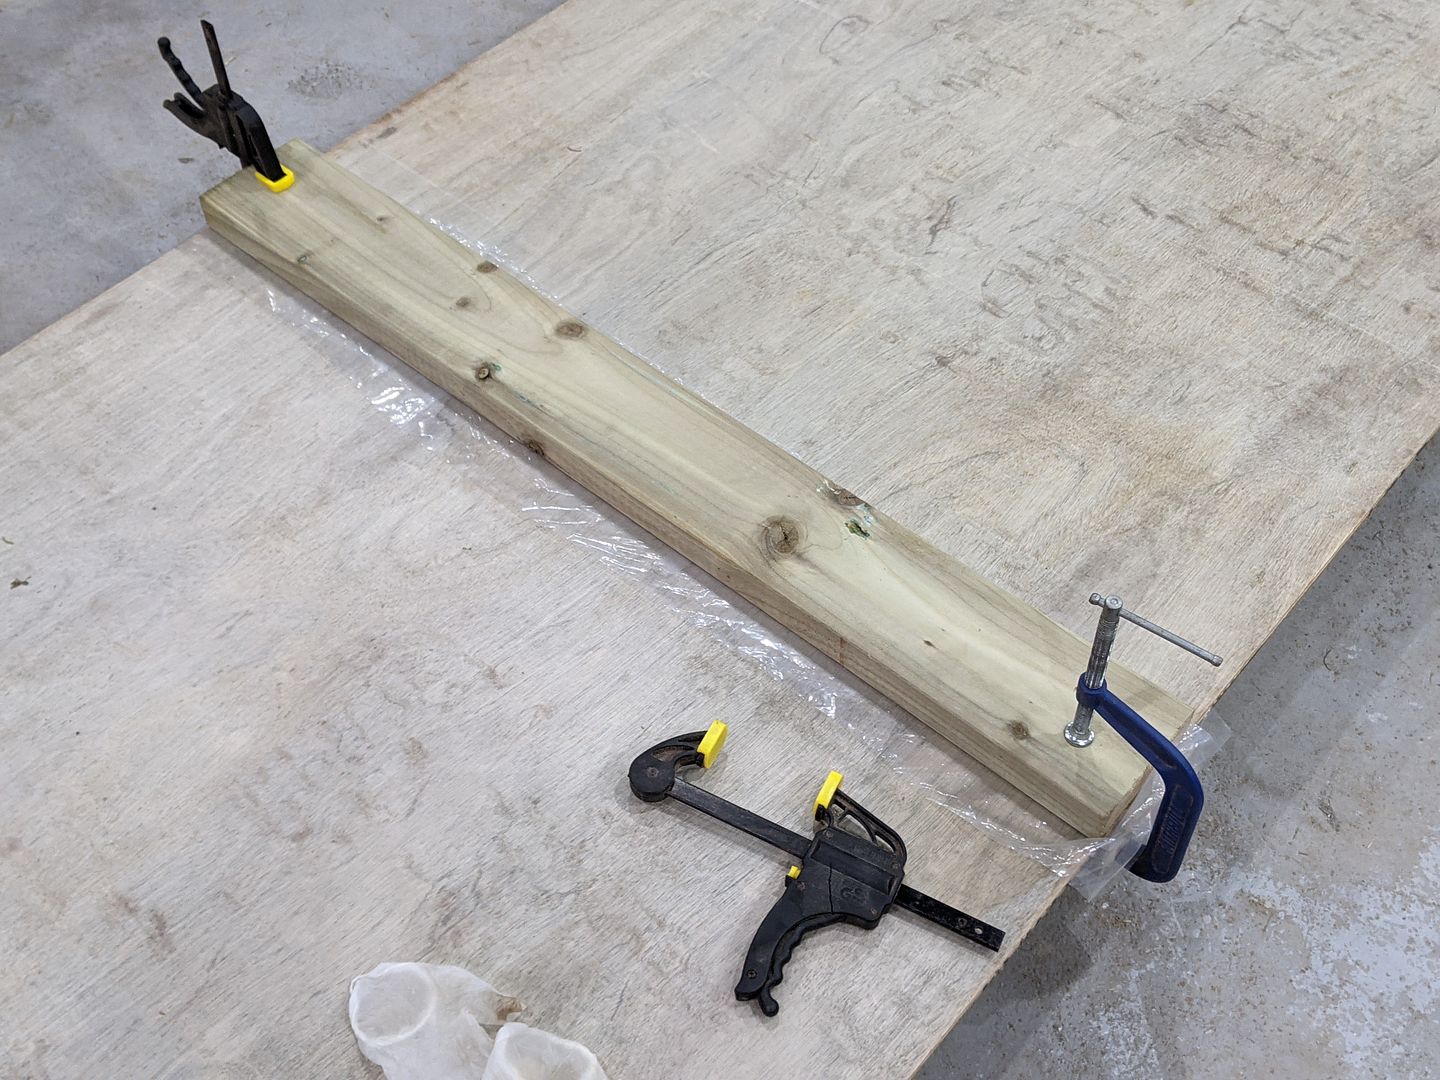
Obviously the polythene was to prevent me gluing the planks I used to distribute the clamping pressure across the whole joint to the joint itself...
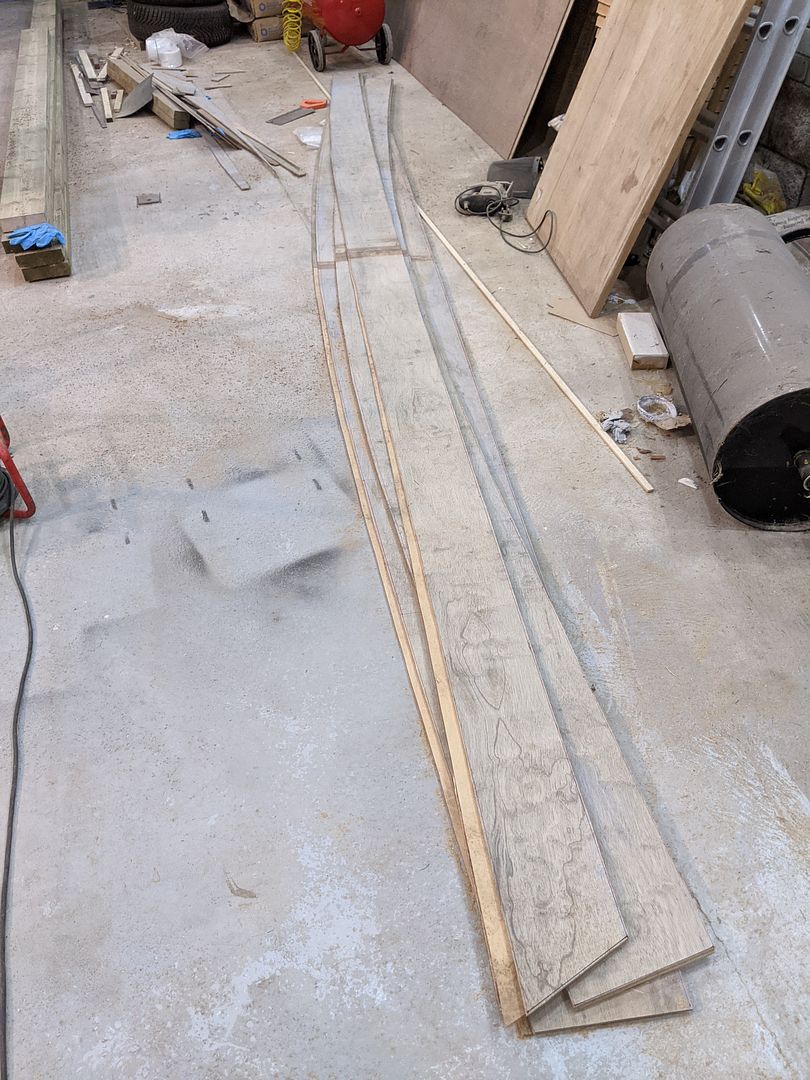
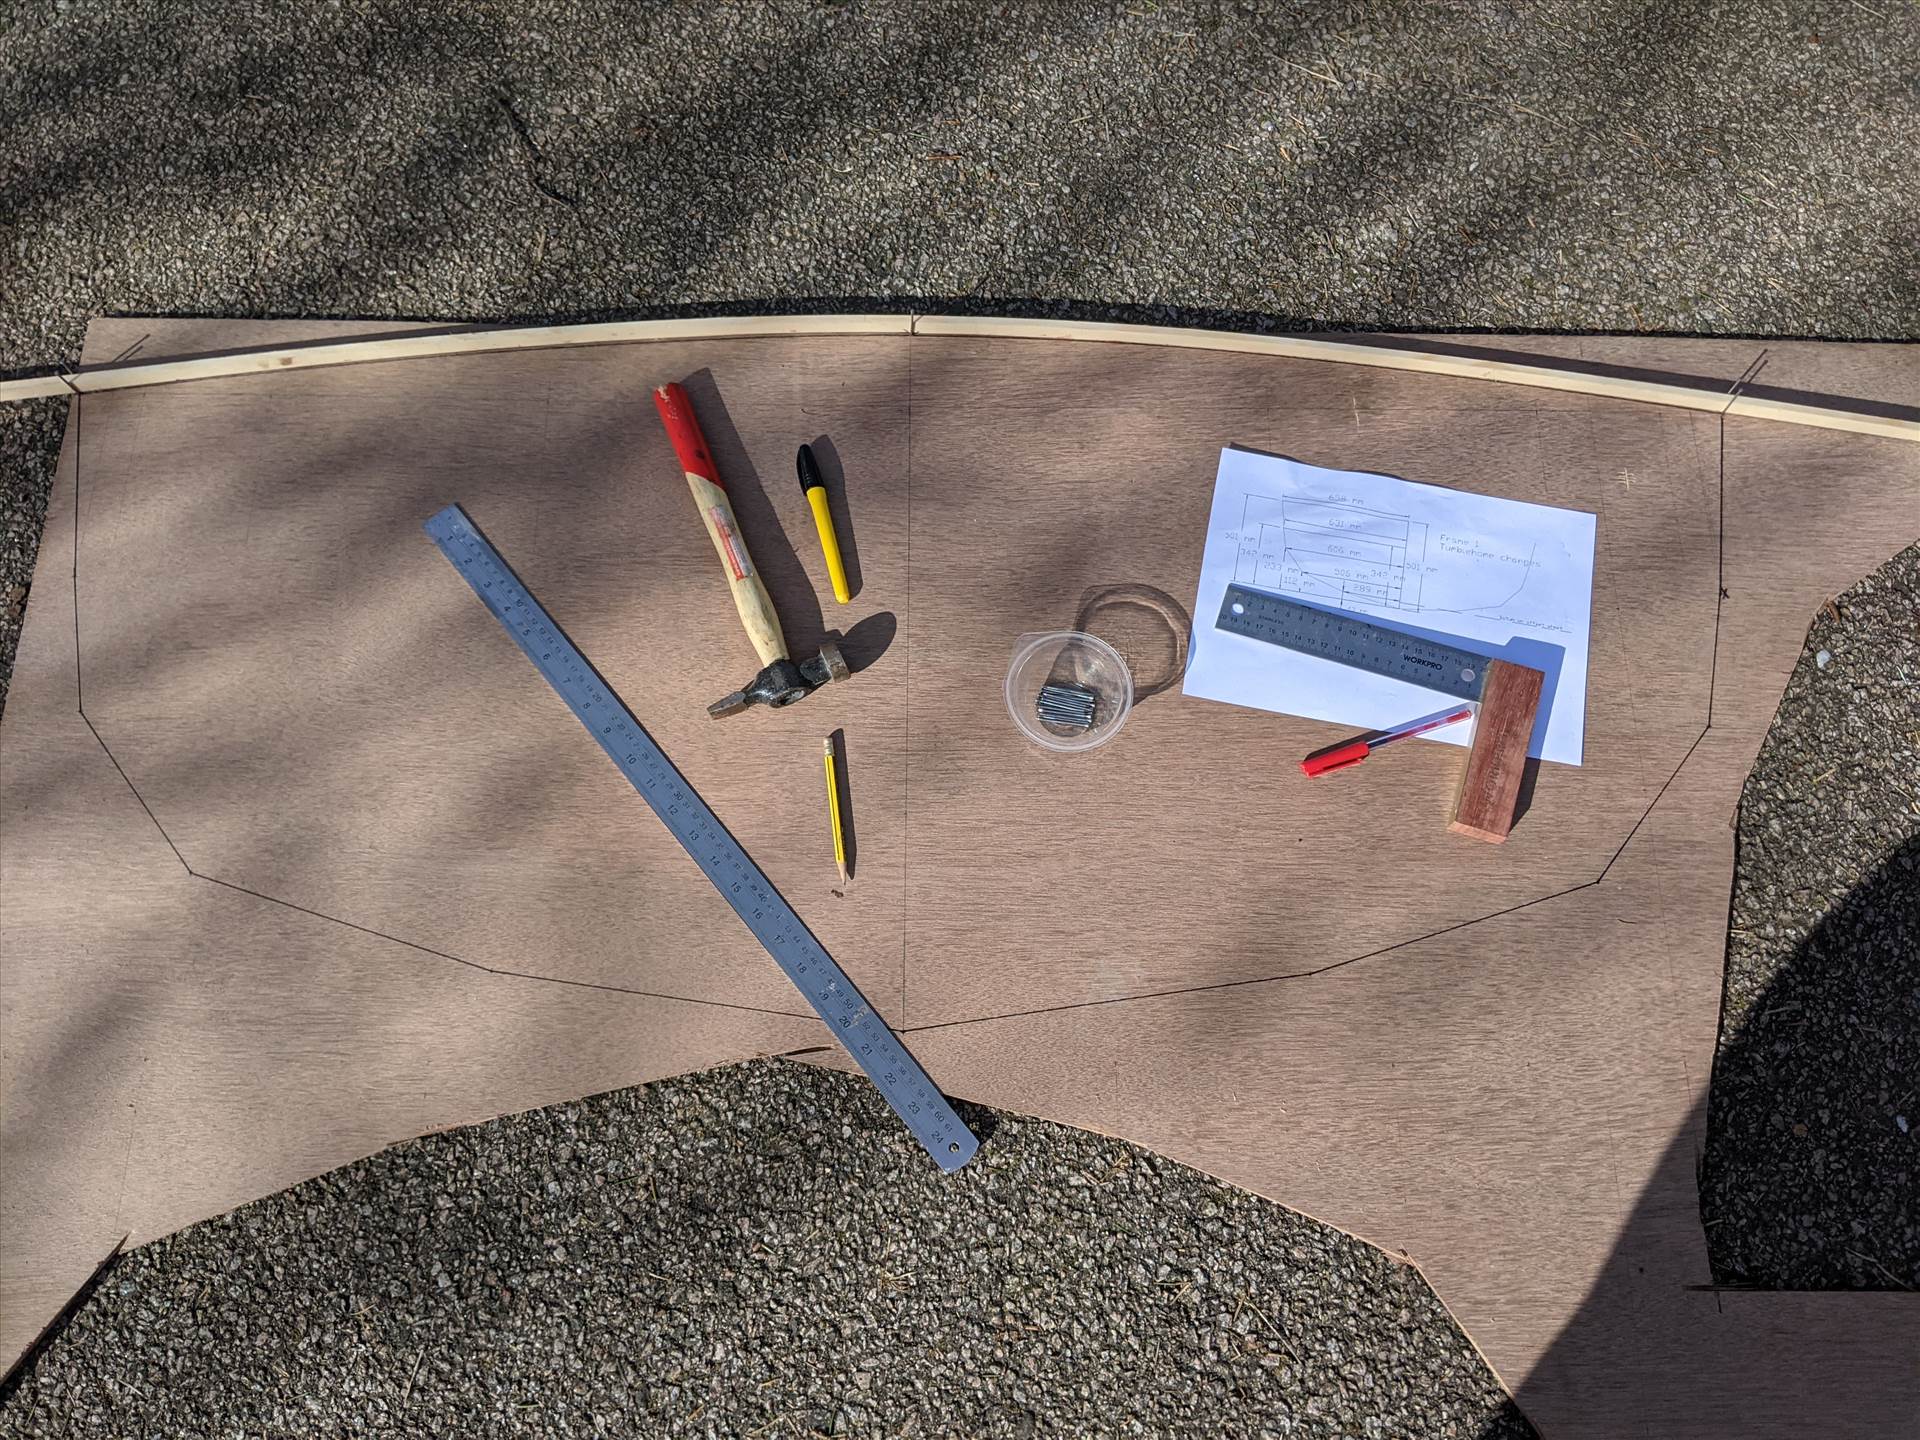
Each plank then needs its own datum measured and marked onto the resultant 16ft board, and a series of stations describing the upper and lower edges are lofted onto the plywood from a table of measurements
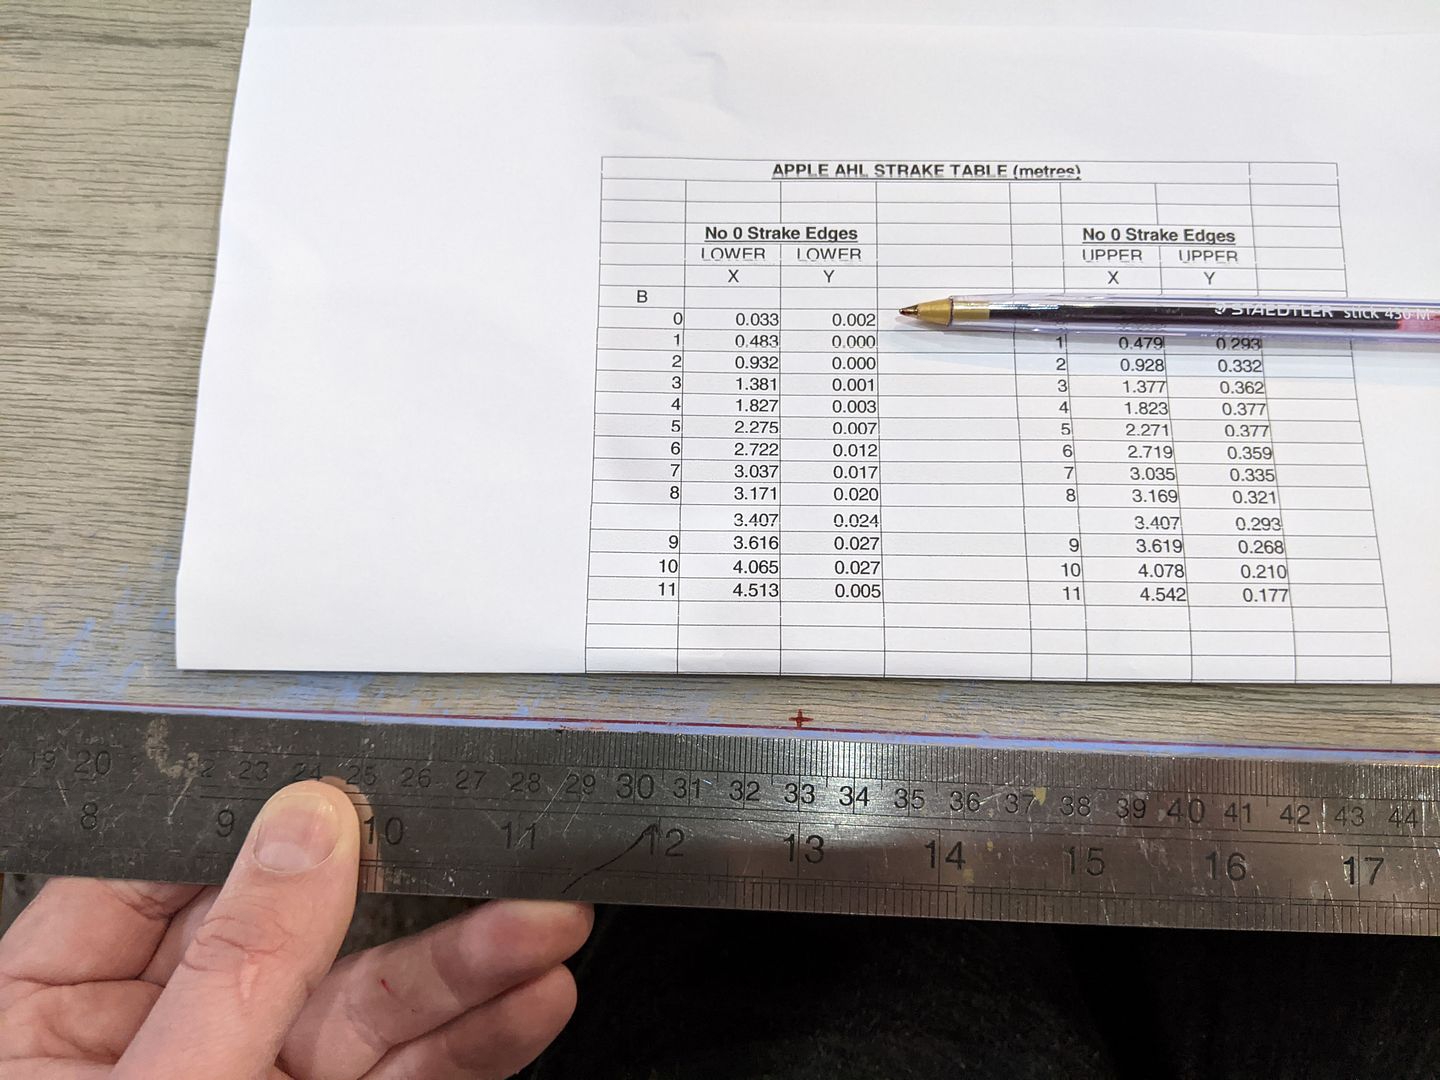
Once all the stations are marked, pins are tapped in to each and a long batton sprung to join the dots with a fair curve to trace out with a pen.

The uppermost plank does need an extra little bit scarphed on to make up the length, but the extra bit is cut from elsewhere on the board. Due to the nesting to get all planks from the one board, they're staggered slightly fore and aft to offset their deepest points.

I only marked out the planks on one board, then clamped both boards together tightly, set the cut depth to 12mm on a circular saw with a fairly fine blade with lots of little teeth and cut them out together. Each pair of planks was then clamped together whilst I finished down to the lines.
Here we have a hull kit. Ok, not quite - there's no transom here and I hadn't yet cut out the internal frames. Actually on closer inspection, I'd rough cut the planks for this picture but evidently had had enough fun for one night - so they're still to be finally trimmed down to the lines.
Of course, plywood boards come as 8ft x 4ft so the first job was to scarph them together. It is actually permissible in the plans to butt-join them and fibreglass tape the joint, but I preferred to scarph them.
To lazy to make a scarphing jig, I just did it with the power planer and the results were useable but hardly great quality. To make up for lack of quality I thickened up the epoxy a touch with milled fibres.
I broke a plastic clamp whilst clamping the scarphs together for gluing and shortly after this photo went all-metal
Obviously the polythene was to prevent me gluing the planks I used to distribute the clamping pressure across the whole joint to the joint itself...
Each plank then needs its own datum measured and marked onto the resultant 16ft board, and a series of stations describing the upper and lower edges are lofted onto the plywood from a table of measurements
Once all the stations are marked, pins are tapped in to each and a long batton sprung to join the dots with a fair curve to trace out with a pen.
The uppermost plank does need an extra little bit scarphed on to make up the length, but the extra bit is cut from elsewhere on the board. Due to the nesting to get all planks from the one board, they're staggered slightly fore and aft to offset their deepest points.
I only marked out the planks on one board, then clamped both boards together tightly, set the cut depth to 12mm on a circular saw with a fairly fine blade with lots of little teeth and cut them out together. Each pair of planks was then clamped together whilst I finished down to the lines.
Here we have a hull kit. Ok, not quite - there's no transom here and I hadn't yet cut out the internal frames. Actually on closer inspection, I'd rough cut the planks for this picture but evidently had had enough fun for one night - so they're still to be finally trimmed down to the lines.
Edited by jamieduff1981 on Tuesday 31st May 20:56
Edited by jamieduff1981 on Wednesday 1st June 07:42
The bit I was most looking forward to was stitching the planks together of course. It all happened really fast although it quickly became a 2 person job from the 3rd plank onwards as it was quite unwieldy trying to support a 16ft long floppy plywood strip whilst carefully drilling two holes and tie-wrapping it to another.
The keel was easy. Not knowing what to expect, I used twice as many tie-wraps as turned out to be necessary. The top corner of the stem was bolted with penny washers as the twist here was substantial and the designer warned that a tie-wrap here would just fail and even bolts might pull through without big washers.
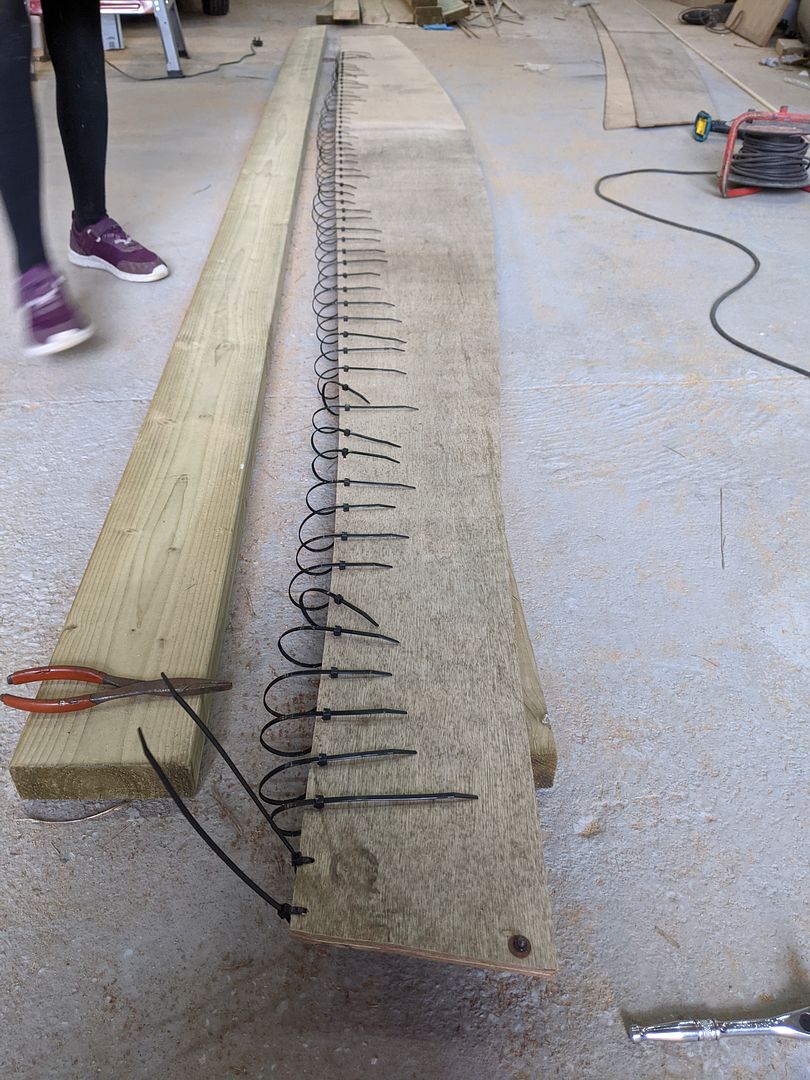
I was in no particular rush so I turned it upside down and left it overnight to start to relax into its new unnatural shape

Stitching on the second plank was easy enough on the floor, and I started jamming chunks of timber in the bow to prise the shape open.
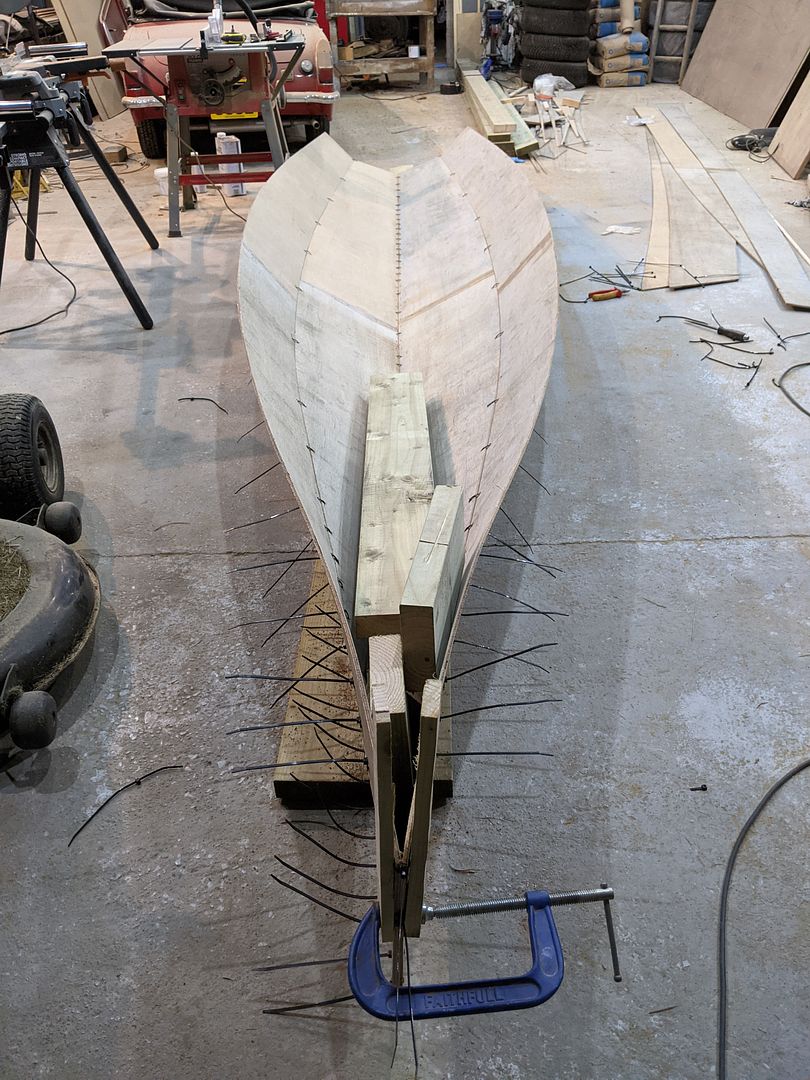
I was fearing that I'd fundamentally screwed up the lofting though as the planks just wouldn't close up at the bow.

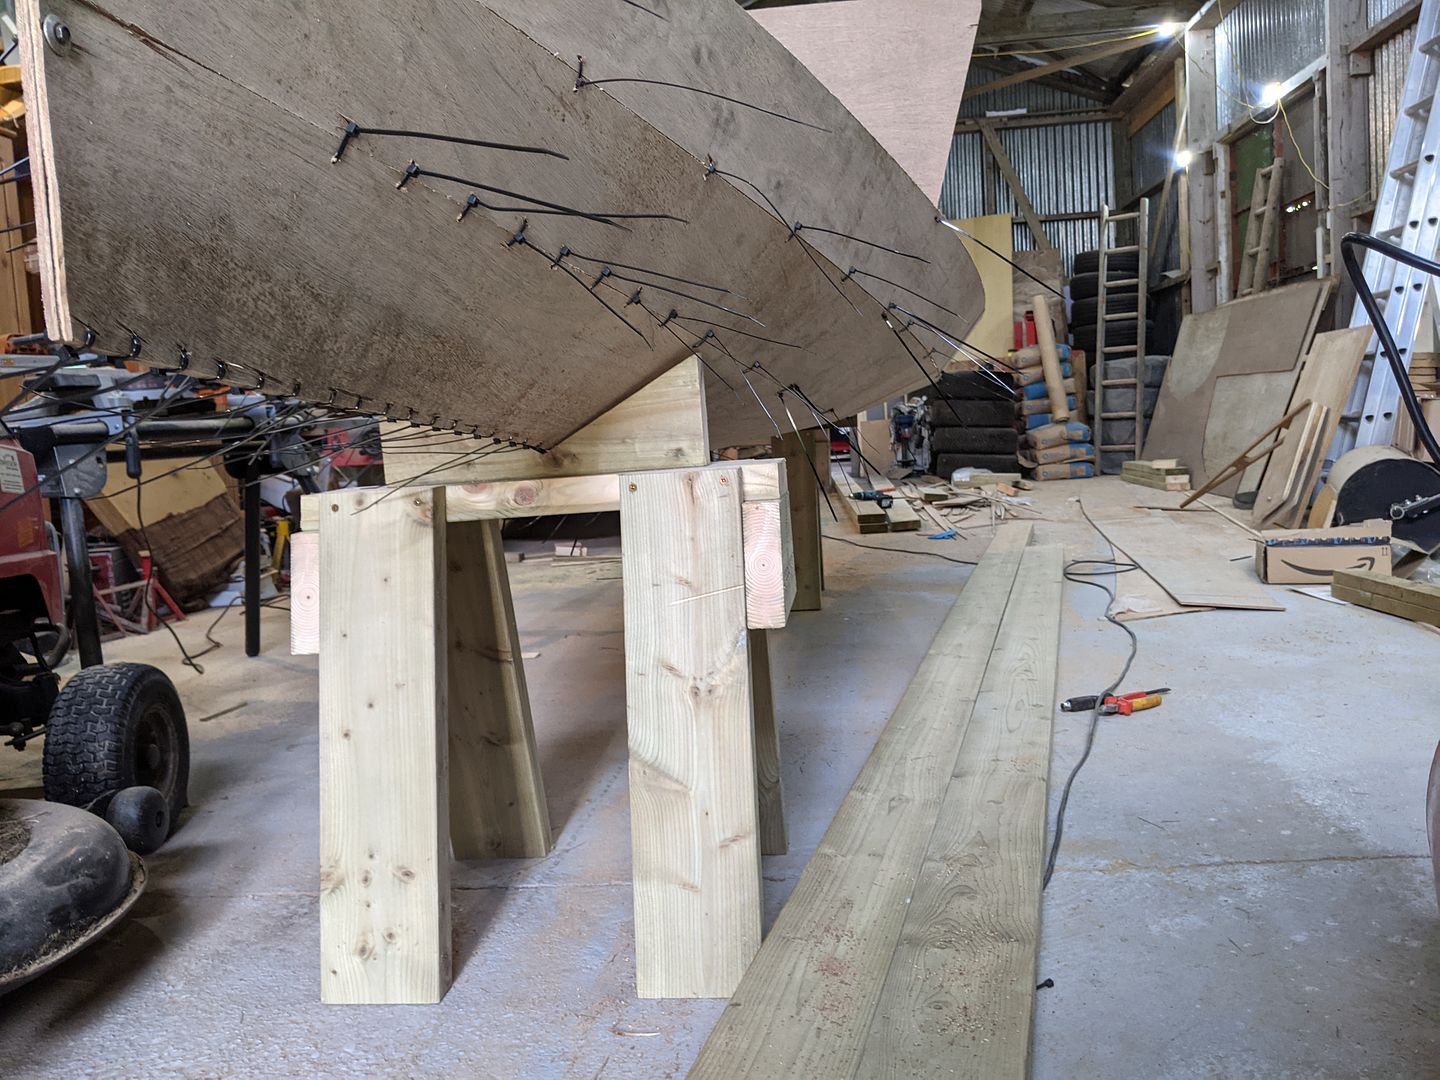
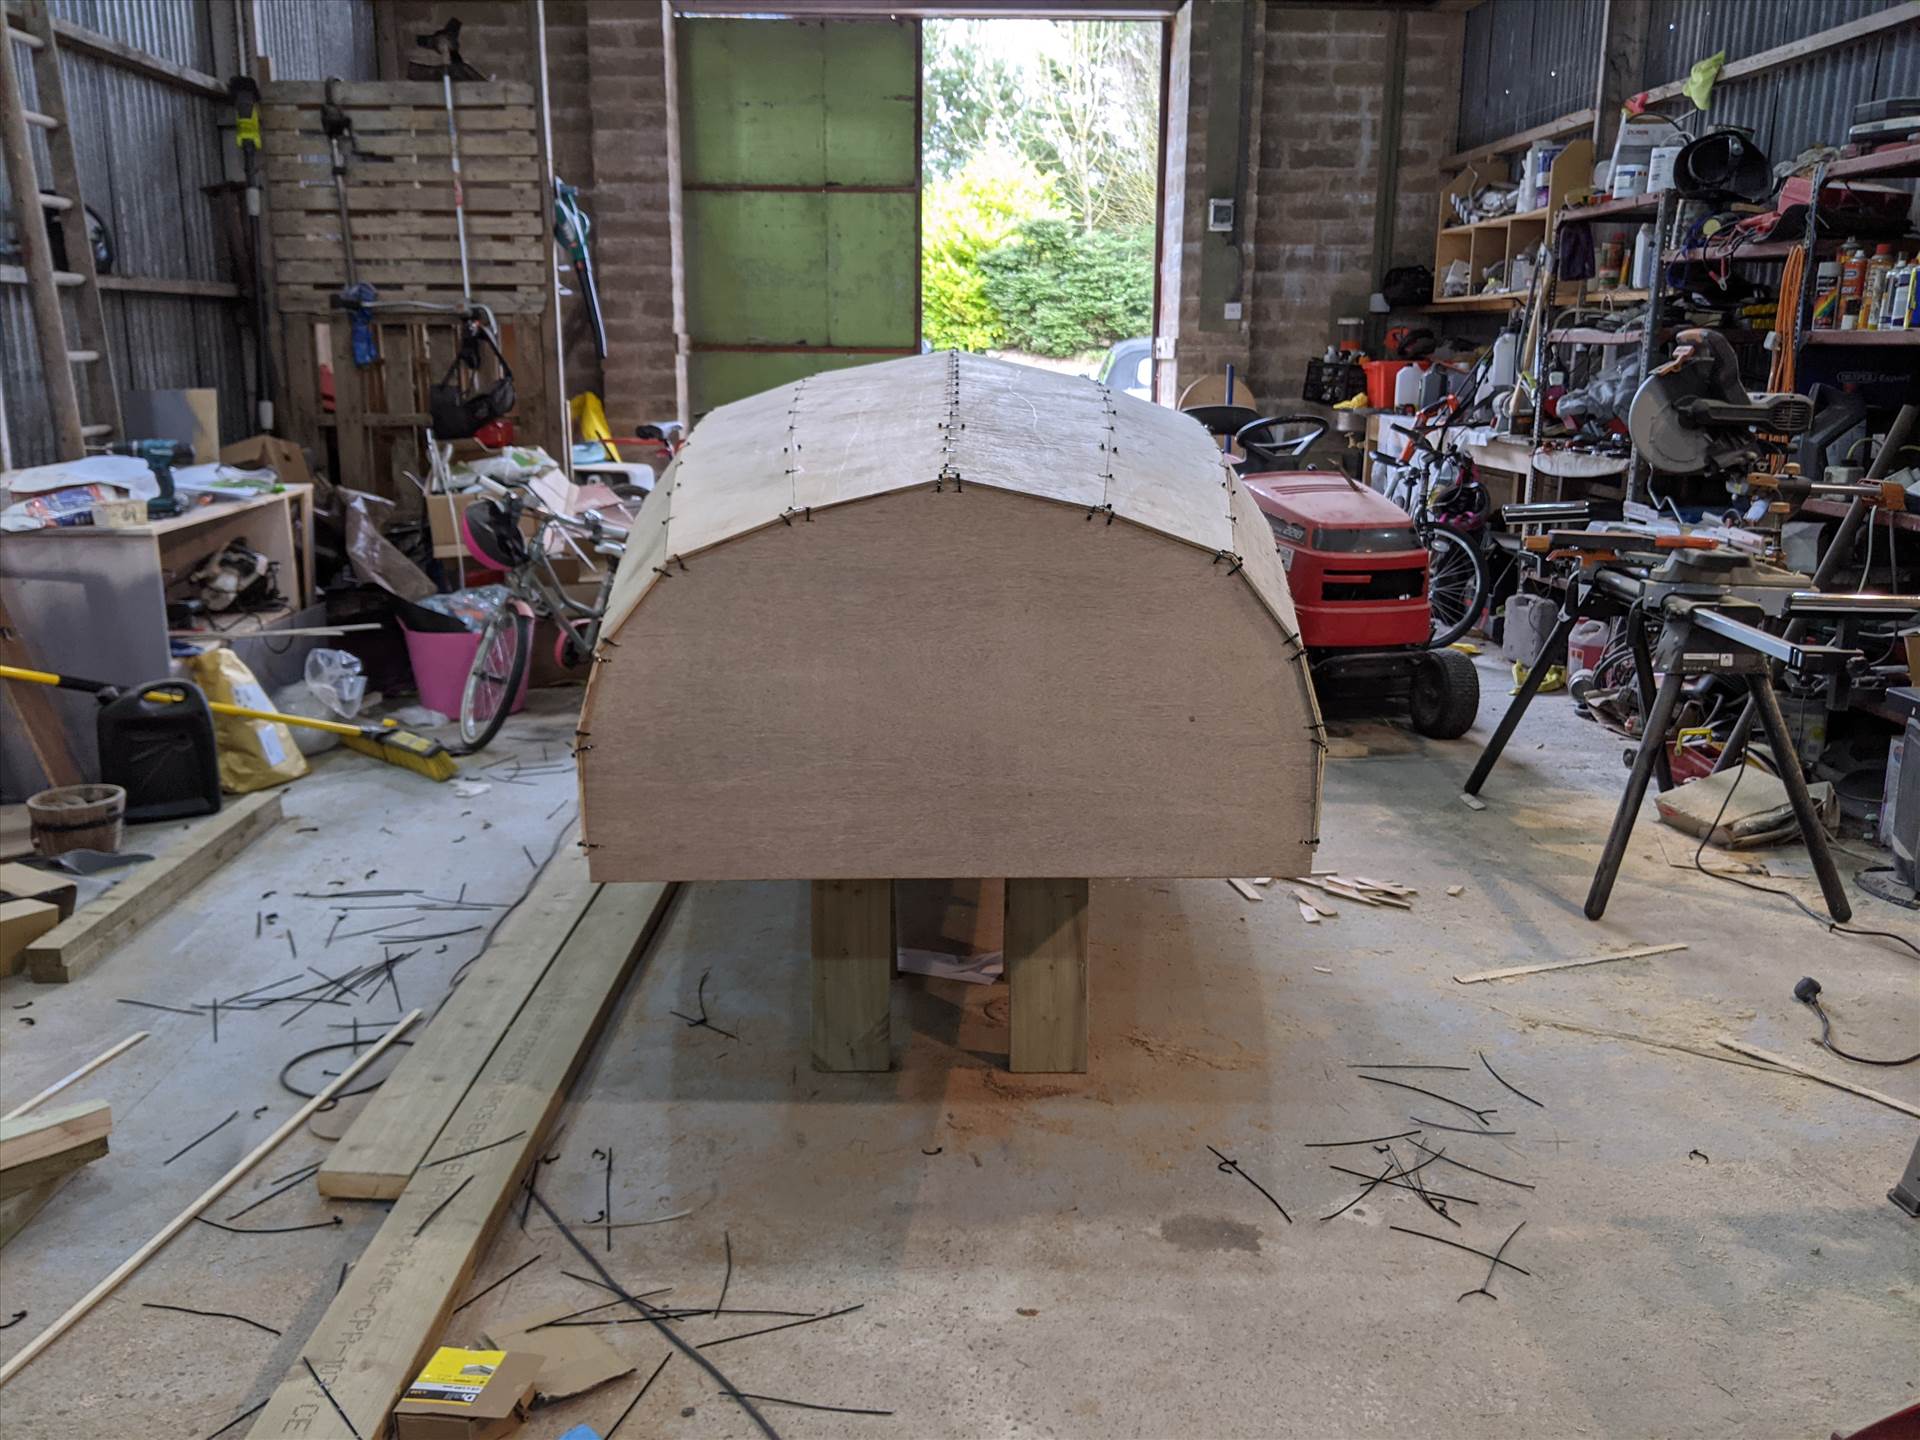
I realised that whilst the garage floor was flat, the keel wasn't supposed to be. Having the hull sat on the floor was effectively hogging the hull. I didn't know what this would mean, but nothing good, so it was time to knock up a couple of trestles and the family helped me lift the hull up onto them. As it by magic, all the tiewraps up front went slack and the gaps at the bow vanished. You'll notice I've added the transom and the biggest frame inside the hull - the one immediately forward of the mast.

The boat seemed to be in its most fragile state to date like this though. Without the final planks on, the hull kept trying to turn "inside out" over the aft trestle.
The keel was easy. Not knowing what to expect, I used twice as many tie-wraps as turned out to be necessary. The top corner of the stem was bolted with penny washers as the twist here was substantial and the designer warned that a tie-wrap here would just fail and even bolts might pull through without big washers.
I was in no particular rush so I turned it upside down and left it overnight to start to relax into its new unnatural shape
Stitching on the second plank was easy enough on the floor, and I started jamming chunks of timber in the bow to prise the shape open.
I was fearing that I'd fundamentally screwed up the lofting though as the planks just wouldn't close up at the bow.
I realised that whilst the garage floor was flat, the keel wasn't supposed to be. Having the hull sat on the floor was effectively hogging the hull. I didn't know what this would mean, but nothing good, so it was time to knock up a couple of trestles and the family helped me lift the hull up onto them. As it by magic, all the tiewraps up front went slack and the gaps at the bow vanished. You'll notice I've added the transom and the biggest frame inside the hull - the one immediately forward of the mast.
The boat seemed to be in its most fragile state to date like this though. Without the final planks on, the hull kept trying to turn "inside out" over the aft trestle.
Edited by jamieduff1981 on Monday 4th October 13:41
Edited by jamieduff1981 on Friday 22 March 08:06
Edited by jamieduff1981 on Friday 22 March 08:07
Edited by jamieduff1981 on Friday 22 March 08:27
Hard-Drive said:
Yes! This is great. Let's have all the details! How long do you expect it to take...looks like you've done a lot of the work already!
I've done something similar although more of a major conversion/surgery job, rather than a new build, and it was on something a bit quicker! It started out as a very old £300 single wire, tin-rig Cherub, and ended up as a wider, longer, twin-wire big carbon rig boat that I won a National Championships with. There's nothing more satisfying than sailing something you've done a lot of design and building work on.
That's bloody brilliant, by the way.I've done something similar although more of a major conversion/surgery job, rather than a new build, and it was on something a bit quicker! It started out as a very old £300 single wire, tin-rig Cherub, and ended up as a wider, longer, twin-wire big carbon rig boat that I won a National Championships with. There's nothing more satisfying than sailing something you've done a lot of design and building work on.
I started half-baked around October last year, but bad weather / cold / damp / anti-epoxy conditions meant I didn't really start properly until February. I did nothing in May as I bought an XJ-S and have been trying to make sure that's up to the job of a trip to Orkney in August, but the time has come to crack on again with the boat. Hopefully late next summer??? Maybe?
anonymous said:
[redacted]
My dad did the same in the 60s/70s.First task was to sew together the largest parts - the bottom boards - with copper wire.
At that point he moved it into the dining room.
We had Christmas dinner on our laps in the lounge, and when the boat was finished, the french doors had to be removed to get it out.
Happy days - good old dad !
The boat number was M7347.
Hi folks,
I'm glad this is vaguely interesting for some. I've got some more photos to upload to bring this up to date then we'll be real-time and I'll need to do some actual work to make actual progress again. I'm a bit frightened on the next thing I have to do and am therefore procrastinating
I'm glad this is vaguely interesting for some. I've got some more photos to upload to bring this up to date then we'll be real-time and I'll need to do some actual work to make actual progress again. I'm a bit frightened on the next thing I have to do and am therefore procrastinating
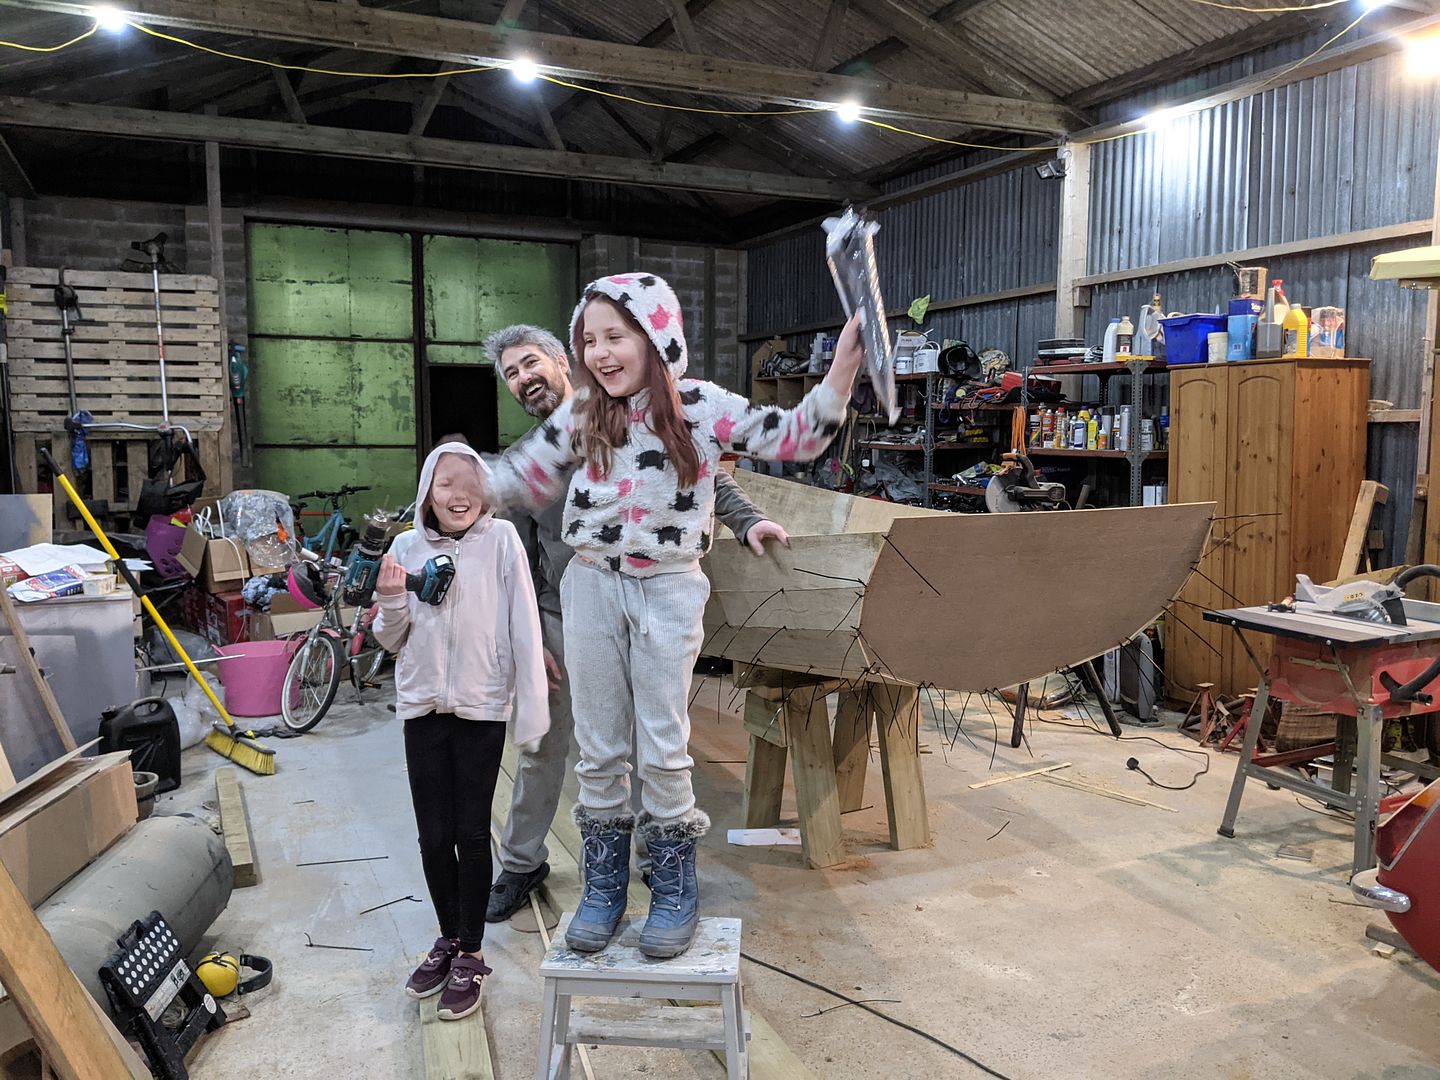
My daughters helped me hang the fourth planks one evening, which despite them being entirely typical in that they love playing with electronic tech, they enjoyed. This leads me to believe that as a generation of parents we can either be morons who berate the young for enjoying the technology we create, or we can create the opportunities for them to enjoy more physical stuff and be part of the solution rather than the problem.
That really didn't stiffen up the boat as much as I thought it might though, so we lofted out and cut a couple more internal frames which helped-ish

They were a struggle to fit though and the planks, especially aft, started trying to buck out and overlap. You might notice we marked the deck camber on but cut the frames out square. This was so I could easily spirit-level the frames to level them out down the hull's length to avoid locking any twist into the hull. We flipped the hull over and stood it on two of its frames.
Once again, all the unhappy hull planks instantly and automatically sorted themselves out and the internal frames suddenly notched nicely into each chine.
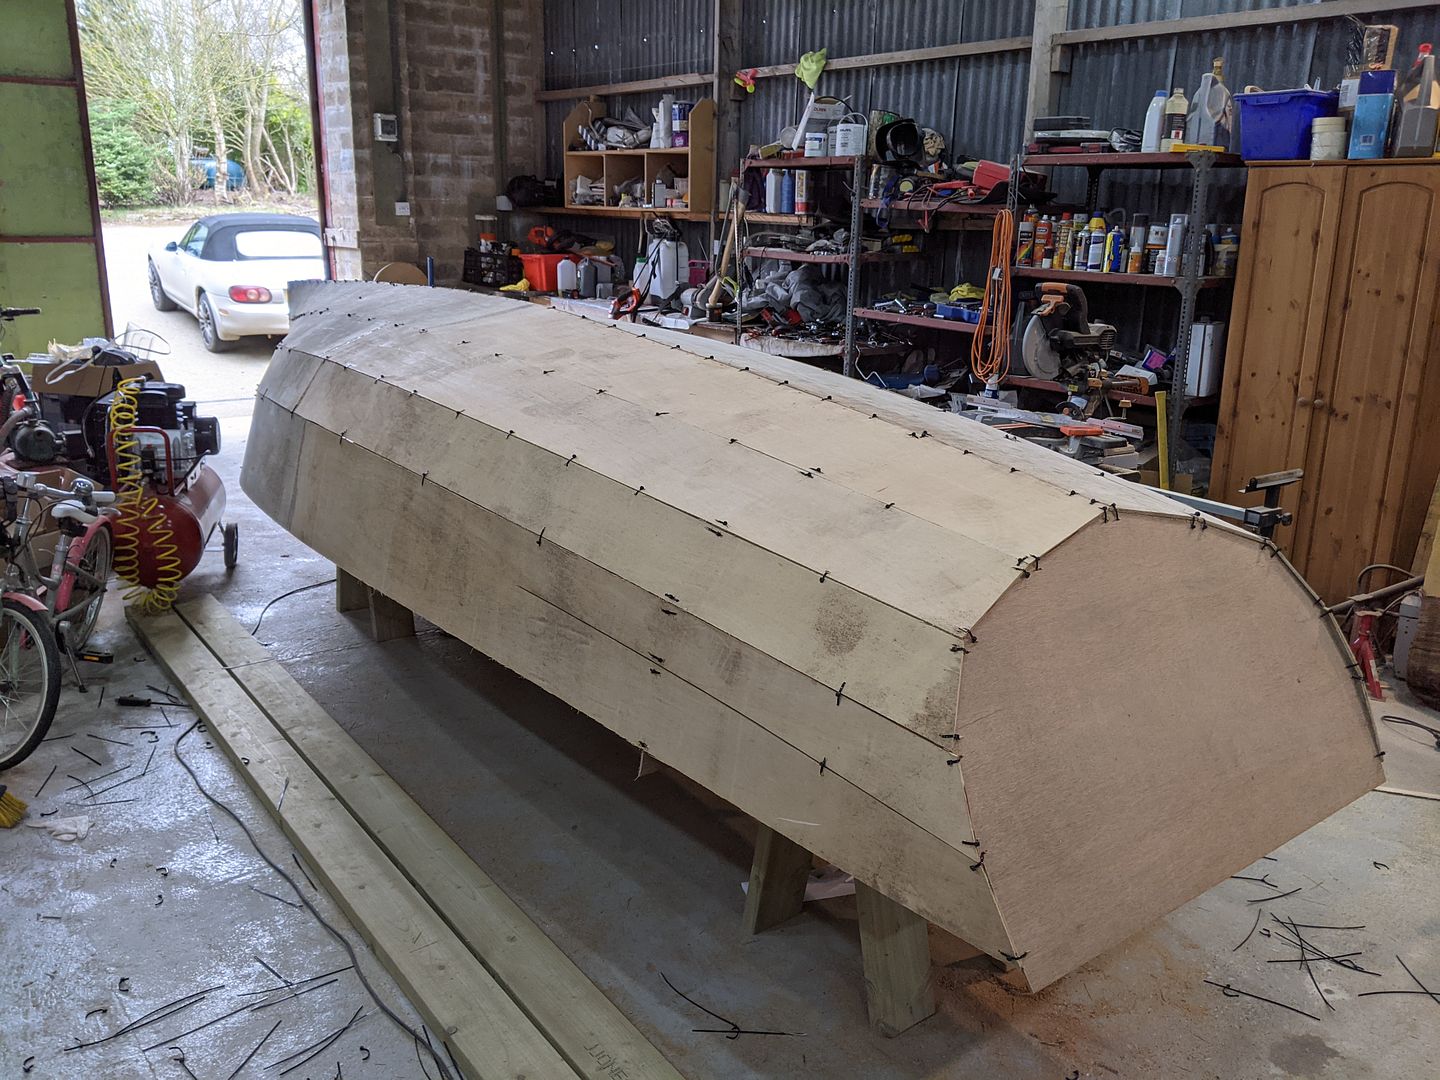
You may spot that the big wide upper plank has been slashed at the aft end. The plans give two options for the transom shape, either a straight one or a tumblehome version which is what I chose. I think it looks a bit nicer. As mentioned previously there's a lower rubbing strip below the gunwale half way down that big plank. Combined with the tumblehome transom it gives a very nice appearance and makes the hull look more shapely.
I don't think this looks at all bad for plywood sheets
With the hull upside down, I spot glued in various places between the planks with dollops of 5 minute epoxy (which only takes 1 hour to harden - uh huh -that's how it's labelled and that's what the instructions say) to tack them together properly. Despite being mostly happy in its new shape, the planks would in places become slightly misaligned and I don't want wavy chines...
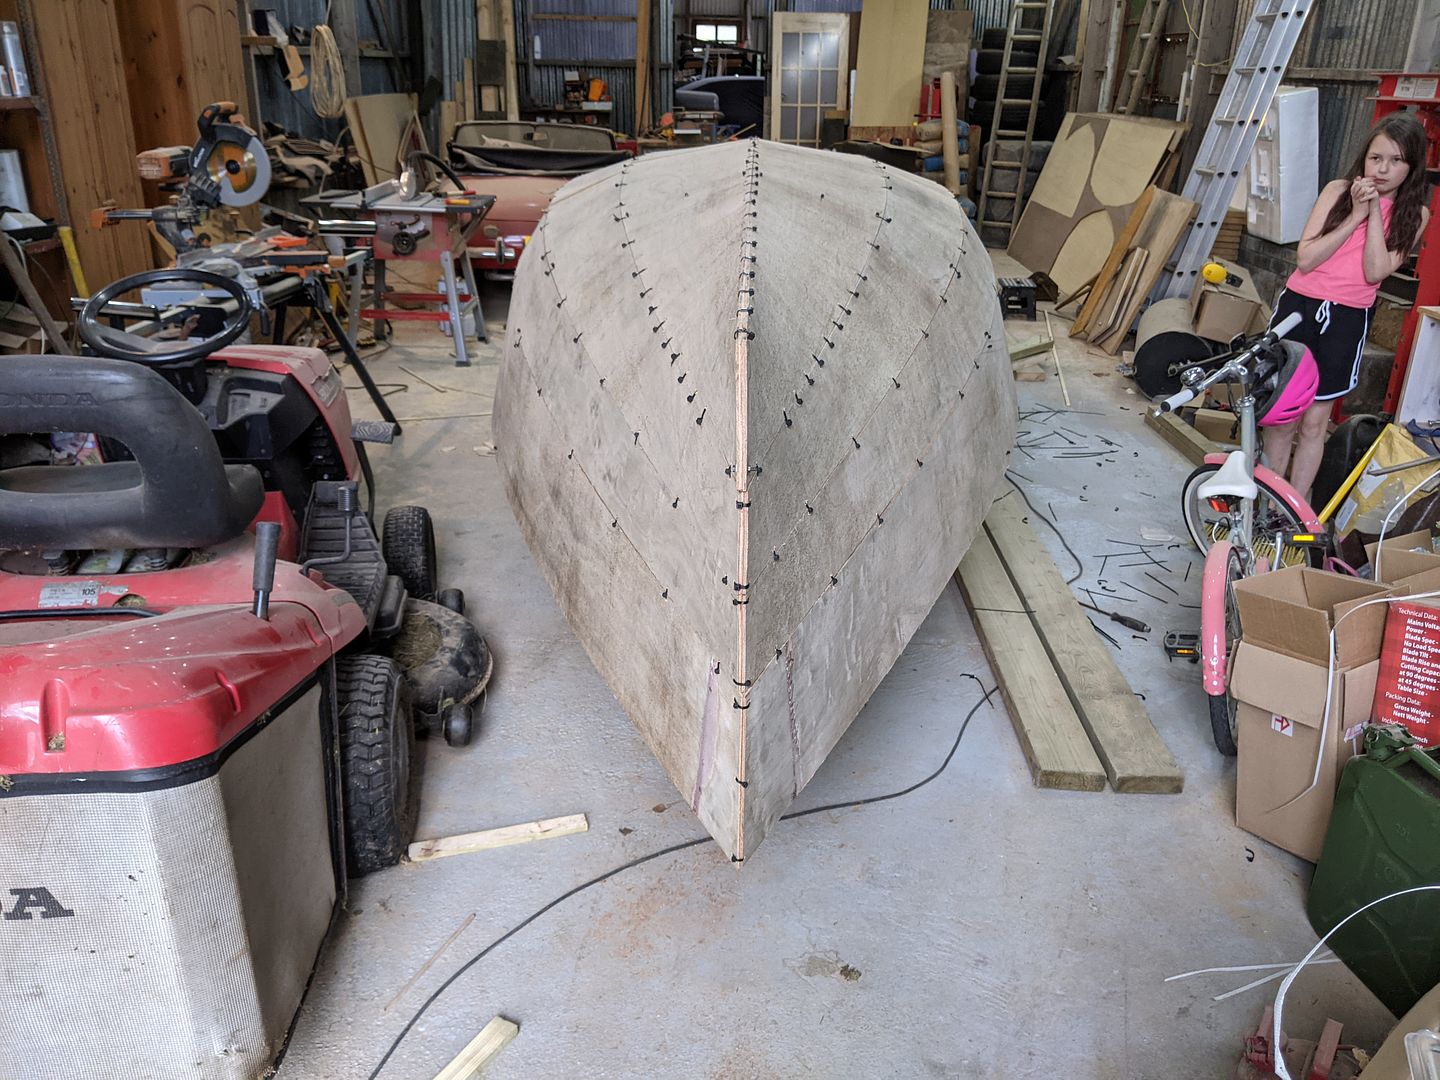
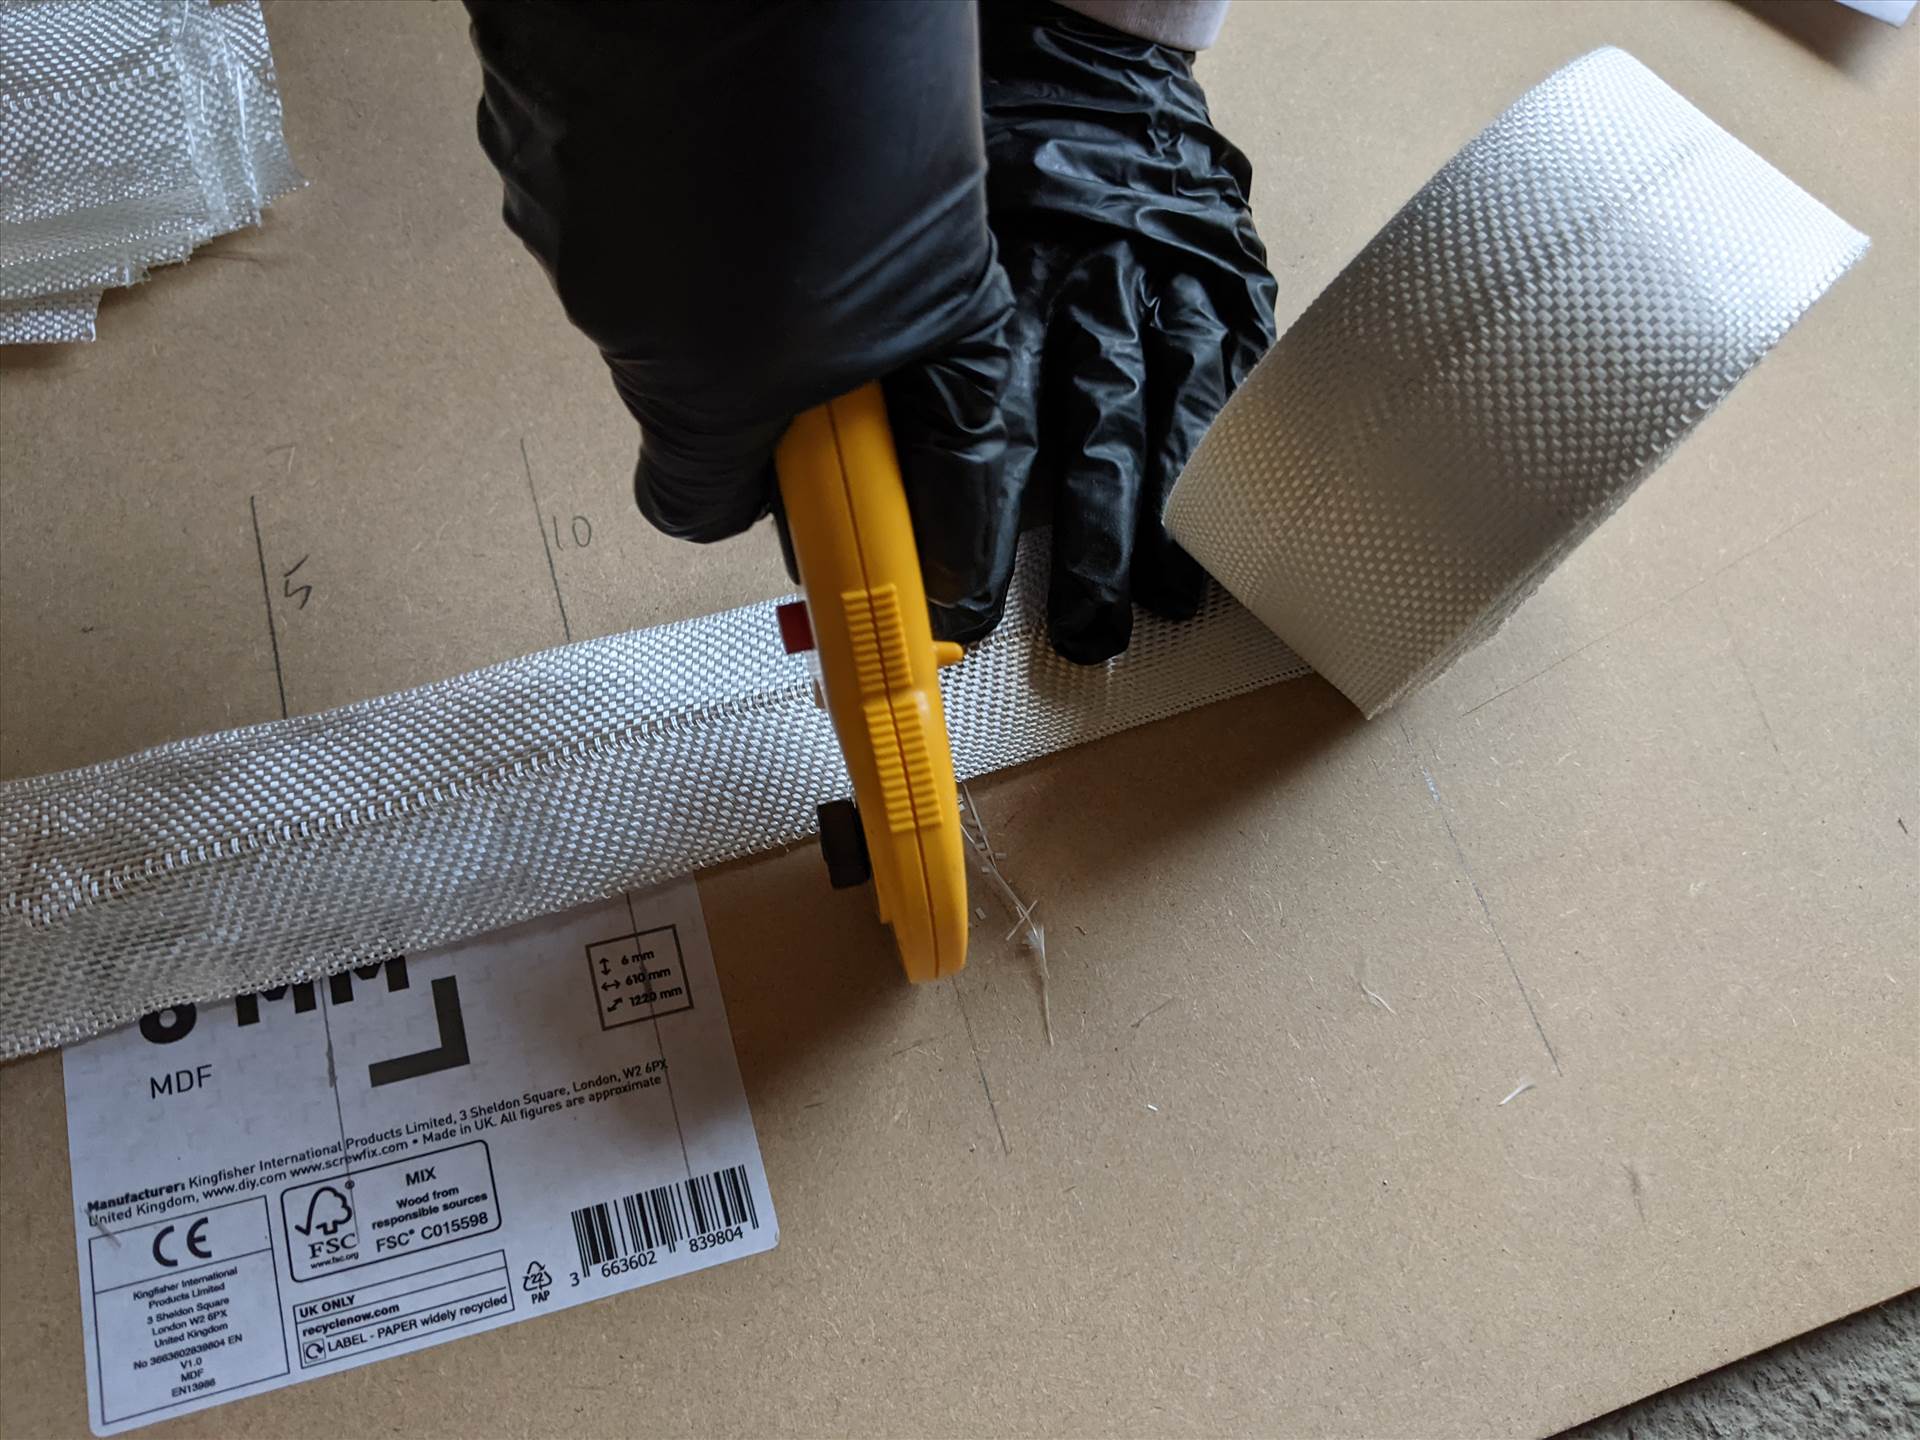
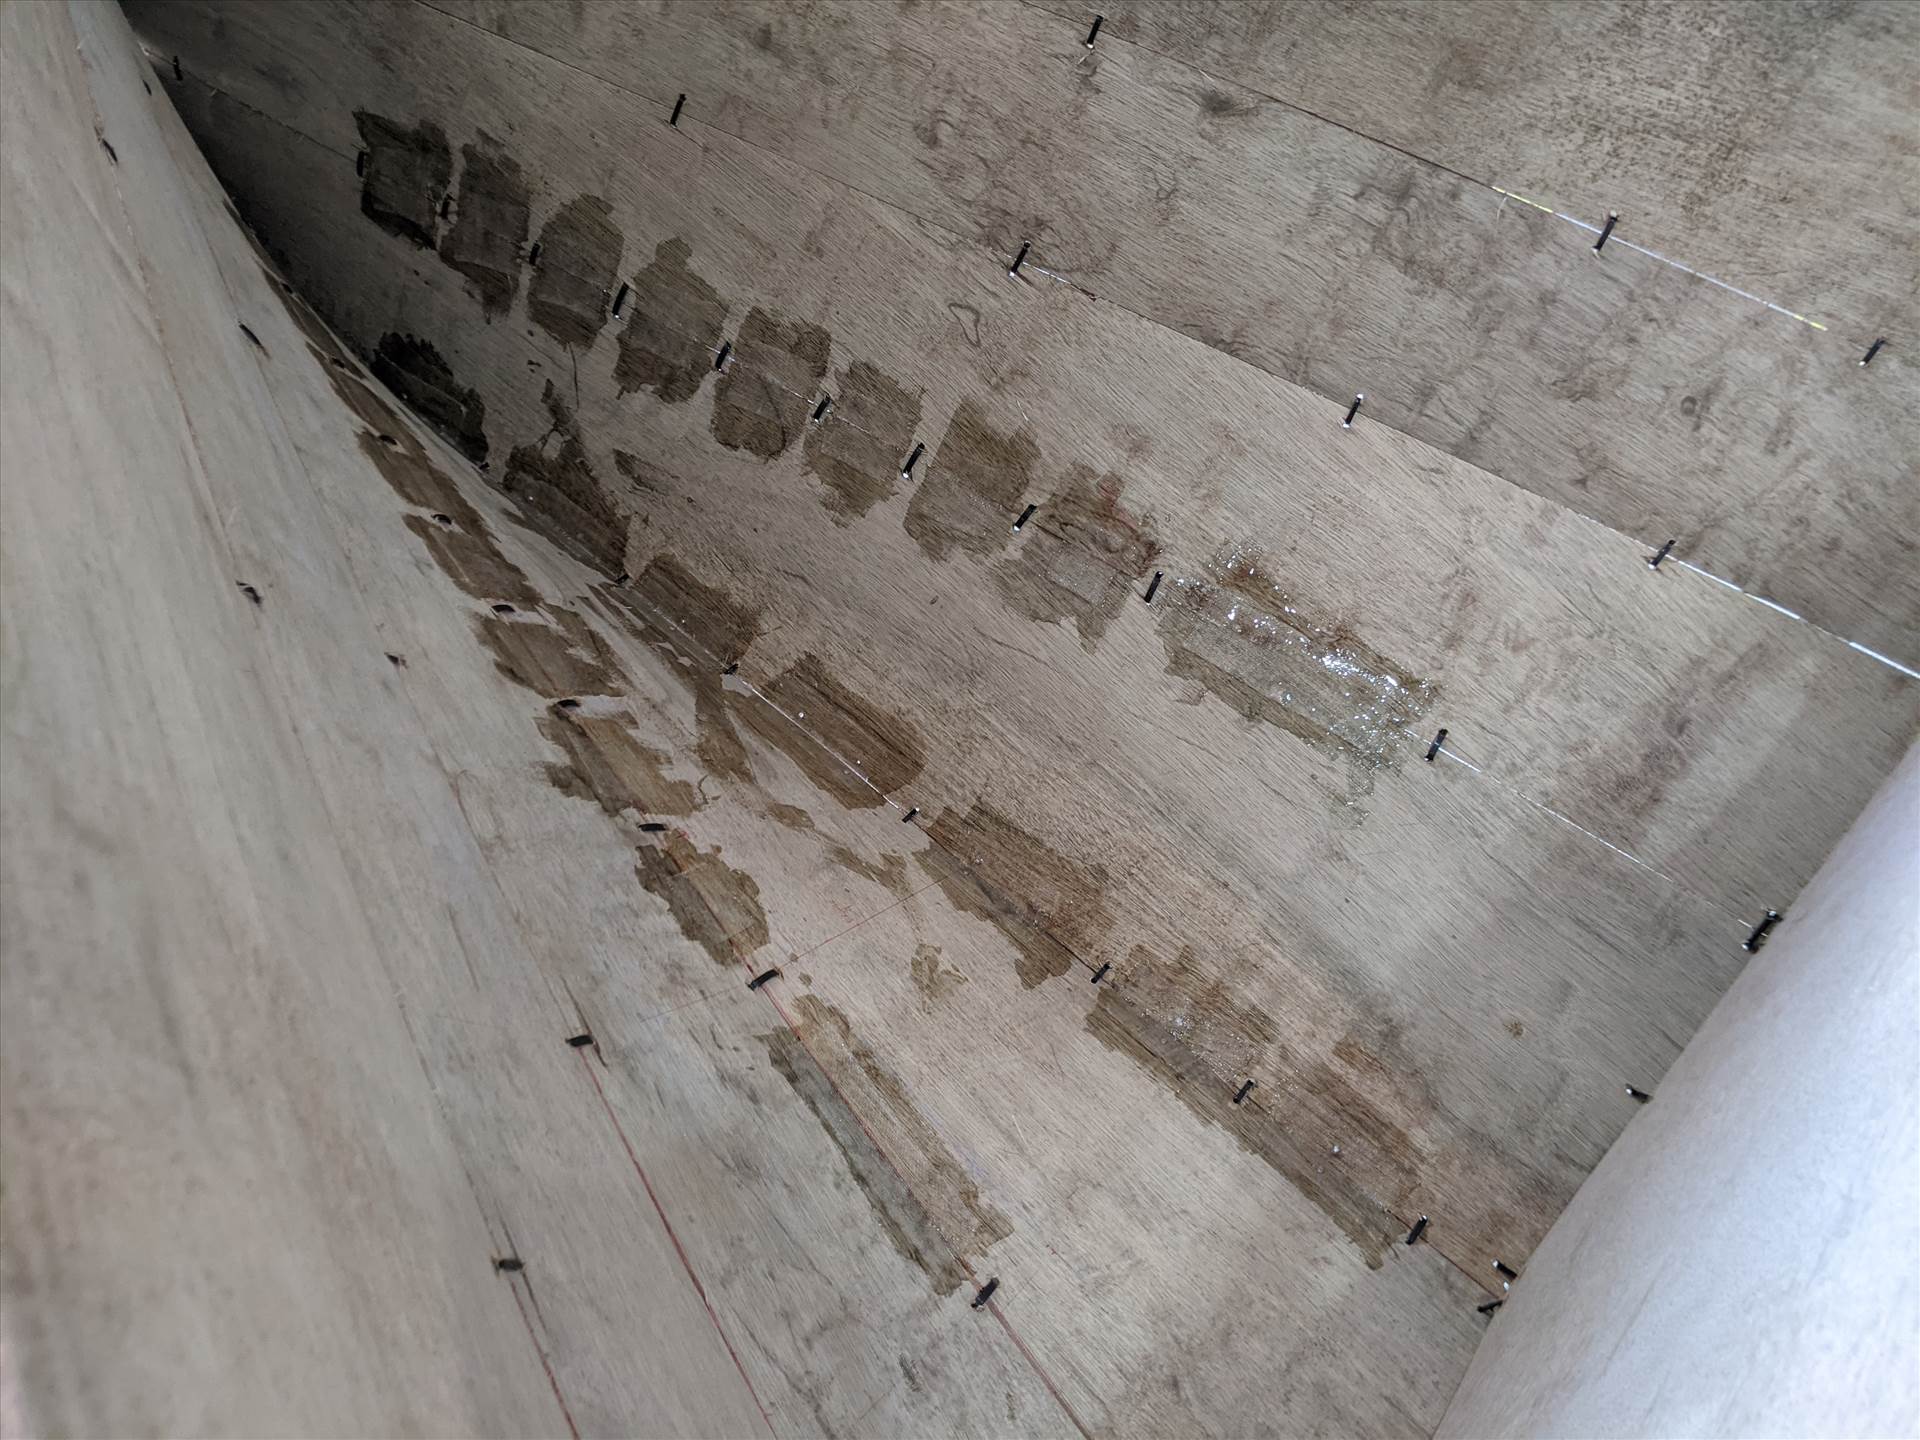
We flipped the boat back over again after this. 50mm wide fibreglass tape was cut into short lengths.
The boat has a 5ft beam so I couldn't actually reach the keel from outside, so I lifted my daughter in as she's much lighter than me and wouldn't collapse the somewhat precarious hull (although you'd think I'd lifted her into a minefield the way she gingerly shuffled about...) and she painted in the first row of fibreglass tapes between the tie-wraps.

There were quite a lot to do. I used 200 grams of epoxy resin at a time. I found using more than that caused it to exotherm which is dangerous, useless, and a complete waste of money.
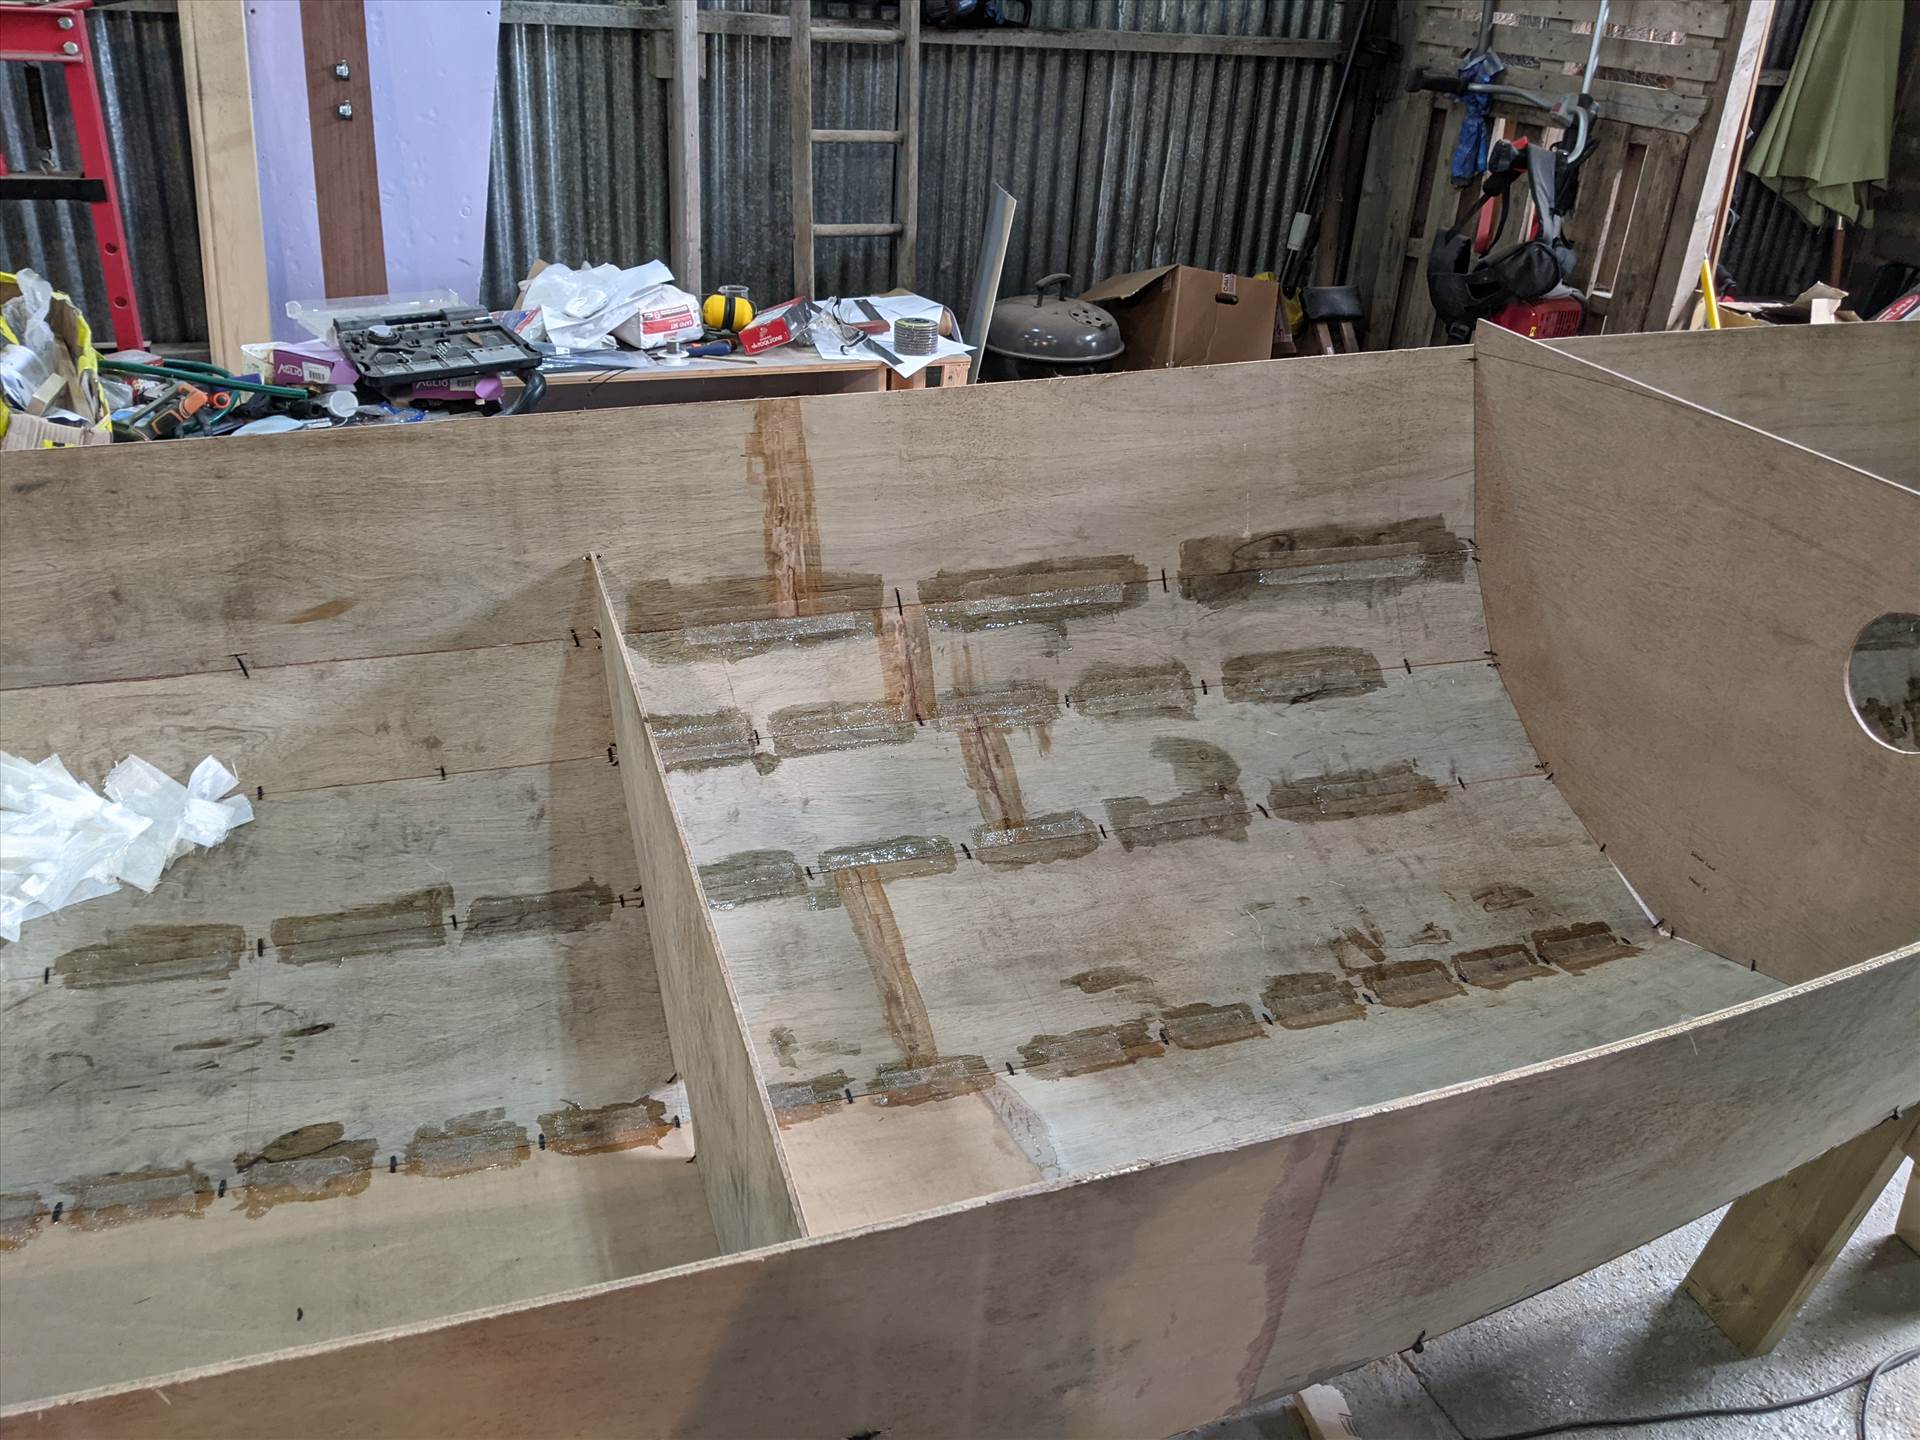
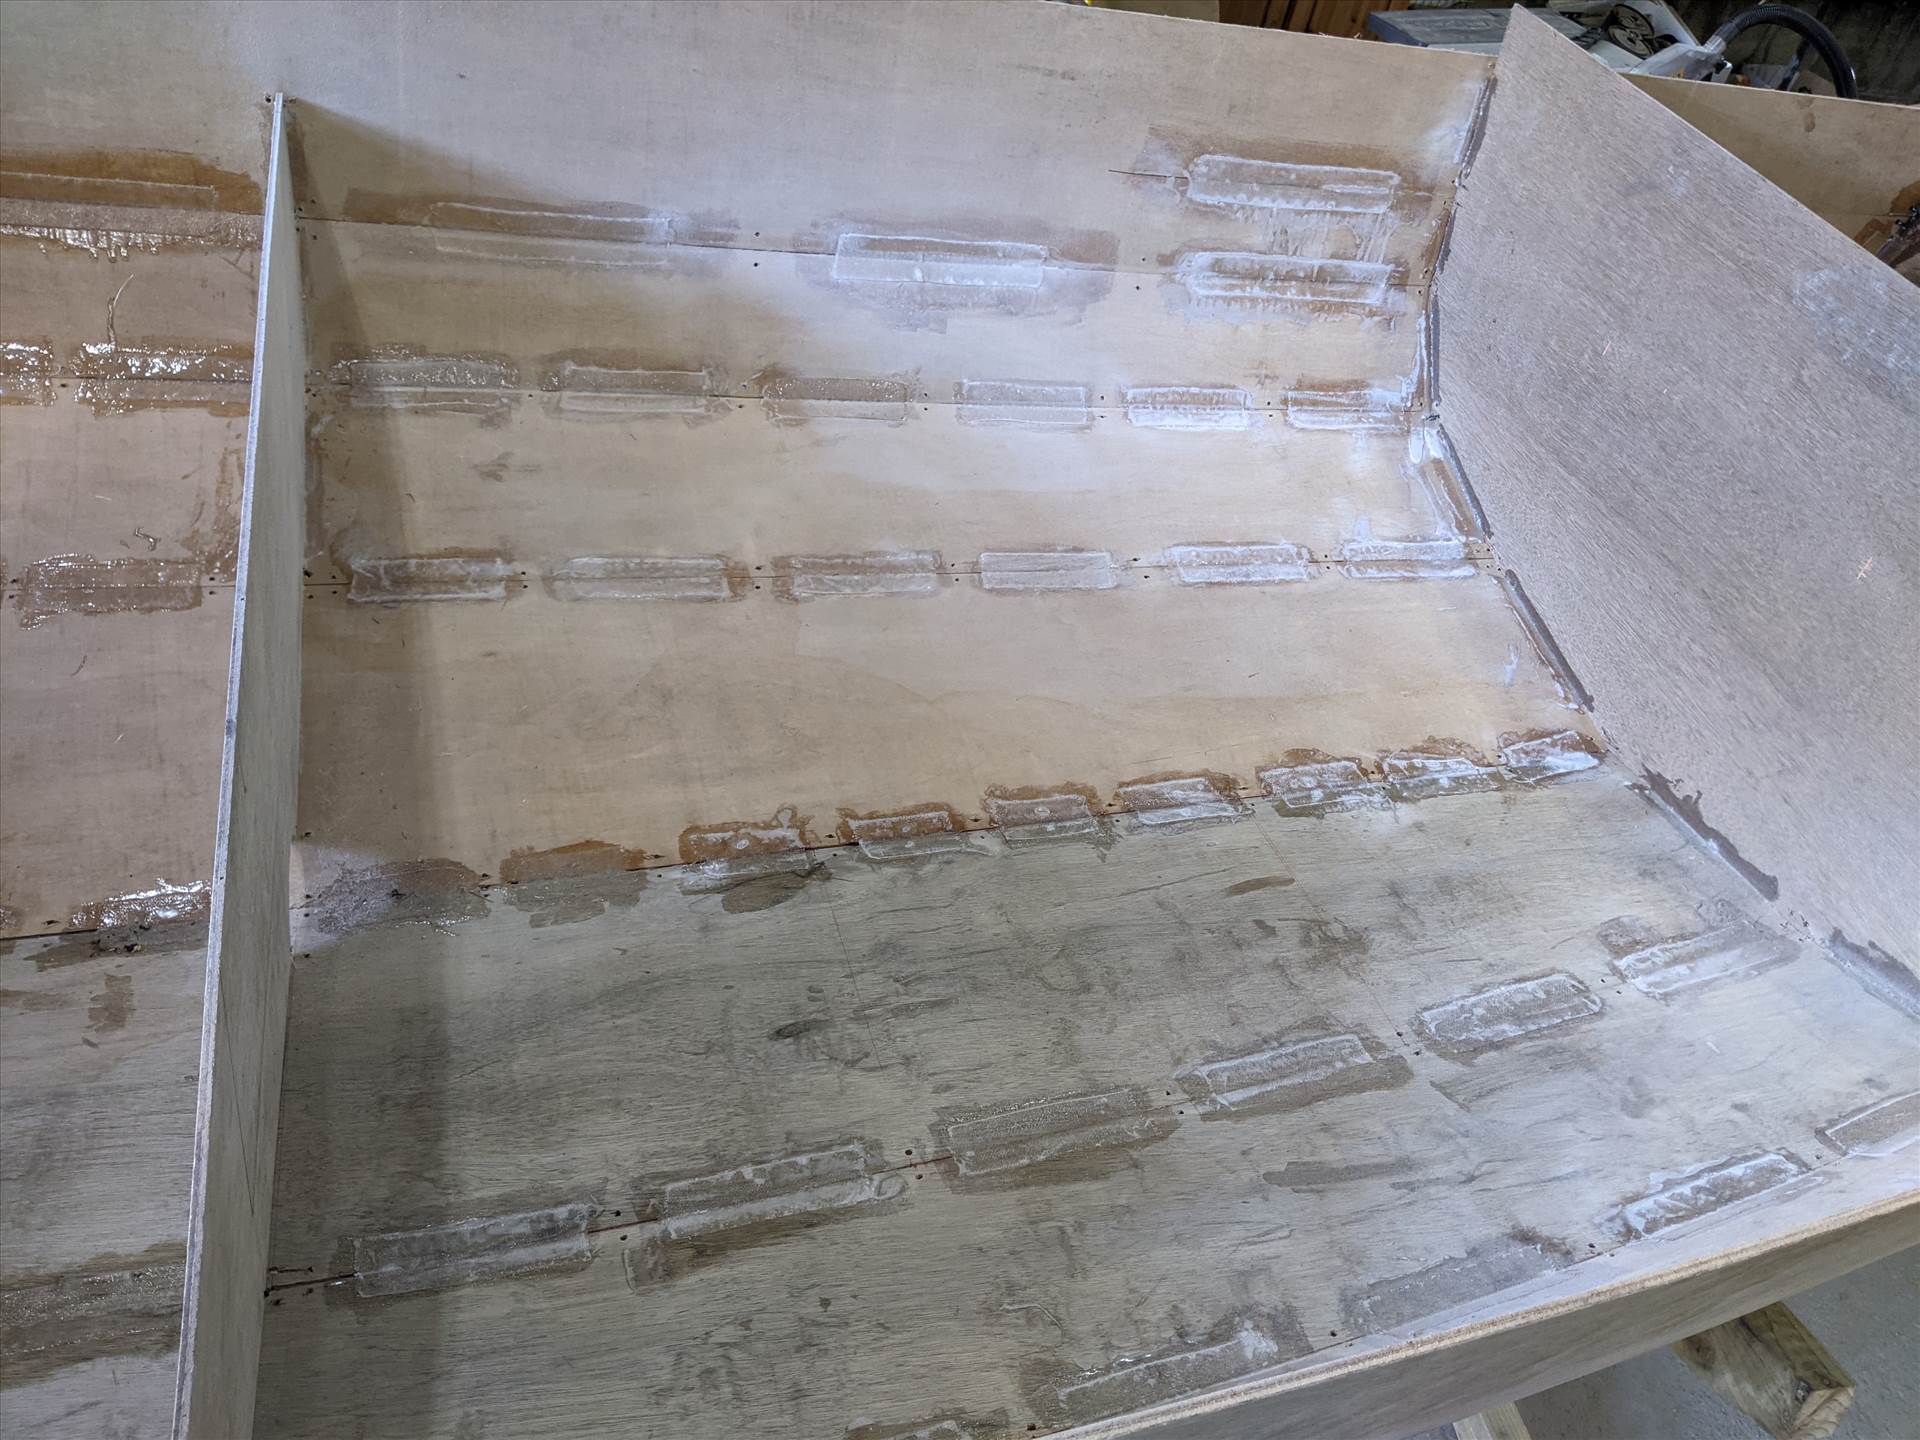
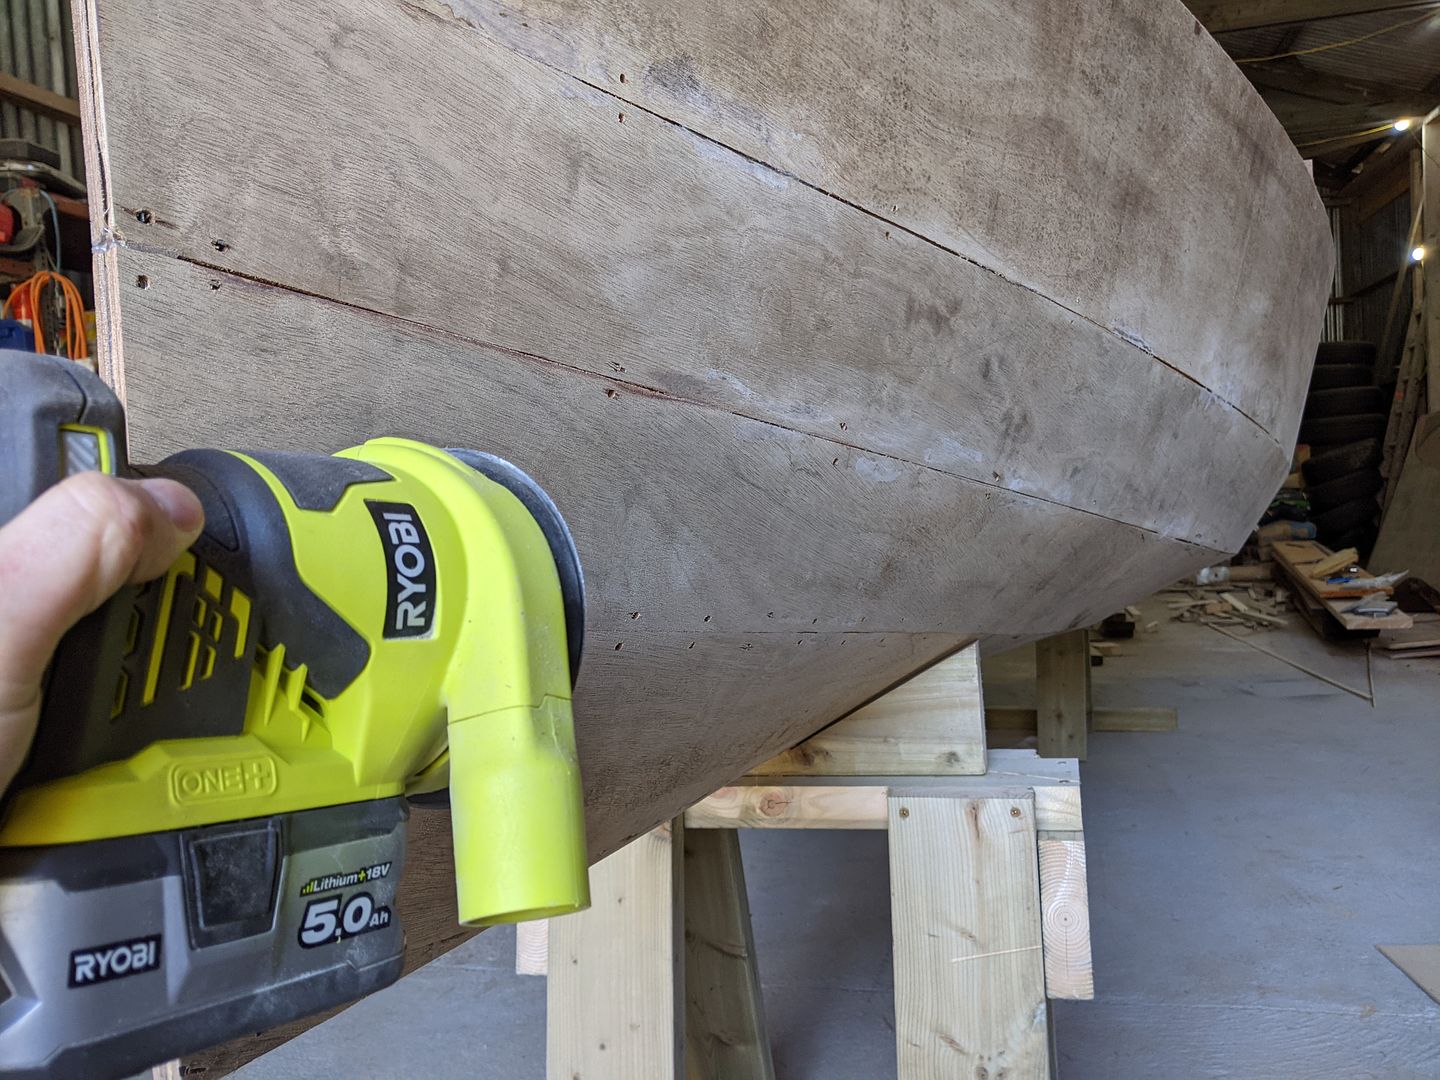
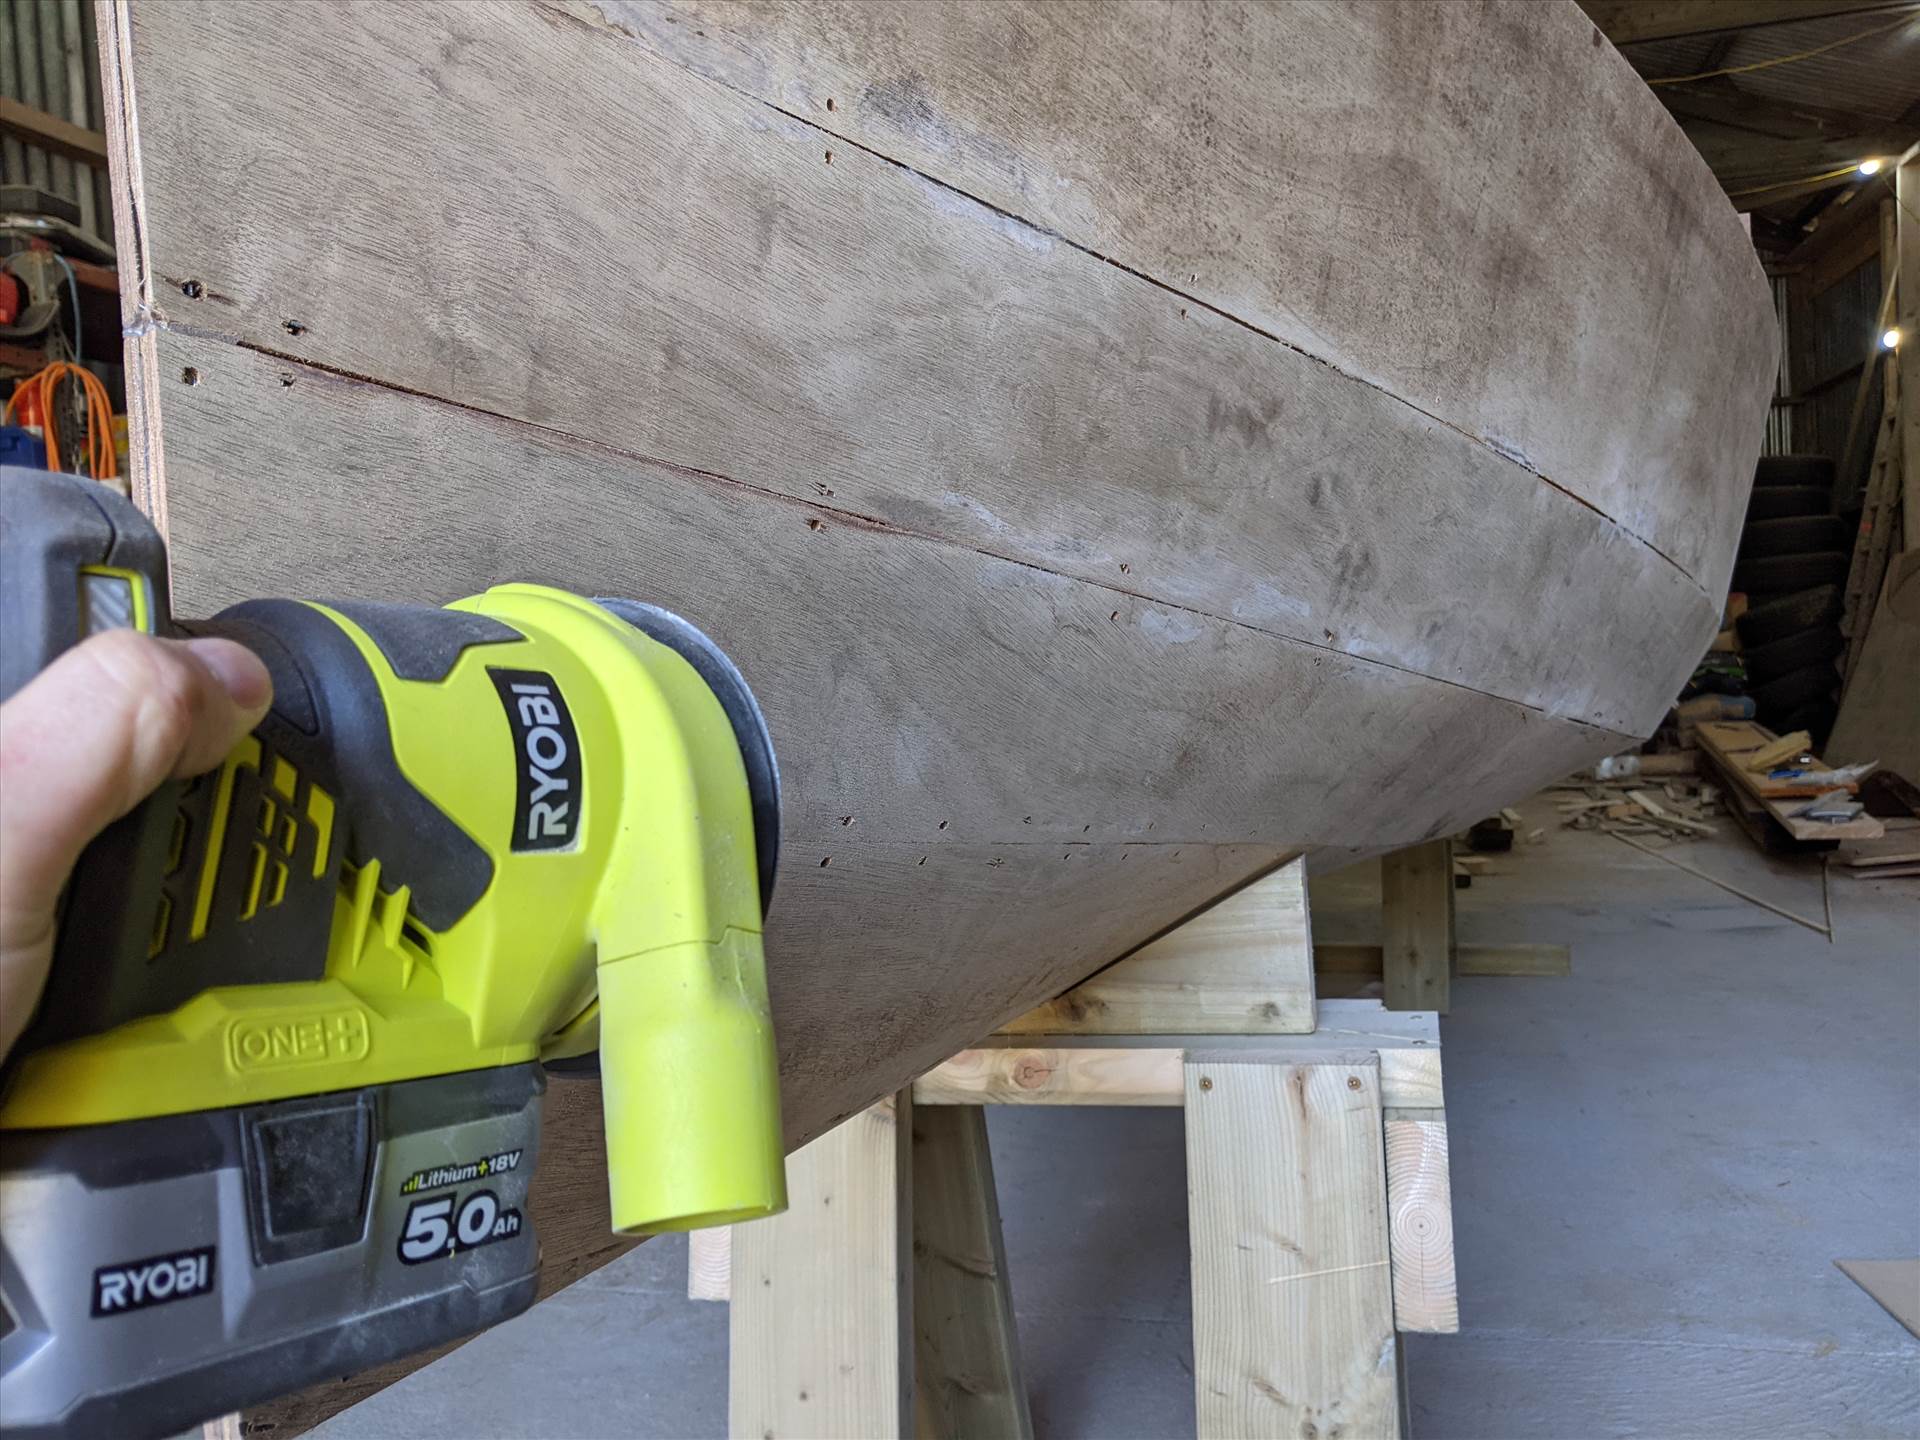
With all the joints now partially fibreglass taped, the boat is fairly rigid although with no gunwales on yet the shearline is still quite wobbly. The next thing to do was cut and remove all the tie-wraps which started out really satisfying but rapidly became quite tedious owing to the quantity used. Those gone, I got out the power sander and attacked all the seams from the outside to fair them off, then I knocked down the 50mm taped joints on the inside too.
Each of the seams will be taped over continuously from stem to stern both inside and out in the near future.
Before doing that though, I want to fit the gunwales which will be Iroko but for this I bought some rough sawn board. I fully expect the gunwales will have something to say about the final shape of the boat as their fairly uniform stiffness will certainly try to apply some batton-effect to the top of the shear in plan-view. As I want to lock the boat together in its final shape rather than lock in extras stresses, I want to fit the gunwales before final taping of the seams.
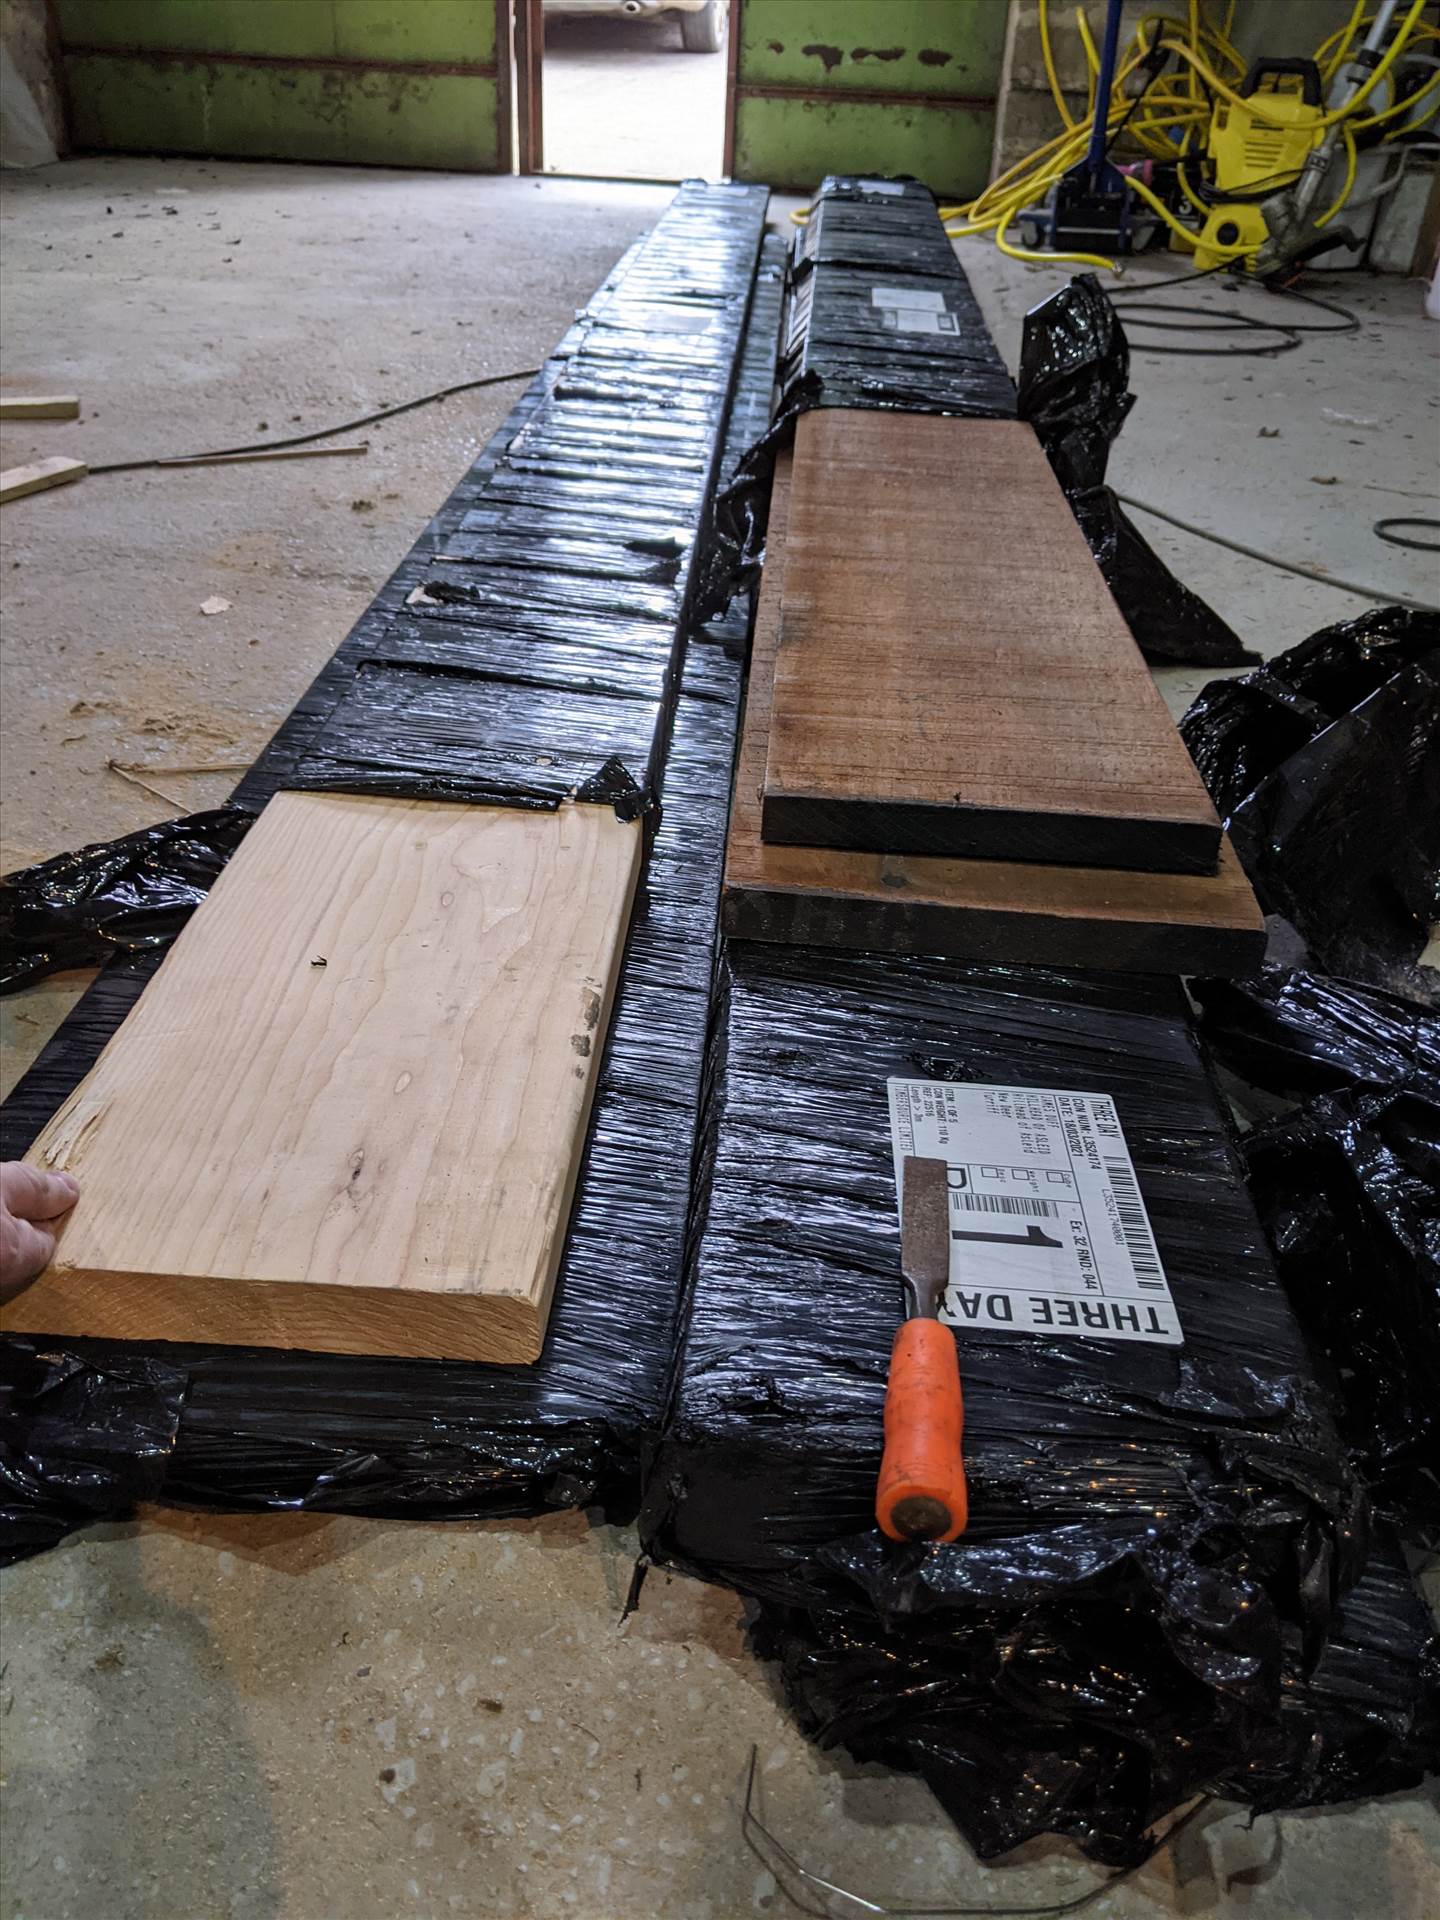
I bought some nice Douglas Fir boards at the same time which will become Melitele's (that's our boat's name, voted on by the family) mast, gaff, boom and bowsprit. Delivered, these boards cost me £500. As I need to rip these boards down, I'm a little nervous about screwing it up. There's no rational reason for this fear, but it's there and I've procrastinated a bit even buying a Jaguar V12 as something safer to play with. I want my sailing boat though so will crack on with this soon. Perhaps even tomorrow
That really didn't stiffen up the boat as much as I thought it might though, so we lofted out and cut a couple more internal frames which helped-ish
They were a struggle to fit though and the planks, especially aft, started trying to buck out and overlap. You might notice we marked the deck camber on but cut the frames out square. This was so I could easily spirit-level the frames to level them out down the hull's length to avoid locking any twist into the hull. We flipped the hull over and stood it on two of its frames.
Once again, all the unhappy hull planks instantly and automatically sorted themselves out and the internal frames suddenly notched nicely into each chine.
You may spot that the big wide upper plank has been slashed at the aft end. The plans give two options for the transom shape, either a straight one or a tumblehome version which is what I chose. I think it looks a bit nicer. As mentioned previously there's a lower rubbing strip below the gunwale half way down that big plank. Combined with the tumblehome transom it gives a very nice appearance and makes the hull look more shapely.
I don't think this looks at all bad for plywood sheets
With the hull upside down, I spot glued in various places between the planks with dollops of 5 minute epoxy (which only takes 1 hour to harden - uh huh -that's how it's labelled and that's what the instructions say) to tack them together properly. Despite being mostly happy in its new shape, the planks would in places become slightly misaligned and I don't want wavy chines...
We flipped the boat back over again after this. 50mm wide fibreglass tape was cut into short lengths.
The boat has a 5ft beam so I couldn't actually reach the keel from outside, so I lifted my daughter in as she's much lighter than me and wouldn't collapse the somewhat precarious hull (although you'd think I'd lifted her into a minefield the way she gingerly shuffled about...) and she painted in the first row of fibreglass tapes between the tie-wraps.
There were quite a lot to do. I used 200 grams of epoxy resin at a time. I found using more than that caused it to exotherm which is dangerous, useless, and a complete waste of money.
With all the joints now partially fibreglass taped, the boat is fairly rigid although with no gunwales on yet the shearline is still quite wobbly. The next thing to do was cut and remove all the tie-wraps which started out really satisfying but rapidly became quite tedious owing to the quantity used. Those gone, I got out the power sander and attacked all the seams from the outside to fair them off, then I knocked down the 50mm taped joints on the inside too.
Each of the seams will be taped over continuously from stem to stern both inside and out in the near future.
Before doing that though, I want to fit the gunwales which will be Iroko but for this I bought some rough sawn board. I fully expect the gunwales will have something to say about the final shape of the boat as their fairly uniform stiffness will certainly try to apply some batton-effect to the top of the shear in plan-view. As I want to lock the boat together in its final shape rather than lock in extras stresses, I want to fit the gunwales before final taping of the seams.
I bought some nice Douglas Fir boards at the same time which will become Melitele's (that's our boat's name, voted on by the family) mast, gaff, boom and bowsprit. Delivered, these boards cost me £500. As I need to rip these boards down, I'm a little nervous about screwing it up. There's no rational reason for this fear, but it's there and I've procrastinated a bit even buying a Jaguar V12 as something safer to play with. I want my sailing boat though so will crack on with this soon. Perhaps even tomorrow
Edited by jamieduff1981 on Friday 22 March 14:59
In terms of the exothermic reaction, are you using fast or slow hardener? I always use slow for anything that’s boat building…fast if you are in need of a quick repair.
Also, use shallow tubs. You want minimum “depth” and maximum surface area so any heat can get out and not be held in the epoxy. Plastic takeaway containers work well!
It’s looking great by the way…well done!!
Also, use shallow tubs. You want minimum “depth” and maximum surface area so any heat can get out and not be held in the epoxy. Plastic takeaway containers work well!
It’s looking great by the way…well done!!
I sort of bought a car which kept me a bit busier than I had initially expected, but mostly that's an excuse and I was procrastinating as I was afraid of messing up that nice timber.
I don't really have any friends who are remotely interested in making things and whilst that blanket statement doesn't include my wife, she's not keen on lugging timber about.
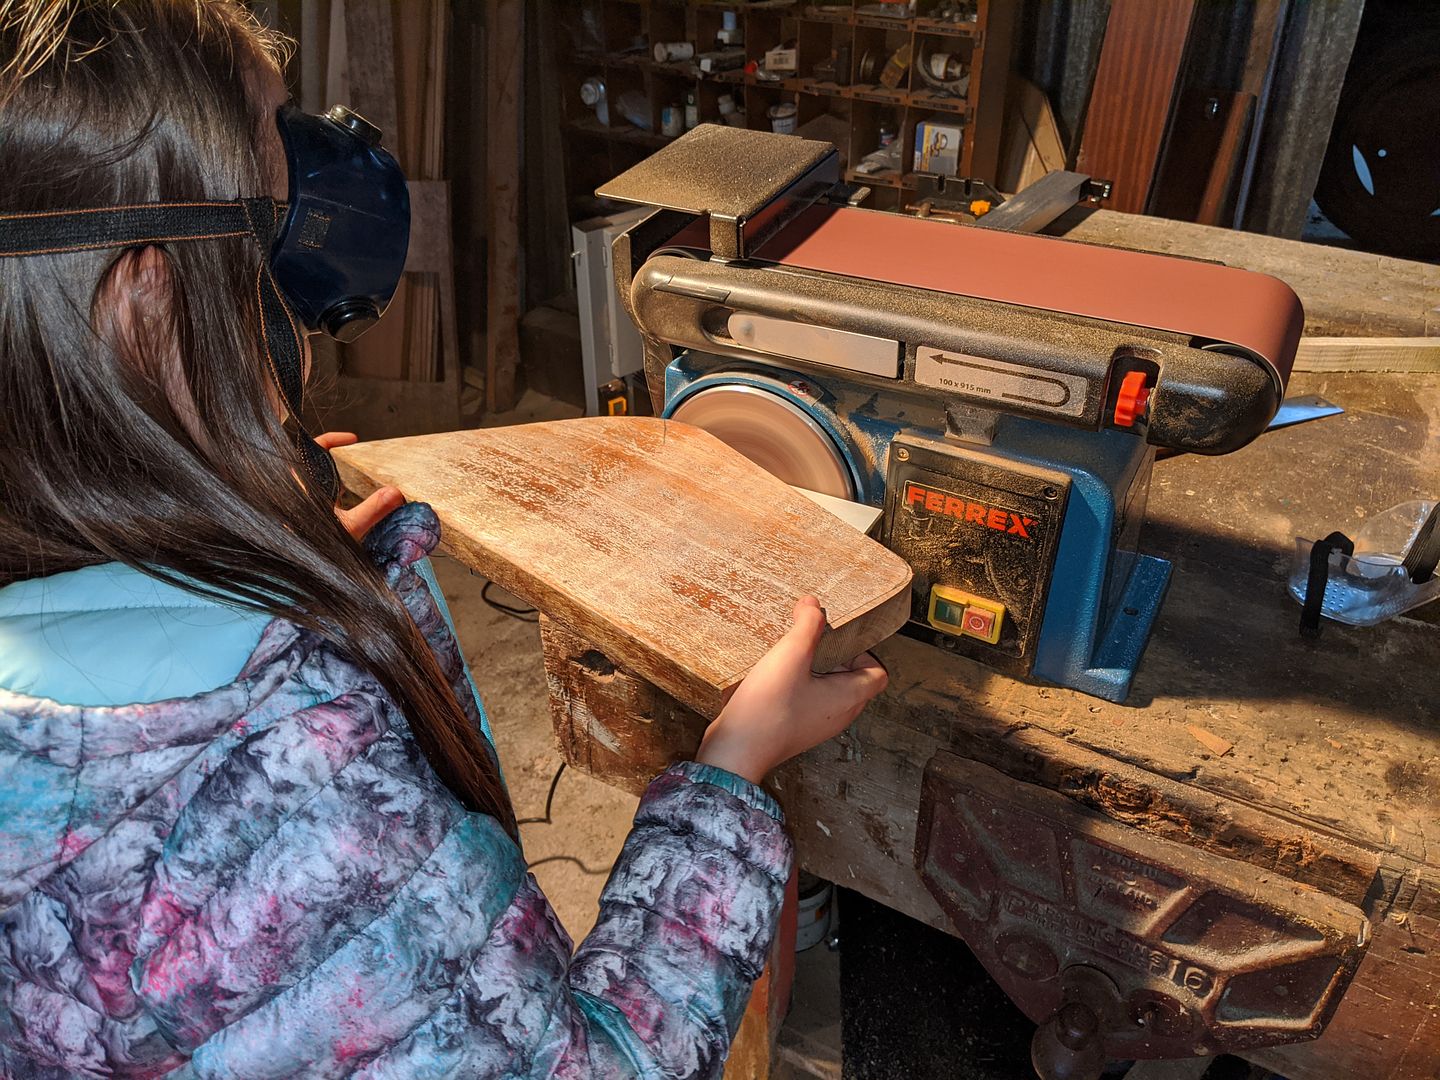
My 11 and 9 year old daughters however have proven up for the task and having bought them each a new pair of kiddie-sized ear defenders they helped me plane and thickness down the first board with complete success. It was actually really rewarding seeing a beautiful piece of wood emerge from the tough sawn board. Silly, I know, but still really great.


This was thicknessed down to 20mm. The gunwales are made, according to the plans, from two laminations of 20mm x 20mm hardwood but I read on another forum a while ago that a builder had breakages bending the hardwood around the shear of the hull. To mitigate this, I decided to cut narrower strips i.e. 13.5mm and use three laminations instead. I expected mistakes and wastage but it actually went really well.
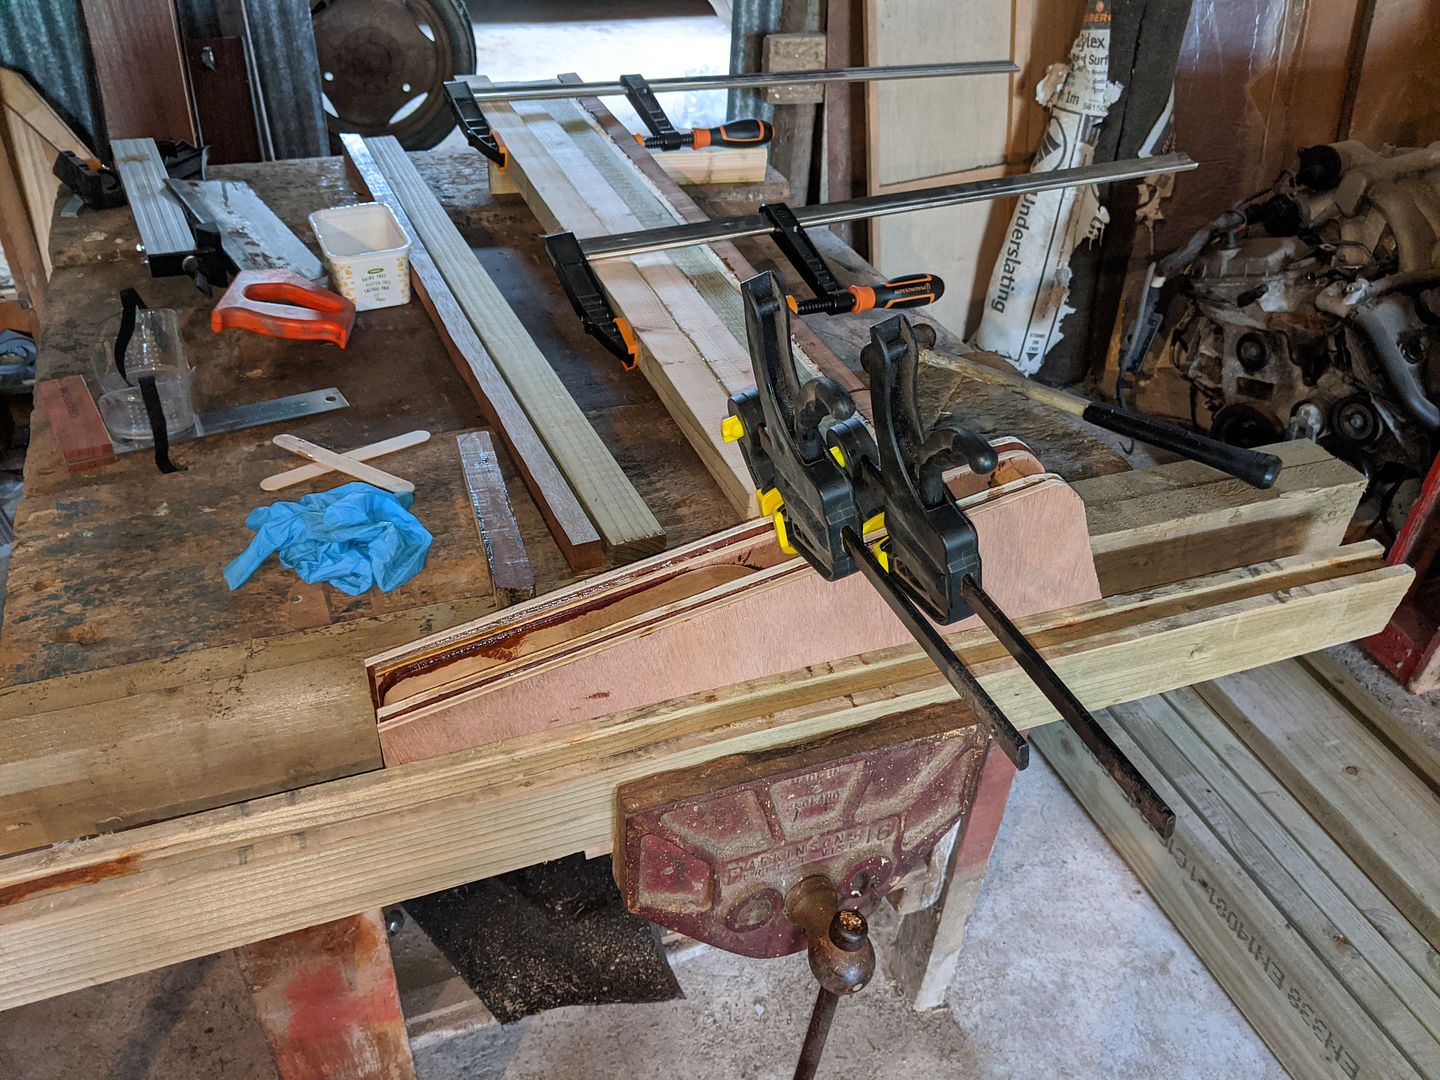
I was a little concerned about the shape of my bow which the plywood tried to straighten out.

To ensure the correct shape was locked in by the gunwales I cut temporary forms to clamp on the inside whilst gluing up the gunwales and tested it using scrap batons to check I achieved a nice fair curve. It worked.

There is a 20 x 20mm strip amongst these from which I'll cut the stem post and the hardwood keel strip back to the daggerboard opening (there's a wedge shaped skeg aft of the daggerboard opening which will need cut from another board later).


I don't really have any friends who are remotely interested in making things and whilst that blanket statement doesn't include my wife, she's not keen on lugging timber about.
My 11 and 9 year old daughters however have proven up for the task and having bought them each a new pair of kiddie-sized ear defenders they helped me plane and thickness down the first board with complete success. It was actually really rewarding seeing a beautiful piece of wood emerge from the tough sawn board. Silly, I know, but still really great.
This was thicknessed down to 20mm. The gunwales are made, according to the plans, from two laminations of 20mm x 20mm hardwood but I read on another forum a while ago that a builder had breakages bending the hardwood around the shear of the hull. To mitigate this, I decided to cut narrower strips i.e. 13.5mm and use three laminations instead. I expected mistakes and wastage but it actually went really well.
I was a little concerned about the shape of my bow which the plywood tried to straighten out.
To ensure the correct shape was locked in by the gunwales I cut temporary forms to clamp on the inside whilst gluing up the gunwales and tested it using scrap batons to check I achieved a nice fair curve. It worked.
There is a 20 x 20mm strip amongst these from which I'll cut the stem post and the hardwood keel strip back to the daggerboard opening (there's a wedge shaped skeg aft of the daggerboard opening which will need cut from another board later).
Boatbuoy said:
Great work Jamie, keep it up!
Thanks! I'm hoping I can finish work today with 2 ounces of energy left to mix up some epoxy and glue on the stem post. With that fitted first I can more neatly finish the stem end of each gunwale lamination. More clamps are on order and hopefully will be here tomorrow - fingers crossed...Gassing Station | Boats, Planes & Trains | Top of Page | What's New | My Stuff