Big single custom bike project
Discussion


Over the years I have done quite a few custom bike builds and also restorations, here are a few...
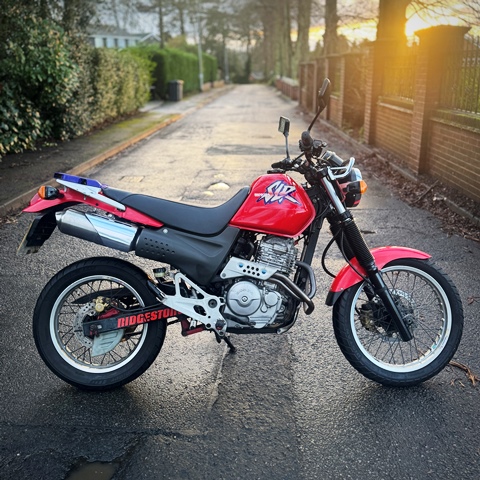
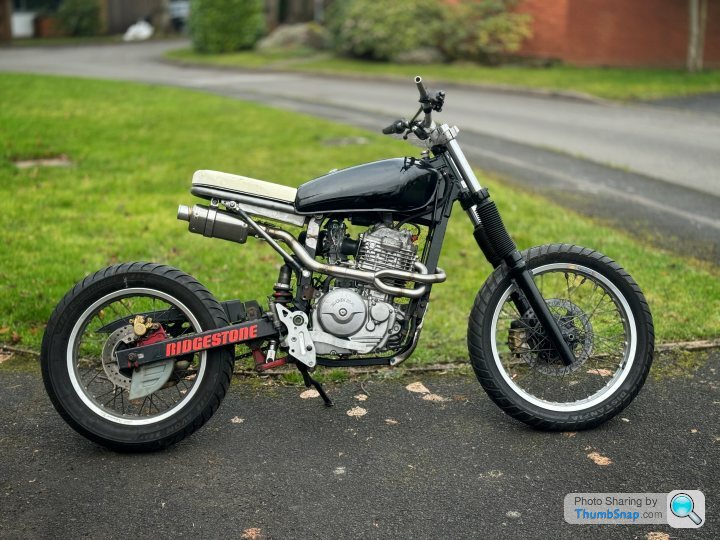
For this year I decided to do something different and do a big single project. I decided on a Honda 650 SLR as a base as it has a light frame, and a great engine.

Here is what I started with...
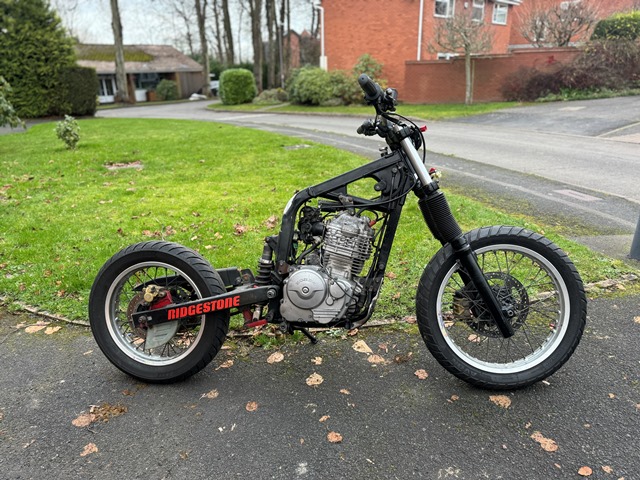
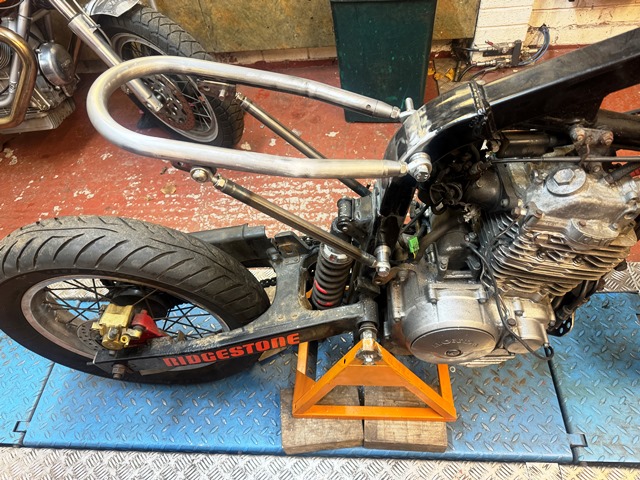
here's what was left after the angle grinder came out!
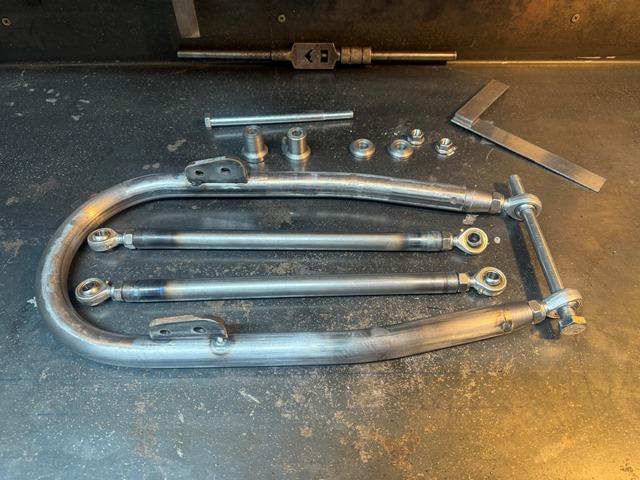
first job was to fabricate the rear subframe
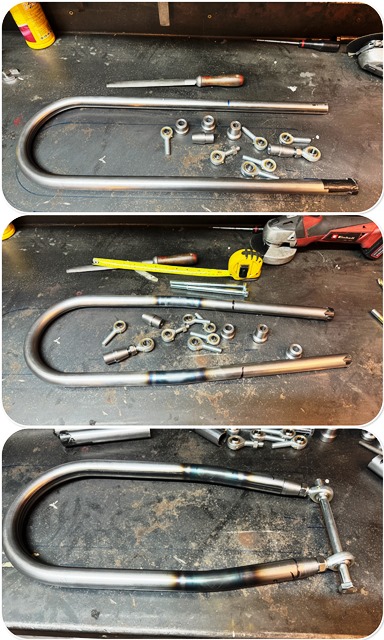
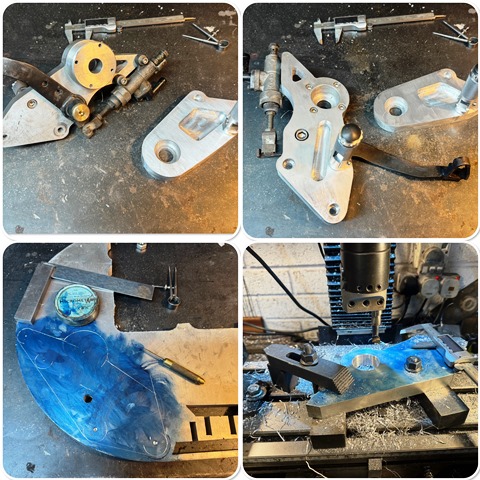
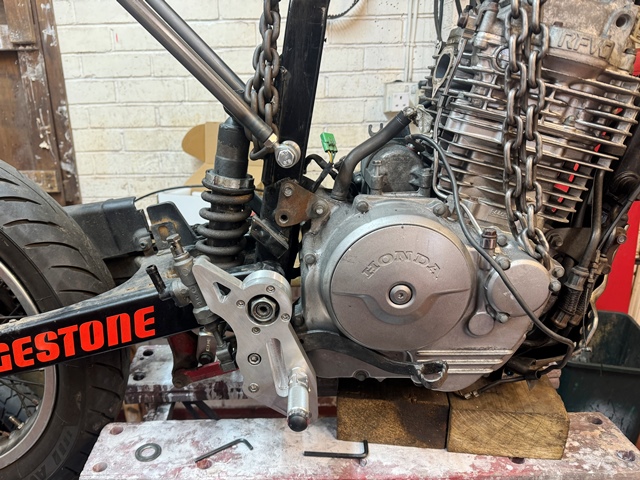
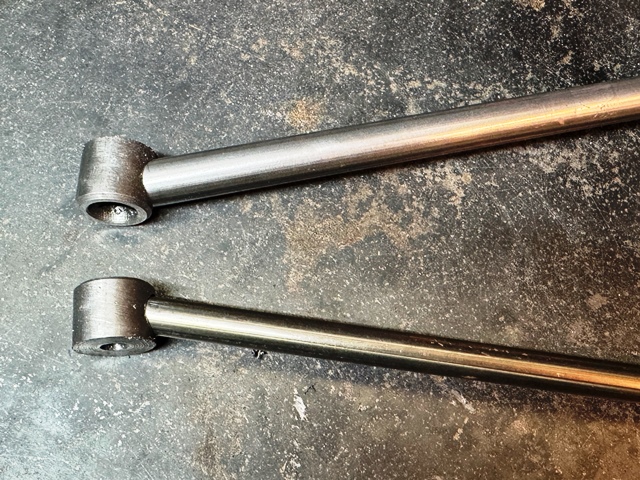
Next job took some thinking about and making… the footrest plates are structural to the frame as they support the ends of the swinging arm. I also wanted to mover the pegs forward slightly… here is the result… more chunky than I usually make bit they need to be!
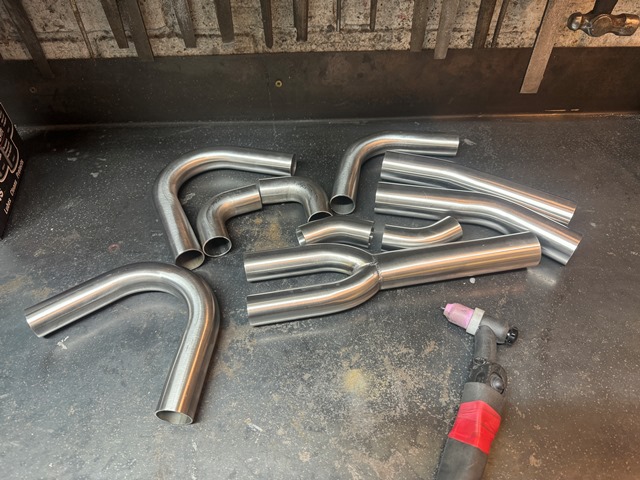
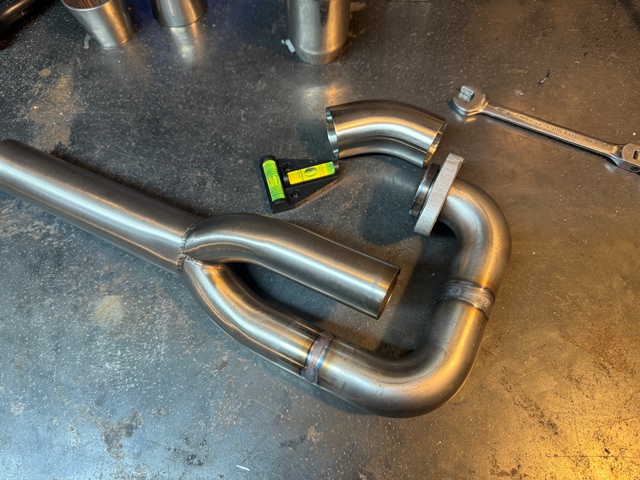
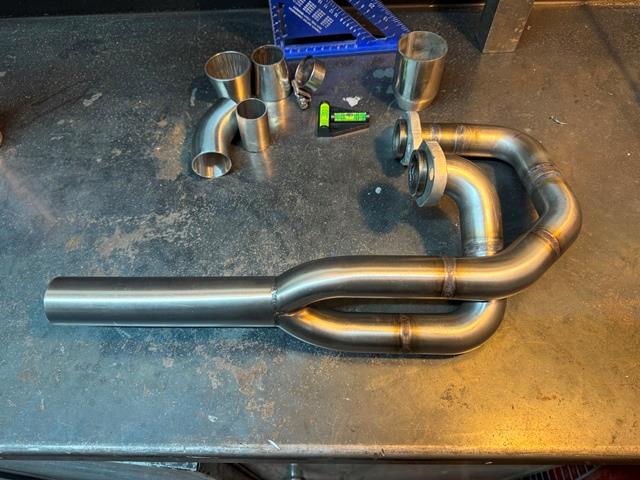
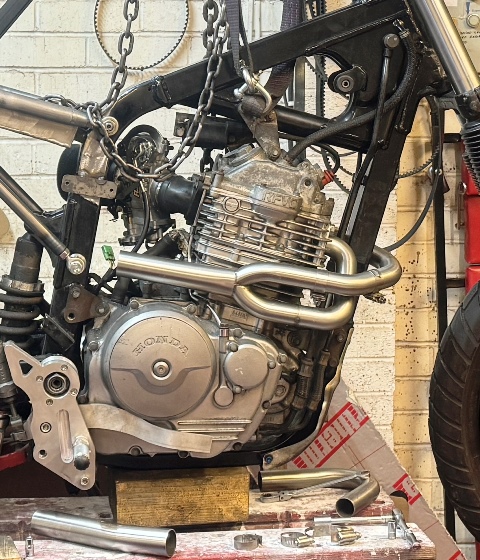
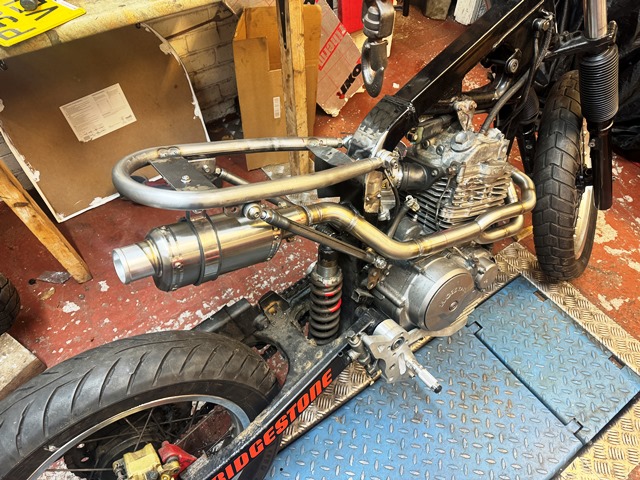
now one of the more satisfying jobs… exhaust fabrication! the original headers were 28mm but its very hard to get any sorts of bends in that diameter so I went up to 32mm, which aesthetically I think looks better. 32mm bends are available in quite a few angles, its just deciding which ones you need, and that’s just an eyeball thing.
Its not that difficult to make a system, its more time consuming. Cuts are made using a 1mm cutting disk in the angle grinder, and if you wrap masking tape around the cut line you can get it very accurate. then it’s a matter of assembling it together, initially with Jubilee clips. I cut slots in these so I can tack it in situ. A tip about tacking is to double the amps on the welder to what you would use to weld… and then put the tiniest of tacks in place. A tiny tack also has the advantage that it does not pull a gap on the opposite side that you will get if you make big ones. Three tiny tacks are actually very strong, but if you make a mistake, can easily be broken by touching them with the cutting disk.
Note the 2 way spirit level… this is a VERY useful (and cheap!) way of making sure build lines are correct. If you have the bike vertically (using a long spirit level on the wheel) and horizontal you can place the 2 way level on the bike and tape it there… that becomes your datum. To get it right on this bike I had to drop the stanchions through the yokes as I will be replacing the 19″ front wheel with a 17″ on soon.
For this year I decided to do something different and do a big single project. I decided on a Honda 650 SLR as a base as it has a light frame, and a great engine.
Here is what I started with...
here's what was left after the angle grinder came out!
first job was to fabricate the rear subframe
Next job took some thinking about and making… the footrest plates are structural to the frame as they support the ends of the swinging arm. I also wanted to mover the pegs forward slightly… here is the result… more chunky than I usually make bit they need to be!
now one of the more satisfying jobs… exhaust fabrication! the original headers were 28mm but its very hard to get any sorts of bends in that diameter so I went up to 32mm, which aesthetically I think looks better. 32mm bends are available in quite a few angles, its just deciding which ones you need, and that’s just an eyeball thing.
Its not that difficult to make a system, its more time consuming. Cuts are made using a 1mm cutting disk in the angle grinder, and if you wrap masking tape around the cut line you can get it very accurate. then it’s a matter of assembling it together, initially with Jubilee clips. I cut slots in these so I can tack it in situ. A tip about tacking is to double the amps on the welder to what you would use to weld… and then put the tiniest of tacks in place. A tiny tack also has the advantage that it does not pull a gap on the opposite side that you will get if you make big ones. Three tiny tacks are actually very strong, but if you make a mistake, can easily be broken by touching them with the cutting disk.
Note the 2 way spirit level… this is a VERY useful (and cheap!) way of making sure build lines are correct. If you have the bike vertically (using a long spirit level on the wheel) and horizontal you can place the 2 way level on the bike and tape it there… that becomes your datum. To get it right on this bike I had to drop the stanchions through the yokes as I will be replacing the 19″ front wheel with a 17″ on soon.


Hello Buzzer, thanks for posting yet another build thread !
Regarding the 2-way spirit level: I understand the vertical bit,
but how do you decide which way is the "correct" horizontal angle when you have a "blank canvas" to start from ?
Is it more asthetics or do you think of an "ideal" front fork rake & wheel trail optimized to suit the riding style ?
The exhaust looks great, although I would have tried to align the header pipe(s) parallel to the cylinder cooling fins.
Onelastattempt said:
Some nice bikes there, wonder what colour the new project will be, orange perhaps ?
I think you know....
Biker 1 said:
That looks totally awesome mate!!!! I simply have no idea how you have enough spare time to do this sort of stuff.....
I retired 14 years ago... so time is now split between holidays, and days out with my wife, and bike building, and other "projects" some of which are below... I started late this year, and was in fact not going to do a bike as I had a list of house renovation jobs to do...(happy wife, happy life) lots of Decorating, new floors, and the big job a new kitchen! That all went very well and I finished before Christmas (plan was March!) When this Honda came up I thought why not!
There will be a break for a while now though as we are off to get some sun for 3 week
here is the stainless steel fire pit an BBQ i made as she wanted her own veggie grill
 All made out of 316 stainless, it will outlast me!
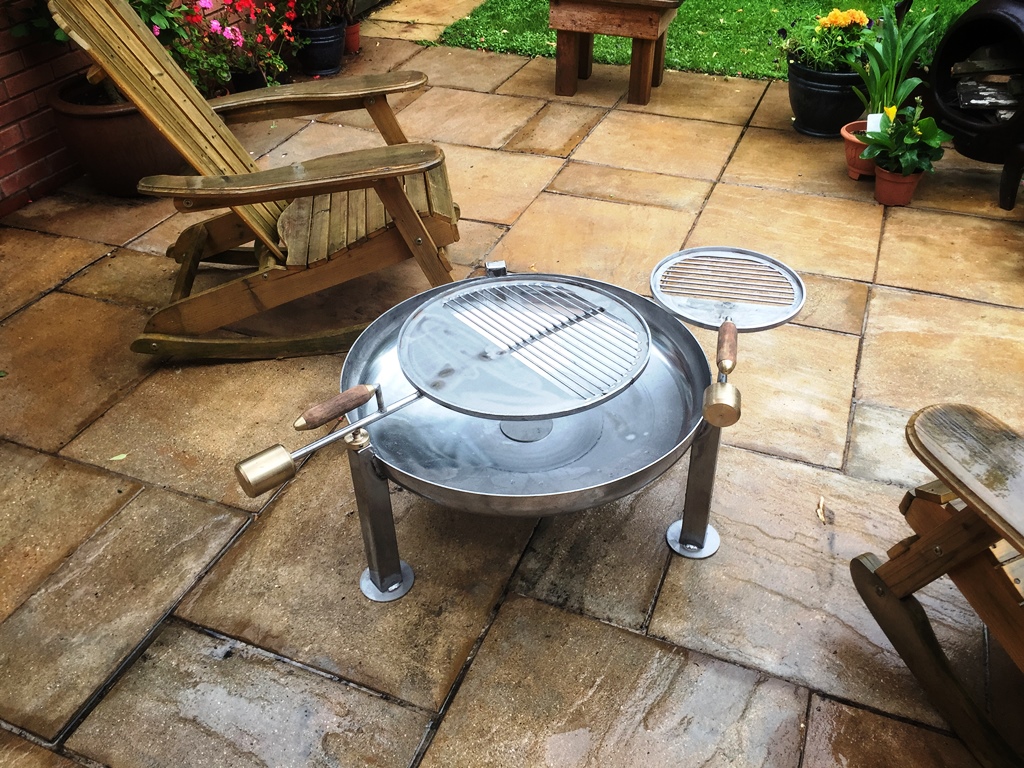
As a christmas present I renovated an old writing box and made it into a Jewellery box...


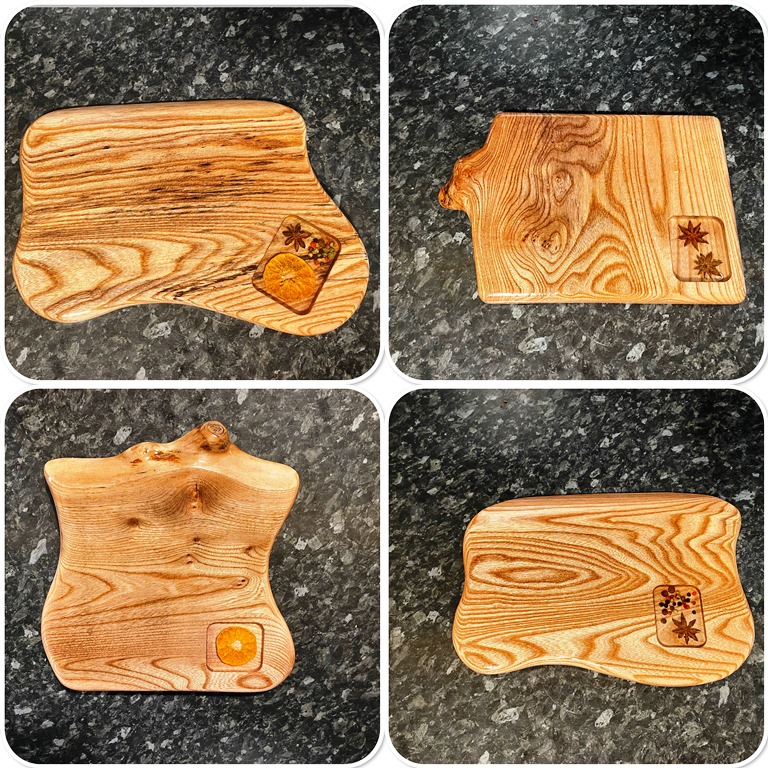
I sometimes make some cheese boards for friends....
then there's water features....


Benni said:
Hello Buzzer, thanks for posting yet another build thread !
Regarding the 2-way spirit level: I understand the vertical bit,
but how do you decide which way is the "correct" horizontal angle when you have a "blank canvas" to start from ?
Is it more asthetics or do you think of an "ideal" front fork rake & wheel trail optimized to suit the riding style ?
The exhaust looks great, although I would have tried to align the header pipe(s) parallel to the cylinder cooling fins.
The horizontal I normally take from Wheel spindle centres, but in this case, as I am changing the front wheel, I had to do a little calculation. Regarding the 2-way spirit level: I understand the vertical bit,
but how do you decide which way is the "correct" horizontal angle when you have a "blank canvas" to start from ?
Is it more asthetics or do you think of an "ideal" front fork rake & wheel trail optimized to suit the riding style ?
The exhaust looks great, although I would have tried to align the header pipe(s) parallel to the cylinder cooling fins.
In terms of suspension geometry, I normally leave things as they are.
I know what you mean about the exhaust, initially I did line it up with the cylinder fins. However, I stood back and looked and it just didn’t look right. The exhaust now lines up with the angle of the rear subframe which I felt looked better. it’s subjective, though, of course.
I am a bit of a purist (snob?) and never like it when people modify any bike, especially turning into a cafe racer (shudder), and I don't like what you are doing to that (but let's face it who cares about the SLR!) but props to your fabrication and general amazing skillz! 
(I am also very glad it isn't an XR600)
(I am also very glad it isn't an XR600)
 :
:nismocat said:
I am a bit of a purist (snob?) and never like it when people modify any bike, especially turning into a cafe racer (shudder), and I don't like what you are doing to that (but let's face it who cares about the SLR!) but props to your fabrication and general amazing skillz!
(I am also very glad it isn't an XR600)
I do believe there are bikes that should be preserved... and kept unmodified, but not many. When I bought a tatty but original early Ducati Monster it would have been a crime to modify it, so I restored it, especially as it had the original frame tail on it.(I am also very glad it isn't an XR600)
Its also a financial decision... many bikes are simply not worth the time, effort and money to restore.
As for most bikes, they are just bikes... and I don't feel guilty about getting the angle grinder out!
What really hacks me off is the rivet counters who go around saying that sticker is too low on the tank..., or thats the wrong type of brake lever... or it doesn't look right in two pack it should be celulose...
Or even worse are the guys with loads bikes in the shed that they are going to "restore one day! One of my mates has a Suzuki GT 750 that has stood in his shed since 1980... along with many early race parts... the roof leaks and its in a terrible state, but he is "going to restore it one day" When I chopped up an ST4s Ducati he was aghast! he didn't get the irony of his criticism

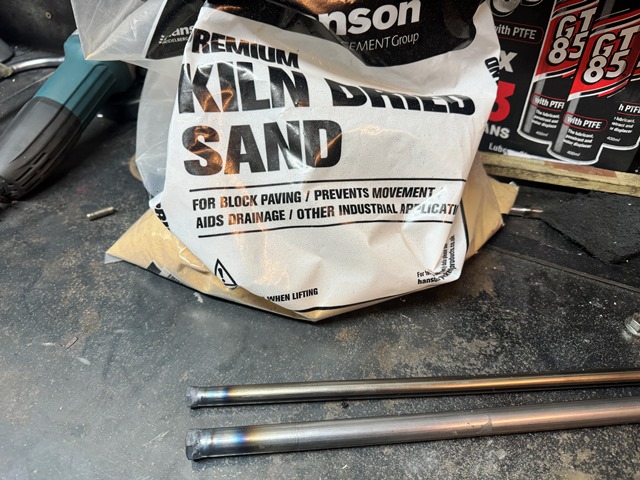
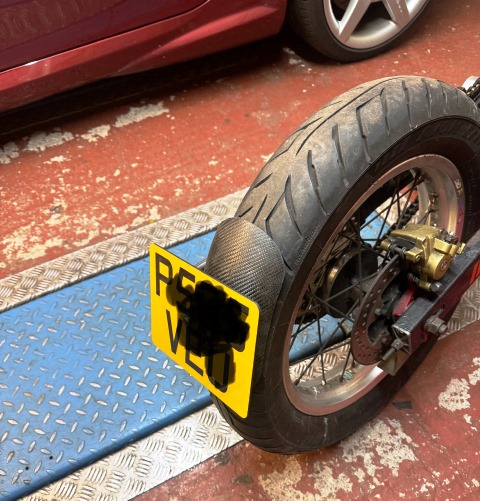
I have agonised over what to do about the number plate… In the end I decided to copy the current crop of bikes that hang it off a bracket off the swinging arm. I quite like how CCM do it so have sort of copied their design. I have used thin wall steel tube which is always difficult to bend, so to prevent kinking I fill the pipe with sand. First I block one end off, and weld a nut on the other. Then its filled with dry sand until its below the threads in the nut. I then hold the tube against the bench grinder and the vibration compacts the sand, so I fill it again. Finally a bolt is tightened onto the sand which compacts it furter.
Doing this means its far less likely to kink as its bent!
Doing this means its far less likely to kink as its bent!
Fabulous workmanship - great to see.
 Even ramming it in (ooh er missus) I guess the sand wasn't packed-in enough and I didn't do the bolt in the end to compact it, just sealed the end...another tip gleaned
  Not surprisingly, I guess, it got creased and I ended up buying bends and welding it up in sections. Every day's a school day
I love reading how things were achieved, especially on stuff I've had a go at and failed.
buzzer said:
First I block one end off, and weld a nut on the other. Then its filled with dry sand until its below the threads in the nut. I then hold the tube against the bench grinder and the vibration compacts the sand, so I fill it again. Finally a bolt is tightened onto the sand which compacts it further.
I tried the sand method to make an exhaust system last year, without the bench-grinder vibes - I'll use that tip in future Even ramming it in (ooh er missus) I guess the sand wasn't packed-in enough and I didn't do the bolt in the end to compact it, just sealed the end...another tip gleaned Not surprisingly, I guess, it got creased and I ended up buying bends and welding it up in sections. Every day's a school day I love reading how things were achieved, especially on stuff I've had a go at and failed.
tvrolet said:
I tried the sand method to make an exhaust system last year, without the bench-grinder vibes - I'll use that tip in future Even ramming it in (ooh er missus) I guess the sand wasn't packed-in enough and I didn't do the bolt in the end to compact it, just sealed the end...another tip gleaned Not surprisingly, I guess, it got creased and I ended up buying bends and welding it up in sections. Every day's a school day
I love reading how things were achieved, especially on stuff I've had a go at and failed.
to be honest, the bigger the pipe, the less effective the method with sand... I tried it years ago on some 2" pipe and it failed miserably. this is why I prefer to do what you did and weld bend together Even ramming it in (ooh er missus) I guess the sand wasn't packed-in enough and I didn't do the bolt in the end to compact it, just sealed the end...another tip gleaned Not surprisingly, I guess, it got creased and I ended up buying bends and welding it up in sections. Every day's a school day I love reading how things were achieved, especially on stuff I've had a go at and failed.
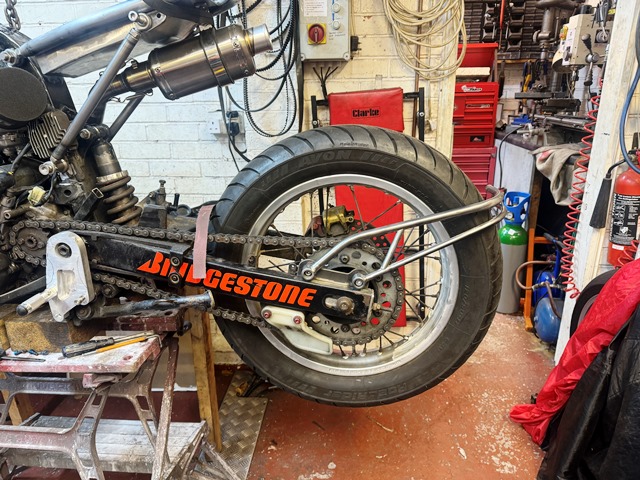
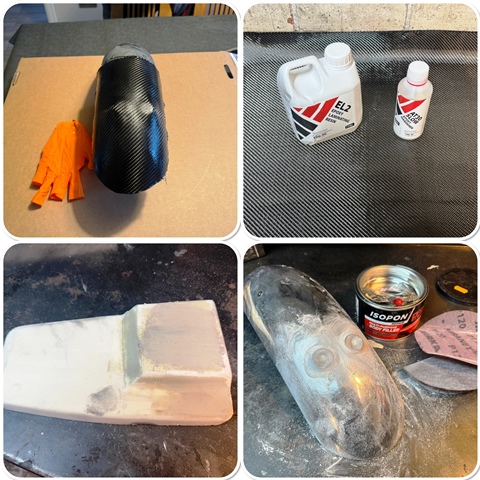
The rear number plate mounting looked OK, but it needed a hugger… I wanted to keep things as light as I could so I decided to try some carbon fibre.. first and probably last time as its a nightmare to work with! I had to buy a meter, so I decided to also make the battery tray as well… That’s currently drying, its nice and light but not that pretty, but its unseen so I will live with it. I used an old mudguard to make the mould and the hugger came out rather well! with what’s left I will probably make a front mudguard, we will see how that turns out, on this one I will try the vacuum bag approach.
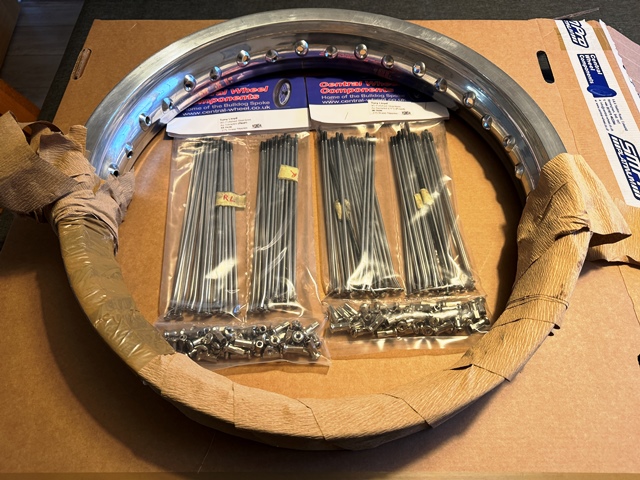
The new 17″ front rim and new stainless spokes have also arrived. Expensive, but you can't have rusty spokes, it spoils a build
there will be a short interlude in updates now as we are off for some sun for three weeks!
The new 17″ front rim and new stainless spokes have also arrived. Expensive, but you can't have rusty spokes, it spoils a build
there will be a short interlude in updates now as we are off for some sun for three weeks!
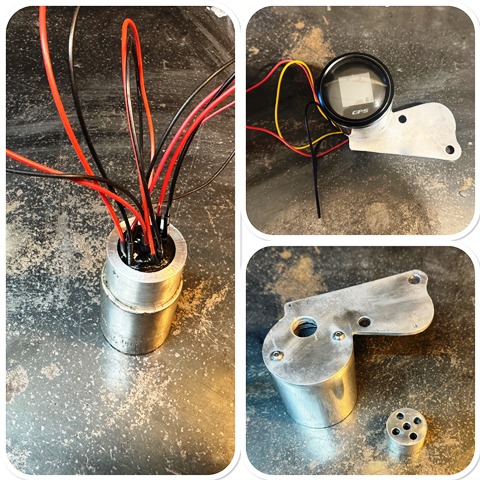
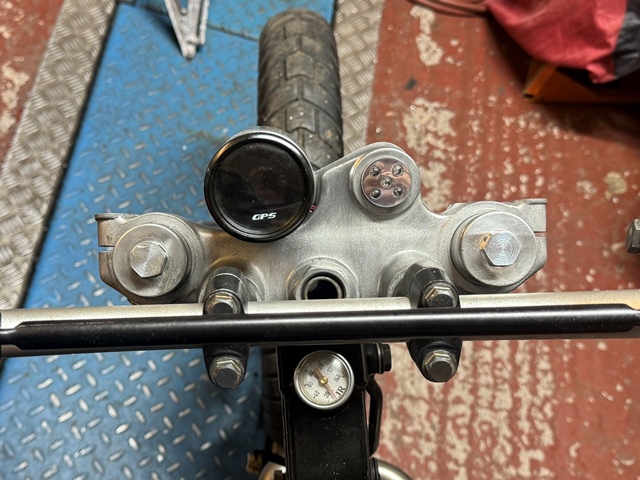
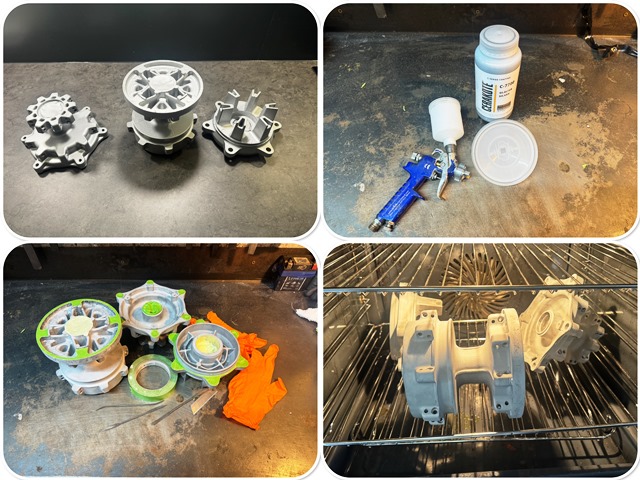
I have wanted to try Cerakote for a while due to the great reports of its durability and finish. So I purchased a pint to see how it went… its not cheap! I read the instructions on their knowledge base and it seemed simple enough so I thought I would start with the wheel hubs.
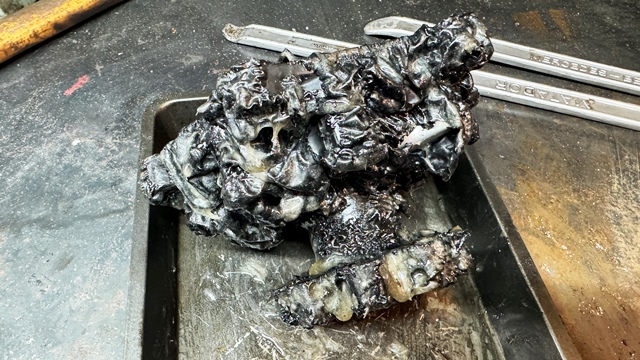
First job was stripping the thick powder coat off, and for this I used some commercial paint stripper. As you can see this makes short work of removing it! the stuff you buy from DIY stores is next to useless for this.
Next prep for the coating. I gave the hubs a good blasting with aluminium oxide grit to give it a key, then cleaned then in hot water with some detergent in. I never use washing up liquid for things like this (or rubbing down paintwork) as it contains silicone, which kind of defeats the object of trying for a clean surface! I then popped them in the warm oven for two reasons…. one is to make sure they are completely dry, and secondly if you mask them while warm, the tape sticks MUCH better. With regard to masking, I put the tape on, and then brush the edges with a riffler file and then you can peel it off perfectly.
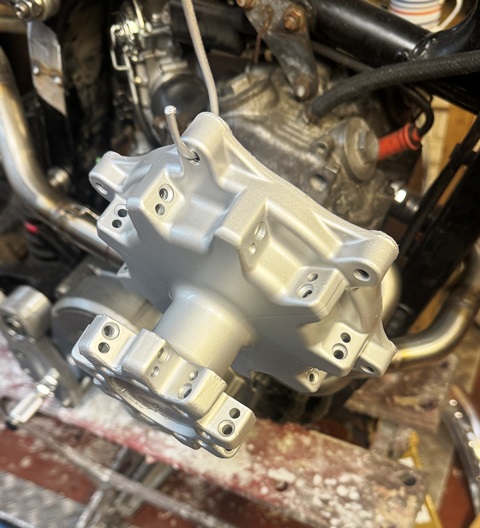
Next i gave them a single thin coat of Cerakote. I used a paper strainer as they suggested. Its very thin, but highly pigmented and covers really well. It flash dries in 45 mins, and is handleable in a few hours, but it takes 5 days to fully cure. I was impressed with the ease of application and the finish!
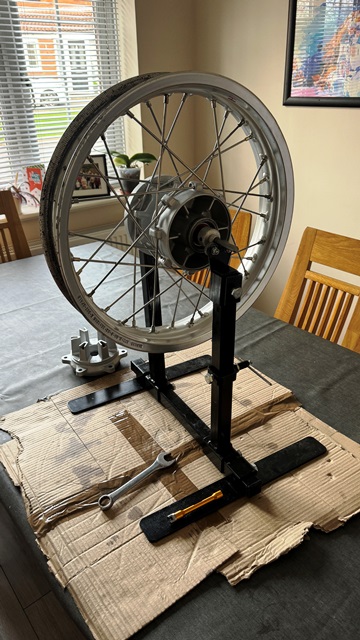
with the hubs now painted it’s time to try something I haven’t done before, and that’s wheel building. I watched a few videos on Youtube and managed to loan a jig off my mate, which actually proved really useful! I got special dispensation to do it on the dining room table as I knew it would take a while and I wanted to be able to sit down!
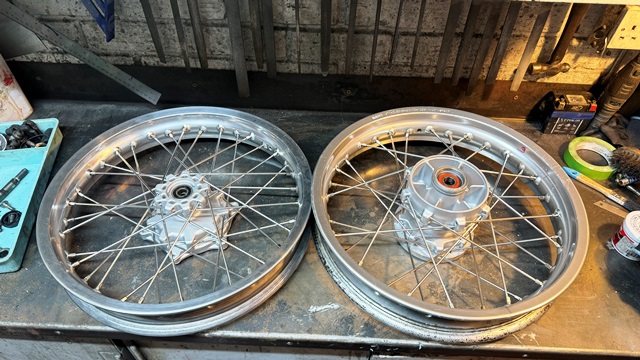
I was actually surprised how easy it was! I managed to get the correct offset, and up and down and side to side within half a mm.. here they are complete with new bearings and seals.
First job was stripping the thick powder coat off, and for this I used some commercial paint stripper. As you can see this makes short work of removing it! the stuff you buy from DIY stores is next to useless for this.
Next prep for the coating. I gave the hubs a good blasting with aluminium oxide grit to give it a key, then cleaned then in hot water with some detergent in. I never use washing up liquid for things like this (or rubbing down paintwork) as it contains silicone, which kind of defeats the object of trying for a clean surface! I then popped them in the warm oven for two reasons…. one is to make sure they are completely dry, and secondly if you mask them while warm, the tape sticks MUCH better. With regard to masking, I put the tape on, and then brush the edges with a riffler file and then you can peel it off perfectly.
Next i gave them a single thin coat of Cerakote. I used a paper strainer as they suggested. Its very thin, but highly pigmented and covers really well. It flash dries in 45 mins, and is handleable in a few hours, but it takes 5 days to fully cure. I was impressed with the ease of application and the finish!
with the hubs now painted it’s time to try something I haven’t done before, and that’s wheel building. I watched a few videos on Youtube and managed to loan a jig off my mate, which actually proved really useful! I got special dispensation to do it on the dining room table as I knew it would take a while and I wanted to be able to sit down!
I was actually surprised how easy it was! I managed to get the correct offset, and up and down and side to side within half a mm.. here they are complete with new bearings and seals.
Gassing Station | Biker Banter | Top of Page | What's New | My Stuff