Reinforcing an internal wall
Discussion


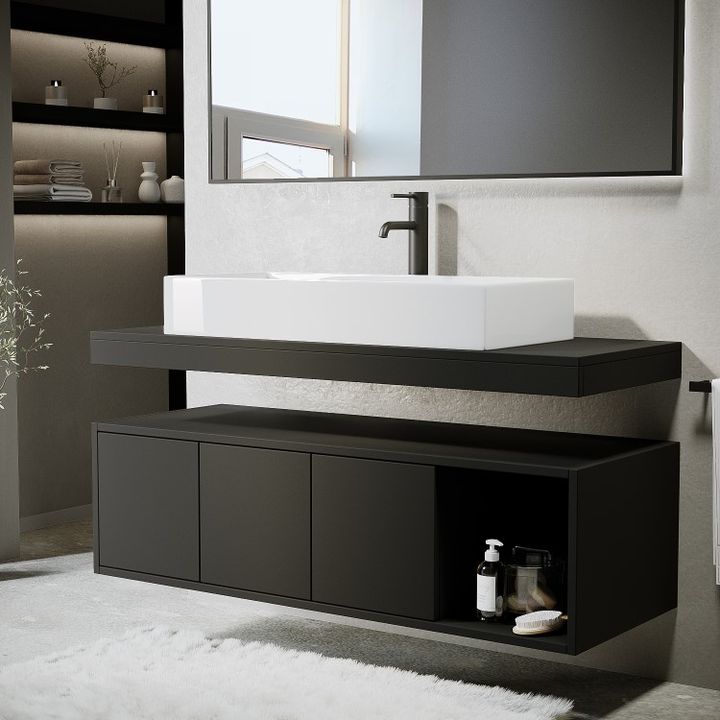
My wife has bought a massive marble "floating" double sink and vanity unit from China. Fitting it in China would be easy where most internal walls are concrete but here in the UK with our cheapy stud and plasterboard efforts it becomes a bit more difficult.
It also has a floating unit that sits below it but with a gap between them.
The long part will be against an internal wall which isn't load bearing but which has a built-in wardrobe at the other side. One of the sink's short sides will be flush to an external wall.
I'm thinking some sort of reinforcement built in the wardrobe for the sink's hidden brackets to mount to would be a starting point but I was after any suggestions or advice from anyone who's fitted similar if possible.
Thanks!
Assuming something like (what i found googling your description):-
I'd raise the cabinet to touch the sink then fit legs underneath. I would probably fit the legs 6" in from the corner to hide them. Probably not what you are after but I've never got this need to make things look structurally unsound.
I'd raise the cabinet to touch the sink then fit legs underneath. I would probably fit the legs 6" in from the corner to hide them. Probably not what you are after but I've never got this need to make things look structurally unsound.
If I was going to do this DIY, my approach would be to cut out the section of plasterboard in the bathroom, then install a heavy duty framework of timber joists, noggins, facing ply board, etc, which would create something solid for you to fix the vanity unit and cupboard into.
Make good the plasterboard and plaster surface, et voila.
Make good the plasterboard and plaster surface, et voila.
Mandat said:
If I was going to do this DIY, my approach would be to cut out the section of plasterboard in the bathroom, then install a heavy duty framework of timber joists, noggins, facing ply board, etc, which would create something solid for you to fix the vanity unit and cupboard into.
Make good the plasterboard and plaster surface, et voila.
Probably something like that; how heavy is this unit and what do the brackets look like?Make good the plasterboard and plaster surface, et voila.
Mandat said:
If I was going to do this DIY, my approach would be to cut out the section of plasterboard in the bathroom, then install a heavy duty framework of timber joists, noggins, facing ply board, etc, which would create something solid for you to fix the vanity unit and cupboard into.
Make good the plasterboard and plaster surface, et voila.
This. It’s known as a pattress.Make good the plasterboard and plaster surface, et voila.
You really need to consider this when building the partition (or when buying the VU!). You would normally sheath the studs with 18mm ply before the plasterboard in addition to providing noggins in the target area where the fixings will go.
...as that opportunity no longer exists you could have some laminated glass panels made to size and use those as 'invisible' supports to mainatin the floating look?
...as that opportunity no longer exists you could have some laminated glass panels made to size and use those as 'invisible' supports to mainatin the floating look?
Lotobear said:
You really need to consider this when building the partition (or when buying the VU!). You would normally sheath the studs with 18mm ply before the plasterboard in addition to providing noggins in the target area where the fixings will go.
...as that opportunity no longer exists you could have some laminated glass panels made to size and use those as 'invisible' supports to mainatin the floating look?
Still have the opportunity to do most things. Old tiles removed but not started moving plumbing and electrics yet. The existing internal wall can be removed and rebuilt, or plasterboard removed to build any new supporting structure. And if the structure needs to be a bit ghetto on the other side that's no issue as it'll be in a wardrobe....as that opportunity no longer exists you could have some laminated glass panels made to size and use those as 'invisible' supports to mainatin the floating look?
I would add extra studs where the brackets are to be fitted and face the whole wall with 18mm osb, then plasterboard or tile backer boards on top. The brackets it comes with won’t give it a floating look which is a bit odd for a floating shelf, whatever you use will need to be pretty substantial. Use something like these for fixing the brackets to the timber.
https://www.screwfix.com/p/timco-hex-socket-timber...
https://www.screwfix.com/p/timco-hex-socket-timber...
skyebear said:
Lotobear said:
You really need to consider this when building the partition (or when buying the VU!). You would normally sheath the studs with 18mm ply before the plasterboard in addition to providing noggins in the target area where the fixings will go.
...as that opportunity no longer exists you could have some laminated glass panels made to size and use those as 'invisible' supports to mainatin the floating look?
Still have the opportunity to do most things. Old tiles removed but not started moving plumbing and electrics yet. The existing internal wall can be removed and rebuilt, or plasterboard removed to build any new supporting structure. And if the structure needs to be a bit ghetto on the other side that's no issue as it'll be in a wardrobe....as that opportunity no longer exists you could have some laminated glass panels made to size and use those as 'invisible' supports to mainatin the floating look?

Lotobear said:
skyebear said:
Lotobear said:
You really need to consider this when building the partition (or when buying the VU!). You would normally sheath the studs with 18mm ply before the plasterboard in addition to providing noggins in the target area where the fixings will go.
...as that opportunity no longer exists you could have some laminated glass panels made to size and use those as 'invisible' supports to mainatin the floating look?
Still have the opportunity to do most things. Old tiles removed but not started moving plumbing and electrics yet. The existing internal wall can be removed and rebuilt, or plasterboard removed to build any new supporting structure. And if the structure needs to be a bit ghetto on the other side that's no issue as it'll be in a wardrobe....as that opportunity no longer exists you could have some laminated glass panels made to size and use those as 'invisible' supports to mainatin the floating look?
skyebear said:
Lotobear said:
skyebear said:
Lotobear said:
You really need to consider this when building the partition (or when buying the VU!). You would normally sheath the studs with 18mm ply before the plasterboard in addition to providing noggins in the target area where the fixings will go.
...as that opportunity no longer exists you could have some laminated glass panels made to size and use those as 'invisible' supports to mainatin the floating look?
Still have the opportunity to do most things. Old tiles removed but not started moving plumbing and electrics yet. The existing internal wall can be removed and rebuilt, or plasterboard removed to build any new supporting structure. And if the structure needs to be a bit ghetto on the other side that's no issue as it'll be in a wardrobe....as that opportunity no longer exists you could have some laminated glass panels made to size and use those as 'invisible' supports to mainatin the floating look?
Lotobear said:
skyebear said:
Lotobear said:
skyebear said:
Lotobear said:
You really need to consider this when building the partition (or when buying the VU!). You would normally sheath the studs with 18mm ply before the plasterboard in addition to providing noggins in the target area where the fixings will go.
...as that opportunity no longer exists you could have some laminated glass panels made to size and use those as 'invisible' supports to mainatin the floating look?
Still have the opportunity to do most things. Old tiles removed but not started moving plumbing and electrics yet. The existing internal wall can be removed and rebuilt, or plasterboard removed to build any new supporting structure. And if the structure needs to be a bit ghetto on the other side that's no issue as it'll be in a wardrobe....as that opportunity no longer exists you could have some laminated glass panels made to size and use those as 'invisible' supports to mainatin the floating look?
you really need to consider loadings beyond the weight of the sink. Where does a sink full of water with you leaning on it leave you? I would start with the factory fixings. Are they up to the job or are they likely to have a little deflection? if so, consider the plasterboard. will it crush under the weight and create further deflection. in my experience most cantilever features and furniture are either not up to the job or make huge assumptions regarding the wall on which they are to be fixed. Glass panels are a great idea and if done right will look like an integral part of the unit. Failing that you need some serious studwork which will spread the load over as large an area of the wall as you can afford
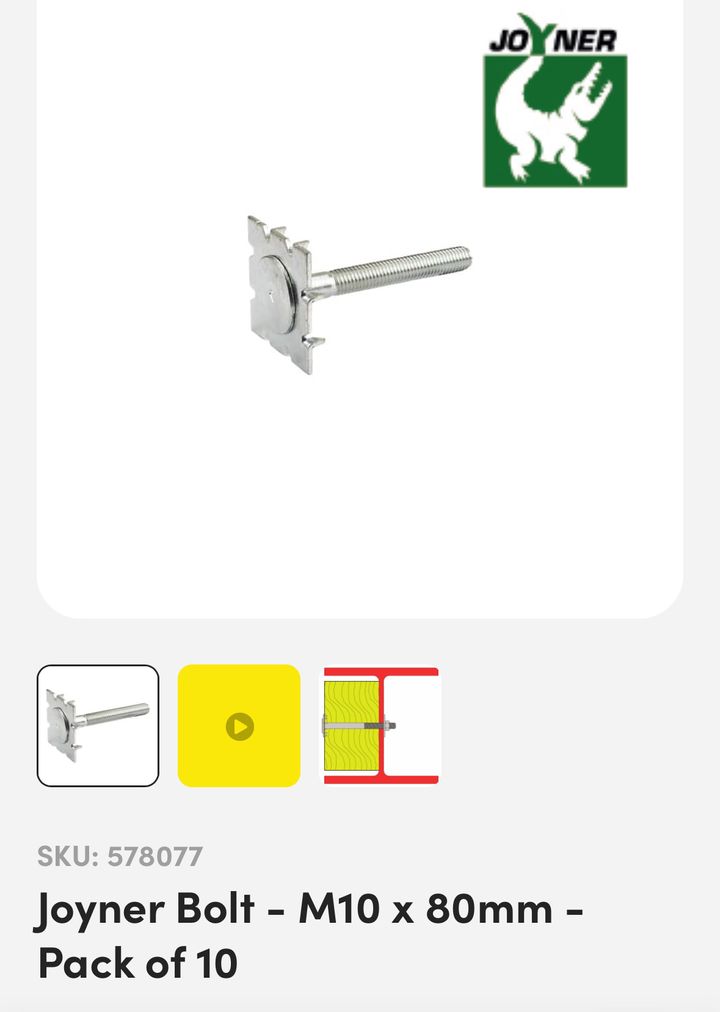
How about something like:
6x2 noggins with joiner bolts fitted through from the back, covered with 18mm osb notched out for the nuts for the joiner bolts.
This would leave you with X number of threaded bars to mount the units to and no real chance of failure.
You’d have to be spot on with locations, but I can’t see how that’d move once in place.
Exactly what I was thinking.
That's a big weight on quite a lever. I'd go as far as to say it should support someone sitting on it or standing on it to reach something high up, dusting for example.
If that thing falls off it could really hurt someone.
What ever solution you go for I'd be over engineering at much as reasonably possible.
skyebear said:
Still have the opportunity to do most things. Old tiles removed but not started moving plumbing and electrics yet. The existing internal wall can be removed and rebuilt, or plasterboard removed to build any new supporting structure. And if the structure needs to be a bit ghetto on the other side that's no issue as it'll be in a wardrobe.
Ground or first floor?Pattress approach should be fine but if it happened to be ground floor, you might also be able to go with a section of blockwork for total overkill.
Are you brave enough to ask your wife how she thought it was going to be fitted when she ordered it?
Look on the bright side, it's not a 250kg bath that "somehow" needs to get upstairs.
LooneyTunes said:
skyebear said:
Still have the opportunity to do most things. Old tiles removed but not started moving plumbing and electrics yet. The existing internal wall can be removed and rebuilt, or plasterboard removed to build any new supporting structure. And if the structure needs to be a bit ghetto on the other side that's no issue as it'll be in a wardrobe.
Ground or first floor?Pattress approach should be fine but if it happened to be ground floor, you might also be able to go with a section of blockwork for total overkill.
Are you brave enough to ask your wife how she thought it was going to be fitted when she ordered it?
Look on the bright side, it's not a 250kg bath that "somehow" needs to get upstairs.
And, no, I'm not brave or stupid enough to ask! Have you asked the same question in relation to the bathtub?
Here's the sink and brackets. Brackets aren't affixed, I just sat them there. Brackets are 500mm x 150mm. Just eyeballing them I don't think 150mm height offers enough support, I'd prefer longer vertical supports to spread the load.
They are 'short' arms to affix.
As others have said, I would take off the plasterboard entirely and create significantly more studs and noggins, ideally go for a deeper stud, osb over and plasterboard over that again.
For the fixings, as deep as you can go, with carriage bolts and washers.
You could also hide under the sink a horizontal steel angle over the brackets, high enough to supply some support to the brackets too, and wide enough to connect with every stud behind.
Gassing Station | Homes, Gardens and DIY | Top of Page | What's New | My Stuff