Alpine A110 Windows Regulator Replacement
Discussion


First post on this forum, so hopefully this is in the right place...
Disclaimer: The following is an account of my experiences with replacing the driver’s side windows regulator on a 2021 Alpine A110 GT Legende.
This is the only windows regulator that I have every replaced and should not be taken as a guide on how to do this.
Start of my troubles
Getting out of the car I opened the door and heard a strange noise, I closed the door but it didn’t close fully. It appeared that the window was stuck in the fully up position ie. It wasn’t automatically dropping and raising on opening the door. The windows switches were functioning, I could hear the motor but the window was not moving. Fortunately there was enough clearance for the glass for the door to open and close with the window fully up.
I sourced a replacement driver’s side windows regulator assembly from eBay.
Overall:
The following took me 4 hours to complete, mainly due to silly mistakes (see later), I am confident that I could do this again in 1 to 2 hours.
Should not require specialist tools or a high level of skill.
Door card removal
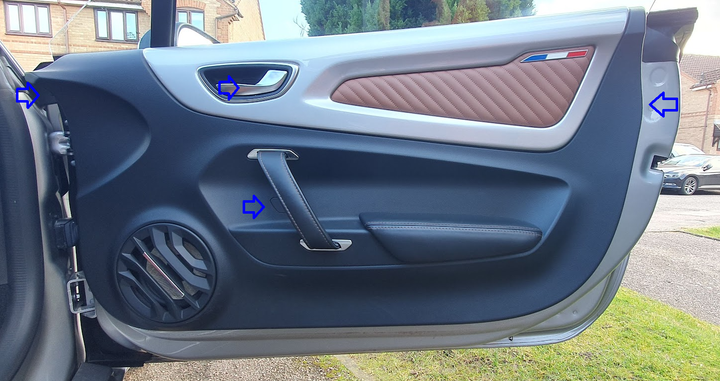
There are 4 screws to be removed:
1. Side-rear: Small torx behind cover (easily removed)
2. Side front: Small torx, same size as above, no cover
3. Behind door pull handle: Small torx (short) behind cover (easily removed)
4. Behind door release: Larger torx (short) behind cover (tricky to remove)
Fasteners appear to be quite soft, so heads need to be treated with care.
Body panel clips
There are 8 of these, I found plastic trim levers and small inflatable air wedges worked well to release these.
The door card sits on the top of the door, so after releasing the 8x clips the door panel lifted off.
The door release lever sub-assembly simply slid through the door card allowing the door card to be removed without release of any additional items.
Backside of door card:
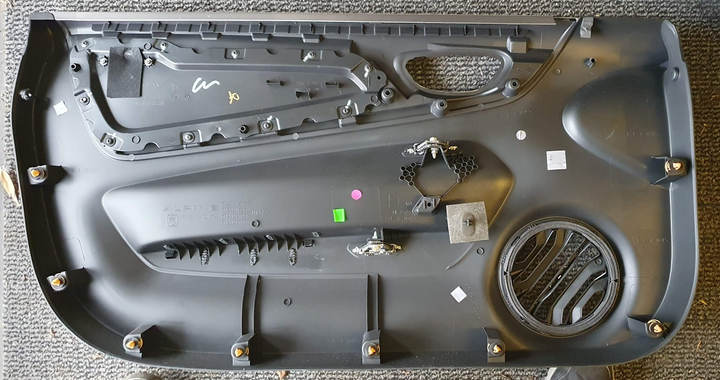
Access into the inside of the door is covered with a thick, flexible polystyrene (?) cover which is glued in place. I could see no other option other than cutting this with a knife to remove. Unfortunately I didn’t take a picture of the whole of the door with this cover in place:
Note: On re-installation later this glue appeared to re-stick between that on the cover and that on the door (ie. It re-healed itself).
Access cover removed:

The following removal of the old regulator wasn’t actually that difficult.
Removal of glass
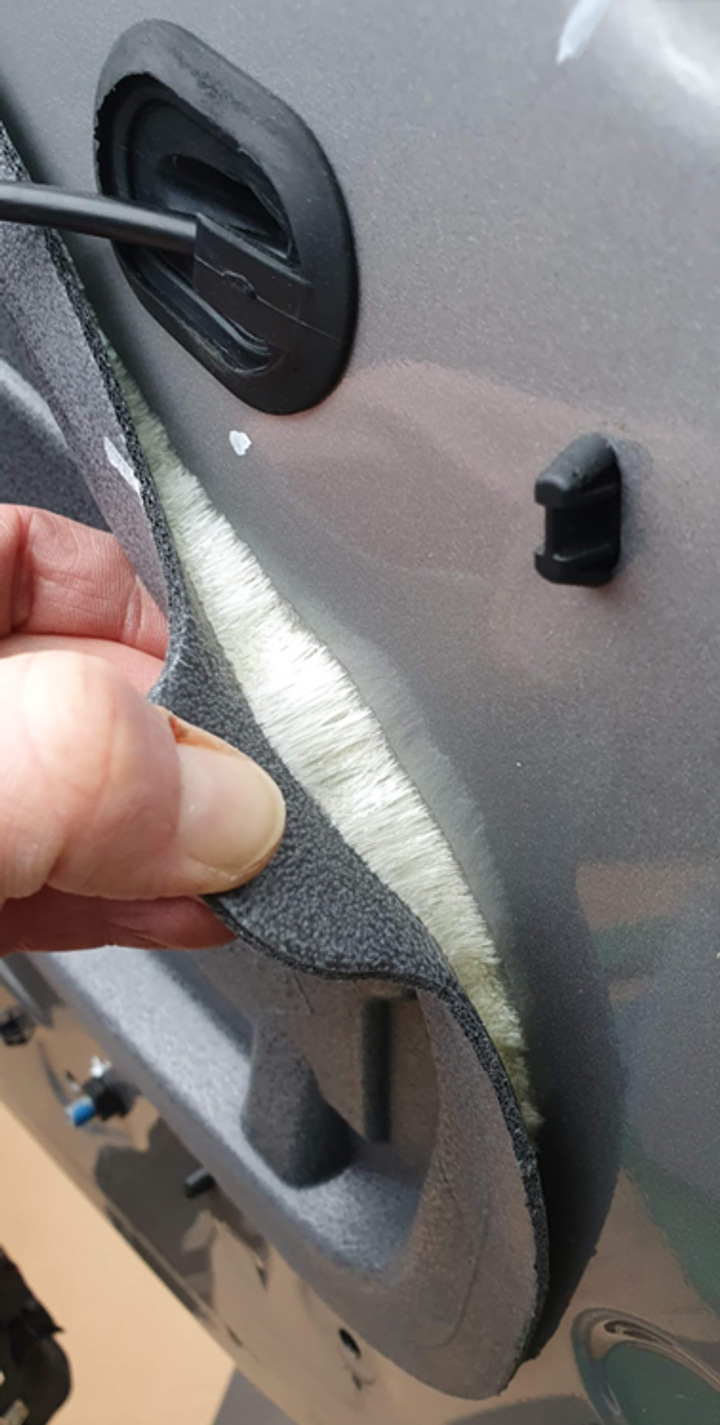
Note: Glass was in the fully raised position at the time of removal, I don’t know how I would have done this with it lowered, see notes later.
(Green circles above) Remove dust covers to access 2 screws which locate front and rear glass carriers.
The front screw (green, top-left) does not go through the glass (I think), this may only require loosening (check to confirm).
The back screw (green, top-right) goes through the glass and needs to be completely removed, there is also a clip in this carrier holding it to the hole in the glass, so this needs to be prised apart (carefully) when lifting the glass out.. I actually broke the rear carrier (of the broken regulator) doing this.
Full removal of the front screw should then allow removal of the separate front carrier sub-assembly which cradles the glass at the front. Careful not to drop it inside the door (like I did).
Note: Both of these screws are accessible through the holes in the door with the glass in its fully up position. I am not sure how easy it would be to access the front of these screws with the window lowered.
Removal of regulator assembly
Unfortunately I didn’t take a picture of the replacement regulator assembly before reinstallation and the old one pretty much fell apart on removal due to cable having snapped.
Motor
The cable running from the top-right of the regulator assembly should be unclipped from the back of the motor frame, this will make removal of the regulator much easier later.
The motor is held in place with 3 screws and 2x clips (magenta square, above), removing these should allow for the motor to be moved to access the motor-harness connector. It may also be useful to temporarily release the clips which hold the harness in place (orange, above). Unlike most other automative electrical connectors, this was NOT a complete PITA to remove. The harness clips were easy to relocate afterwards.
Regulator assembly frame
The regulator assembly frame is held in place by 5x fixings, labelled in blue above:
4x nuts, top-right nut is behind an easily removed cover
1x screw in bottom-left behind dust cover, after removal of this screw take a note of how the frame sits behind it (see later)
Note the 2x fixings in bottom left, obscured in above photo, are easily accessible, the speaker does NOT have to be removed.
With all 5x fixings (blue, above) removed and the cable released from the motor assembly (described earlier) it was relatively easy to remove the old regulator assembly, but with only one area of difficulty: The lower-right of the regulator frame didn’t have the clearance to be removed… It took me a few minutes to realise that the stud, that the lower-right nut had been removed from earlier, needed to be wound back into the regulator frame using the hex slot on the top of the fixing to provide the clearance to draw this out from the insider of the door
Installation of the new regulator assembly (not the glass, yet)
Reverse of above, fairly straightforward, things to be careful of:
1. The lower-left screw behind the dust cover (blue, above): Make sure that the frame is correctly placed re. the fastener, I am not sure how, but I managed to initially position the regulator frame incorrectly within the door: The screw should go through the hole in the door panel (exposed by the removal of the dust cover), through the regulator frame and then into the threaded portion in the door.
2. The carrier for the front of the glass (green, top-left above) has an additional assembly (removed earlier), hold this in place and fix with screw (green, top-left). This screw does not go through the glass (I think, please confirm by checking the glass).
3. Frame alignment: I just secured the frame in place with the 4x nuts (blue, above), I forgot that I had wound the lower-right fixing in on removal, it is possible that I needed to wind this back out after installation for better alignment of the regulator frame within the door. It is possible that all 4 of these need to be adjusted, I am not sure.
Installation and alignment of the glass
Drop the window through the top and fix in place with 2x screws (green, above).
Note: Do NOT reinstall the door card at this stage, as I stupidly initially did, as it appears that the glass will need to be manually aligned.
Alignment of the window/glass was tricky as the 2 screws (green, above) only appear accessible through the holes in the door when the window is fully up. But now that the regulator is correct and working… the window is dropped down a bit when the door is open. So, I ended up aligning the window from inside the car with the door closed. Honestly: I was amazed at how much the glass could be misaligned with small adjustments to the position of the glass by these 2 fixings. This is the area of this process I am least confident in, there was a quite a bit of back and forth and I still think it is probably slightly out. It was also a bit of a PIT having to start the engine every time I wanted to raise/lower the glass to check position.
Note: The instruction manual describes a method to initialise the position of the window, I don’t recall having to do this.
When happy with the alignment and operation of the glass…
Re-install the grey access panel cover to the inside of the door
I found that this re-stuck itself quite well (when I later had to remove it again after stupidly refitting the door card without aligning the glass)
Also: Don’t forget to re-install the 3x dust covers above (another one of the mistakes I made).
Re-install the door card
Run the door level release sub-assembly through the door card, re-fit the door card onto the top of the door, clip into place and re-install screws
Note: The screw through the door release lever was a complete PITA to locate, which maybe explains why it had a tapered end:
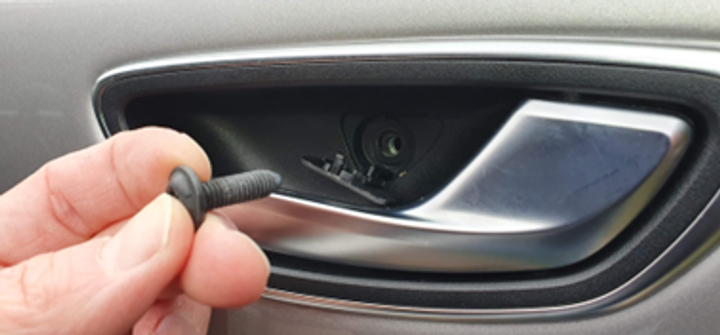
I ended up drilling out the plastic hole in the release lever sub-assembly, see below:

Done.
Disclaimer: The following is an account of my experiences with replacing the driver’s side windows regulator on a 2021 Alpine A110 GT Legende.
This is the only windows regulator that I have every replaced and should not be taken as a guide on how to do this.
Start of my troubles
Getting out of the car I opened the door and heard a strange noise, I closed the door but it didn’t close fully. It appeared that the window was stuck in the fully up position ie. It wasn’t automatically dropping and raising on opening the door. The windows switches were functioning, I could hear the motor but the window was not moving. Fortunately there was enough clearance for the glass for the door to open and close with the window fully up.
I sourced a replacement driver’s side windows regulator assembly from eBay.
Overall:
The following took me 4 hours to complete, mainly due to silly mistakes (see later), I am confident that I could do this again in 1 to 2 hours.
Should not require specialist tools or a high level of skill.
Door card removal
There are 4 screws to be removed:
1. Side-rear: Small torx behind cover (easily removed)
2. Side front: Small torx, same size as above, no cover
3. Behind door pull handle: Small torx (short) behind cover (easily removed)
4. Behind door release: Larger torx (short) behind cover (tricky to remove)
Fasteners appear to be quite soft, so heads need to be treated with care.
Body panel clips
There are 8 of these, I found plastic trim levers and small inflatable air wedges worked well to release these.
The door card sits on the top of the door, so after releasing the 8x clips the door panel lifted off.
The door release lever sub-assembly simply slid through the door card allowing the door card to be removed without release of any additional items.
Backside of door card:
Access into the inside of the door is covered with a thick, flexible polystyrene (?) cover which is glued in place. I could see no other option other than cutting this with a knife to remove. Unfortunately I didn’t take a picture of the whole of the door with this cover in place:
Note: On re-installation later this glue appeared to re-stick between that on the cover and that on the door (ie. It re-healed itself).
Access cover removed:
The following removal of the old regulator wasn’t actually that difficult.
Removal of glass
Note: Glass was in the fully raised position at the time of removal, I don’t know how I would have done this with it lowered, see notes later.
(Green circles above) Remove dust covers to access 2 screws which locate front and rear glass carriers.
The front screw (green, top-left) does not go through the glass (I think), this may only require loosening (check to confirm).
The back screw (green, top-right) goes through the glass and needs to be completely removed, there is also a clip in this carrier holding it to the hole in the glass, so this needs to be prised apart (carefully) when lifting the glass out.. I actually broke the rear carrier (of the broken regulator) doing this.
Full removal of the front screw should then allow removal of the separate front carrier sub-assembly which cradles the glass at the front. Careful not to drop it inside the door (like I did).
Note: Both of these screws are accessible through the holes in the door with the glass in its fully up position. I am not sure how easy it would be to access the front of these screws with the window lowered.
Removal of regulator assembly
Unfortunately I didn’t take a picture of the replacement regulator assembly before reinstallation and the old one pretty much fell apart on removal due to cable having snapped.
Motor
The cable running from the top-right of the regulator assembly should be unclipped from the back of the motor frame, this will make removal of the regulator much easier later.
The motor is held in place with 3 screws and 2x clips (magenta square, above), removing these should allow for the motor to be moved to access the motor-harness connector. It may also be useful to temporarily release the clips which hold the harness in place (orange, above). Unlike most other automative electrical connectors, this was NOT a complete PITA to remove. The harness clips were easy to relocate afterwards.
Regulator assembly frame
The regulator assembly frame is held in place by 5x fixings, labelled in blue above:
4x nuts, top-right nut is behind an easily removed cover
1x screw in bottom-left behind dust cover, after removal of this screw take a note of how the frame sits behind it (see later)
Note the 2x fixings in bottom left, obscured in above photo, are easily accessible, the speaker does NOT have to be removed.
With all 5x fixings (blue, above) removed and the cable released from the motor assembly (described earlier) it was relatively easy to remove the old regulator assembly, but with only one area of difficulty: The lower-right of the regulator frame didn’t have the clearance to be removed… It took me a few minutes to realise that the stud, that the lower-right nut had been removed from earlier, needed to be wound back into the regulator frame using the hex slot on the top of the fixing to provide the clearance to draw this out from the insider of the door
Installation of the new regulator assembly (not the glass, yet)
Reverse of above, fairly straightforward, things to be careful of:
1. The lower-left screw behind the dust cover (blue, above): Make sure that the frame is correctly placed re. the fastener, I am not sure how, but I managed to initially position the regulator frame incorrectly within the door: The screw should go through the hole in the door panel (exposed by the removal of the dust cover), through the regulator frame and then into the threaded portion in the door.
2. The carrier for the front of the glass (green, top-left above) has an additional assembly (removed earlier), hold this in place and fix with screw (green, top-left). This screw does not go through the glass (I think, please confirm by checking the glass).
3. Frame alignment: I just secured the frame in place with the 4x nuts (blue, above), I forgot that I had wound the lower-right fixing in on removal, it is possible that I needed to wind this back out after installation for better alignment of the regulator frame within the door. It is possible that all 4 of these need to be adjusted, I am not sure.
Installation and alignment of the glass
Drop the window through the top and fix in place with 2x screws (green, above).
Note: Do NOT reinstall the door card at this stage, as I stupidly initially did, as it appears that the glass will need to be manually aligned.
Alignment of the window/glass was tricky as the 2 screws (green, above) only appear accessible through the holes in the door when the window is fully up. But now that the regulator is correct and working… the window is dropped down a bit when the door is open. So, I ended up aligning the window from inside the car with the door closed. Honestly: I was amazed at how much the glass could be misaligned with small adjustments to the position of the glass by these 2 fixings. This is the area of this process I am least confident in, there was a quite a bit of back and forth and I still think it is probably slightly out. It was also a bit of a PIT having to start the engine every time I wanted to raise/lower the glass to check position.
Note: The instruction manual describes a method to initialise the position of the window, I don’t recall having to do this.
When happy with the alignment and operation of the glass…
Re-install the grey access panel cover to the inside of the door
I found that this re-stuck itself quite well (when I later had to remove it again after stupidly refitting the door card without aligning the glass)
Also: Don’t forget to re-install the 3x dust covers above (another one of the mistakes I made).
Re-install the door card
Run the door level release sub-assembly through the door card, re-fit the door card onto the top of the door, clip into place and re-install screws
Note: The screw through the door release lever was a complete PITA to locate, which maybe explains why it had a tapered end:
I ended up drilling out the plastic hole in the release lever sub-assembly, see below:
Done.
Edited by NIrishRob on Saturday 22 February 18:33
Gassing Station | Alpine | Top of Page | What's New | My Stuff