Dreaded Headlight Condensation
Discussion


So after 11 years of ownership I am having to deal with the headlight condensation issue. MOT next week and I dont want to have to deal with it after a fail even if my MOT man is of the friendly sort!
Numerous threads online here and 6 Speed with people that have done it. So i decided to do the "box with hairdryer" example of a makeshift oven.
One B&M cheap hairdryer later, hole in box, even with a thermometer from Amazon i was cooking away.
Well I think Aston on my car used the same sealant that keeps submarines together! Didnt really work and I got to the stage of plastic about to snap.
I then went for the direct heat with the hairdryer on sections which after some cursing it worked.....slowly! I laughed at those that did the oven thing for 15 mins at 100F and "it popped off"!
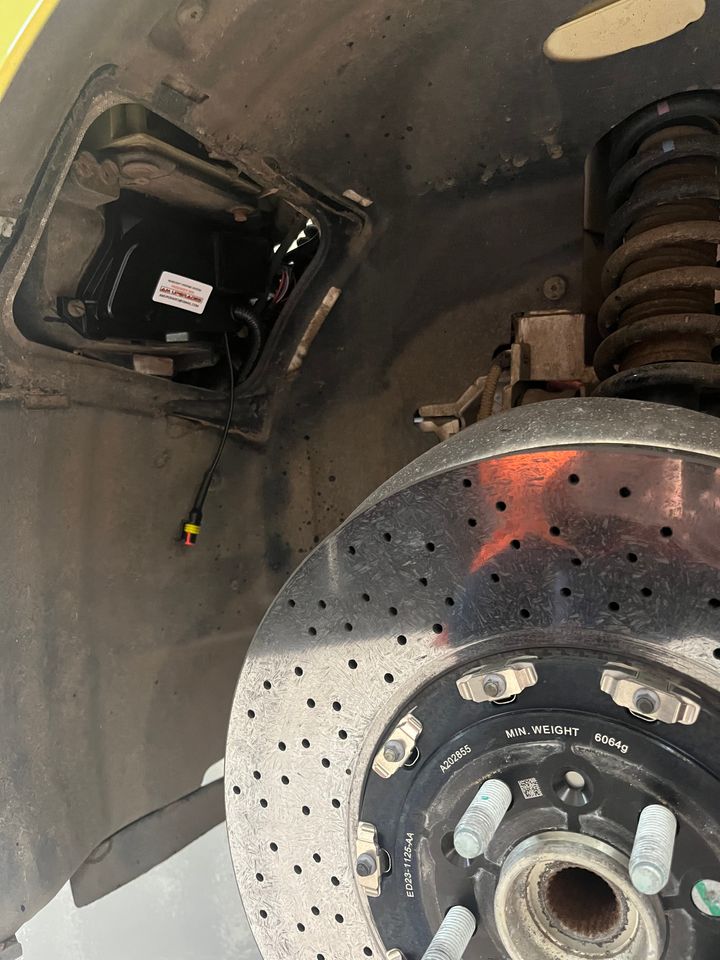
Of course the front mount when I removed the headlight snapped off (very common thing) so luckily found on EBay a guy who does mount and washer motor replacement fixing kit. £30 per kit, so thats 2 ordered because both snapped! The reason is the screws corrode heavily and the threaded insert breaks at the weakest point which is the plastic its attached to.
To be honest my lens probably do need replacing as the car is stored outside, used all weathers but for now Ill do the self-help repair. Some Autoglym headlight lens repair applied and they are a lot better but not "as new".
Just finished the 1st one, lens repaired, resealed on outside this time so easier to remove if needed, desiccant bags in the rear by bulbs as per Aston Service Modification and new front mount attached.
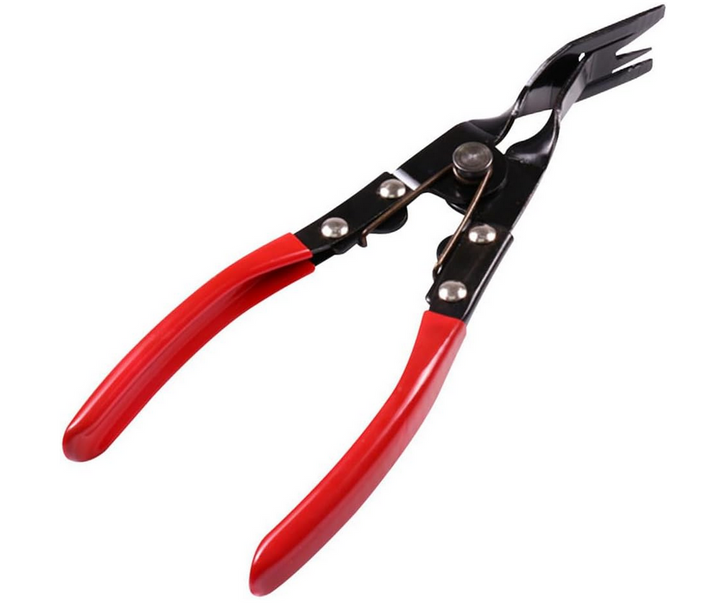
If anyone considers doing it.....buy one of these for prying apart the lens from body, God send!
Numerous threads online here and 6 Speed with people that have done it. So i decided to do the "box with hairdryer" example of a makeshift oven.
One B&M cheap hairdryer later, hole in box, even with a thermometer from Amazon i was cooking away.
Well I think Aston on my car used the same sealant that keeps submarines together! Didnt really work and I got to the stage of plastic about to snap.
I then went for the direct heat with the hairdryer on sections which after some cursing it worked.....slowly! I laughed at those that did the oven thing for 15 mins at 100F and "it popped off"!
Of course the front mount when I removed the headlight snapped off (very common thing) so luckily found on EBay a guy who does mount and washer motor replacement fixing kit. £30 per kit, so thats 2 ordered because both snapped! The reason is the screws corrode heavily and the threaded insert breaks at the weakest point which is the plastic its attached to.
To be honest my lens probably do need replacing as the car is stored outside, used all weathers but for now Ill do the self-help repair. Some Autoglym headlight lens repair applied and they are a lot better but not "as new".
Just finished the 1st one, lens repaired, resealed on outside this time so easier to remove if needed, desiccant bags in the rear by bulbs as per Aston Service Modification and new front mount attached.
If anyone considers doing it.....buy one of these for prying apart the lens from body, God send!
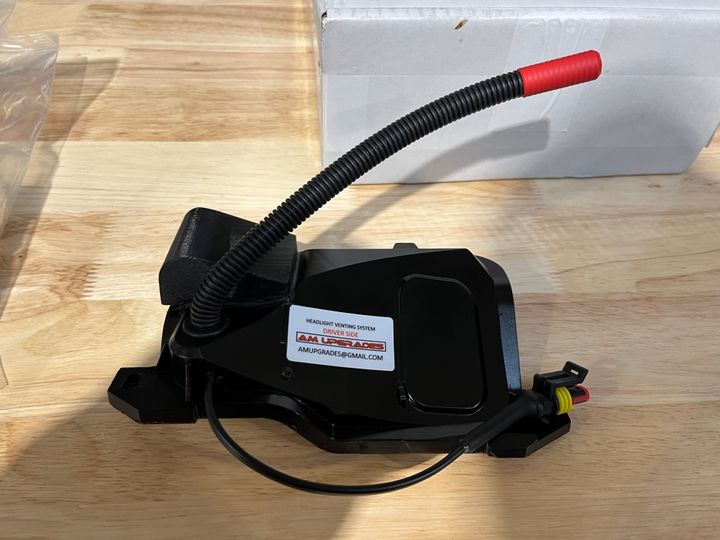
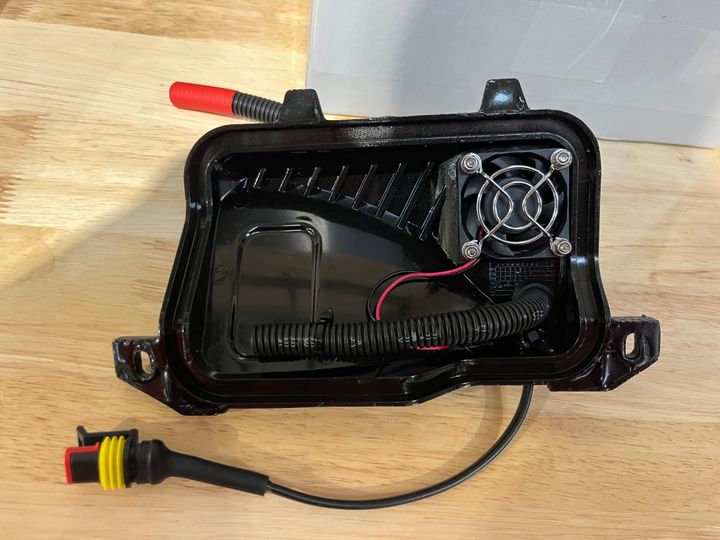
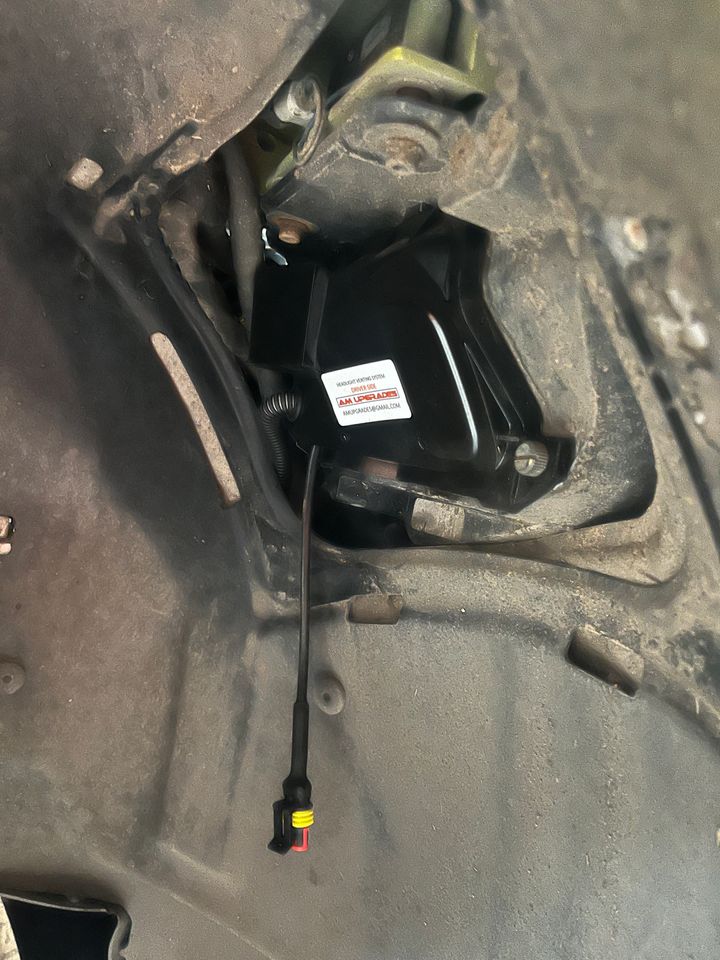
Alternatively AM Upgrades, have a fan venting kit designed especially for this known issue.
Appreciate you have short notice for your MOT, he delivered in 3 days after payment.
I’ve actually just been looking at my kit today as I’ll install over the weekend. It’s got a very good step by step guide on how to install and each part come clearly marked and referred to in the guide.
It’s a relatively simple job for anyone to install from what I’ve read.
Send Ian an email: amupgrades@gmail.com and tell him what you’re after.
The AM Upgrades venting kit is what you want. I suspect anything else is just a temporary solution. Fitted the kit myself a year or so ago and have never had any condensation since. Clearly, in the 12 year model run the headlight units should have been modified to eliminate this problem but they weren't, in true AML fashion.
The rear lights on the other hand ................ come on AM Upgrades, you can find a solution.
The rear lights on the other hand ................ come on AM Upgrades, you can find a solution.
I'm now another big fan of AM Upgrade's headlamp venting kit. Last month, whilst at Aston Installations in Tewkesbury (for another reason), I asked them to fit the venting kit. This is the third VH Vantage I've owned, and they all do the same; mild condensation in cold weather after a long run. Many car makes have the same problem. But I was a little concerned that over the long term, moisture would affect the electronics within (reported here and several times elsewhere).
AI fitted it quickly and very neatly. Since then, both units have remained crystal clear.
After initially fitting, the fans ran for 3+ hours after parking up. It's not a big problem as the electrical drain is minimal. However, I contacted AG Upgrades direct (even though I didn't buy direct) and they very kindly sent a different rate temp sensor which I swapped out in under a minute, and it's now staying on for a shorter length of time, whilst still being very effective. I've since tested it frosty and damp weather, which would have definitely caused condensation in the past. Not a bit of it now
The kit itself appears well-made with quality 3D printed plastic.
Annoyingly ridiculous that Aston`s commonly have this problem with their headlights, and I have had it intermittently since 2018, but ordered and fitted the AM Upgrades venting kit last year and since then no problem, and they`re a doddle to fit.
Don`t get me started on the tail lights, about to replace a fourth in 10 years...
Don`t get me started on the tail lights, about to replace a fourth in 10 years...
Mr.Tremlini said:
Annoyingly ridiculous that Aston`s commonly have this problem with their headlights, and I have had it intermittently since 2018, but ordered and fitted the AM Upgrades venting kit last year and since then no problem, and they`re a doddle to fit.
Don`t get me started on the tail lights, about to replace a fourth in 10 years...
Yes, it is a shame they don't do one for the rear lights .Don`t get me started on the tail lights, about to replace a fourth in 10 years...
SHIFTY said:
That's good to know about the sensor as I leave the fuse out when in the garage like you stated the fans do remain on for a long time after.
Maybe I will give AM Upgrdes a call.
The replacement temperature sensor does cost, usually £89 plus shipping. It has a range of setting so you can adjust to change the delay to longer or shorter as neededMaybe I will give AM Upgrdes a call.
It’s a simple swap in swap out, you don’t need to remove or modify the main loom going to the headlights or the venting covers themselves (eg no removing wheel arch covers or wheels) only swap the sensor module and sensor that connects to the 12V supply as plug and play.
ds666 said:
Mr.Tremlini said:
Annoyingly ridiculous that Aston`s commonly have this problem with their headlights, and I have had it intermittently since 2018, but ordered and fitted the AM Upgrades venting kit last year and since then no problem, and they`re a doddle to fit.
Don`t get me started on the tail lights, about to replace a fourth in 10 years...
Yes, it is a shame they don't do one for the rear lights .Don`t get me started on the tail lights, about to replace a fourth in 10 years...
Apollya said:
ds666 said:
Mr.Tremlini said:
Annoyingly ridiculous that Aston`s commonly have this problem with their headlights, and I have had it intermittently since 2018, but ordered and fitted the AM Upgrades venting kit last year and since then no problem, and they`re a doddle to fit.
Don`t get me started on the tail lights, about to replace a fourth in 10 years...
Yes, it is a shame they don't do one for the rear lights .Don`t get me started on the tail lights, about to replace a fourth in 10 years...

I guess you could make holes for a venting kit if you wanted to try.
So update on the first post starting this thread.
2nd headlight completed today and using the direct hairdryer method the lens actually came off a lot easier. It seems that the sealant may get slightly harder through age which means even with heat it still stays solid hence my struggle other day on the first headlight. But today it nearly just popped off as other have said. The sealant was also easier to remove. Polished only on inside to remove the condensation staining and refurb on outside to remove slight scratches etc.
Again had to grind down the front plastic mount which had come apart when removing from car, will fit the new mounts to both on weekend prior to reinstalling.
Both now "repaired" with the sealant on outside and dessicant bags in the bulb compartment.
Also did the coils and spark plugs as they are "due" so with this headlight repair should be ok for the MOT on Monday.
I do like the idea of the fan on the back of the headlight so I think with the MOT out of the way, ill look into purchasing them.
All fitted, tested and done.
All straight forward, the guide really is good and takes you through step by step.
It took me far longer than it should, I removed the wheels and best advice I can give is have a good Jack if doing that, I used the one out of my daily which was very stiff and hard to turn.
You’ll also never guess what I found inside the headlight units… two large silica gel packs in each cable tied to wires.
Apollya said:
All fitted, tested and done.
All straight forward, the guide really is good and takes you through step by step.
It took me far longer than it should, I removed the wheels and best advice I can give is have a good Jack if doing that, I used the one out of my daily which was very stiff and hard to turn.
You’ll also never guess what I found inside the headlight units… two large silica gel packs in each cable tied to wires.
Congrats on getting it sorted! Hope you can enjoy it fully again.All straight forward, the guide really is good and takes you through step by step.
It took me far longer than it should, I removed the wheels and best advice I can give is have a good Jack if doing that, I used the one out of my daily which was very stiff and hard to turn.
You’ll also never guess what I found inside the headlight units… two large silica gel packs in each cable tied to wires.
Well car went into MOT and passed but comment on the rear tyres that were very very (!) borderline so got them to change them. Car is with them all week as I am working away so may as well get the tyres done whilst its there. To be honest I was not entirely happy with my 2nd headlight refurb attempt so most likely this year I will look at sending them both off to get professionally done or try and find replacement lens and when re-installing ill put the fan mod in.
Well Car just had its’ MOT after I installed the headlight vent kit few weekends ago.
Passed with flying colours, not a single advisory, huge relief I didn’t buy a lemon. It also made quite a commotion in the testing centre with half the staff coming to have a good look and chat about it.
I did have to laugh a little as the tester stalled it numerous times (at least 3) trying to use reverse and tight turning angles to get it lined up into the bay and ramp. But I reassured him after that the manual gearbox and ultra light flywheel does mean that happens on occasion, it’s a real pain to reverse with full lock even for me.
Let me know after you do it what results are like and who you used for the professional headlight polishing. Will get mine done at some point if I decide not to buy new front headlight units instead.
I’ve also read on another forum for Porsche of people using 99.9% pure methanol to clean out the inside discolouration rather than having to split open the units themselves, has anyone else seen or done this for an Aston?
As a chemical engineer that has worked professionally with methanol in a small plant, I’d be worried or cautious doing it myself and would not advise other doing it unless they know full well how dangerous methanol is to inhale and precautions that need to be taken (full gas mask with correct filters spec and chemical resistant gloves)
Gassing Station | Aston Martin | Top of Page | What's New | My Stuff