90's toilet questions...
Discussion


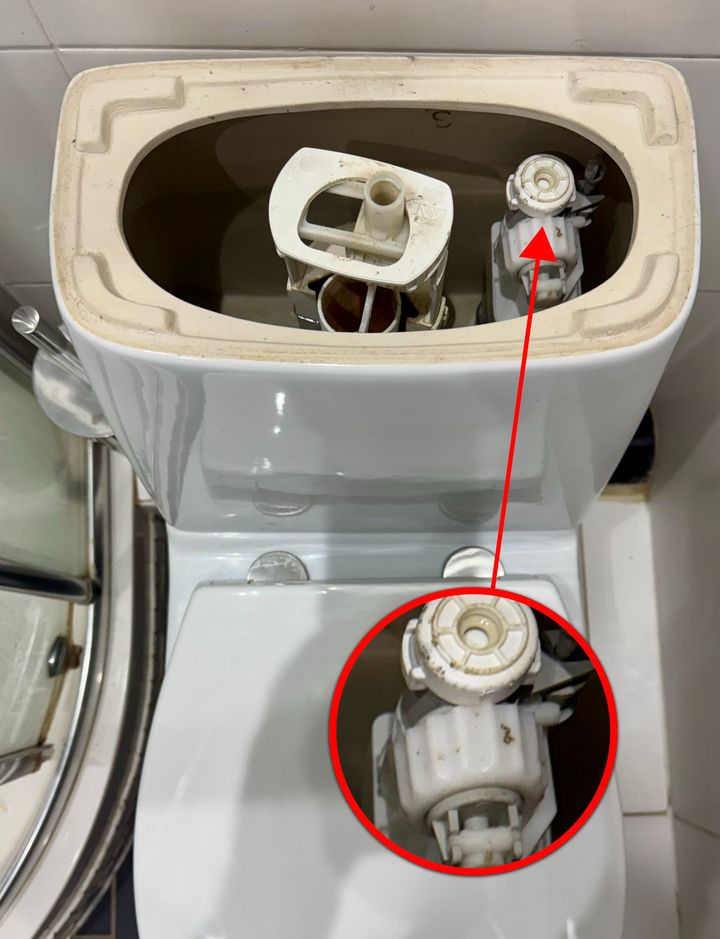
We're having some works done at the moment, and this lovely mid 1990's porcelain throne is leaking water down onto the floor and through to the ceiling below. The good news is I think I've worked out the problem and it's fresh water related (a missing cap from the float valve meaning water is shooting straight upwards and running down the back of loo, between the cistern and the wall, hence all the black marks now the cistern lid is off), the bad news is I cannot work out how the hell it comes apart!
Ideally I want to change the float valve. I'm hoping that if I turn the main stopcock off (as there is no isolator fitted), empty the cistern and undo the bolts from inside the cistern, it will come apart and hopefully there are captive nuts in the pan section for the cistern bolts, and also a nice long flexi connected to the bottom of the float valve, because there is no access to the back of the pan at all!
But stuff is often not that easy, so any tips would be very much appreciated!
Edited by Hard-Drive on Monday 5th January 18:37
Not a plumber, or even an enthuastic amature, but do you have to do that much disassembly?
You toilet looks somewhat similar to mine, (other than the cistern not bolted to wall, and mine has an isolation valve), and my float value was leaking for a while, fortunately into the cistern which overflowed into the bowl rather than elsewhere, turns out there's a rubber diaphragm inside the float valve. Mine had perished and was leaking, but after turning off the water and unscrewing the highlighted 'thing' the diaphragm was easy to replace and was only £4 for a 5 pack.
There are bolts holding my cistern to the pan which have wing nuts accessible from underneath, can you see bolts at the bottom of your cistern, or are the screws holding it to the wall also securing it to the pan?
But I think you're on the right track, drain and remove the cistern, see what's underneath.
As Gooddoc says you might just be able to get the diaphragm. See if you can get the top of the valve off and take the diaphragm to a proper plumbers merchants (like a small independent place if possible).
If you can't then ypu need to dismantle the toilet and replace the entire valve. I'm a landlord and I only use these...
Fluidmaster 400 Bottom Entry Fill Valve (Brass Shank) SKU: 400LB074
https://www.fluidmasteruk.com/products/400-bottom-...
You can get them in screwfix. They have a brass shank so unlikely to cross thread when doing up, and the diaphragm is readily avaiable for when it next needs doing.
If you do need to dismantle it I would also replace the flush valve, and the seal on the flexible water connection.
Hard-Drive said:
I'm hoping that if I turn the main stopcock off (as there is no isolator fitted) empty the cistern and undo the bolts from inside the cistern, it will come apart
I was surprised a mid-90s toilet didn't have an isolation valve, but having checked the water regs it wasn't a regulatory requirement until Jan 1st 2001. Still, seems like something that would have obvious benefits in a new install long before it was required. Might help to work out who made your inlet value. Once I worked out mine was a Siamp inlet valve I quickly found a YouTube video that explained exactly what the issue was, and that was why I spent £4 on a couple of diaphragms rather than £20 on a new value (and was a lot easier to install).
Here's hoping you have a flexi-hose, but assuming you can get the same valve, or replace a failed seal, then there shouldn't be an issue reassembling what's already there.
Good luck!
Your toilet looks like mine (a back to the wall toilet) and has the same problem mine had.
The solution was to replace the rubber diaphragm as mentioned above. The can be dome tin the filler valve still in place, no need to remove it but doing so will make it easier as it is a tight space within the cistern
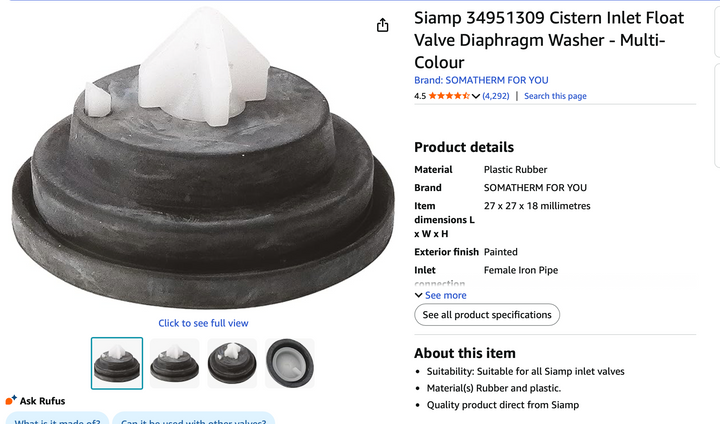
Note the small hole in the rubber which needs aligning with the peg. I think there are different variations of this diaphragm so could be trial and error. Take yours out, photograph it and put it back in whilst you research which one you need. Though if could fall apart in your hands if it had deteriorated badly, so best to have a few different one to hand when removing. They are cheap to buy.
Be mindful when removing the cap that it is fitted to a pivoting plastic lever that attaches to the filler valve, so note/photograph everything first, and observe carefully when removing so you know how to refit it.
Youtube is your friend. Go to 2m:50 secs here https://www.youtube.com/watch?v=cQTpGAPdH_U&li...
The issue I had with it being a back to the wall toilet was that I couldn't access any isolation valve under the cistern to turn off the water supply whilst I fixed it, so I had to turn off the water supply for the house, then flush the toilet to empty the cistern. Problem solved though.
I want to replace the fill valve as that brand/type is known to be poor, but I need to pull the toilet away from the wall to access the securing bolt underneath, so I want a plumber to do this for me.
My problem now is I get 'run on' after flushing where the flush dent fully stop, with water trickling out for a minute or so. I think it's a different rubber diaphragm/washer on the filler valve that is causing that, with the water intake not closing off when the cistern is full, so it overflows down the flush valve.? I need to research this.
The solution was to replace the rubber diaphragm as mentioned above. The can be dome tin the filler valve still in place, no need to remove it but doing so will make it easier as it is a tight space within the cistern
Note the small hole in the rubber which needs aligning with the peg. I think there are different variations of this diaphragm so could be trial and error. Take yours out, photograph it and put it back in whilst you research which one you need. Though if could fall apart in your hands if it had deteriorated badly, so best to have a few different one to hand when removing. They are cheap to buy.
Be mindful when removing the cap that it is fitted to a pivoting plastic lever that attaches to the filler valve, so note/photograph everything first, and observe carefully when removing so you know how to refit it.
Youtube is your friend. Go to 2m:50 secs here https://www.youtube.com/watch?v=cQTpGAPdH_U&li...
The issue I had with it being a back to the wall toilet was that I couldn't access any isolation valve under the cistern to turn off the water supply whilst I fixed it, so I had to turn off the water supply for the house, then flush the toilet to empty the cistern. Problem solved though.
I want to replace the fill valve as that brand/type is known to be poor, but I need to pull the toilet away from the wall to access the securing bolt underneath, so I want a plumber to do this for me.
My problem now is I get 'run on' after flushing where the flush dent fully stop, with water trickling out for a minute or so. I think it's a different rubber diaphragm/washer on the filler valve that is causing that, with the water intake not closing off when the cistern is full, so it overflows down the flush valve.? I need to research this.
Edited by The Gauge on Tuesday 6th January 13:57
I would not bother trying to take that apart if you are unsure!? the wingnuts on the close couple kit will not be captive and will fall inside the back of the pan! You are then likely to need a new donut rubber and a cc kit as well as a pan connector these things tend to spiral.. better to see if you can fix the existing
Thanks all. It looks like my hunch was correct, the massive fountain coming out the top of the float valve was just going down the back. Although the cap to prevent this was partially damaged, I have managed to cable tie it in place for now securely.
We're hopefully ripping the whole bathroom out later in the year so it will do for now.
Thanks for all the help and advice!
We're hopefully ripping the whole bathroom out later in the year so it will do for now.
Thanks for all the help and advice!
Gassing Station | Homes, Gardens and DIY | Top of Page | What's New | My Stuff