seat harnesses
Discussion


Modellers use a variety of materials to simulate seat straps. I've used the following -
Tamiya tape cut into thin strips
Lead foil from a wine bottle - which can be punched to simulate the large holes seen in old style Sutton Harnesses
Some after market specialist manufacturers make photoetched brass straps which can be very detailed. I don't know if any such set exists for 1/24 Harriers.

I used this method for the Spitfire:
http://www.britmodeller.com/forums/index.php?showt...
They look OK, but not very accurate, and might not be any good for something more modern:

Not 100% sure what you mean by HUD, but for my reflector gunsight I used a rectangle of acetate sheet, scrap brass and a plastic battery connector allcobbled together:
If you wanted it translucent green (or whatever), you can get 'clear' Tamiya acrylic paints, or use Johnsons Klear mixed with a spot of food dye. You could use a paper hole punch if you wanted it round.
http://www.britmodeller.com/forums/index.php?showt...
They look OK, but not very accurate, and might not be any good for something more modern:

Not 100% sure what you mean by HUD, but for my reflector gunsight I used a rectangle of acetate sheet, scrap brass and a plastic battery connector allcobbled together:

If you wanted it translucent green (or whatever), you can get 'clear' Tamiya acrylic paints, or use Johnsons Klear mixed with a spot of food dye. You could use a paper hole punch if you wanted it round.
Edited by dr_gn on Monday 1st February 15:24
Shar2 said:
I would have bought the Flightpath detail set before starting the kit, it includes a wealth of stuff but is a bit pricey.
Check this out (unless it happens to be yours!):http://www.britmodeller.com/forums/index.php?showt...
Morf said:
dr_gn said:
Not 100% sure what you mean by HUD, but for my reflector gunsight...
HUD = Head Up Display. reflector gunsight plus 50 years and probably several million dollars of development!dr_gn said:
I used this method for the Spitfire:
http://www.britmodeller.com/forums/index.php?showt...
They look OK, but not very accurate, and might not be any good for something more modern:
Not 100% sure what you mean by HUD, but for my reflector gunsight I used a rectangle of acetate sheet, scrap brass and a plastic battery connector allcobbled together:
If you wanted it translucent green (or whatever), you can get 'clear' Tamiya acrylic paints, or use Johnsons Klear mixed with a spot of food dye. You could use a paper hole punch if you wanted it round.
Cheers Doc, will try and get some tape. The angled plate on the HUD is what I'm looking to replace....hopefully tonight I can upload a pic, you'll see what I mean.http://www.britmodeller.com/forums/index.php?showt...
They look OK, but not very accurate, and might not be any good for something more modern:
Not 100% sure what you mean by HUD, but for my reflector gunsight I used a rectangle of acetate sheet, scrap brass and a plastic battery connector allcobbled together:
If you wanted it translucent green (or whatever), you can get 'clear' Tamiya acrylic paints, or use Johnsons Klear mixed with a spot of food dye. You could use a paper hole punch if you wanted it round.
Edited by dr_gn on Monday 1st February 15:24
The kit is pretty big and will take a bit of time.....I'm a lazy bast, my eyesight isn't what it was and I feel like Gene Wilder in Blazing Saddles when it comes to detail work.
the fuselage appears to have measles, the wings are badly warped and you have to cut the nose off to convert it to an FRS1 too!
Edited by YAD061 on Monday 1st February 15:58
YAD061 said:
dr_gn said:
I used this method for the Spitfire:
http://www.britmodeller.com/forums/index.php?showt...
They look OK, but not very accurate, and might not be any good for something more modern:
Not 100% sure what you mean by HUD, but for my reflector gunsight I used a rectangle of acetate sheet, scrap brass and a plastic battery connector allcobbled together:
If you wanted it translucent green (or whatever), you can get 'clear' Tamiya acrylic paints, or use Johnsons Klear mixed with a spot of food dye. You could use a paper hole punch if you wanted it round.
Cheers Doc, will try and get some tape. The angled plate on the HUD is what I'm looking to replace....hopefully tonight I can upload a pic, you'll see what I mean.http://www.britmodeller.com/forums/index.php?showt...
They look OK, but not very accurate, and might not be any good for something more modern:
Not 100% sure what you mean by HUD, but for my reflector gunsight I used a rectangle of acetate sheet, scrap brass and a plastic battery connector allcobbled together:
If you wanted it translucent green (or whatever), you can get 'clear' Tamiya acrylic paints, or use Johnsons Klear mixed with a spot of food dye. You could use a paper hole punch if you wanted it round.
Edited by dr_gn on Monday 1st February 15:24
The kit is pretty big and will take a bit of time.....I'm a lazy bast, my eyesight isn't what it was and I feel like Gene Wilder in Blazing Saddles when it comes to detail work.
the fuselage appears to have measles, the wings are badly warped and you have to cut the nose off to convert it to an FRS1 too!
Edited by YAD061 on Monday 1st February 15:58
Good Luck with the model.
Another good link here:
http://tinyurl.com/ycjmkmh
Edited by dr_gn on Monday 1st February 16:10
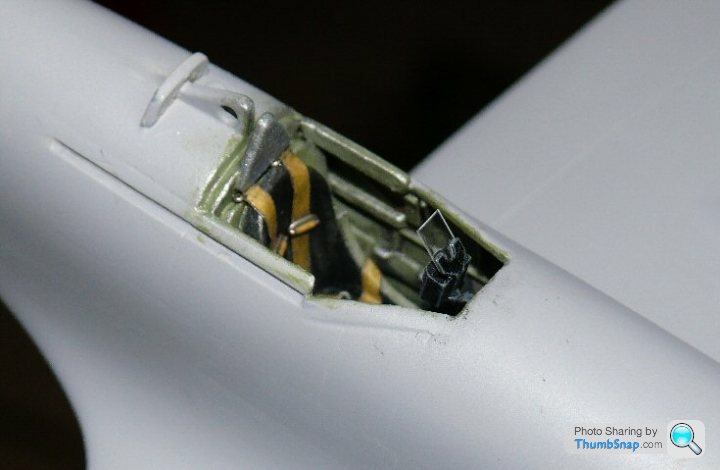
cracked it, as you can see, I ain't up to dr gns standard. The angled plate has been replaced on one example of an F15 I saw somewhere by something like a sequin. It gave off a rainbow effect through the windscreen that looked very realistic. I figure throwing the usual confusion of belts onto the seat will hide a mutitude of sins too

YAD061 said:
cracked it, as you can see, I ain't up to dr gns standard. The angled plate has been replaced on one example of an F15 I saw somewhere by something like a sequin. It gave off a rainbow effect through the windscreen that looked very realistic. I figure throwing the usual confusion of belts onto the seat will hide a mutitude of sins too
My standard? I haven't attempted anything like that (with any real cockpit detail) yet, and yours looks superb to me. I'd be totally happy with it. keep up the good work!dr_gn said:
Shar2 said:
I would have bought the Flightpath detail set before starting the kit, it includes a wealth of stuff but is a bit pricey.
Check this out (unless it happens to be yours!):http://www.britmodeller.com/forums/index.php?showt...
dr_gn said:
YAD061 said:
cracked it, as you can see, I ain't up to dr gns standard. The angled plate has been replaced on one example of an F15 I saw somewhere by something like a sequin. It gave off a rainbow effect through the windscreen that looked very realistic. I figure throwing the usual confusion of belts onto the seat will hide a mutitude of sins too
My standard? I haven't attempted anything like that (with any real cockpit detail) yet, and yours looks superb to me. I'd be totally happy with it. keep up the good work!
irredescent, that's the word I was looking for
Gassing Station | Scale Models | Top of Page | What's New | My Stuff