
Mirror spacers
Discussion


I am looking to change my wing mirrors from the original to the VW Corrado morrors on the SE 500's. I can source the mirrors easily enough, but can not find any spacers (TVR pt numbers B1122 and B1123) - does anyone have any or know where they can be found...................?
Many thanks!!!!
Many thanks!!!!
It'll show you how the mirror is fixed, the 19mm hollow bolt, the wiring etc . .
I'm sure you'll have seen it all before, but i'll take some shot's when I hit the garage this evening . . Never having had a normal 500 I can't compare the differences, although i'm sure they are just the difference in the spacer/mounting plate.
Have you tried the breakers, I know not going to be cheap, but at least they may have some ?
ETA - There's a BNIB drivers side mirror on Ebay currently (search for Corrado and not for Cerb/Tuscan/Chimp mirrors) as they're massively overpriced and have had the button cut into the bottom for the door release which you probably won't want . . I've been picking up spares etc of late so have been doing quite a bit of surfing on Ebay . .
I'm sure you'll have seen it all before, but i'll take some shot's when I hit the garage this evening . . Never having had a normal 500 I can't compare the differences, although i'm sure they are just the difference in the spacer/mounting plate.
Have you tried the breakers, I know not going to be cheap, but at least they may have some ?
ETA - There's a BNIB drivers side mirror on Ebay currently (search for Corrado and not for Cerb/Tuscan/Chimp mirrors) as they're massively overpriced and have had the button cut into the bottom for the door release which you probably won't want . . I've been picking up spares etc of late so have been doing quite a bit of surfing on Ebay . .
Edited by Johno on Thursday 11th March 13:49


Johno said:
Photos taken, but off to Plasticman for him to work his magic and will upload later this evening . .
You should ask him about the extensions to raise the mirror J, I seem to recall it was he that did it on a Cerb (few years ago). I certainly made a mental note at the time as it looked like it would give a much better view out of the mirrors?

So here's a bunch of photos that may or may not help people . . Bare in mind that mine is already an SE, so there will be differences I'm sure.
First of, this is the door aperture for the mirror. The central hole is not threaded on mine and the hollow bolt you'll see a couple of photos down only passes through this.

Here's what it looks like from inside the door looking up . . . pretty much as you'd expect.

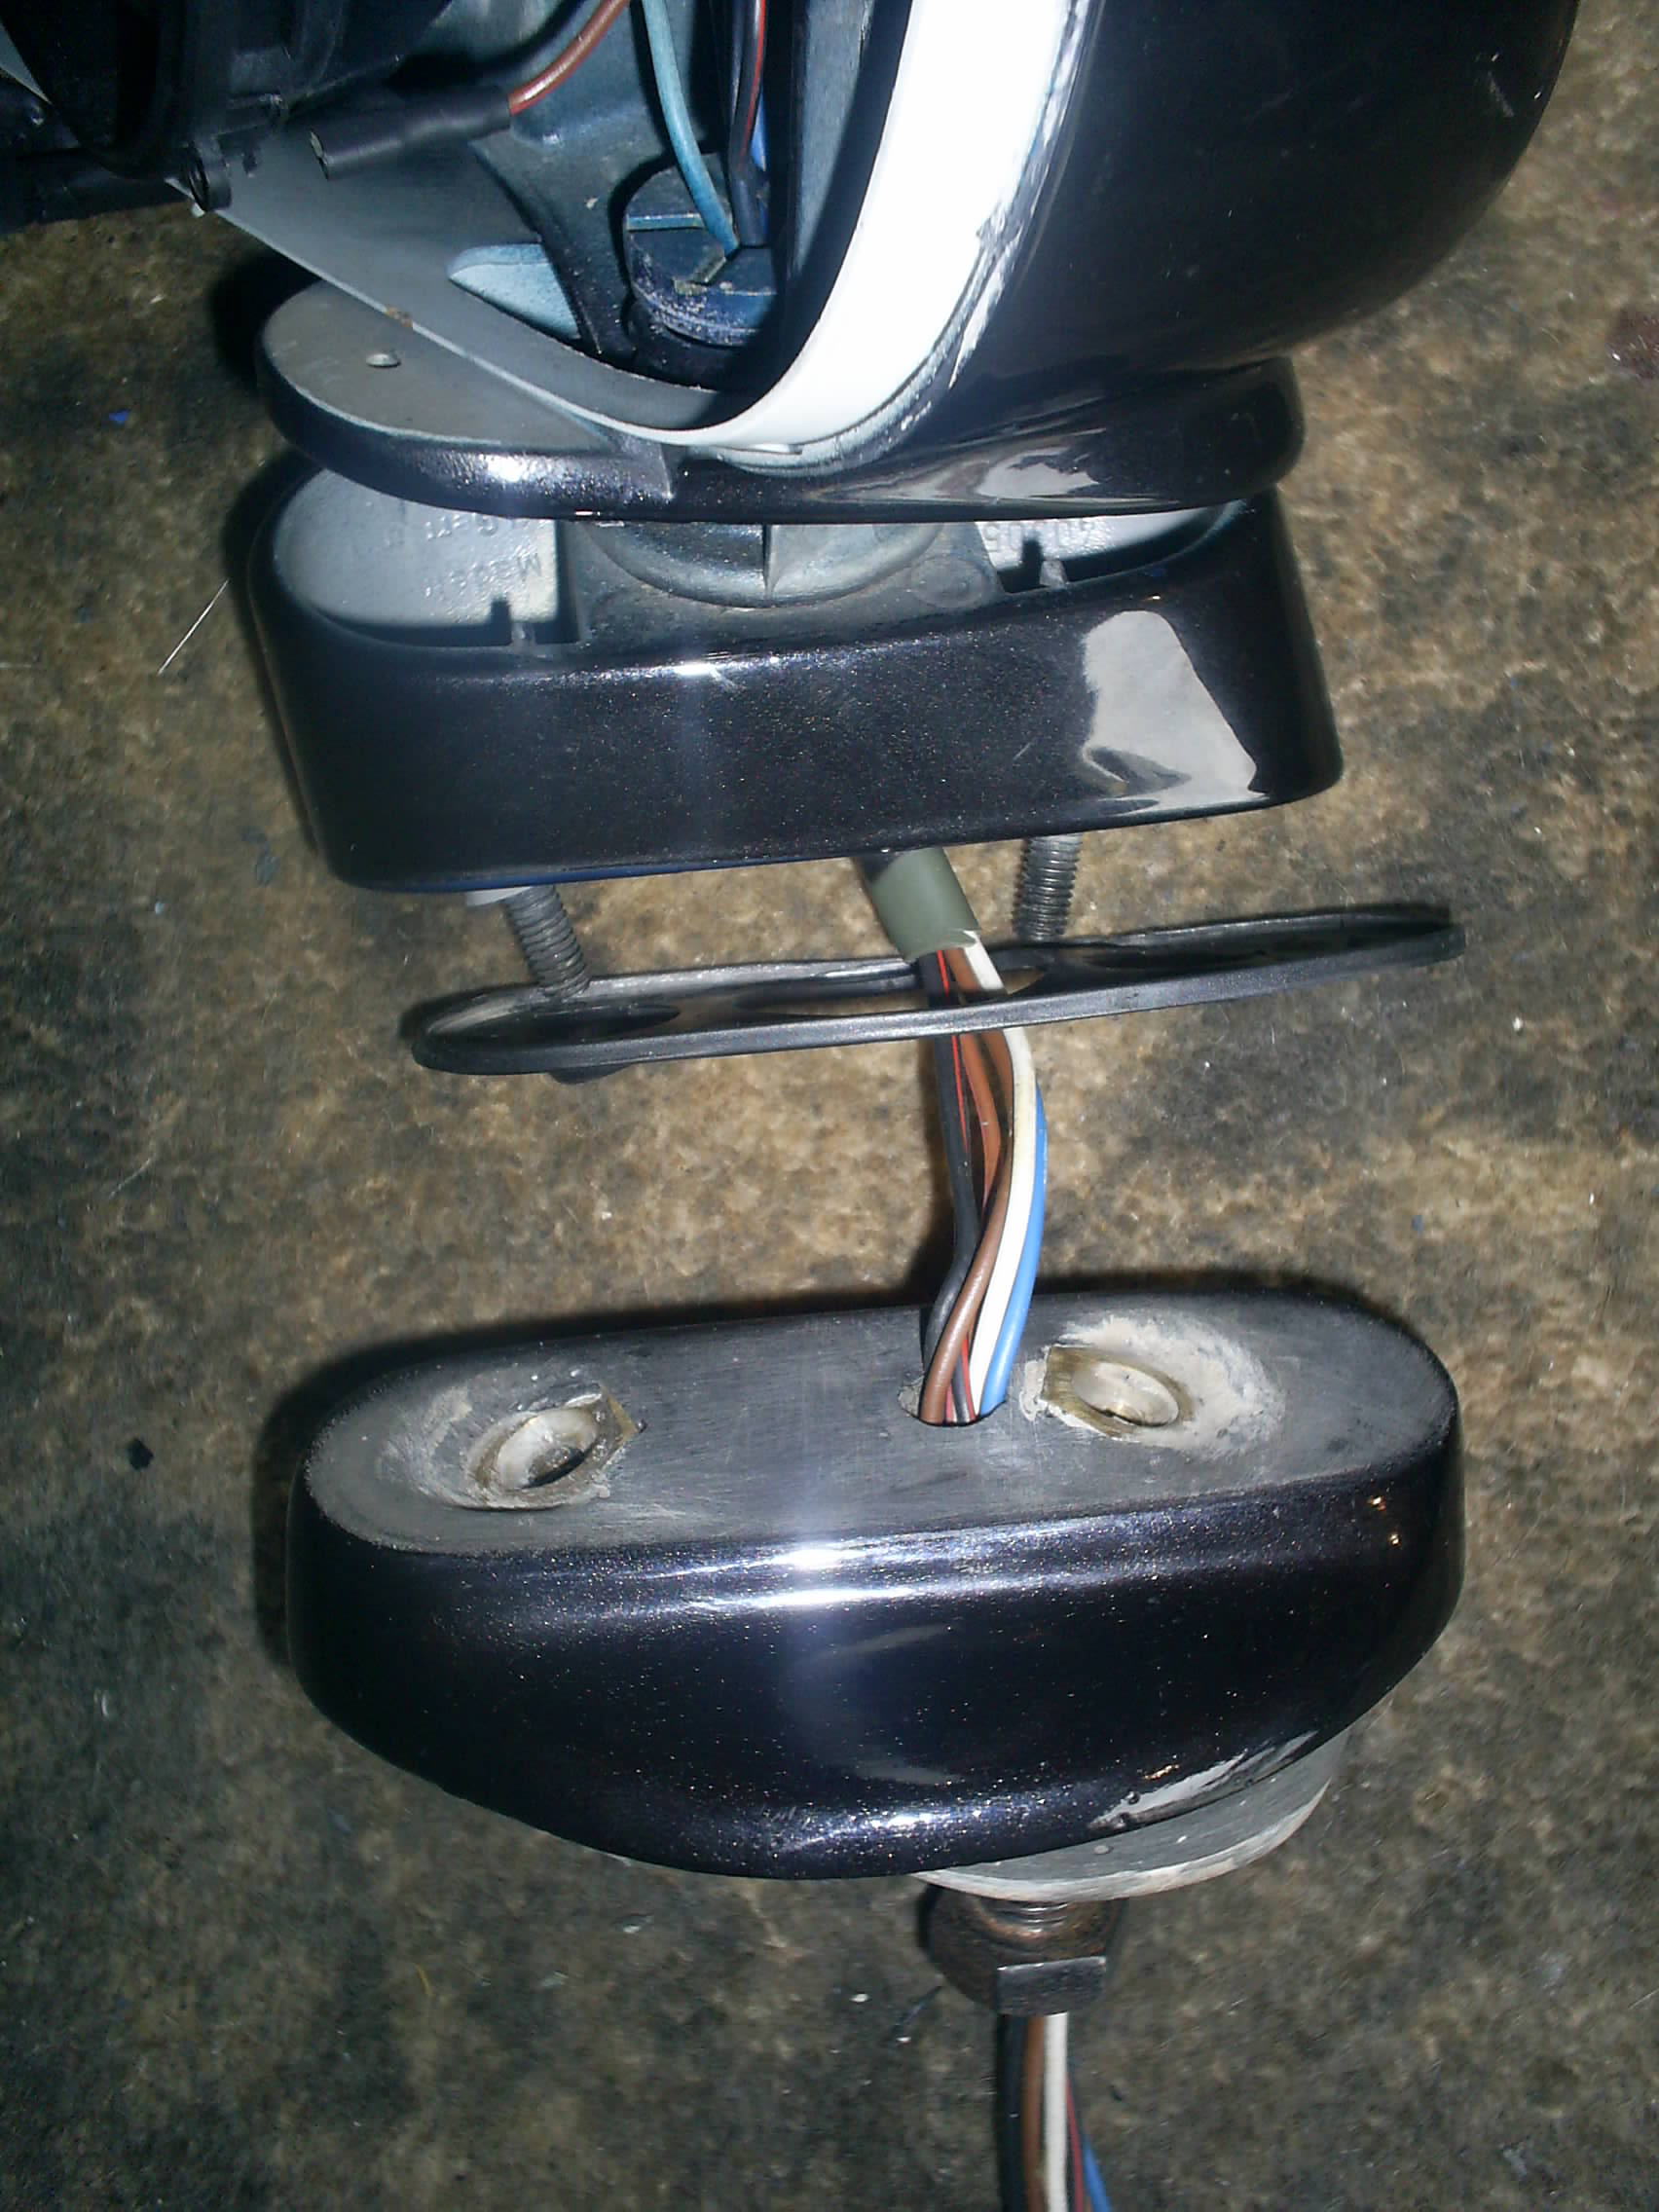
The spacer is attached to the mirror assembly by 2 x M6 countersunk allen bolts, the spacer itself is seated into the aperture and held in place only by the hollow bolt, no other fixings to the door. The loom is 6 wires, 2 for the heated mirror and 4 for the motor control. I don't know whether our looms would be the same but having put new connectors onto mine you have to make sure you connect them up to the right ones . . . You have to cut off the connectors to feed the loom through the bolt, so you'll need either a 6 way, or a 2 and a 4 etc . .
You'll also note the routing of the loom through the bolt and spacer is not straight, there is a slight kink. Most mirrors come with the loom covered in a plastic tube cover, if not however, I would recommend getting some heat shrink.

Here's a couple fo the spacer and the loom routing . .


Here's one of the component parts of the mirror assembly. The front facing ring facia that sounds the mirror aperture is held in with 4 screws into the body and one from underneath. It also clips into the body, as you undo the screws the whole body and facia become loose and allow you to remove the facia. The body stay on unless you want to tackle the spring loaded axis . . . You can also see clearly the 2 heated wires.
As for what connectors to use, I use the mini connectors 2.8mm and crimp them up with a normal crimping tool, about half way down the page. . .
Connectors
Everyone will have a preference, but these are nice and small and neat. I make sure the mirror gets the female connector, that way less likelihood of ingress etc. . .
You'll also note there is a rubber bush/grommet/gasket between the spacer and the bottom of the housing.
Best way to get the mirror of is to angle it as much as possible upwards and use a flat blade and a bit of rag to lever the bottom clip off the mounting ring, then work your way round doing the same for the other 3 clips, be very careful, easy to snap a mirror and they're £47+ from VW dealers. . . the TVR dealers want even more . .


I spoke to Dave today when I dropped the car off and left him one of my spacers. He'd not made them up before and believes the bolt sizes may be different from the originals to mine, but he's going to have a look and see what he thinks over this week, I'm there next Friday to collect the car and will speak to him about what he thinks.
Set into the spacer are 3 nuts/threads. One for the main hollow loom/fixing bolt and 2 for the countersunk allen bolts to fixing the housing to the spacer. I imagine the real challenge is getting those orientated correctly etc . . . but he knows more of these thing than I. So we'll see, but I'll let you know in a week.
First of, this is the door aperture for the mirror. The central hole is not threaded on mine and the hollow bolt you'll see a couple of photos down only passes through this.
Here's what it looks like from inside the door looking up . . . pretty much as you'd expect.
The spacer is attached to the mirror assembly by 2 x M6 countersunk allen bolts, the spacer itself is seated into the aperture and held in place only by the hollow bolt, no other fixings to the door. The loom is 6 wires, 2 for the heated mirror and 4 for the motor control. I don't know whether our looms would be the same but having put new connectors onto mine you have to make sure you connect them up to the right ones . . . You have to cut off the connectors to feed the loom through the bolt, so you'll need either a 6 way, or a 2 and a 4 etc . .
You'll also note the routing of the loom through the bolt and spacer is not straight, there is a slight kink. Most mirrors come with the loom covered in a plastic tube cover, if not however, I would recommend getting some heat shrink.
Here's a couple fo the spacer and the loom routing . .
Here's one of the component parts of the mirror assembly. The front facing ring facia that sounds the mirror aperture is held in with 4 screws into the body and one from underneath. It also clips into the body, as you undo the screws the whole body and facia become loose and allow you to remove the facia. The body stay on unless you want to tackle the spring loaded axis . . . You can also see clearly the 2 heated wires.
As for what connectors to use, I use the mini connectors 2.8mm and crimp them up with a normal crimping tool, about half way down the page. . .
Connectors
Everyone will have a preference, but these are nice and small and neat. I make sure the mirror gets the female connector, that way less likelihood of ingress etc. . .
You'll also note there is a rubber bush/grommet/gasket between the spacer and the bottom of the housing.
Best way to get the mirror of is to angle it as much as possible upwards and use a flat blade and a bit of rag to lever the bottom clip off the mounting ring, then work your way round doing the same for the other 3 clips, be very careful, easy to snap a mirror and they're £47+ from VW dealers. . . the TVR dealers want even more . .
I spoke to Dave today when I dropped the car off and left him one of my spacers. He'd not made them up before and believes the bolt sizes may be different from the originals to mine, but he's going to have a look and see what he thinks over this week, I'm there next Friday to collect the car and will speak to him about what he thinks.
Set into the spacer are 3 nuts/threads. One for the main hollow loom/fixing bolt and 2 for the countersunk allen bolts to fixing the housing to the spacer. I imagine the real challenge is getting those orientated correctly etc . . . but he knows more of these thing than I. So we'll see, but I'll let you know in a week.
Thanx for that - the pics will be a great help, although feeling a little daunted now!!! If your chappy could make 2 up, even without holes in (I can always sort those out myself), and perhaps extended slighty (as per the threads....) would be very happy to buy them!!!
Thanx once again, and hopefully get a +ve response back from your chappy!
Thanx once again, and hopefully get a +ve response back from your chappy!
 looks like the SE's were done differently in 2 parts. The upgrade part is one piece that sits under the corrado mirror and fills up the door 'recess/hole'.
Gassing Station | Griffith | Top of Page | What's New | My Stuff