The tricky bit
Discussion


I for one found that setting out the firewall with all the plumbing, wiring, brethers and pumps, was quite a challenge! ...Perhaps one of the bigger ones! ..for me anyway!
In addition, I did not want to fit the cab at this point, until I had 'proved' the engine, as it such a PAIN having to squeeze in and out of the cab area playing with wiring and the like!
So like some others here, I decided to go for an ally firewall that could be fitted to hold all the bits without the cab being in place, and making sure the cab rear panel will 'slip' nicely into place retrospectively! The theory was that with a little trimming of the lower part of the GRP panel and making sure there was a 'spacer' (actually the trimmed part from the GRP)rivited between the ally panel and the tubing, this can be achieved!
So here are some progress photos that might help (or put off!) others wanting to go this route!
Main template made:

Cover in 'Cool-it':

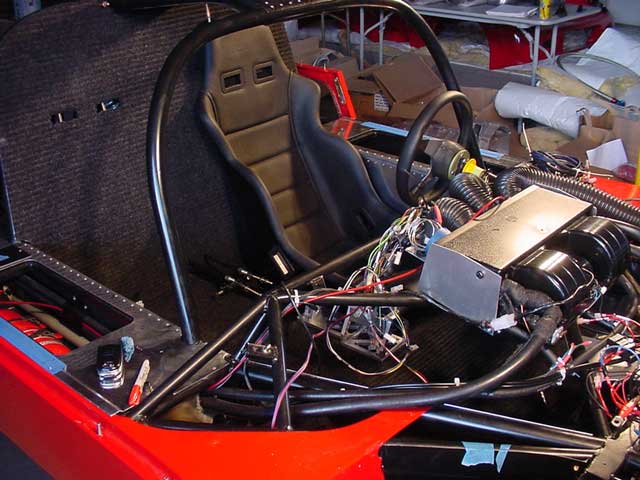
Lay out the rest of the plumbing, putting all the pump stuff on a bottom plate for easier access later if necessary!

Engine in:

Cheers
Keith
In addition, I did not want to fit the cab at this point, until I had 'proved' the engine, as it such a PAIN having to squeeze in and out of the cab area playing with wiring and the like!
So like some others here, I decided to go for an ally firewall that could be fitted to hold all the bits without the cab being in place, and making sure the cab rear panel will 'slip' nicely into place retrospectively! The theory was that with a little trimming of the lower part of the GRP panel and making sure there was a 'spacer' (actually the trimmed part from the GRP)rivited between the ally panel and the tubing, this can be achieved!
So here are some progress photos that might help (or put off!) others wanting to go this route!
Main template made:
Cover in 'Cool-it':
Lay out the rest of the plumbing, putting all the pump stuff on a bottom plate for easier access later if necessary!
Engine in:
Cheers
Keith
V8 Vum said:
So like some others here, I decided to go for an ally firewall that could be fitted to hold all the bits without the cab being in place, and making sure the cab rear panel will 'slip' nicely into place retrospectively! The theory was that with a little trimming of the lower part of the GRP panel and making sure there was a 'spacer' (actually the trimmed part from the GRP)rivited between the ally panel and the tubing, this can be achieved!
Cheers
Keith
Hmmm... has anyone else done it this way ? I know people have made an ally bulkhead so that there are two layers between the engine and the cockpit, and also people who have "lined" the GRP with ally, when the cockpit is already on - but I haven't seen this idea before.Cheers
Keith
Have you actually tried to fit the cockpit in place with this arrangement ? It is a B*****d to remove and re-fit, even on a bare chassis, let alone with a limited gap behind the rear hoop - it certainly doesn't "slip nicely" into place....
Also, (IMHO) I think it is important (for structural rigidity) that the cockpit is glued and rivetted all the way along its bottom edge.
Regards
I agree!
I am hoping that rigidity integrity will be maintained by glueing and riveting to the ally panel once in place! ...and yes I have test refitted! - a bit of a struggle, but do-able!
I have also a set of purpose-made brackets to use to reinforce the link between the tubing and the grp panel also, so recon it should be robust enough!
Just makes so much difference not having the cab on at this stage!
cheers
keith
Keith, you look to have the same setup that I have. Looks to be provided by Jeff? I did something very similar with the alloy panel. The difference is my alloy panel attached directly to the FG firewall. On a side note, how much clearance do you have between the alloy panel and your oil tank? For that matter what’s the total distance between your oil tank and the location of the original FG firewall. I have mind set in the recommend factory position, but I am getting concerned that when I refit the motor the Alternator is going to hit the oil tank. I have taken a bunch of measurements, and I know it is going to be very close. From your pictures it looks like the oil tank is nearly hitting the alloy firewall. Can you take some measurements for me?
Thanks,
Randy
Thanks,
Randy
Randy,
Yes it is tight, however if yours is the same, what I did was go get another pulley belt 2 inches approx shorter, re-drilled the bracket stay-bar, thus bringing in the alternator by about an inch. Don't go too much smaller as there is not a lot of margin for shortening. Worked a treat from me. Just go to your local motor factor, take the belt, and ask for the shorter one - I was amazed how may lengths there were! Much easier than expected!
Cheers
Keith
It's tight, but it all fits. I put the sump tank in place, with the engine and Alt installed, to check for interference. I think that was test-fit #16 for the engine. 
I bonded an Ali panel to the inside of the GRP. Everything fits fine. It made fitting the center section slightly more challenging, but only due to the extra few pounds. I wanted the Ali panel to support the various components and didn't think the GRP would hold up, over time, to the weight of the tanks, etc.
I also extended the length of the Ali panel below the GRP and put a bend at the bottom, where the GRP stops, to match up well with the lower panel angle.
Steve_D said:
I'm liking the ali panel idea.
A gap left between the ali and the body will help prevent both sound and heat being transferred into the cockpit.
Steve
I've also made a carpeted Ali panel for the inner side. Hush-mat on both inner sides of the Ali panels. Really cleans up the interior, without going to full upholstery.A gap left between the ali and the body will help prevent both sound and heat being transferred into the cockpit.
Steve
Gassing Station | Ultima | Top of Page | What's New | My Stuff