Bridgeported, single-turbo FD3S RX7 project
Discussion


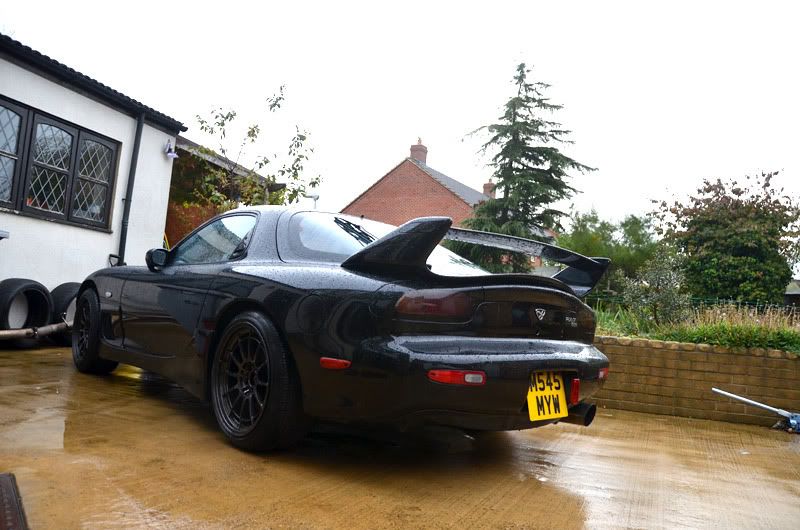
Thought it was about time i posted up my latest sensible purchase, a 1995 mazda RX7. Cut a long story short, i had an R32 GT-R drag car a couple of years ago which inevitably broke. Alot. I then decided to go sensible and own an Evo X FQ360 for 6 months, which was the best car i've ever owned, but insurance, tax and general costs just crippled me. So i bought an R33 GT-R. Which i inevitably broke (not too much, and wasn't my fault).
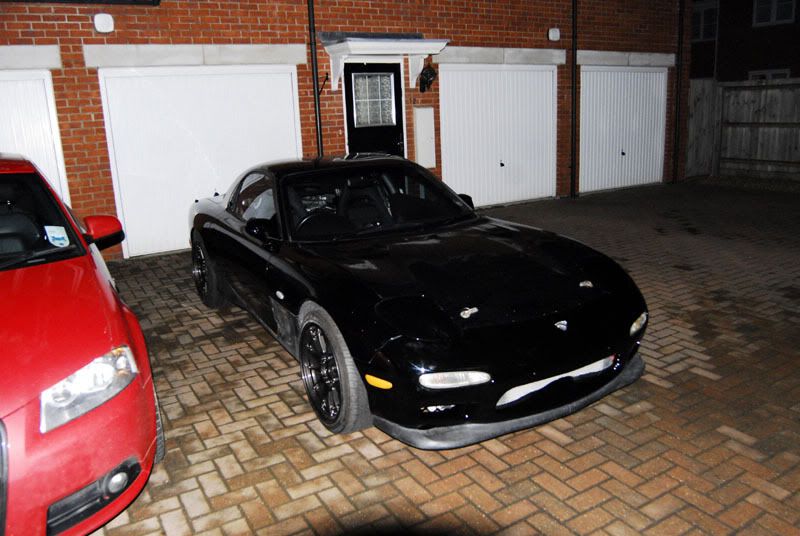
Which leads me to the RX7! I owned a standard FD around 3 years ago which i loved to bits, but it was a bit slow for my liking (i got 'beat' by a friend's E46 M3 which made me want to sell it). So when this bridgeported, HKS T51-R powered RX7 came up for sale i just had to have it. Unfortunately, it broke 35 miles after i picked it up.
I had been told it was mapped, which it was! Unfortunately just on wastegate spring pressure (0.8 bar). Cue first time properly booting it, peaking at over 1.1bar and it turned out to have chipped a tip. b ks. Live and learn, i considered myself a competent RX7 owner, very nearly decided to break it for bits but thought stuff it, i'll rebuild it and actually try and use it.
It had some old bodywork i really didn't like, and some fairly pants wheels but i'd bought some new Rota GKRs literally the day i was picking it up to fit which, despite engine issues, i decided to do:
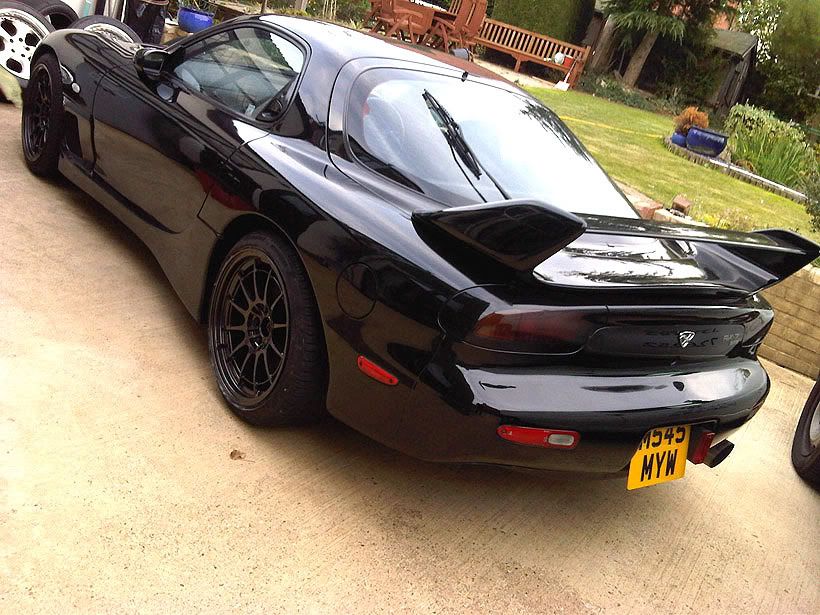
Definitely spurred me on as it made it look 10 times better even with the mass of bodykit.
Main dilemma for me was, like most young, Japanese car owners i'm pretty skint, and with the car broken it made it difficult to take it anywhere to be inspected/rebuilt/worked on without forking more cash out. Luckily my mate Chris came to the rescue who offered to get the engine out for me, with a few handy pointers from Ben @ MAV Tuning in the process.

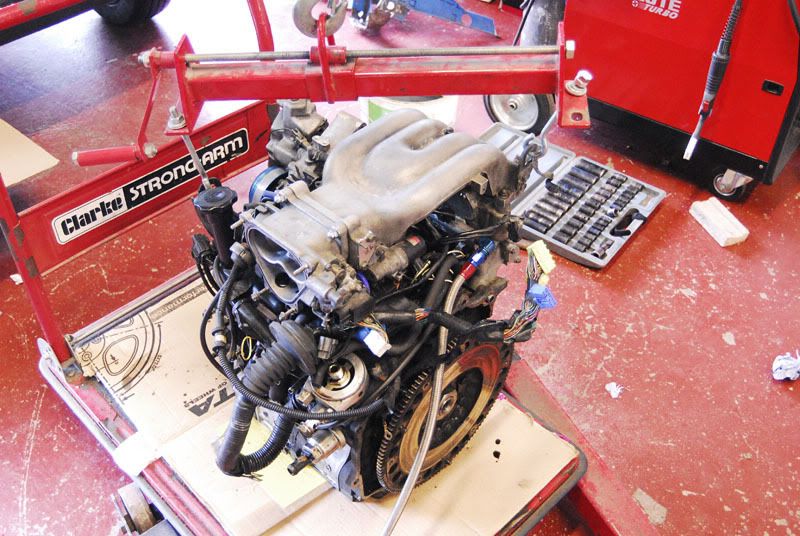
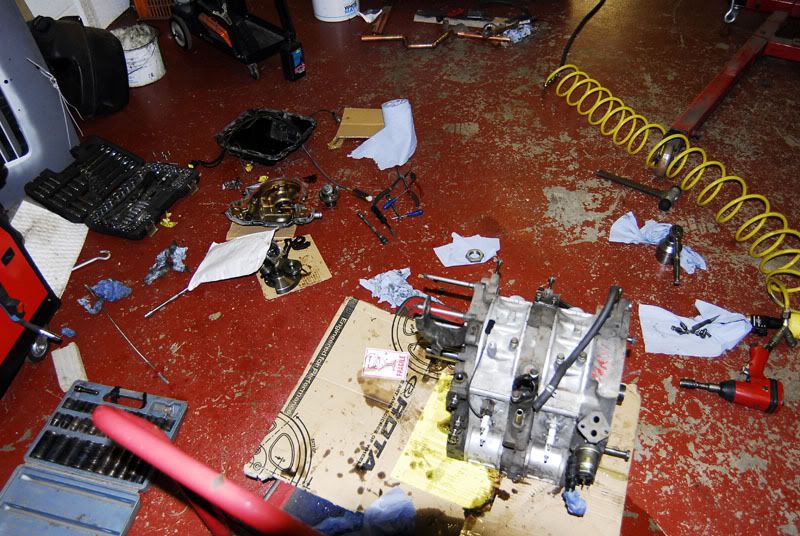
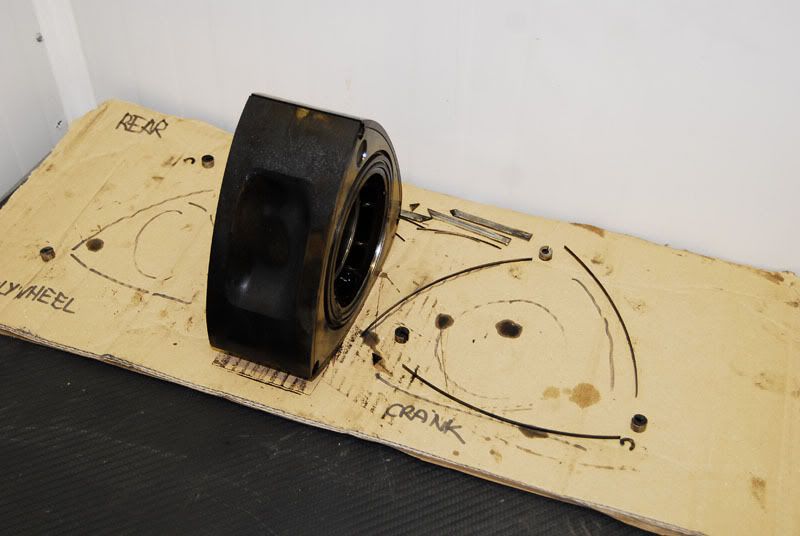
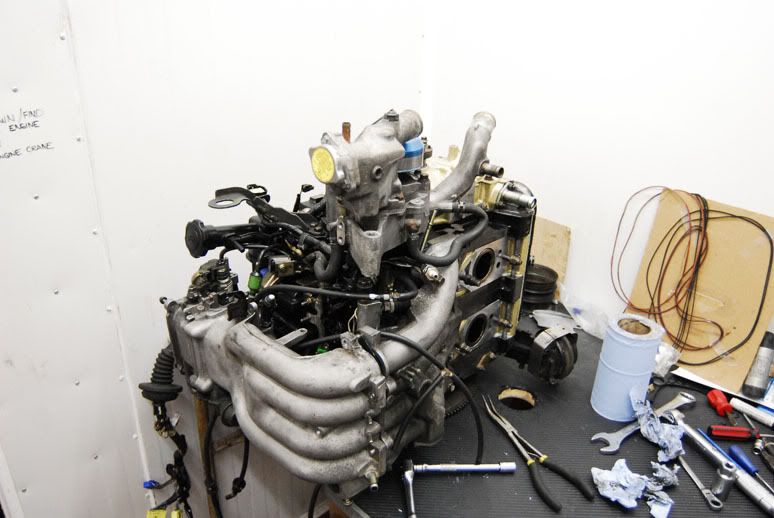
To be fair, getting the engine ready to be removed wasn't too bad considering both me and Chris have never done anything like this before (well, he's a mechanic, but not an rx7 one) and the main issue was the sheer amount of wires/plugs/hoses these friggin things have... and this has had the rats nest removed.

A few hours later and this was the sight - it probably took around 4/5 hours in total, but a good hour/2 hours was spent working out what bits need to come off in what order, as well as labelling/marking all the parts so we know how to put it back together (putting screws back in, taking pics of various sensors etc.)

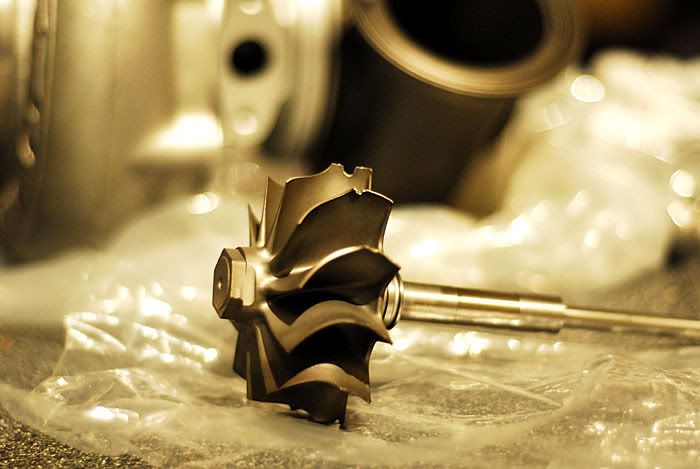
probably the main reason i didn't break the car is, the T51-R turbo had taken some damage from the exiting apex seal. With the turbo kit alone being worth £2k (although broken, not even worth half that) i figured i had no choice but to repair or lose out bigtime.

The turbo was a complete stter, but if anything it meant i had no choice but to go down the rebuild route as essentially the car wouldn't be worth breaking.
Main options included:
-Buying a replacement engine
-getting the current engine replaced
-rebuild it myself
In the end i went for something in between, mainly thanks to the help of Ben Lewis @ MAV Tuning ( http://www.mavtuning.com/) who i literally cannot thank enough. With my budget pretty much non-existent, i couldn't really afford to send off the engine/car and have it all rebuild.
While i'm mechanically retarded, i'm always keen to help/learn and with Ben's guidance i'll be rebuilding the engine myself - i say that, Ben's going to be doing the tricky bits which require actual skill, while i'm going to be doing the more tedious bits such as cleaning etc. to keep labour costs down.
Ben's one of the nicest guys i've had the pleasure of meeting and always happy to help anyone/offer advice. Even if i was in the lucky position to have all the money in the world for a crazy engine build i wouldn't just send it off to someone and then await for it's return - having been stung in the past as a GTR owner i'm always skeptical as to exactly 'what's been done', and the fact he's happy to let me help/watch and explain (which to be honest is probably going to take him twice as long as if i wasnt there!) is pretty awesome - i'd like to think of myself as a pretty competent RX7 owner anyways, but to learn as much as i can about 'em certainly isn't a downside.
After i'd got the engine out, i took it down to Ben to begin stripping it down to find out the cause and what the next plan would be (not to mention exactly what needs replacing). Ben was happy to go through every stage with me, putting up with me asking ALOT of basic questions but to be honest it's completely fascinating just how these engines work - really looking forward to getting stuck into it now i've a proper understanding (of the basics at least) and with Ben's help it should be a solid motor very shortly.
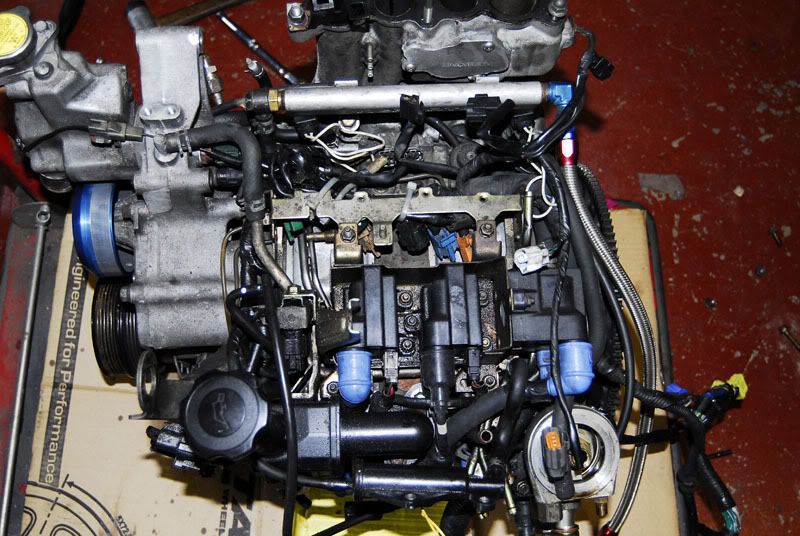
So anyways, first came off the ancillaries - no idea how he knows what goes where, i was taking pictures every 30 seconds just to remember haha. Even with the rats nest removed, this just makes my brain ache. Will possibly look at removing some of the unused plugs on the loom depending on time.
One thing which was news to me was the OMP. I'd heard of it, but never fully understood what it actually did and what it's purpose was. After being explained exactly how it works and seeing the colour of the oil it pumps in, it made 110% to do away with it completely and instead opt to run premix - makes total sense plus it's a thousand times easier to do with the engine out. As much as this is being a case of getting the engine back and running as quickly and cost-effectively as possible, there's a few elements we'll be adding/changing purely to aid the engine life, and from what i've read the only downside is having to use your brain when filling it with fuel.
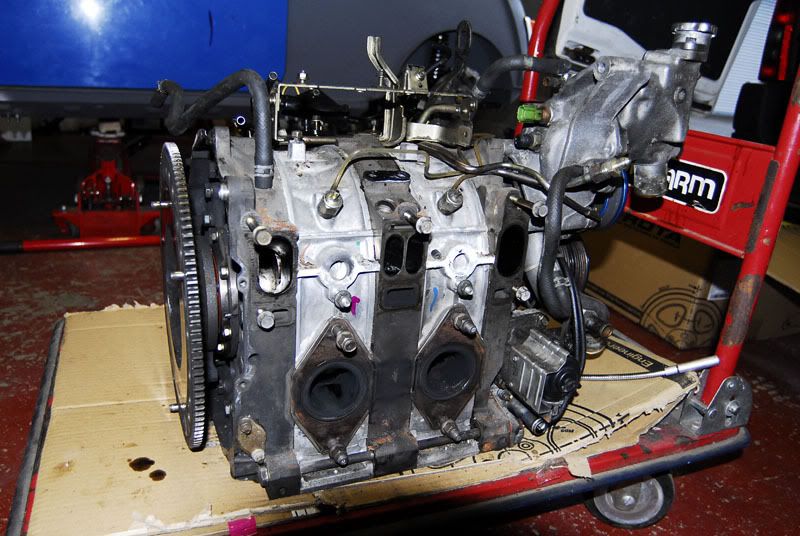
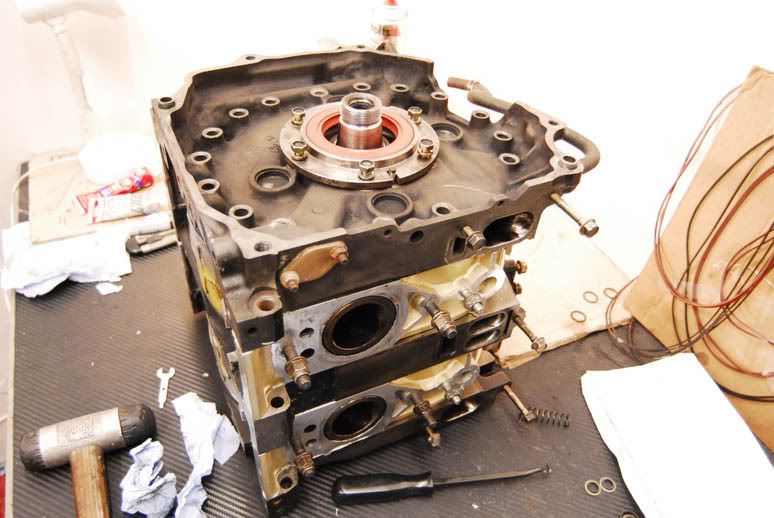
With everything removed it was ready to come apart (pretty sure you've probs all seen these steps 1000 times, but fascinates me anyways!). Comically-large nut took some creative use of some scaffolding to remove and then it was ready to see the damage...
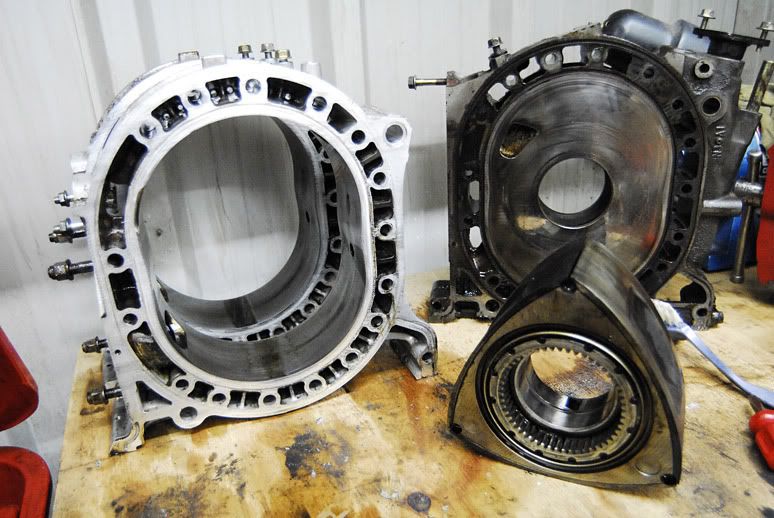
At this point i was expecting the worst - like literally an apocalypse of a rotor upside down and half a horse head lodged in the port judging by how great this car's been so far. But with the rear plate (damaged rotor) removed, FINALLY had some luck, absolutely zero damage to the plates/housings. Ben properly cleaned 'em to double check but they're all perfect, so what's actually happened?
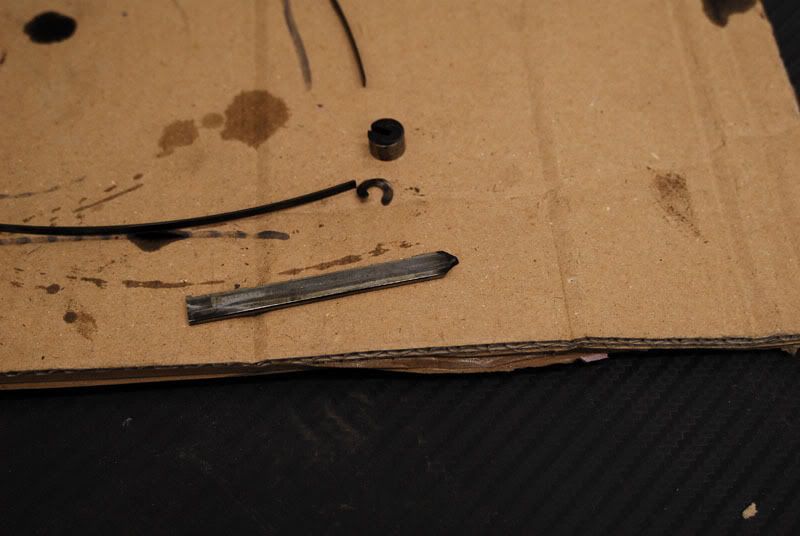
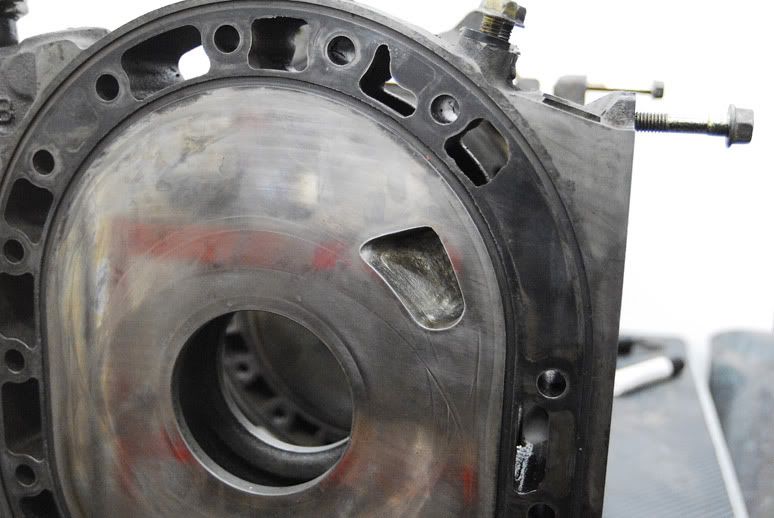
This little bd. As expected, chipped tip - the second part of the seal was completely fine also, it was literally the small part missing above which caused the damage.
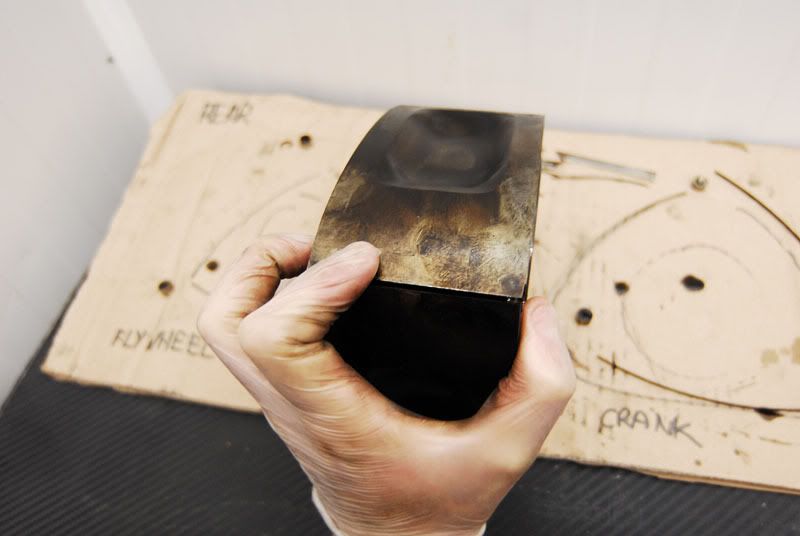
as you can see on the rotor above, it has marked it upon the breakage/exiting the engine, but nothing which is going to affect it or require a new rotor etc. Ben was happy with the overall condition of the engine - all the corner seals/springs/gaskets/seals/bearings all backup the recent engine rebuild, and as well the porting is all to a very high standard and very well done.
Absolutely nothing wrong with the engine build which looks to have been put under little or no stress and very few miles, and all the signs lead to the original diagnosis - overboosting with a map not able to suit causing it to det and cause the damage. Injectors/plugs etc. are all fine. I was told it'd been mapped only on wastegate spring pressure, and i'm 99% sure i saw it peak past that, can't remember exactly what it was holding at WOT but that seems to be the cause.
Rather than risk a half-build, we decided to take apart the rest of the engine - just to check the front rotor and make sure everything was ok on the primary ports etc. Once again, been very lucky as the only damage appears to be the chipped apex seal which took out the turbo blades - sooner it damage that than require a new end plate/porting/housing that's for sure!
The front rotor assembly looks almost new - it's going to need a new water seal kit (to be fair, standard gaskets were mint but, it'd be sods law and for the sake of the extra money it's peace of mind) so it shouldn't take long to sort out. The main issue is measuring the tolerances on everything to see just what can be re-used, and anything which can (bonus) but anything which can't isn't the end of the world.
The porting's been done very well - even with a slip recess on the housings for the bridge. Just pleased it's all re-useable!
Really can't thank Ben enough for all the info/help, without sounding like a brown noser this isn't some special service, he'd be just as helpful for anyone and for an evening's work i've learnt way more than any evening's on forums has taught me seeing/stripping it down first hand.
I've gotta admit prior to now even with the engine being rebuilt i would've been a bit skeptical on giving it 'death' or some proper abuse, even if it was rebuilt by Jesus, but being able to see and work on it first hand it's definitely gave me some more confidence and hope in these odd creations yet.


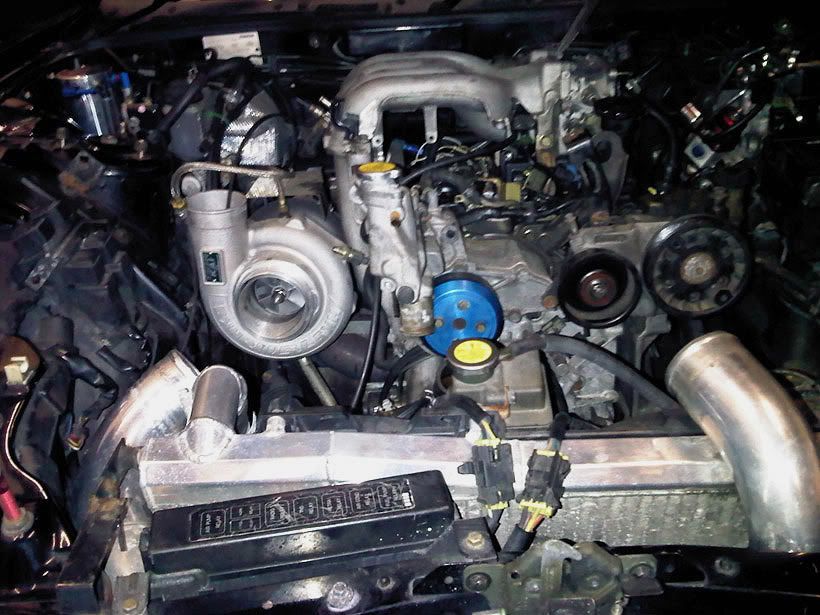
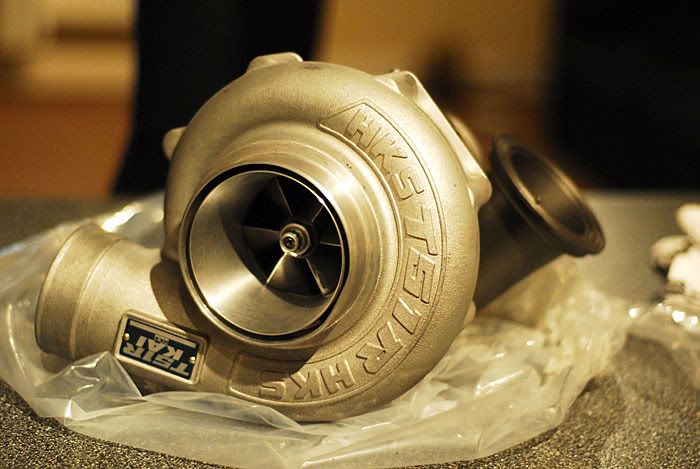
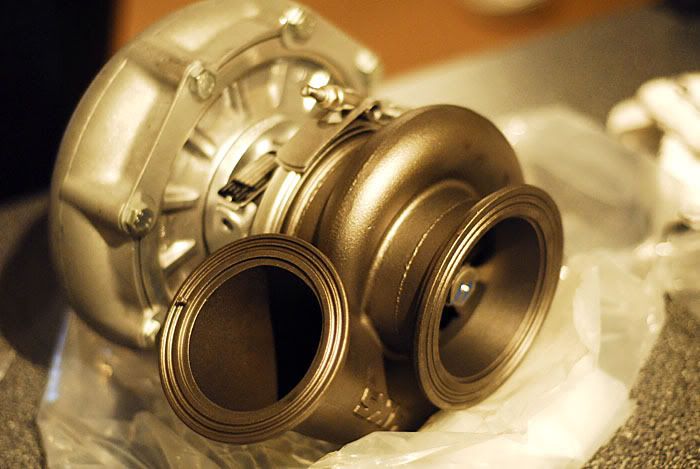
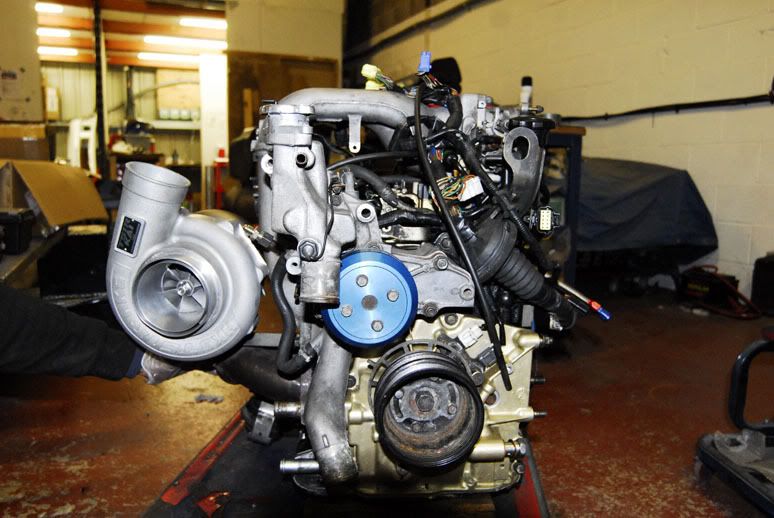
I then got the turbo back from Universal Turbos - looks better than new. So friggin' annoying looking at what damage their is and the costs involved in a replacement - god love bending over backwards for HKS overpriced bummery. If it wasn't for the noise i've wanted for about 6 years i'd have stuck a cheap T04 on it instead.
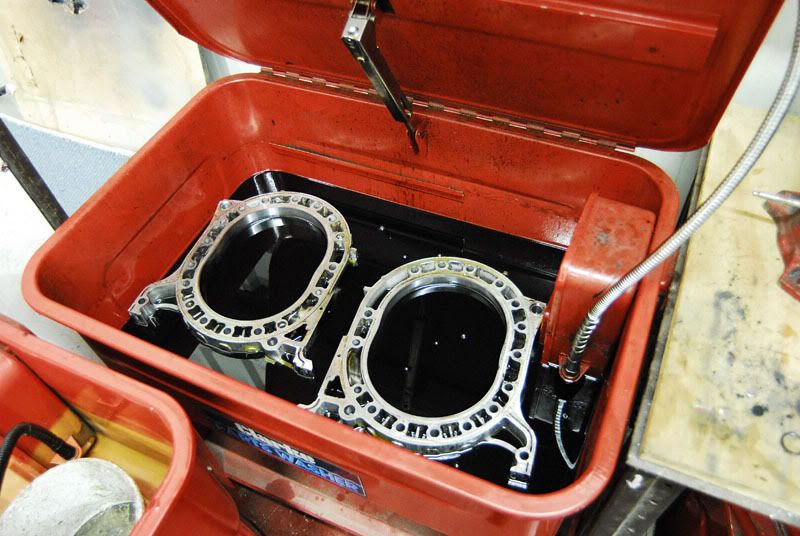
the next (and one of the most important aspects) was cleaning. I don't think i've ever cleaned anything to this level before in my life, and truth be told if time/money wasn't an issue Ben would be even more meticulous with every part.
But joking aside it's an awesome learning curve, and i'm fully enjoying actually being a part of the rebuild. I'm absolutely useless with anything mechanical - just haven't got the patience/dedication, but it's a really good eye opener to just see and understand every single part, definitely making me feel more of an RX7 'enthusiast' than just an owner/driver as gay as that sounds.
Cleaning is around 90% there in these pictures - rotors, housings all complete and the plates have been checked for wear/all jackets cleaned and checked. Just need a final clean to make sure they're all ok then it's time to bolt it all back together.
Another big thankyou to RX Motors for sorting out a replacement water seal kit and next-day delivery.

before:
after:

all ready!

centre plate ported as well as exhaust ports
i was somehow talked into picking up a paintbrush and get my Tony Hart game on... simply unheard of, but 'if you're rebuilding the engine, you might as well make it look nice... so people know it's been rebuilt'
Does mean i'm not on the lookout for some black hoses and possibly a gold funnel for the T51R mind.
Few pictures as always starting with the initial assembly - i must admit trying to explain/purchase various bits for Rotary assembly is a fairly homoerotic experience. Way too much vaseline, lube, finger-motion involved to be taken seriously by any non-rotary friends haha.
So to start with, Ben tidied up his work bench after being horrified at a previous picture showing roughly 35 nano-specs of dirt littering his engine desk. After this was complete it was on with the first plate and a load of lube haha:

then came the first housing, and a bit more engine lube...
First rotor placed - again, plenty of vaseline used. Crazy seeing it all come together, apex seals slot in and generally watch exactly how it rotates/works:
Then came the eccentric shaft which, i thought would be difficult but turned out to be a piece of piss compared to finding TDC on a piston engine. However, i spoke too soon as the centre plate was next, and bejesus is that a mission! Trying to make sure the water seals don't fall out/twist, then flip it upside down, then lift the shaft, then slide it down, lube... it all sounds seriously dodgy. I'm sure you all know this process anyways, but it's all new to me - properly interesting to see!
and then the first stages repeated for the second housing/rotor.

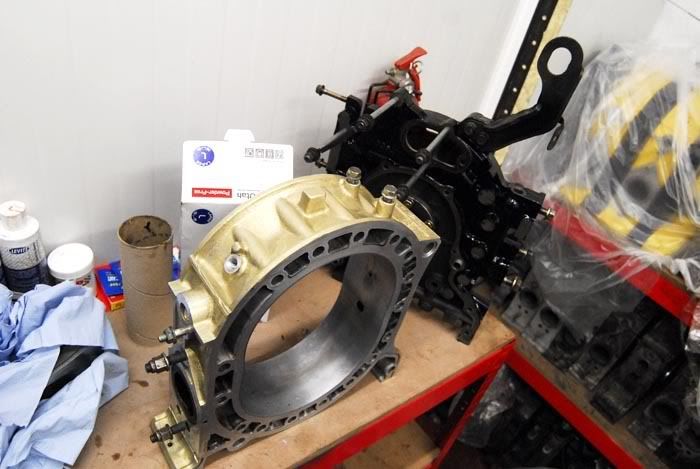
And voila! One completed bridgeported short block Well, almost... Ben was keen to point out that only once it was torqued down would you know if it'd been done right and none of the water seals had pinched etc.
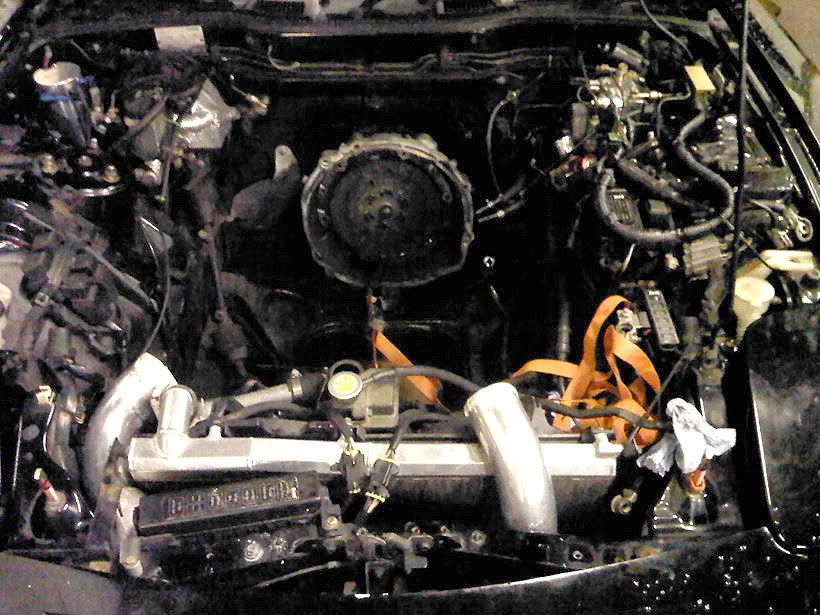
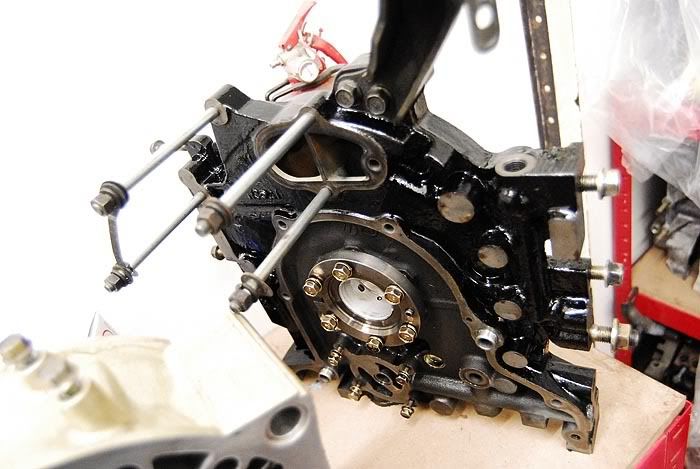
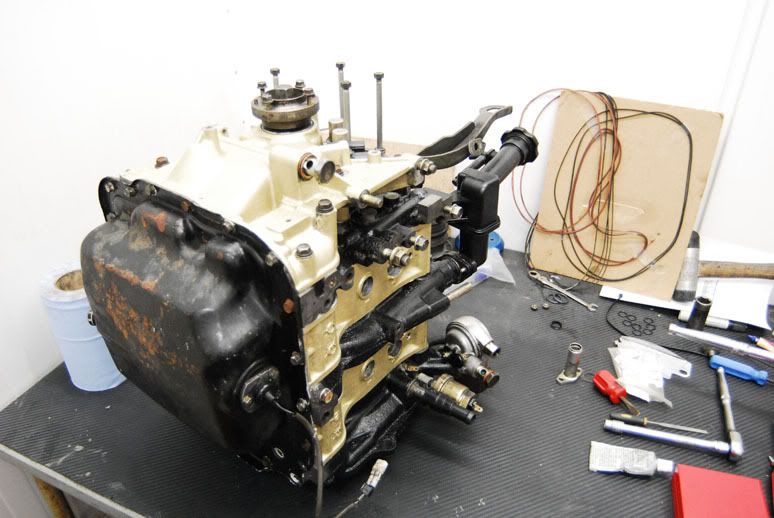
And as the pictures on the last page show the front cover was put back on, all torqued up and ready for putting back in the car! Well, nearly, just need to put the various electrics etc. back on to make it that little easier.
with the shortblock finished the 'fun' part was last, sticking on all the electrics/loom/injectors etc. which had to be removed for the rebuild. CANNOT thank Ben enough for doing this for me - it makes my brain ache just looking at it, let alone trying to take off/reassemble and stick all the vac hoses in.
He's a combination of a lunatic/nicest bloke ever, i think i left MAV Tuning at 5:30am Saturday morning after going down the following evening, unbelievable deddication! Although i'm sure he was just being extra meticulous to guarantee he never has to see that engine out the car ever again
First up was the sump using liberal amounts of sealant. Whoever previously did the sump i want to kill after taking nearly 2 hours to remove all the old sealant from it, but at least it was done properly. Saying that, i don't ever want to take off this sump ever again either! Ben made sure to attach the engine mounts while the sealant was beginning to rubber up, mainly to stop it from leaking when the engine goes back in.
Then it was time for the water pump, which signalled the start of making the engine 'ugly' again much to Ben's annoyance. I did put about 5 minutes of cleaning into it, but by this time i was far too lazy/giddy to see the engine looking like an engine again to care.
Plugs/loom/oil pipes were next. Not even going to attempt to explain what's going on here, it makes my brain ache. My constant picture-taking proved to be handy when checking which pipes weren't used anymore and various plugs etc. with the rats nest removed.

Lower/upper intake manifold next. Weirdly neither had been port matched to the gasket. Ben was fairly tempted to bust out the grinder but seeing as it was gone midnight decided to save it for another time!
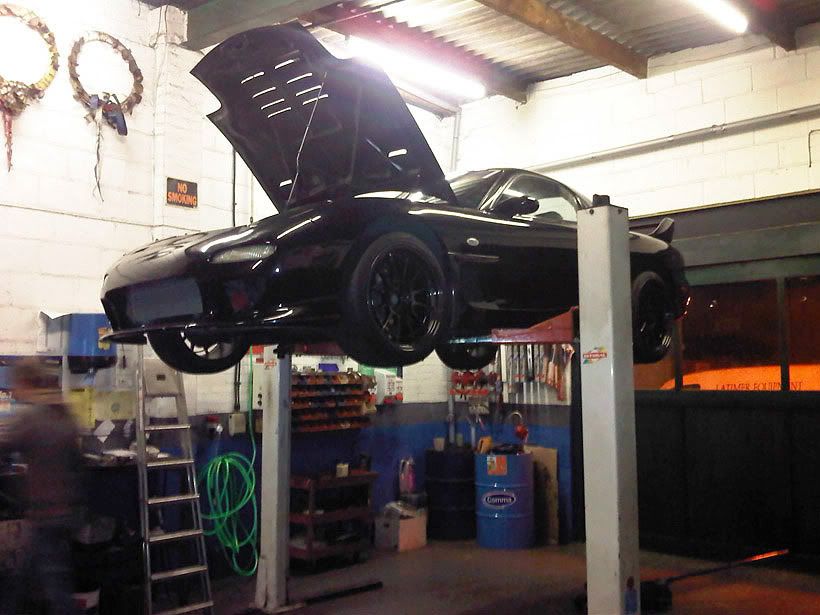
Then came the time to pick it up! Should've probably done this before completely loading every piece onto it (felt a bit like that guy who built a Lambo in his cellar... then had to remove the doors to get it out).
With precision blurry-eyed vision at around 4am managed to get it out!
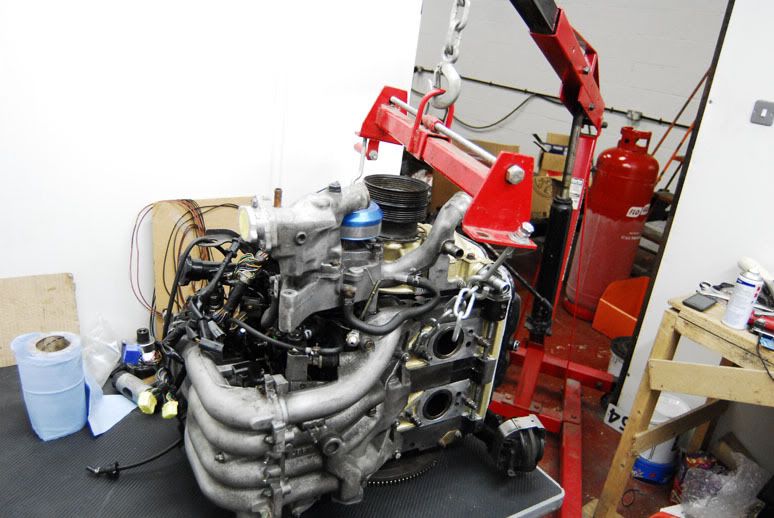
And then it was time for the token 'holding turbo up' engine sat back down shot! Ready to be put back in the RX7 tonight.

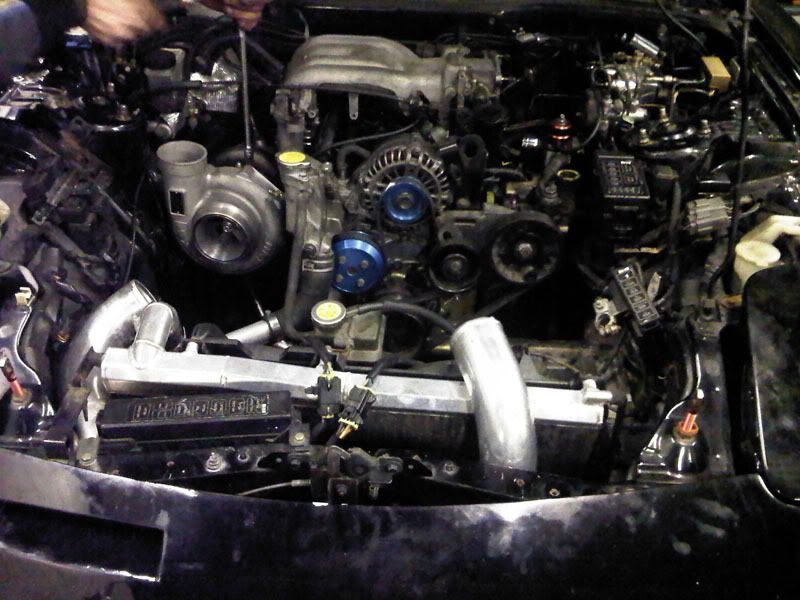
had a slight delay so didn't get started until last night. Managed to get it in the car and bolted up fairly quickly, main pain in the arse job was clutch + wiring loom + however many plugs/clips all reconnecting!


all was going well until it flooded at around 11:30pm last night - decided to call it a day and crack on with it today...
Basically seemed like the battery wasn't charged enough and even with a booster pack on it just wasn't cranking it over hard enough to fire up, so it was semi-firing before dying, thus flooding it again! Did this about 4 times before finally charging it up fully, heating up the plugs before sticking 'em back in and fired up straight away!

And finally, some videos. Apologies for how quiet they are, my Blackberry camera is ste. Going to borrow my mate's Canon and get some proper vids to show off the noise/how loud it is.
Initial engine start:
http://s154.photobucket.com/albums/s265/markriccio...
holding throttle, smokey but fully freed up!
http://s154.photobucket.com/albums/s265/markriccio...
Idling by itself (although nearly stalls at the end, had only been running for around 5-10mins)
http://s154.photobucket.com/albums/s265/markriccio...
And finally a little video from today going through town, just letting the T51R make a little bit of noise (no boost of course)
http://s154.photobucket.com/albums/s265/markriccio...
Oh and also, i finally managed to get the Mazdaspeed skirts + border bumper switched over. What a pain in the arse the bumper was - needs a damn good clean where the side skirts were (and some pics in daylight) but once it's lowered (happening tomorrow) and the feed side steps fitted, should be on the right track again

And that's basically where i'm at now! Engine is just about run-in after a load of driving, ready for new plugs/oil in the next week and the map checking to ensure it doesn't overboost again. Makes a hell of a noise even part throttle, will get some dyno videos once it's all sorted and mapped - should be good for around 500 at the fly at 1.0-1.1 bar of boost.
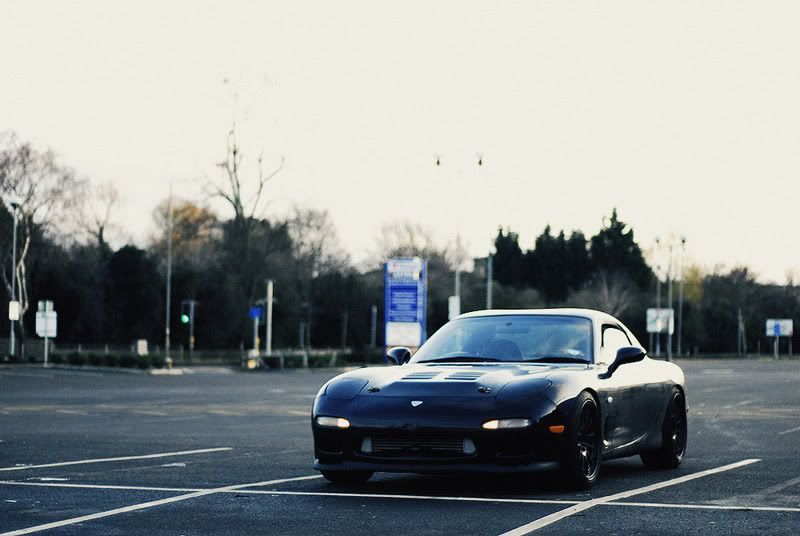
And i'll leave with a picture taken on XMas day when traffic was blissful!
Which leads me to the RX7! I owned a standard FD around 3 years ago which i loved to bits, but it was a bit slow for my liking (i got 'beat' by a friend's E46 M3 which made me want to sell it). So when this bridgeported, HKS T51-R powered RX7 came up for sale i just had to have it. Unfortunately, it broke 35 miles after i picked it up.
I had been told it was mapped, which it was! Unfortunately just on wastegate spring pressure (0.8 bar). Cue first time properly booting it, peaking at over 1.1bar and it turned out to have chipped a tip. b
ks. Live and learn, i considered myself a competent RX7 owner, very nearly decided to break it for bits but thought stuff it, i'll rebuild it and actually try and use it.It had some old bodywork i really didn't like, and some fairly pants wheels but i'd bought some new Rota GKRs literally the day i was picking it up to fit which, despite engine issues, i decided to do:
Definitely spurred me on as it made it look 10 times better even with the mass of bodykit.
Main dilemma for me was, like most young, Japanese car owners i'm pretty skint, and with the car broken it made it difficult to take it anywhere to be inspected/rebuilt/worked on without forking more cash out. Luckily my mate Chris came to the rescue who offered to get the engine out for me, with a few handy pointers from Ben @ MAV Tuning in the process.
To be fair, getting the engine ready to be removed wasn't too bad considering both me and Chris have never done anything like this before (well, he's a mechanic, but not an rx7 one) and the main issue was the sheer amount of wires/plugs/hoses these friggin things have... and this has had the rats nest removed.
A few hours later and this was the sight - it probably took around 4/5 hours in total, but a good hour/2 hours was spent working out what bits need to come off in what order, as well as labelling/marking all the parts so we know how to put it back together (putting screws back in, taking pics of various sensors etc.)
probably the main reason i didn't break the car is, the T51-R turbo had taken some damage from the exiting apex seal. With the turbo kit alone being worth £2k (although broken, not even worth half that) i figured i had no choice but to repair or lose out bigtime.
The turbo was a complete s
tter, but if anything it meant i had no choice but to go down the rebuild route as essentially the car wouldn't be worth breaking.Main options included:
-Buying a replacement engine
-getting the current engine replaced
-rebuild it myself
In the end i went for something in between, mainly thanks to the help of Ben Lewis @ MAV Tuning ( http://www.mavtuning.com/) who i literally cannot thank enough. With my budget pretty much non-existent, i couldn't really afford to send off the engine/car and have it all rebuild.
While i'm mechanically retarded, i'm always keen to help/learn and with Ben's guidance i'll be rebuilding the engine myself - i say that, Ben's going to be doing the tricky bits which require actual skill, while i'm going to be doing the more tedious bits such as cleaning etc. to keep labour costs down.
Ben's one of the nicest guys i've had the pleasure of meeting and always happy to help anyone/offer advice. Even if i was in the lucky position to have all the money in the world for a crazy engine build i wouldn't just send it off to someone and then await for it's return - having been stung in the past as a GTR owner i'm always skeptical as to exactly 'what's been done', and the fact he's happy to let me help/watch and explain (which to be honest is probably going to take him twice as long as if i wasnt there!) is pretty awesome - i'd like to think of myself as a pretty competent RX7 owner anyways, but to learn as much as i can about 'em certainly isn't a downside.
After i'd got the engine out, i took it down to Ben to begin stripping it down to find out the cause and what the next plan would be (not to mention exactly what needs replacing). Ben was happy to go through every stage with me, putting up with me asking ALOT of basic questions but to be honest it's completely fascinating just how these engines work - really looking forward to getting stuck into it now i've a proper understanding (of the basics at least) and with Ben's help it should be a solid motor very shortly.
So anyways, first came off the ancillaries - no idea how he knows what goes where, i was taking pictures every 30 seconds just to remember haha. Even with the rats nest removed, this just makes my brain ache. Will possibly look at removing some of the unused plugs on the loom depending on time.
One thing which was news to me was the OMP. I'd heard of it, but never fully understood what it actually did and what it's purpose was. After being explained exactly how it works and seeing the colour of the oil it pumps in, it made 110% to do away with it completely and instead opt to run premix - makes total sense plus it's a thousand times easier to do with the engine out. As much as this is being a case of getting the engine back and running as quickly and cost-effectively as possible, there's a few elements we'll be adding/changing purely to aid the engine life, and from what i've read the only downside is having to use your brain when filling it with fuel.
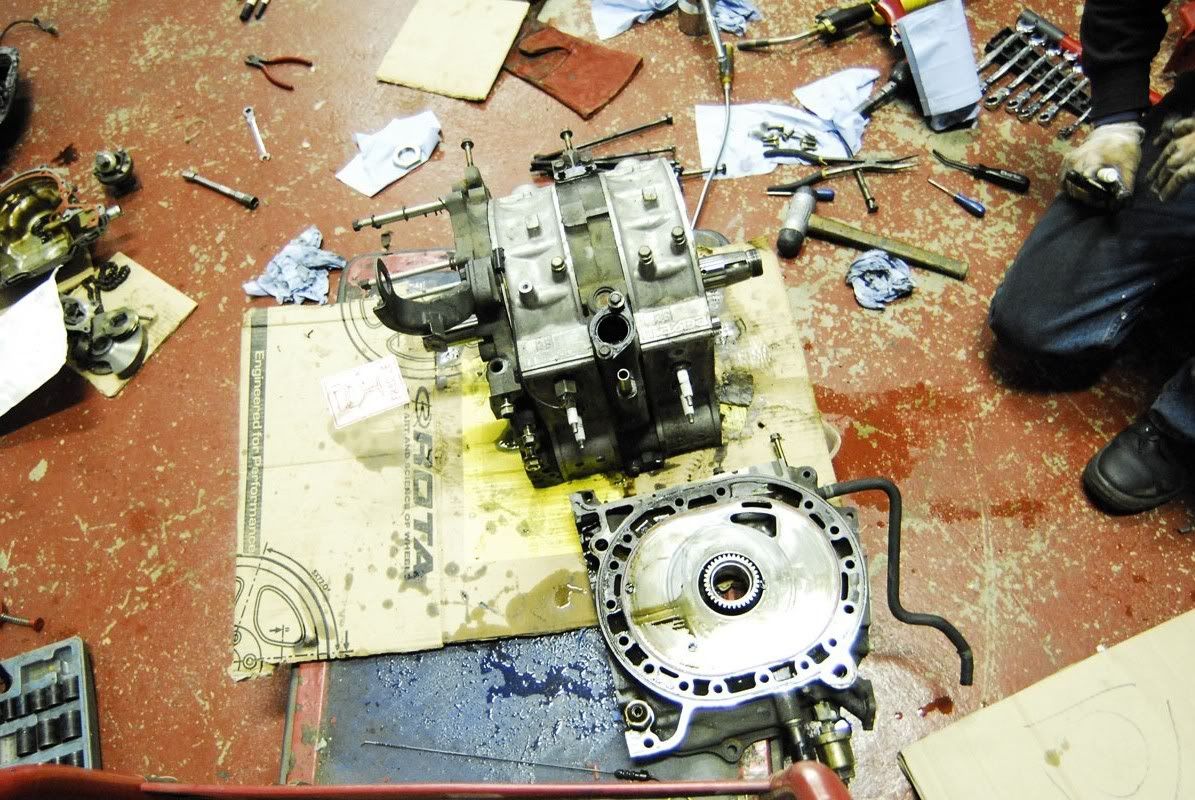
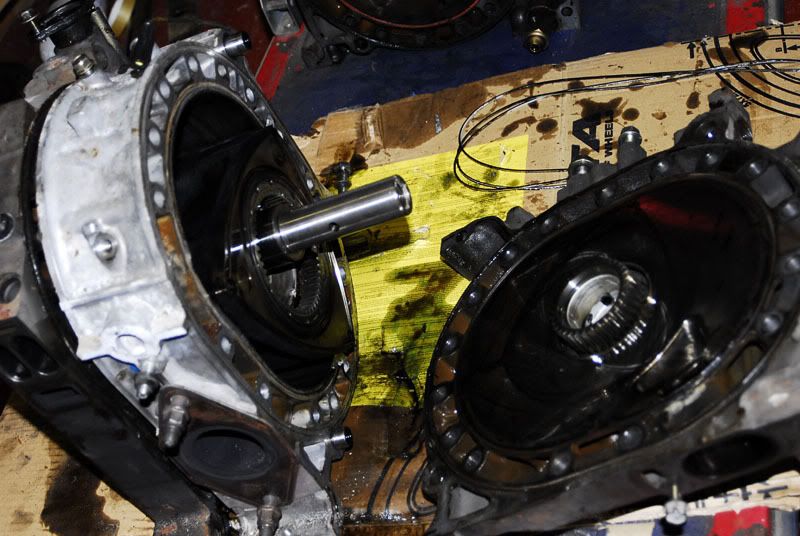
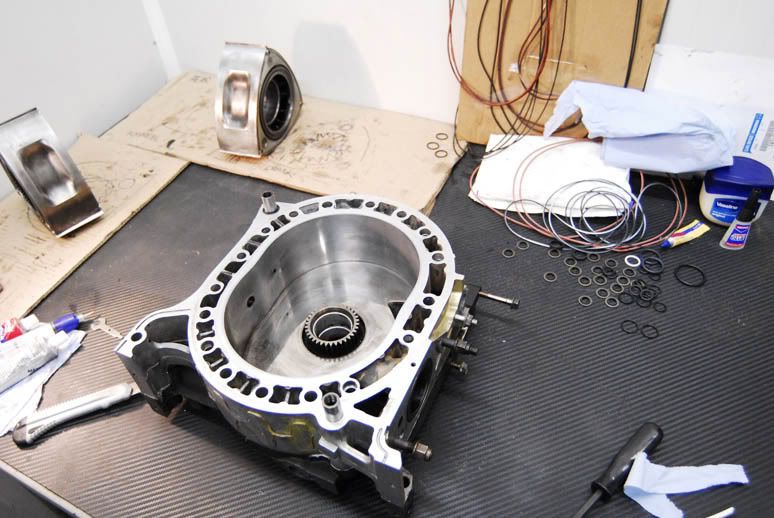
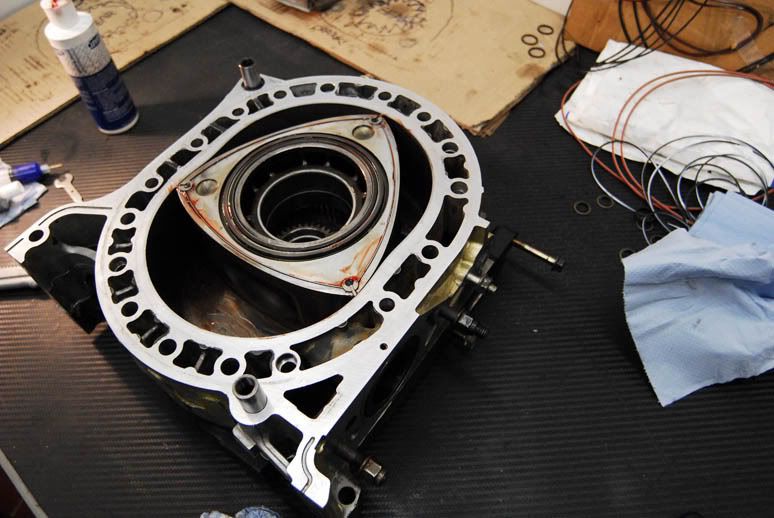
With everything removed it was ready to come apart (pretty sure you've probs all seen these steps 1000 times, but fascinates me anyways!). Comically-large nut took some creative use of some scaffolding to remove and then it was ready to see the damage...
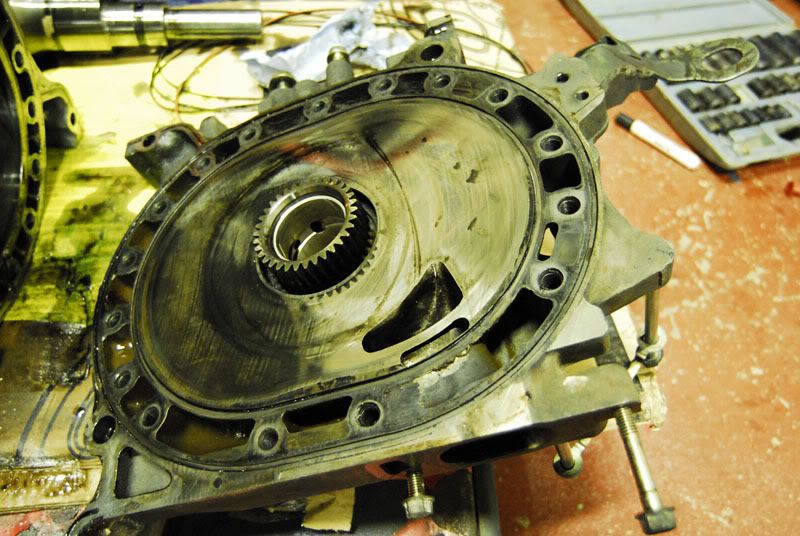
At this point i was expecting the worst - like literally an apocalypse of a rotor upside down and half a horse head lodged in the port judging by how great this car's been so far. But with the rear plate (damaged rotor) removed, FINALLY had some luck, absolutely zero damage to the plates/housings. Ben properly cleaned 'em to double check but they're all perfect, so what's actually happened?
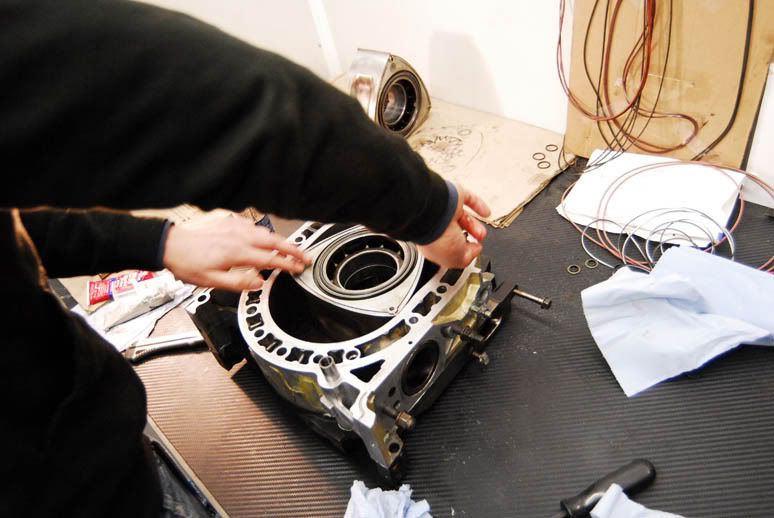
This little b
d. As expected, chipped tip - the second part of the seal was completely fine also, it was literally the small part missing above which caused the damage.as you can see on the rotor above, it has marked it upon the breakage/exiting the engine, but nothing which is going to affect it or require a new rotor etc. Ben was happy with the overall condition of the engine - all the corner seals/springs/gaskets/seals/bearings all backup the recent engine rebuild, and as well the porting is all to a very high standard and very well done.
Absolutely nothing wrong with the engine build which looks to have been put under little or no stress and very few miles, and all the signs lead to the original diagnosis - overboosting with a map not able to suit causing it to det and cause the damage. Injectors/plugs etc. are all fine. I was told it'd been mapped only on wastegate spring pressure, and i'm 99% sure i saw it peak past that, can't remember exactly what it was holding at WOT but that seems to be the cause.
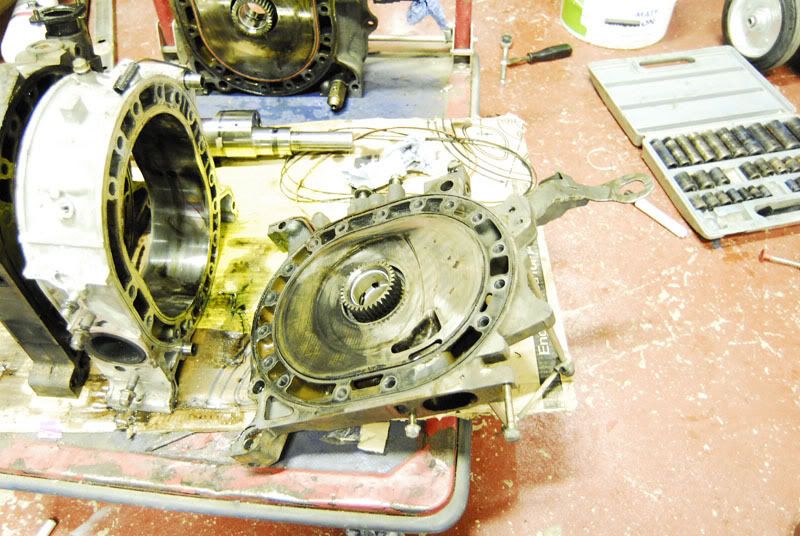
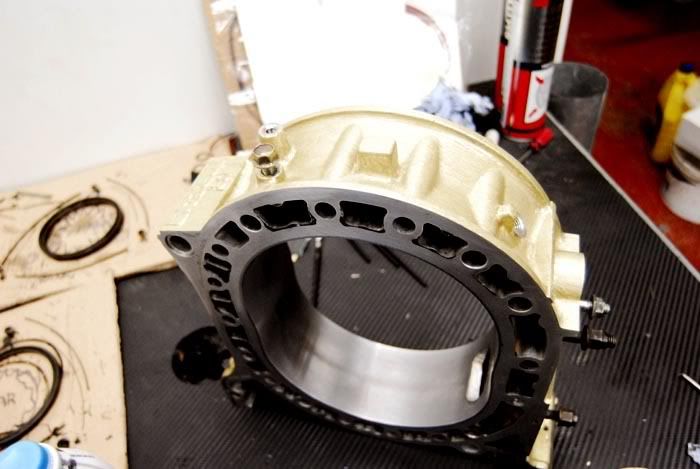
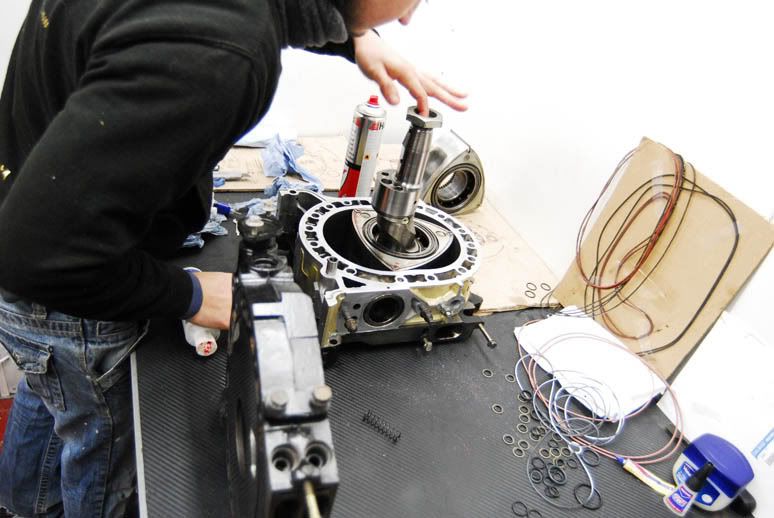
Rather than risk a half-build, we decided to take apart the rest of the engine - just to check the front rotor and make sure everything was ok on the primary ports etc. Once again, been very lucky as the only damage appears to be the chipped apex seal which took out the turbo blades - sooner it damage that than require a new end plate/porting/housing that's for sure!
The front rotor assembly looks almost new - it's going to need a new water seal kit (to be fair, standard gaskets were mint but, it'd be sods law and for the sake of the extra money it's peace of mind) so it shouldn't take long to sort out. The main issue is measuring the tolerances on everything to see just what can be re-used, and anything which can (bonus) but anything which can't isn't the end of the world.
The porting's been done very well - even with a slip recess on the housings for the bridge. Just pleased it's all re-useable!
Really can't thank Ben enough for all the info/help, without sounding like a brown noser this isn't some special service, he'd be just as helpful for anyone and for an evening's work i've learnt way more than any evening's on forums has taught me seeing/stripping it down first hand.
I've gotta admit prior to now even with the engine being rebuilt i would've been a bit skeptical on giving it 'death' or some proper abuse, even if it was rebuilt by Jesus, but being able to see and work on it first hand it's definitely gave me some more confidence and hope in these odd creations yet.
I then got the turbo back from Universal Turbos - looks better than new. So friggin' annoying looking at what damage their is and the costs involved in a replacement - god love bending over backwards for HKS overpriced bummery. If it wasn't for the noise i've wanted for about 6 years i'd have stuck a cheap T04 on it instead.
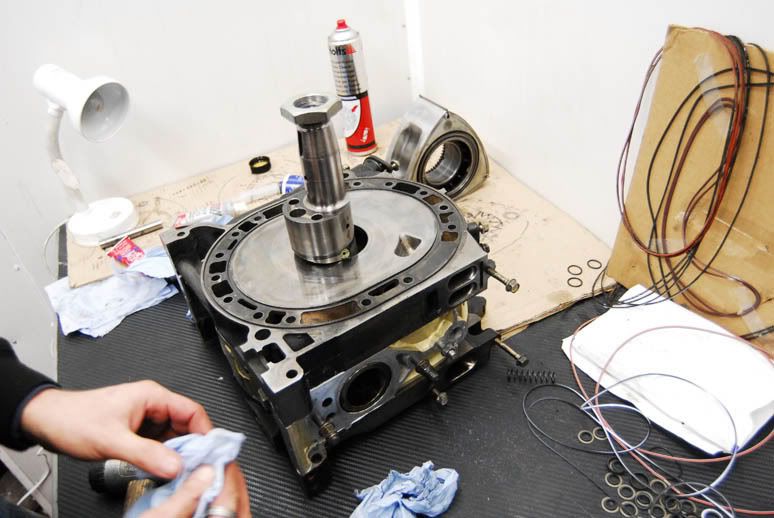
the next (and one of the most important aspects) was cleaning. I don't think i've ever cleaned anything to this level before in my life, and truth be told if time/money wasn't an issue Ben would be even more meticulous with every part.
But joking aside it's an awesome learning curve, and i'm fully enjoying actually being a part of the rebuild. I'm absolutely useless with anything mechanical - just haven't got the patience/dedication, but it's a really good eye opener to just see and understand every single part, definitely making me feel more of an RX7 'enthusiast' than just an owner/driver as gay as that sounds.
Cleaning is around 90% there in these pictures - rotors, housings all complete and the plates have been checked for wear/all jackets cleaned and checked. Just need a final clean to make sure they're all ok then it's time to bolt it all back together.
Another big thankyou to RX Motors for sorting out a replacement water seal kit and next-day delivery.
before:
after:
all ready!
centre plate ported as well as exhaust ports
i was somehow talked into picking up a paintbrush and get my Tony Hart game on... simply unheard of, but 'if you're rebuilding the engine, you might as well make it look nice... so people know it's been rebuilt'
Does mean i'm not on the lookout for some black hoses and possibly a gold funnel for the T51R mind.
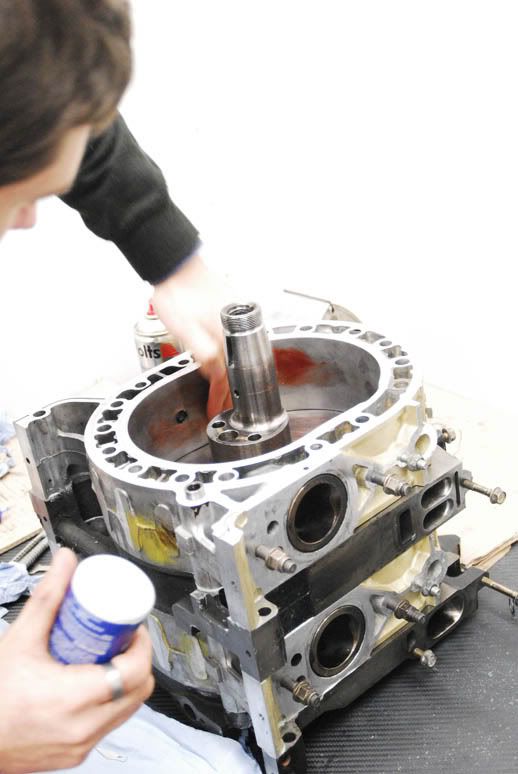
Few pictures as always starting with the initial assembly - i must admit trying to explain/purchase various bits for Rotary assembly is a fairly homoerotic experience. Way too much vaseline, lube, finger-motion involved to be taken seriously by any non-rotary friends haha.
So to start with, Ben tidied up his work bench after being horrified at a previous picture showing roughly 35 nano-specs of dirt littering his engine desk. After this was complete it was on with the first plate and a load of lube haha:
then came the first housing, and a bit more engine lube...
First rotor placed - again, plenty of vaseline used. Crazy seeing it all come together, apex seals slot in and generally watch exactly how it rotates/works:
Then came the eccentric shaft which, i thought would be difficult but turned out to be a piece of piss compared to finding TDC on a piston engine. However, i spoke too soon as the centre plate was next, and bejesus is that a mission! Trying to make sure the water seals don't fall out/twist, then flip it upside down, then lift the shaft, then slide it down, lube... it all sounds seriously dodgy. I'm sure you all know this process anyways, but it's all new to me - properly interesting to see!
and then the first stages repeated for the second housing/rotor.
And voila! One completed bridgeported short block
Well, almost... Ben was keen to point out that only once it was torqued down would you know if it'd been done right and none of the water seals had pinched etc. And as the pictures on the last page show the front cover was put back on, all torqued up and ready for putting back in the car! Well, nearly, just need to put the various electrics etc. back on to make it that little easier.
with the shortblock finished the 'fun' part was last, sticking on all the electrics/loom/injectors etc. which had to be removed for the rebuild. CANNOT thank Ben enough for doing this for me - it makes my brain ache just looking at it, let alone trying to take off/reassemble and stick all the vac hoses in.
He's a combination of a lunatic/nicest bloke ever, i think i left MAV Tuning at 5:30am Saturday morning after going down the following evening, unbelievable deddication! Although i'm sure he was just being extra meticulous to guarantee he never has to see that engine out the car ever again
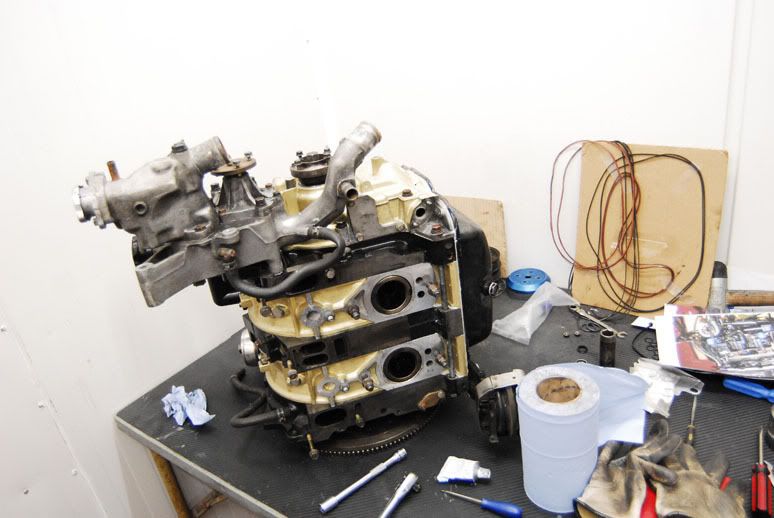
First up was the sump using liberal amounts of sealant. Whoever previously did the sump i want to kill after taking nearly 2 hours to remove all the old sealant from it, but at least it was done properly. Saying that, i don't ever want to take off this sump ever again either! Ben made sure to attach the engine mounts while the sealant was beginning to rubber up, mainly to stop it from leaking when the engine goes back in.
Then it was time for the water pump, which signalled the start of making the engine 'ugly' again much to Ben's annoyance. I did put about 5 minutes of cleaning into it, but by this time i was far too lazy/giddy to see the engine looking like an engine again to care.
Plugs/loom/oil pipes were next. Not even going to attempt to explain what's going on here, it makes my brain ache. My constant picture-taking proved to be handy when checking which pipes weren't used anymore and various plugs etc. with the rats nest removed.
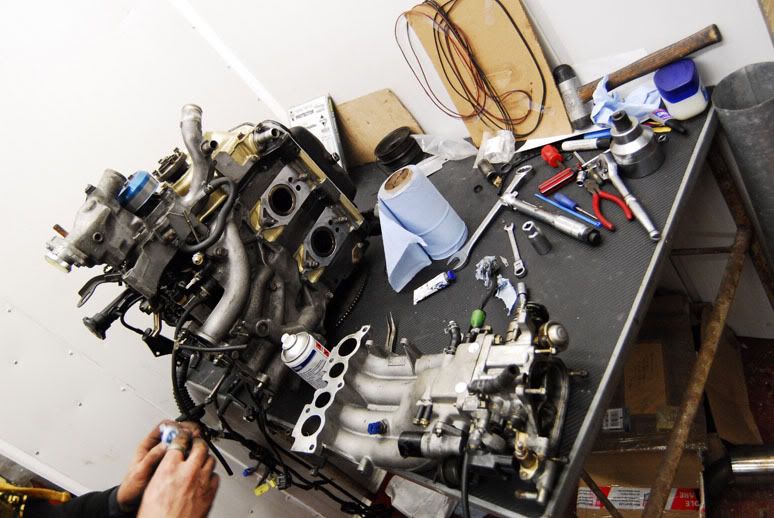
Lower/upper intake manifold next. Weirdly neither had been port matched to the gasket. Ben was fairly tempted to bust out the grinder but seeing as it was gone midnight decided to save it for another time!
Then came the time to pick it up! Should've probably done this before completely loading every piece onto it (felt a bit like that guy who built a Lambo in his cellar... then had to remove the doors to get it out).
With precision blurry-eyed vision at around 4am managed to get it out!
And then it was time for the token 'holding turbo up' engine sat back down shot! Ready to be put back in the RX7 tonight.
had a slight delay so didn't get started until last night. Managed to get it in the car and bolted up fairly quickly, main pain in the arse job was clutch + wiring loom + however many plugs/clips all reconnecting!
all was going well until it flooded at around 11:30pm last night - decided to call it a day and crack on with it today...
Basically seemed like the battery wasn't charged enough and even with a booster pack on it just wasn't cranking it over hard enough to fire up, so it was semi-firing before dying, thus flooding it again! Did this about 4 times before finally charging it up fully, heating up the plugs before sticking 'em back in and fired up straight away!
And finally, some videos. Apologies for how quiet they are, my Blackberry camera is s
te. Going to borrow my mate's Canon and get some proper vids to show off the noise/how loud it is.Initial engine start:
http://s154.photobucket.com/albums/s265/markriccio...
holding throttle, smokey but fully freed up!
http://s154.photobucket.com/albums/s265/markriccio...
Idling by itself (although nearly stalls at the end, had only been running for around 5-10mins)
http://s154.photobucket.com/albums/s265/markriccio...
And finally a little video from today going through town, just letting the T51R make a little bit of noise (no boost of course)
http://s154.photobucket.com/albums/s265/markriccio...
Oh and also, i finally managed to get the Mazdaspeed skirts + border bumper switched over. What a pain in the arse the bumper was - needs a damn good clean where the side skirts were (and some pics in daylight) but once it's lowered (happening tomorrow) and the feed side steps fitted, should be on the right track again
And that's basically where i'm at now! Engine is just about run-in after a load of driving, ready for new plugs/oil in the next week and the map checking to ensure it doesn't overboost again. Makes a hell of a noise even part throttle, will get some dyno videos once it's all sorted and mapped - should be good for around 500 at the fly at 1.0-1.1 bar of boost.
And i'll leave with a picture taken on XMas day when traffic was blissful!
Chris Peacock said:
Great read, thanks.
Love the fact that mazda didn't follow the crowd with 4 cyl engines etc
The rotary lump still boggles me, just the simplicity yet oddity of it - was a real eye-opener building one and seeing the 'associated' piston equivalent parts if that makes sense.Love the fact that mazda didn't follow the crowd with 4 cyl engines etc
The fact it's held together by 17 monstrously-long dowel pins and a LOT of sealant, i'm surprised it hasn't gone bang already haha!
Gassing Station | Readers' Cars | Top of Page | What's New | My Stuff