Removing headlight covers..........
Discussion


The dipped beam headlight units in my car have become very dull and dirty and I want to access them for cleaning or perhaps if necessary for re-placement.
To clean them I guess I only have to cut through the silicone to remove the perspex cover. At this time would I also be able to remove the light units or would I have to remove the entire light pod to do this?
What is the best/easiest to use sealer when refitting the covers?
To clean them I guess I only have to cut through the silicone to remove the perspex cover. At this time would I also be able to remove the light units or would I have to remove the entire light pod to do this?
What is the best/easiest to use sealer when refitting the covers?
Not quite sure I understand the question, you do know that to remove the Perspex cover you are going to have to take out the entire headlight 'pod' don't you?
Revealing the cover to the pod is simple and just needs or clear silicone because you can't see it when you have the pod back in and sealed anyway.
The pod is held in place by a flat bar to the wheel arch at the back but all that holds the front is sealant.
I use tiger seal for this.
Revealing the cover to the pod is simple and just needs or clear silicone because you can't see it when you have the pod back in and sealed anyway.
The pod is held in place by a flat bar to the wheel arch at the back but all that holds the front is sealant.
I use tiger seal for this.
Thanks Barreti. What I want to know is.....
1) Can I slice through the black silicone and lift JUST the perspex cover off?
2) Is the pod attached seperately to the bodyshell and can it be left in place if I remove just the perspex cover?
3) Do I have to remove the entire assembly (perspex,pod,strap) to remove the light unit?
1) Can I slice through the black silicone and lift JUST the perspex cover off?
2) Is the pod attached seperately to the bodyshell and can it be left in place if I remove just the perspex cover?
3) Do I have to remove the entire assembly (perspex,pod,strap) to remove the light unit?
Hedgehopper said:
The dipped beam headlight units in my car have become very dull and dirty and I want to access them for cleaning or perhaps if necessary for re-placement.
To clean them I guess I only have to cut through the silicone to remove the perspex cover. At this time would I also be able to remove the light units or would I have to remove the entire light pod to do this?
What is the best/easiest to use sealer when refitting the covers?
Hi Hedgehopper, before you get stuck in to removing the lens etc try just cleaning the inside of the light itself! i have recently done this and it cleared up a hazy light output! Worth trying before you embark on taking the front plastic cover off. Here you go: Jack up front and place on axle stands, take wheel off, remove lamp access cover (note it may have sealant keeping it on, mine did so I modified it it to be screwed back), disconnect wires and remove rubber seal from back of lamp assembly, carefully remove bulb, then remove the two small security torx srcews holding the back of the lamp on, remove lamp back. Once that is done get a piece of stout wire and roll some soft paper towel or light cloth around the end (for about 4"), then form the padded end into a curve, lightly soak in lens cleaner (I used iso-propyl-alcohol. which is the constituent of lens cleaner), then work the paced wire around the deflector bar and wipe the front glass, re-apply some cleaner and then manoeuvre to carefully wipe around the lamp reflector. Once done just refit everything and you have a clean lamp. Really worked well on mine. Worth trying first before you embark upon removing front cover taking lamp out etc. hope this was helpful? Rgds, Pete To clean them I guess I only have to cut through the silicone to remove the perspex cover. At this time would I also be able to remove the light units or would I have to remove the entire light pod to do this?
What is the best/easiest to use sealer when refitting the covers?
Thanks Barreti, you're correct, that wasn't what I wanted to hear. I hadn't realised that the perspex was also screwed into place.
PeteGrif, thanks for your suggestion of cleaning the inside of the glass lens insitu. For some reason I had got it into my brain that the milkiness was on the outside of the glass, but thinking about it there is no reason why this should be so. So before I do anything else I will try the lens cleaner approach.
PeteGrif, thanks for your suggestion of cleaning the inside of the glass lens insitu. For some reason I had got it into my brain that the milkiness was on the outside of the glass, but thinking about it there is no reason why this should be so. So before I do anything else I will try the lens cleaner approach.
Sorry for the curt reply yeaterday Hedgehopper, watching England losing wound me up no end as you can tell.
I have photos of the headlight pod if you want them, though if you're going to try to clean the lenses through the back you probably won't need them now.
Good luck and let us know how you get on.
I have photos of the headlight pod if you want them, though if you're going to try to clean the lenses through the back you probably won't need them now.
Good luck and let us know how you get on.
Note, it is quite easy to dislodge the lamp. I did this once myself when replacing a bulb. Secure the lamp in some way before you start.
In my case it did spring back into position, but it did mark the paintwork inside the pod. I am not sure whether it may be possible to push the lamp fully into the pod. If so it may require a pod dismantle to fix.
Removal and dismantling of the pod is a pig of a job.
In my case it did spring back into position, but it did mark the paintwork inside the pod. I am not sure whether it may be possible to push the lamp fully into the pod. If so it may require a pod dismantle to fix.
Removal and dismantling of the pod is a pig of a job.
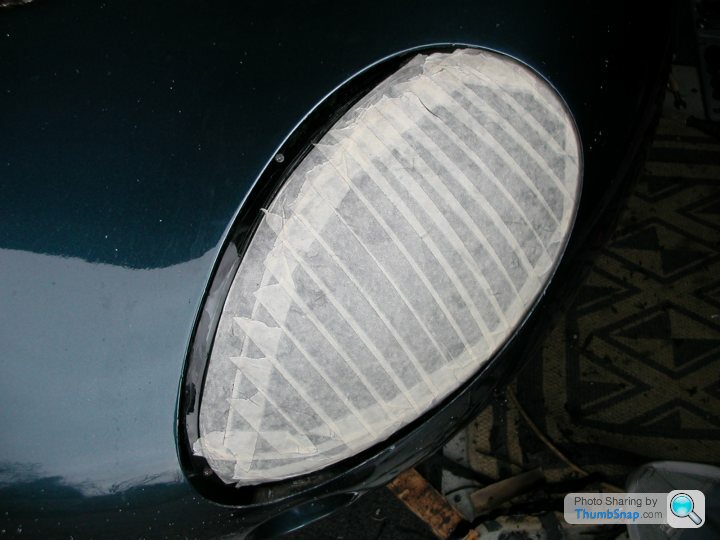
These show how to take the pod out Hedgehopper and you can also see the screws which secure the perspex cover to the pod
Remove the securing strap at the back of the pod by removing the front wheel and open the wheel arch access panel.
Then remove all the black sealant as best you can and tape over the perspex cover to avoid it being scratched on the rough fibreglass inside the cavity behind the pod.
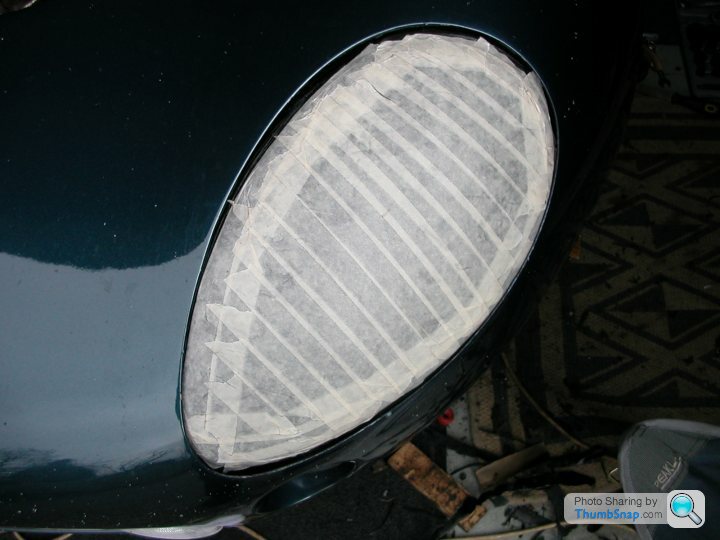
To remove the pod push the windscreen end in and down
and drop the bottom edge into the cavity

until you have the front pointed edge clear enough that you can lift it out of the cavity this end first

Depending how brave you are, you might also want to mask off the paintwork at the very front edge, just in case you scrape the pod against it lifting it out.
One other thing - getting it out is easy compared to putting it back in again
Remove the securing strap at the back of the pod by removing the front wheel and open the wheel arch access panel.
Then remove all the black sealant as best you can and tape over the perspex cover to avoid it being scratched on the rough fibreglass inside the cavity behind the pod.
To remove the pod push the windscreen end in and down
and drop the bottom edge into the cavity
until you have the front pointed edge clear enough that you can lift it out of the cavity this end first
Depending how brave you are, you might also want to mask off the paintwork at the very front edge, just in case you scrape the pod against it lifting it out.
One other thing - getting it out is easy compared to putting it back in again
Edited by Barreti on Sunday 17th March 19:15
A friend of mine invented a trick how to put pressure on it to hold it in place when sikaflexing the bloody thing back. He put an old (uninflated) innertyre in the space under the pod and inflated it then. Of course you have to position it, but it worked very well to push it in place during "drying".
Hope this might help.
Hope this might help.
A friend of mine invented a trick how to put pressure on it to hold it in place when sikaflexing the bloody thing back. He put an old (uninflated) innertyre in the space under the pod and inflated it then. Of course you have to position it, but it worked very well to push it in place during "drying".
Now that is lateral thinking!....but I hope I can clean the lenses in situ. Thanks.
Now that is lateral thinking!....but I hope I can clean the lenses in situ. Thanks.
A quick update to this thread as I experimented with the inner tube idea which Infinity mentioned,
The idea does work, though the inner tube you need is from a wheelbarrow and this when inflated will push the front of the pod up into place tightly and hold it there.
You just need to make sure the screws holding the Perspex to the pod don't protrude enough to puncture the tube. I used a dremel to file off the points when it was on the bench.
PeteGriff said:
Hi Hedgehopper, before you get stuck in to removing the lens etc try just cleaning the inside of the light itself! i have recently done this and it cleared up a hazy light output! Worth trying before you embark on taking the front plastic cover off. Here you go: Jack up front and place on axle stands, take wheel off, remove lamp access cover (note it may have sealant keeping it on, mine did so I modified it it to be screwed back), disconnect wires and remove rubber seal from back of lamp assembly, carefully remove bulb, then remove the two small security torx srcews holding the back of the lamp on, remove lamp back. Once that is done get a piece of stout wire and roll some soft paper towel or light cloth around the end (for about 4"), then form the padded end into a curve, lightly soak in lens cleaner (I used iso-propyl-alcohol. which is the constituent of lens cleaner), then work the paced wire around the deflector bar and wipe the front glass, re-apply some cleaner and then manoeuvre to carefully wipe around the lamp reflector. Once done just refit everything and you have a clean lamp. Really worked well on mine. Worth trying first before you embark upon removing front cover taking lamp out etc. hope this was helpful? Rgds, Pete
Four years later I have finally got around to taking up this advice for cleaning the lenses. It's a much easier job than it sounds and the results were good. When viewed from the front the lights have lost that grey hazy appearance.Thanks PeteGriff.
Gassing Station | Griffith | Top of Page | What's New | My Stuff