Tuscan Door Membranes - My fix to make them better.
Discussion


I am the generally happy custodian of a 2005 T2S, resplendent in spectraflair silver and an all-round rumbling good egg. Now, this is my first ‘fix’ post, so apologies it this has been done before, or if it doesn’t make complete sense….. PM me my all means…
Now….I am no expert on the intricacies of capillary action, however I do know enough to know that rain water can find the smallest of nooks and crannies (or huge gaping holes) to travel.
I have, as I am sure many of you have experienced, leaking doors. This was an obvious an essential optional extra when buying your TVR and the craftsmen of Blackpool clearly thought that it would be ‘top japes’ to offer a partially complete membrane for the doors……
The passenger door was allowing Eider dam levels of water into the footwell through a small gap in the bottom leading corner of the door card. The passenger door would offer a strange patch just forward of the control unit for the wing mirrors….. How can this be ?
Voila…….

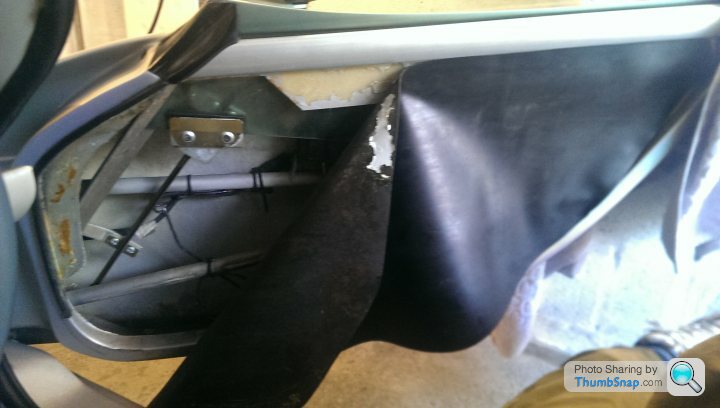
So, over the course of three evenings in the man cave, I have set about to cure the factory based ‘attempt’ at a door weatherproofing membrane.
On seeing the wonderment, I first noted that the bottom of the membrane hangs free over the lower lip of the inner panel on both doors. This would allow any water to run down towards the two drain holes, but does not offer a ‘sealed’ solution. On the driver’s door, there was the added bonus of a 3” slice to allow a ¾” connector through to connect to the mirror control panel, which was unsealed.
OK…. Off to B&Q to pick up the following (all for about £23).
• 15mm ‘L’ shaped plastic edging – 3mtrs
• Double sided sticky tape (‘No More Nails’ do a slightly padded version which works fine)
• Impact adhesive (the proper good stuff you sniffed as a kid……apparently!)
• 4 x ½” self-tapping screws, flathead or cheesehead, but not countersunk (stainless or zinc coated)
• Exterior silicone seal (any colour you like). I went for white at it makes for ease of identifying any gaps when sealing…….more on that later.
Now, in the garage the joy can start (Please note the sizes and retaining door card bolt holes are in relation to a T2S).
• Measure up distance round the bottom half of the door between the 2 contact points for the membrane (it should be about 950 to 980mm).
• For the Tuscan 2, Mark and cut back where the 3 retaining bolts (there are just 2 on the driver’s side) butt against the ‘flat’ of the edging to allow the upright of the edging to sit flush to the edge of the door. Set to the side for now.
• Mark and drill a series of holes (about 8 will do and a 2mm drill is sufficient) along the length of the door between the 2 contact points for the membrane, 6mm in from the inner edge (i.e where the edging will butt up against the door, effectively the centre of the fixed edge under the fibreglass)
• Offer up the edging and mark where it won’t flex. This will be apparent at the curve at the front of the door. You can either cut grooves into the upright side of the edging to allow it to flex round, or cut and mount separately, shaping it to butt against the existing edging.
• Run a thin bead of silicone seal along the 90degree corner of the edging, mount up and using the self-tapping screws fix the edging into location.

So now I have a retaining edge that the membrane can sit against.
Next up is to trim the membrane to it hangs and fits properly to the shape of the inner door and to the bottom of the lip. Don’t’ trim it to hang flush. Allow a little flex, to allow for any give as the shape of the door card faces the membrane and may push it back a little.
When you are happy with that, the pop on some small pieces of double sided sticky tape along the edging to allow a tacky hold for the membrane.
Offer up the door card and note if there is any movement of the membrane, if it hasn’t dislocated from the sticky tape….. Bingo!
Finally run a bead of silicone around the edge of the membrane to seal it to the door frame and close out any rough edges and gaps. Don’t be shy, but also don’t go overboard. Use a wet finger and run it over the silicone to take away any excess and mould the silicone to shape. Check for any gaps or holes, run in more silicone where need be and allow 24 hours to cure.

24hrs later….. Run a hose test to see if there are any leaks coming via the membrane. If not, you have a winner! Fit your door card back and your work there is done.
Now what I have a fully sealed door that keeps the water from getting to the door card. By using the method, it will be straightforward to open up and replace the seal of you need to get into play with the window mechanism.
This will not cure all the water ingress based woes, but will certainly be one less to worry about!
Happy and leak free travels….!
Yours
Marto
Now….I am no expert on the intricacies of capillary action, however I do know enough to know that rain water can find the smallest of nooks and crannies (or huge gaping holes) to travel.
I have, as I am sure many of you have experienced, leaking doors. This was an obvious an essential optional extra when buying your TVR and the craftsmen of Blackpool clearly thought that it would be ‘top japes’ to offer a partially complete membrane for the doors……
The passenger door was allowing Eider dam levels of water into the footwell through a small gap in the bottom leading corner of the door card. The passenger door would offer a strange patch just forward of the control unit for the wing mirrors….. How can this be ?
Voila…….
So, over the course of three evenings in the man cave, I have set about to cure the factory based ‘attempt’ at a door weatherproofing membrane.
On seeing the wonderment, I first noted that the bottom of the membrane hangs free over the lower lip of the inner panel on both doors. This would allow any water to run down towards the two drain holes, but does not offer a ‘sealed’ solution. On the driver’s door, there was the added bonus of a 3” slice to allow a ¾” connector through to connect to the mirror control panel, which was unsealed.
OK…. Off to B&Q to pick up the following (all for about £23).
• 15mm ‘L’ shaped plastic edging – 3mtrs
• Double sided sticky tape (‘No More Nails’ do a slightly padded version which works fine)
• Impact adhesive (the proper good stuff you sniffed as a kid……apparently!)
• 4 x ½” self-tapping screws, flathead or cheesehead, but not countersunk (stainless or zinc coated)
• Exterior silicone seal (any colour you like). I went for white at it makes for ease of identifying any gaps when sealing…….more on that later.
Now, in the garage the joy can start (Please note the sizes and retaining door card bolt holes are in relation to a T2S).
• Measure up distance round the bottom half of the door between the 2 contact points for the membrane (it should be about 950 to 980mm).
• For the Tuscan 2, Mark and cut back where the 3 retaining bolts (there are just 2 on the driver’s side) butt against the ‘flat’ of the edging to allow the upright of the edging to sit flush to the edge of the door. Set to the side for now.
• Mark and drill a series of holes (about 8 will do and a 2mm drill is sufficient) along the length of the door between the 2 contact points for the membrane, 6mm in from the inner edge (i.e where the edging will butt up against the door, effectively the centre of the fixed edge under the fibreglass)
• Offer up the edging and mark where it won’t flex. This will be apparent at the curve at the front of the door. You can either cut grooves into the upright side of the edging to allow it to flex round, or cut and mount separately, shaping it to butt against the existing edging.
• Run a thin bead of silicone seal along the 90degree corner of the edging, mount up and using the self-tapping screws fix the edging into location.
So now I have a retaining edge that the membrane can sit against.
Next up is to trim the membrane to it hangs and fits properly to the shape of the inner door and to the bottom of the lip. Don’t’ trim it to hang flush. Allow a little flex, to allow for any give as the shape of the door card faces the membrane and may push it back a little.
When you are happy with that, the pop on some small pieces of double sided sticky tape along the edging to allow a tacky hold for the membrane.
Offer up the door card and note if there is any movement of the membrane, if it hasn’t dislocated from the sticky tape….. Bingo!
Finally run a bead of silicone around the edge of the membrane to seal it to the door frame and close out any rough edges and gaps. Don’t be shy, but also don’t go overboard. Use a wet finger and run it over the silicone to take away any excess and mould the silicone to shape. Check for any gaps or holes, run in more silicone where need be and allow 24 hours to cure.
24hrs later….. Run a hose test to see if there are any leaks coming via the membrane. If not, you have a winner! Fit your door card back and your work there is done.
Now what I have a fully sealed door that keeps the water from getting to the door card. By using the method, it will be straightforward to open up and replace the seal of you need to get into play with the window mechanism.
This will not cure all the water ingress based woes, but will certainly be one less to worry about!
Happy and leak free travels….!
Yours
Marto

Gassing Station | Tuscan | Top of Page | What's New | My Stuff