Mondeo MK3 - Removing your wiper motor
Discussion


My front wipers packed in last weekend... in the rain. I eventually found out which fuse it was and I located somewhere that sold the rather ridiculous 'mini' fuses. After discovering that I don't have double jointed hands the size of a five year old and the nails of a transvestite, I managed to change the 20A fuse (F94), only for it to blow again immediately after the front wipers performed a single cycle.
The AA came out and had a look and the chap was really helpful, but couldn't really offer a diagnoses, so I did a little internet searching when I got home and found this:
http://www.pistonheads.com/gassing/topic.asp?h=3&a...
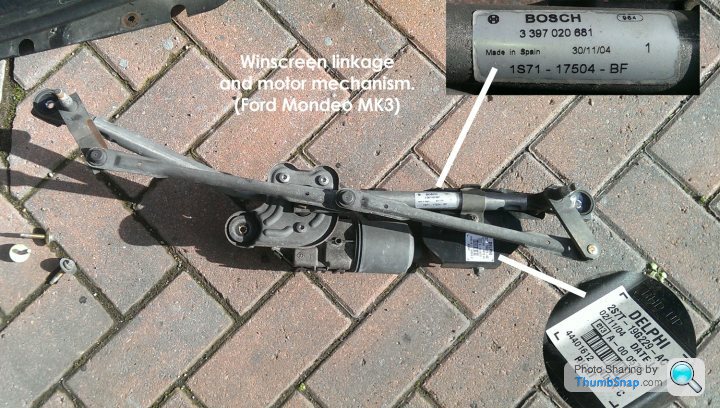
I have replaced the GEM unit, but still no joy and the fuse is still blowing, so I am waiting for another wiper motor and linkage to arrive. Meanwhile, I have removed the old wiper linkage. Before starting, I read a few guides indicating that many people have had difficultly getting the wipers off the splines. It only took me a few seconds. Here's how I did it.
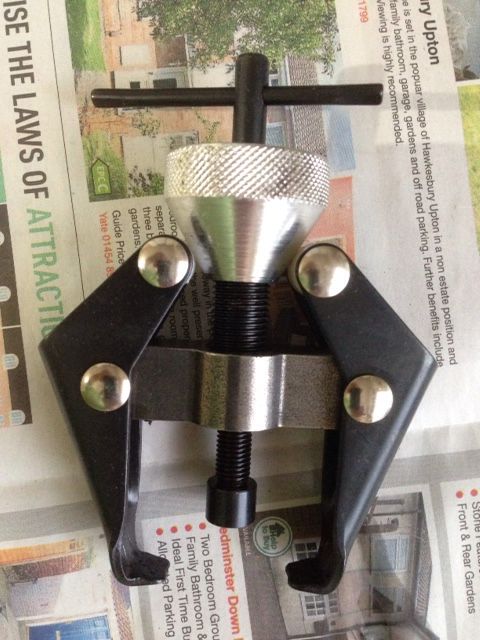
Tools used: T30 socket bit, 8mm & 15mm socket, small flathead screwdriver, forked balljoint splitter and hammer (yes honestly)
1. Open the bonnet
2. Remove the Torx screws from the windscreen drip tray/ mesh using a T30 Torx bit
3. Remove the plastic wiper covers from the bottom of the wipers by lifting them away from the base of the wiper and pulling them upwards and away
4. Undo the bolts holding the wipers to the spindle using a 15mm socket
5. The wipers will be tough to remove at this point. However, I placed a forked balljoint splitter at the joint of the spindle/ under the base of the wiper. A few clunks with the hammer and they'll be off. Repeat this process for both wipers.
6. Remove the mesh/ plastic covering from the base of the windscreen
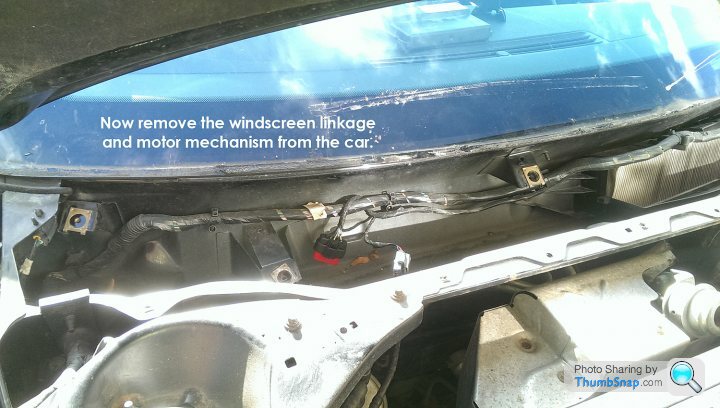
7. Remove the three bolts securing the wiper mechanism to the body using an 8mm socket
8. Remove the two plastic electrical connectors from the wiper motor. The small flathead screwdriver can be used to press down the clip to facilitate removal.
I'm just awaiting a new wiper motor now, so I'm hoping it is going to work. If the wipers work, I'll re-fit the old GEM unit to see if it makes any difference and sell the newer one on again.
Below are a few pics to explain the above (from the point the wipers are removed). HTH someone. I'll update the thread to let you know if I can get my wipers working again too!


The AA came out and had a look and the chap was really helpful, but couldn't really offer a diagnoses, so I did a little internet searching when I got home and found this:
http://www.pistonheads.com/gassing/topic.asp?h=3&a...
I have replaced the GEM unit, but still no joy and the fuse is still blowing, so I am waiting for another wiper motor and linkage to arrive. Meanwhile, I have removed the old wiper linkage. Before starting, I read a few guides indicating that many people have had difficultly getting the wipers off the splines. It only took me a few seconds. Here's how I did it.
Tools used: T30 socket bit, 8mm & 15mm socket, small flathead screwdriver, forked balljoint splitter and hammer (yes honestly)
1. Open the bonnet
2. Remove the Torx screws from the windscreen drip tray/ mesh using a T30 Torx bit
3. Remove the plastic wiper covers from the bottom of the wipers by lifting them away from the base of the wiper and pulling them upwards and away
4. Undo the bolts holding the wipers to the spindle using a 15mm socket
5. The wipers will be tough to remove at this point. However, I placed a forked balljoint splitter at the joint of the spindle/ under the base of the wiper. A few clunks with the hammer and they'll be off. Repeat this process for both wipers.
6. Remove the mesh/ plastic covering from the base of the windscreen
7. Remove the three bolts securing the wiper mechanism to the body using an 8mm socket
8. Remove the two plastic electrical connectors from the wiper motor. The small flathead screwdriver can be used to press down the clip to facilitate removal.
I'm just awaiting a new wiper motor now, so I'm hoping it is going to work. If the wipers work, I'll re-fit the old GEM unit to see if it makes any difference and sell the newer one on again.
Below are a few pics to explain the above (from the point the wipers are removed). HTH someone. I'll update the thread to let you know if I can get my wipers working again too!
Edited by Chuffmeister on Wednesday 4th March 13:46
The wiper arms are prone to sticking as you found out, but I wouldn't go down the route of using a hammer near the screen myself. A wiper arm removal tool costs around ten pounds and is actually easier and certainly less stressful than using a splitter and hammer!
Mini fuses (they are pretty common in modern cars) are fiddly to remove and insert, but Ford do at least help a bit by supplying you with a pair of mini fuse tweezers that are stored on the underside of the engine bay fuse cover lid as well as storage spaces for spare mini fuses. The OEM tweezers do make life easier, but keep a set of aftermarket tweezers in the glovebox that are about 10cm long and much easier to use.
Mini fuses (they are pretty common in modern cars) are fiddly to remove and insert, but Ford do at least help a bit by supplying you with a pair of mini fuse tweezers that are stored on the underside of the engine bay fuse cover lid as well as storage spaces for spare mini fuses. The OEM tweezers do make life easier, but keep a set of aftermarket tweezers in the glovebox that are about 10cm long and much easier to use.
Edited by Raynkar on Saturday 14th March 10:03

Thanks. It transpires that it was the wiper motor, so ai purchased a second-hand one off EBay. The first wiper motor arrived damaged, so it took some eight days for me to get a replacement fitted in. Works a treat.
I've purchased extra long nose pliers to remove the fuses and replaced them with glow fuses so it makes identification of the blown fuse easier.
As for wiper removal, you're actually a reasonable distance from the bottom of the screen, so it wasn't an issue with a steady hand.
The replacement working GEM unit wit be going back on EBay as the issue was with the wiper motor.
Cheers
Chuffy
As I only registered here yesterday I can't use the PM function for the first 24 hours.
Here is the trim I'm referring to, and hopefully you can see how the cowls clip into it.
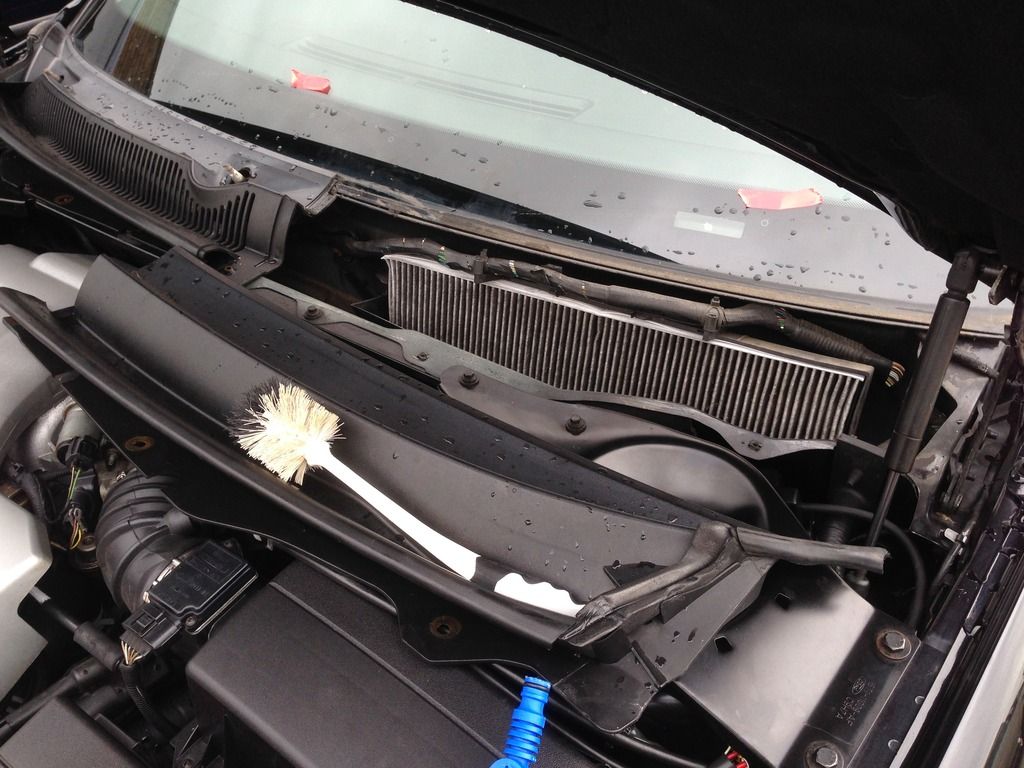
The trim may be stuck to your cowls when you removed them or may just be missing, I can't tell from the pics.
They are only usually loosely pushed into place at the bottom of the screen and sometimes don't get put back on when a front screen is replaced. Without the screen trim in place the cowls won't sit tightly against the screen (they never clip in easily at the best of times, and the cowl on the pollen filter side is the worst offender) and that could lead to water getting onto the wiper motor electrics!
Here is the trim I'm referring to, and hopefully you can see how the cowls clip into it.
The trim may be stuck to your cowls when you removed them or may just be missing, I can't tell from the pics.
They are only usually loosely pushed into place at the bottom of the screen and sometimes don't get put back on when a front screen is replaced. Without the screen trim in place the cowls won't sit tightly against the screen (they never clip in easily at the best of times, and the cowl on the pollen filter side is the worst offender) and that could lead to water getting onto the wiper motor electrics!
The trim only loosely fits on the bottom of the screen, but the cowl trims hold it in place. The cowl on the drivers side clips into the groove in the trim the easiest. If you get to have a look at mk3s quite a few of them have the nearside cowl sticking out from the bottom of the screen as it didn't want to go back on properly after a pollen filter change.
Gassing Station | Ford | Top of Page | What's New | My Stuff