Good Glue for Photo-Etched Parts?
Discussion


I began my first foray into photo-etched parts last night with a seatbelt kit for the 1/32 Revell Hawk (fiddly is the word of the day there!). I've been using super glue which held the metal to the plastic well enough, but when its metal on metal it took a long time to dry and the hold is very brittle, with minor adjustments to bends tending to break the pieces apart again.
Is there any type of glue that is better at holding metal parts together than super glue?
Is there any type of glue that is better at holding metal parts together than super glue?
I use a good quality super glue for metal. I also find using a scalpel to scrape the bonding surface and degreasing the area with solvent on a cotton bud works to make a good bond.
Don't push too hard on the parts though as you will squeeze all the glue out of the join. Just light pressure.
Don't push too hard on the parts though as you will squeeze all the glue out of the join. Just light pressure.
Depending on size and strength requirement, I'll use Araldite (strong and plenty of time for fine positioning) or pva (weaker but flexible and again plenty of time for adjustment). Cyano can really mess things up and ruin the fidelity of the parts if you're not careful. If it's unavoidable I'll dot it on with a cocktail stick and use an accelerator for instant bonding. You can also solder parts together, but again it's a risky business.
I usually use a fibreglass pencil to key surfaces.
For your seatbelts, assuming theyre not pre- coloured, annealing in a candle will make them much less springy and easier to fix in place. I always use pva for belts.
I usually use a fibreglass pencil to key surfaces.
For your seatbelts, assuming theyre not pre- coloured, annealing in a candle will make them much less springy and easier to fix in place. I always use pva for belts.
They were pre-painted pieces, so couldn't do anything too harsh to them and I'd already had an instance of the paint separating from the metal, but thankfully it was easily hidden. Next time I'll try applying the glue with a cocktail stick, as direct from the tube was a bit messy, but again in this case fairly easily hidden with paint or by the parts themselves.
For £8 and my first attempt at such a thing, I don't think I did too badly:
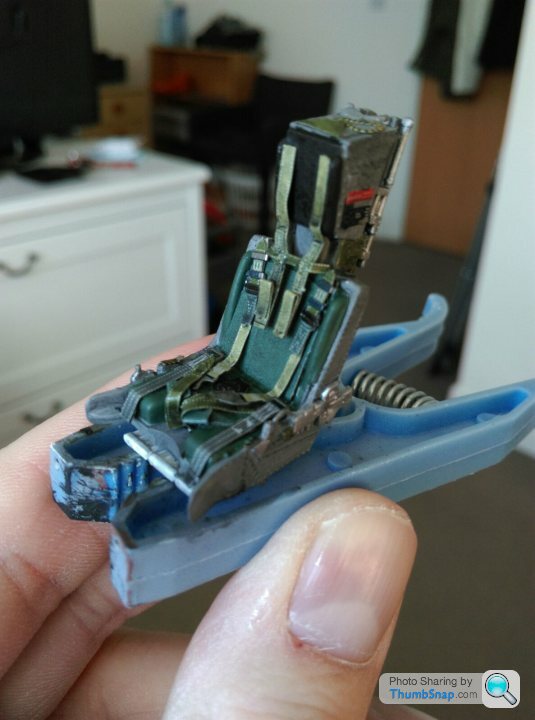
For £8 and my first attempt at such a thing, I don't think I did too badly:
Having checked my reference photos (a bit late to be doing that mind!) you're right, they should go up and over, or at least up and touch the cover which is on top. Looking at the instructions though they are insistent that once the straps are bent correctly they sit at that level, so I'll chalk this one down to not cross referencing my pictures of an actual seat against the instructions! Oh well.
If you've glued the belts to paint rather than bare plastic, you could try cracking them away from the seat with a fine blade, then repositioning them. That's another advantage of pva for belts - it's removable quite cleanly for quite a while. I guess you could also try cutting and weathering some Tamiya tape and overlay the existing straps to the right length?
A lot of photo etch is fantastic, like the belts, but a surprising amount of stuff on many frets can look worse than the original plastic. Same with resin and vacform canopies etc. - get it wrong and you end up wishing you'd not bothered.
Anyway, enough of this positivity...
A lot of photo etch is fantastic, like the belts, but a surprising amount of stuff on many frets can look worse than the original plastic. Same with resin and vacform canopies etc. - get it wrong and you end up wishing you'd not bothered.
Anyway, enough of this positivity...
Tape would be an option, I've certainly used it in the past for 1/48 seat belts, but with this one I wouldn't be able to replicate the stitching so I'm just going to leave it and use it as an example to do better next time! They're in the cockpit now looking fairly good, so I'm calling this tub done now, time to move on to the aircraft proper...

Gassing Station | Scale Models | Top of Page | What's New | My Stuff